by Todd Walker
Hospital personnel said our surgeon wanted to meet with me. It’s only been an hour waiting. Why so quick? The doctor said to expect a four-hour operation.
Fear of the worst paralyzed me. I braced my mind with a shaky hand. Hold it together, Todd.
“The cancer has spread. We can’t do the operation. I’m sorry.”
A year later we realized this was the best news we’d ever gotten from a doctor. You see, DRG still has the top lobe of her lung and is basically cancer free today! We thank God for this blessing and for what we thought was a cruel turn of events.
You’re probably thinking I messed up on the title of this post. How’s he going to transition into a Big Green Egg story?
The surgery that thankfully didn’t happen was scheduled on my 50th birthday last May. DRG was so down about the news it took her weeks to recover emotionally. On top of that, she was beating herself up about not being able to do what she had planned for my big day.
She wanted to get me a present to cover both birthdays this year. Enter the BGE. We’d seen and heard about them for a few years. She goes out and buys me one from a friend who is a BGE dealer. She got a friend discount.
These ceramic cookers are awesome for everyday food preparation. I’ve only used mine a few times but have discovered the BGE would make one heck of an alternative cooking source if the lights went out.
Ceramic Cooker History
The history of ceramic cookers can be traced back to over 3,000 years to China. The Japanese called it “kamado,” their word for stove, oven, heater, or fireplace. The design made its way to America after World War II. There was an immediate and noticeable difference in this ‘new’ cooker and the standard charcoal or gas grill. The food just tastes better. The same way a pig-in-the-ground tastes better than dry pork chops on your charcoal grill.
The BGE is capable of replacing your gas or electric stove in your house – if the need arises. Casseroles, bread, meats, vegetables, you name it, the BGE can handle the job. I just smoked some babyback ribs that DRG has dubbed “Stupid Good Primal Ribs.”
I never would have bought one for myself. They’re pricey. But with proper care, you can pass your BGE on to the next generation of natural-born grillers.
The Big Green Egg Tractor
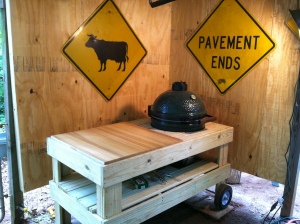
I’d recommend you build a cooking table if you decide to get one. We looked at the BGE tables at the store and thought they were too flimsy. A sturdy, homemade table was in order. Introducing the Big Green Egg Tractor.
It’s constructed with 5/4 x 6 x 8 decking lumber. The stove rests on a piece of slate built into the bottom shelf. On the left, I recessed a 30 x 30 inch cutting board our son gave me that he scavenged. The entire tractor was built around this cutting board.
Time to do the stuff!
Stupid Good Primal Ribs Recipe
Start by buying the best ribs you can find. I bought these from a local farmer at our farmers market. Berkshire pork is the choice of competition BBQ cookers.
Step 1: Remove the membrane from the bone side of the ribs. I use a butter knife to lift the membrane. Then I grab the end with a paper towel and pull, violently at times. Do what it takes to get remove the membrane.
Step 2: Wash your slabs with cold water. Pat dry with a paper towel. I then place mine in a large pan and apply my homemade rub. There are many commercially made rubs available. Add generous amounts of rub to the bone side first. Rub it into all the nooks and crannies of the meat – including the sides. Flip the ribs and repeat for the meaty side.
Step 3: Let the ribs sit for a while. I usually wait an hour or so before starting the fire on my smoker.
The folks at BGE recommend that you use hardwood lump charcoal as your fuel source. Ah, another resilient skill to learn – charcoal making.
I started a layer of lump charcoal (3 inches deep) in the my BGE. I wasn’t sure if that would be enough on my first attempt at smoking meat on this thing. It turns out to be plenty. Ceramic cookers conserve fuel like nothing I’ve ever seen.
After the coals are ready, add your favorite wood chunks for smoke flavor on your ribs. I use apple wood – a few pieces that have been soaked in water (slower burn) and a few that are dry (faster burn). Being from the Peach State, I prefer peach wood.
For indirect cooking, use an EGGcessory called a Plate Setter. This turns your BGE into a convection oven and provides a barrier between your meat and the direct flames.
Regulate the temperature with the top vent and the lower vent until you reach the desired temp of 225 -250 degrees. I was amazed at how well this cooker held a steady temp during the whole smoking process – 240 degrees for 4 hours. And I never had to add charcoal like I did with my old metal smoker. It’s a magic smoking machine.
Step 4: Place a drip pan on top of the Plate Setter. It needs to fit the BGE and be large enough for the ribs to sit over. I poured about an inch of apple cider vinegar in the bottom of the pan to add steam and flavor to the meat. Now, slap the slabs on the a rib rack on top of the grill grate. Close the lid and go do something else for an hour. I made a fresh batch of tallow next to my BGE. Just saying.
Step 5: When you check them in one hour, apply some apple juice to the ribs. I use a spray bottle to lightly coat the meat. You don’t want to wash off the rub, so spray lightly. Close the lid and go back to doing something productive. Don’t check it again for another hour.
Step 6: On the next lid lift, bring your favorite local honey, some of your rub, heavy-duty aluminum foil, and a basting brush or mop. A lot of barbecue purists frown on using foil on ribs. I’m no purist. I’ve cooked ribs both ways and decided to keep foiling.
I cut my slabs in half making 4 smaller racks of ribs to fit over the drip pan. You can leave them long if you wish. Place each rack on a double thickness of foil bone side down. Pour enough honey on the ribs and coat it with your brush or mop. Dust the ribs again with your favorite rub. Close the foil loosely. Puncturing the foil will allow all the goodness to escape. Now you can return the ribs to the grill, get your temp back to low and slow, and forget about ’em for another two hours.
Step 7: At about the 4 hour mark, take a rack off and check for doneness. Carefully open the foil. Watch out for the hot steam coming out of the pack. Stare in amazement at your creation for about 5 seconds. Now find out if they’re ready to eat. You can use a couple of methods here:
- Poke a toothpick between the bones. If goes in like a hot butter knife through butter, they’re ready.
- If you cooked the ribs in a whole slab (not cut like mine), pick up the ribs with tongs from one end. If the over hanging ribs bend to create a 90 degree angle, plate ’em. They’re ready. Just eyeball it. Don’t get your framing square out.
- Some like to stick a meat thermometer between the bones. If the temp is 200-205, they’re done. Unless you’ve got really thick, meaty ribs, I’d stick to one of the first two methods.
If that pack doesn’t meet the doneness check, carefully close it up and return to the grill. Check it again in 20 to 30 minutes.
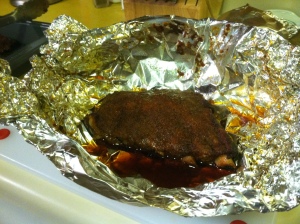
Once they’re done, remove from the grill. Open each foil pack. DO NOT let the juice inside the foil escape. I pour the honey juice into a pan, put my sliced ribs on top of the juice, and baste the ribs while they cool down and rest.
We don’t add any BBQ sauce to our ribs or pulled pork. If you cook the meat right, you won’t need to. If you prefer a sauce, nows the time to add it, I guess.

Stupid Good Primal Ribs ready to eat. We ate these with a side of organic kale cooked in heavy whipping cream and fresh oak leaf salad from the farmers market. Primal dinner is served!
What do you think? Does the Big Green Egg have a place in your post-SHTF cooking plans? I’d love to hear from BGE aficionados out there for this ceramic cooker newbie. Leave your tips in the comment section, please.
P.S.
Did you get here from a friend or link? We’re glad you did. Make yourself at home.
If you’re already subscribed to Survival Sherpa via email or RSS, the latest post will be waiting for you.
If not, go ahead and join over 2,400 other preparedness minded people so you don’t miss a thing. You can also find us on Twitter @SurvivalSherpa and Pinterest.


I have one I inherited from my Dad. It’s now almost thirty years old. It’s seen it’s better days, but still cooks great. Mine does not have a glazing on the outside, so it has absorbed moisture and cracked when heated. If I can give you one piece I’ve advise, keep it out of the weather.
LikeLike
Thanks for the advise. I build a 12 x 16 lean to shed on the back of my shop two years ago for my old smoker. The BGE now resides in the walled corner.
I hope to pass mine own to our son when I’m done here.
LikeLike