
by Todd Walker
There may come a day when axes top the list of must-have tools for harvesting wood. I can see a couple of pending scenarios where owning a well-hung ax is preferred. And no, the Zombie Apocalypse ain’t one of them!

My top reason appeals to manliness – and self-reliance. My “prepping” paradigm continues to shift from consumerism to self-reliance at a startling pace. With the river of shiny survival stuff flooding the banks of the preparedness community, I began to realize my need to go balls to the wall on traditional skills. Forgotten skills. Like how to properly re-handling an ax.
A point of pride for ax aficionados is how well a cutting tool is hung. The way in which an ax is mounted on a wooden handle (haft or helve) is called the hang…. and getting the hang of it takes practice.
Question: Do you want to be known as the woodsman with a well-hung cutting tool?
If so, here’s how to…
Get the Hang of it
I own a fiberglass handled sledge-hammer and splitting maul. Those tools are mere blunt objects that serve a purpose. Box store axes fall into this same “blunt object” category. But a real ax is a work of art, a thing of beauty, and a joy forever. And art work deserves to be hung well.
I refuse to buy or ever consider owning an ax without a wooden handle. Call me old-fashioned, but I like the feel of a hickory handled striking tool. Tradition matters! So does performance.
Before the turn of last century, a good ax head often came without a handle. Woodsmen, lumberjacks, pioneers, and homesteaders had their favorite handle pattern they created from wood staves. The tried and true designs became family heirlooms.
Why?
Because a well-hung ax feels right in your hands. Balance, angle, flexibility, length, weight, and diameter combine for the perfect hang.
Choose Good Wood
The traditional wood used for an ax, adze, and hammer is hickory. When selecting a handle, pay close attention to the run of the wood grain and color. You’re big box hardware store may have a decent handle. I lucked up and found one at a local “Ace is the place” store. This handle will be hung on an old ax I bought at a yard sale a few year back. Nothing special – but almost free – and works for my application.

Some stuff needed to hang an ax… the adze and froe were added for no apparent reason.
No matter where you get your new haft, check the run of the wood grain from the side view. Grain running perpendicular to the handle won’t last long. Look for grain running parallel the whole length. A few stray grains won’t hurt.
Now check the butt end of the handle. Grain running vertically on the end is what you’re after. Horizontal grain in striking tools won’t absorb constant shocks.
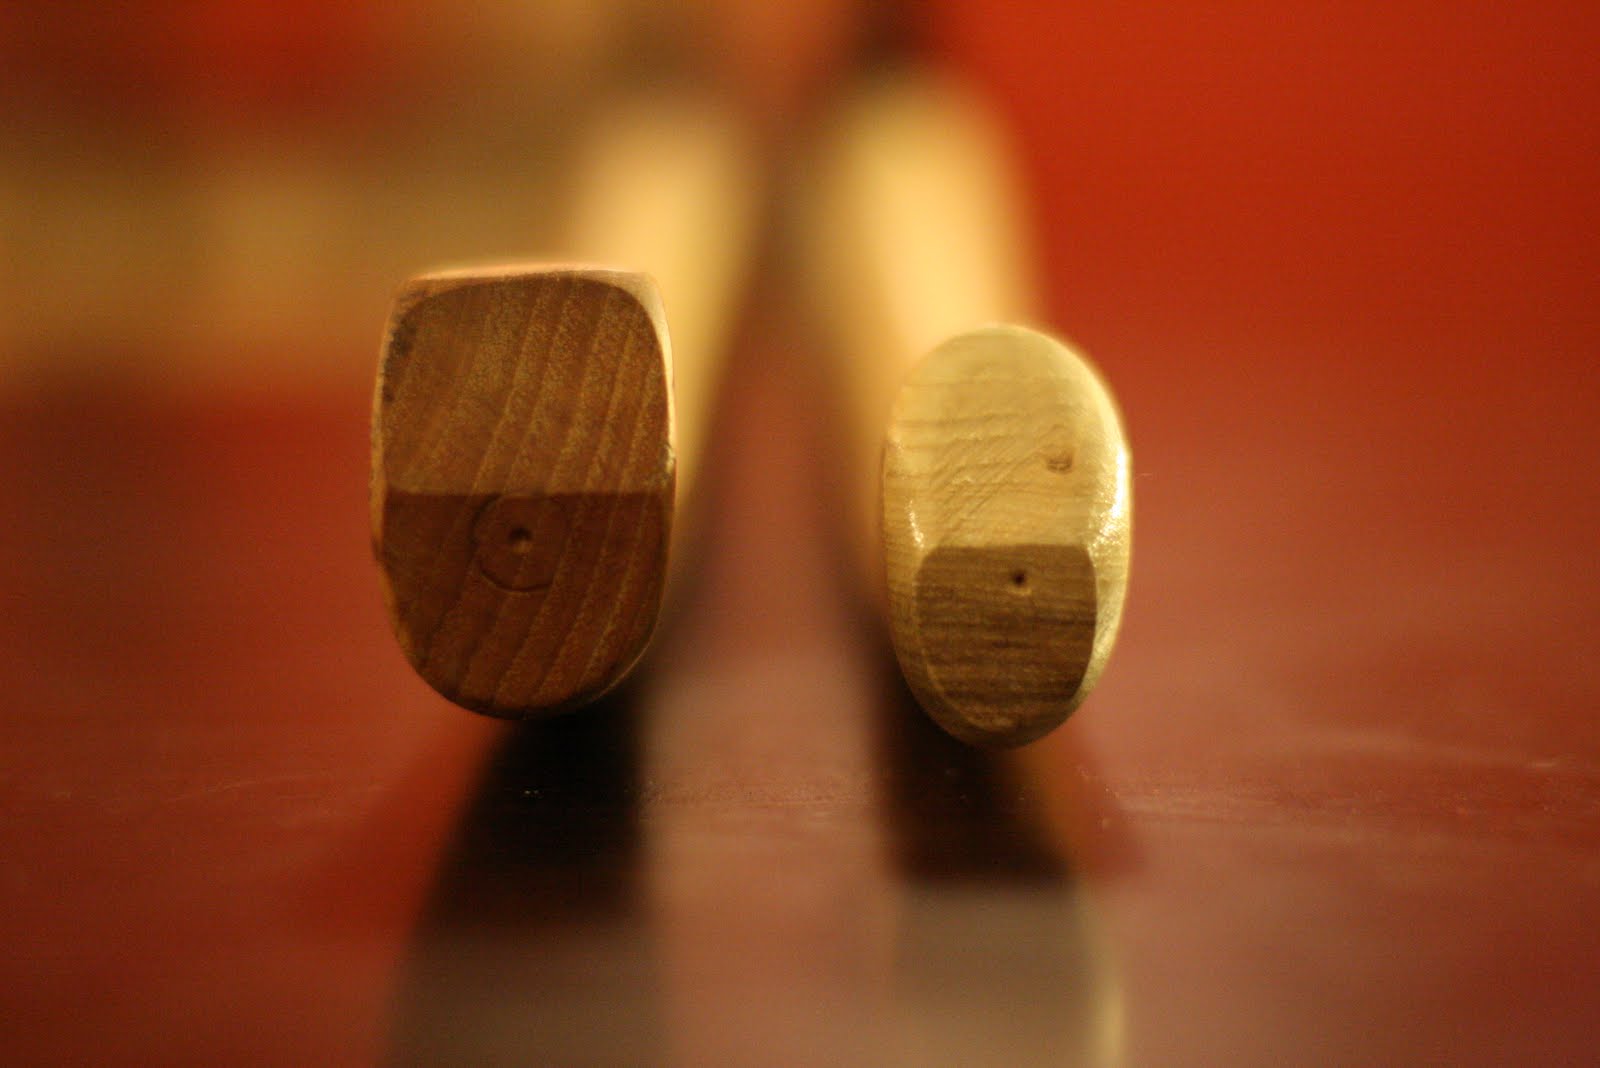
Vertical grain on the left. Image source
Avoid painted or varnished handles. Paint covers a multitude of sins. A clear varnish can be sanded off if it meets good wood standards and an eye-ball test.
Color Counts
Hickory heart wood is reddish in color. You’re likely to find this in low-grade handles. Look for white sap wood handles. My handle has hints of heartwood but is mostly made of the outer white wood.
Size Matters
The size of your handle depends on the weight of your ax. For our purposes here, we aren’t dealing with specialty S-shaped hafts for broad axes. Today we’re talking about axes used for chopping, splitting, and self-reliance tasks.
Haft length depends on the job and personal preference. Longer handles (36″) for felling and chopping large timber, shorter for lighter work. How short? Pictured below is my Wetterlings Ax. Sadly, I didn’t find this one at a yard sale.

Wetterlings Backwoods Ax measures 16″ long
Hanging Procedures
Gather your supplies. You’ll need a handle, wooden wedge, wood glue, hammer or wooden mallet, rasp, sand paper, gloves, saw (hacksaw or reciprocating metal blade), punch, boiled linseed oil, and a vise helps. Don’t have a vise? Improvise with two sections of 4×4 to support the ax-head.
Some stuff need to hang an ax
First, remove the old handle. Saw it off near the bottom of the ax-head. Use a large diameter punch and hammer to drive the remaining wood out of the eye of the ax. I used a section of 5/8 all-thread. If epoxy was used on the head on the last handle, you may have to remove the wood with a drill.

Don’t clamp the ax-head in the vise unless you don’t mind it being scared. Rest it over a gap in the vise to remove the wood.
Turn the ax-head upside down and drive the old wood out through the top of the eye. The eye on axes are tapered from the bottom to the top – small to large. The old rotted handle on this one was easily removed.

First fit with the new handle
Insert the new haft into the eye from the bottom opening. The ax-head will leave marks on the wood showing you how much wood to remove for proper seating. It needs to sit on the shoulder of the new handle. Mine needed to go another two inches to make that point.
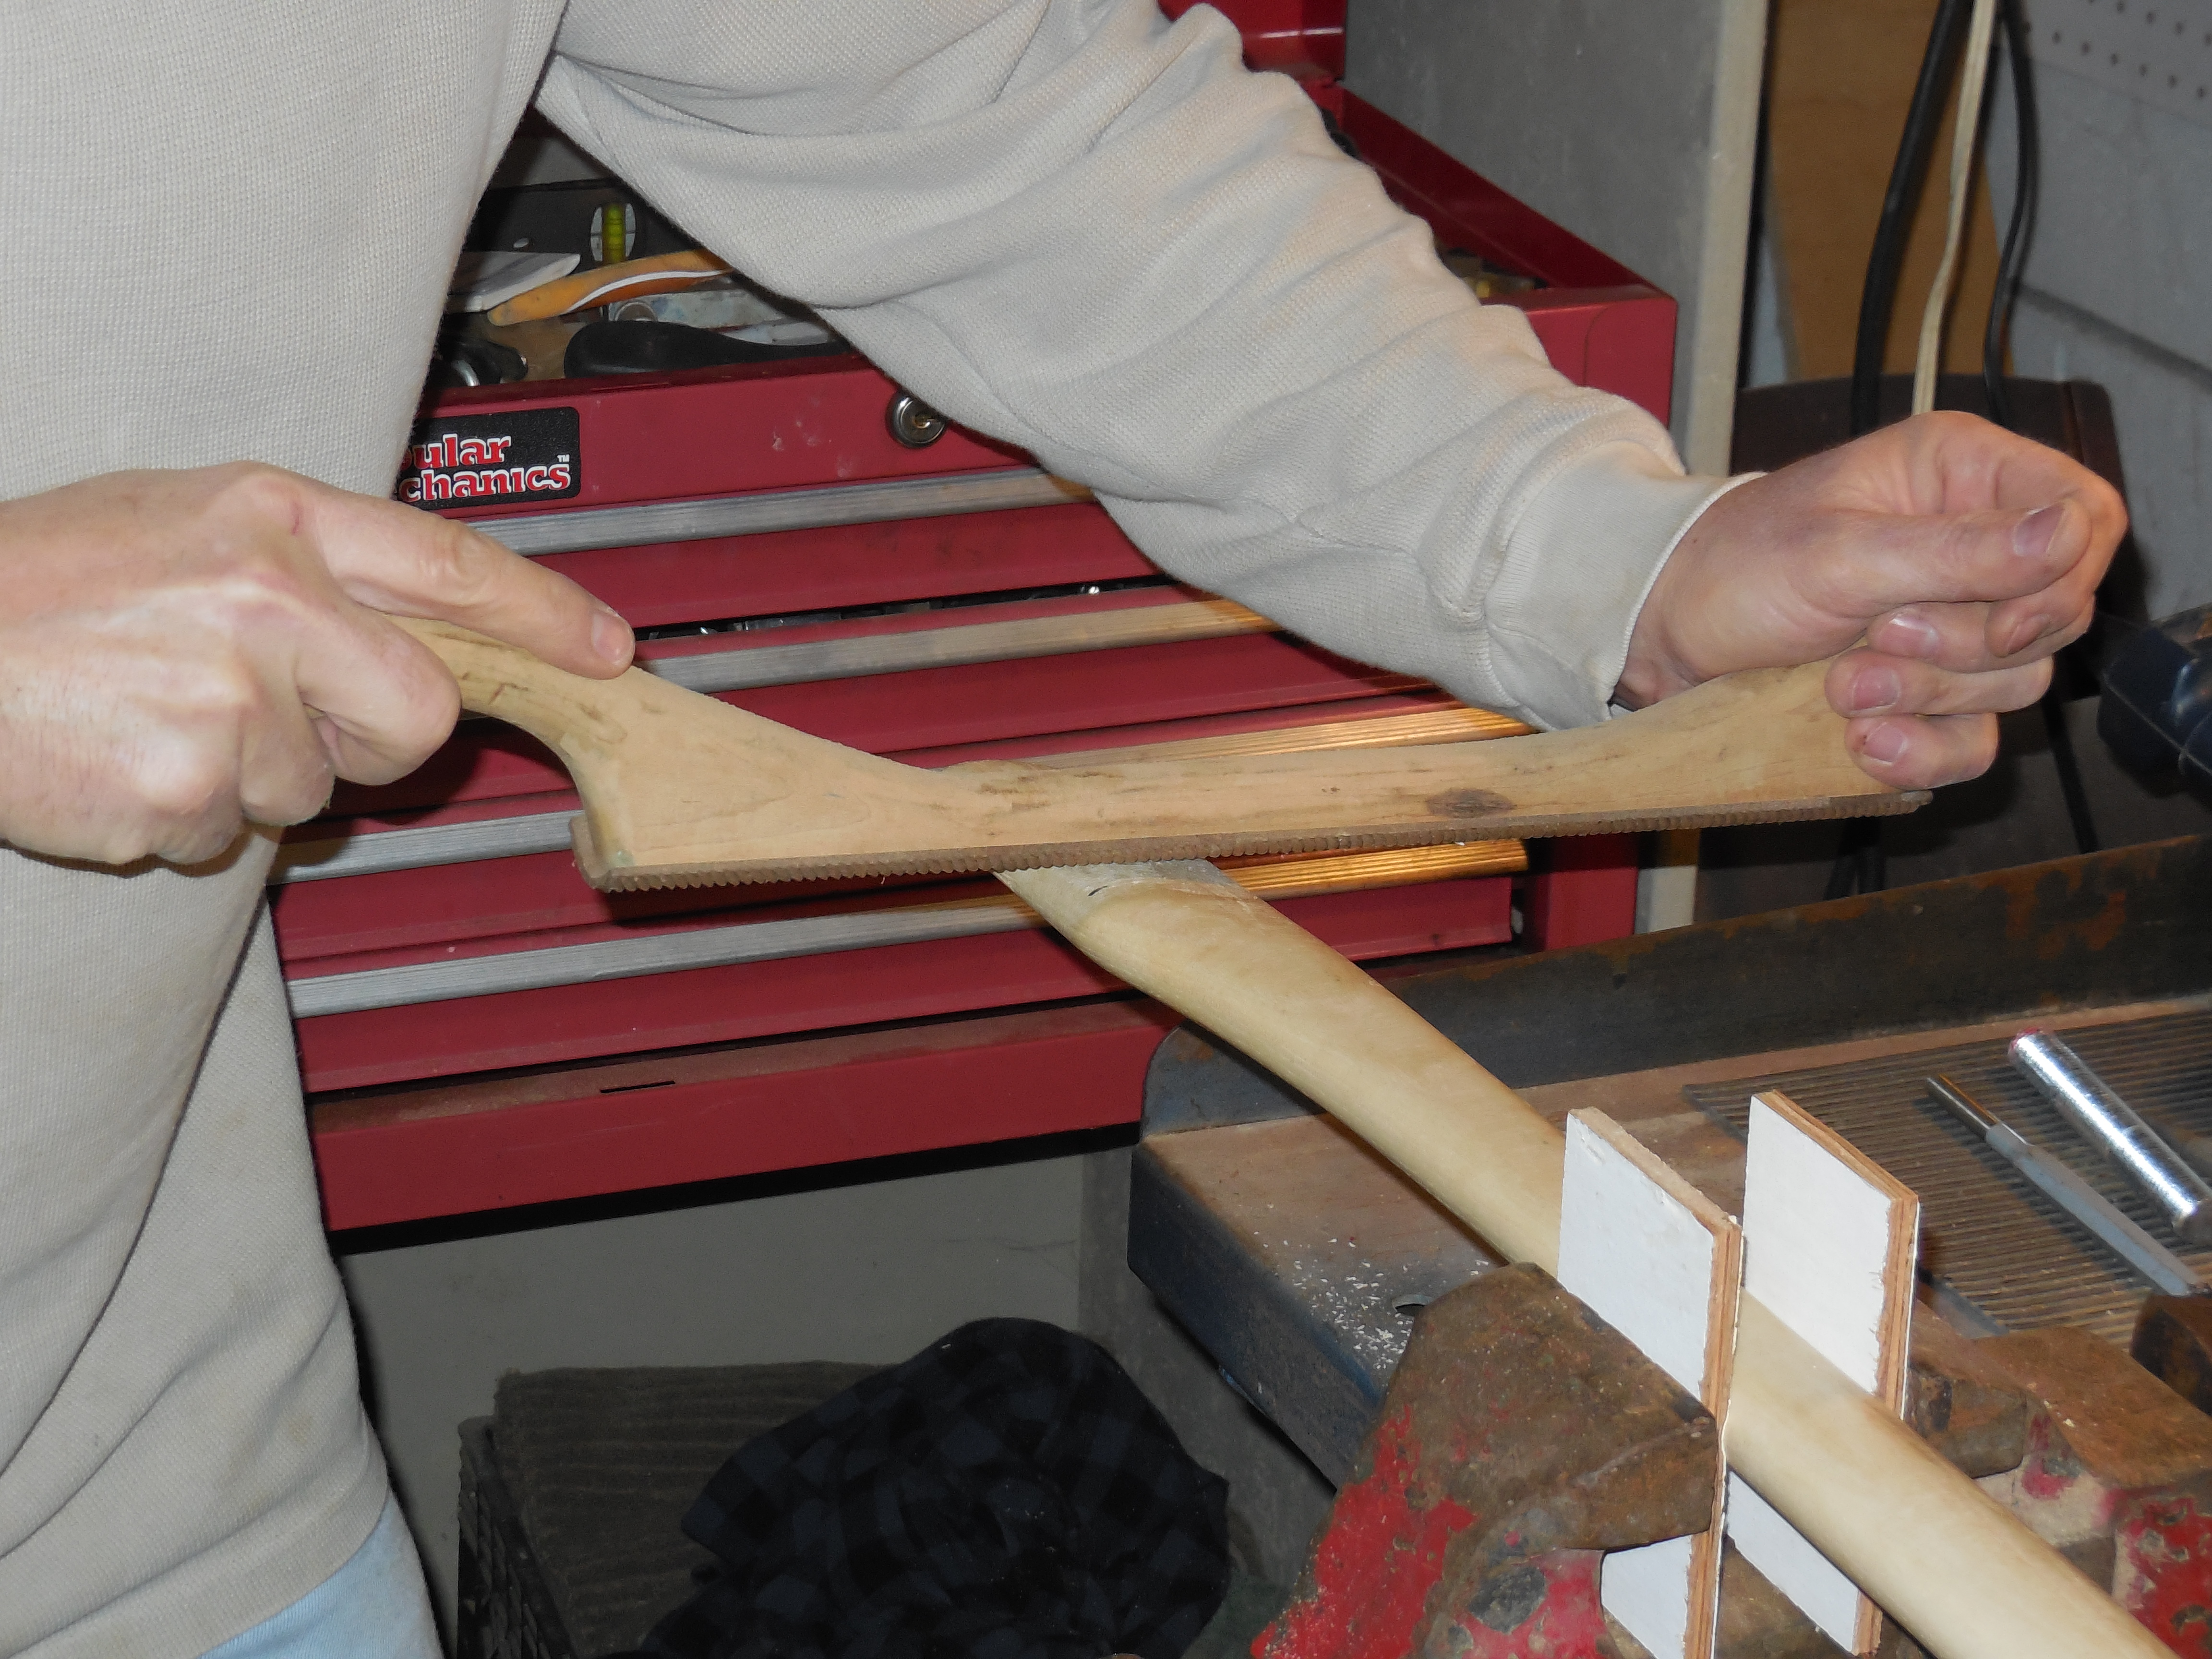
Taking off wood with a rasp
Remove the new handle again and grab your rasp. You can use power tools to remove the excess wood. Be careful not to take too much off though. You can’t glue saw dust back on.

Final fit… after removing extra wood three times.
Once you have a good fit on the haft, apply wood glue to both sides of your wooden wedge. Don’t coat the entire wedge. Spread the glue on the bottom half of the wedge to prevent squeezing glue out of the slotted kerf end of the handle.
I leave about a 1/4″ of the handle above the ax-head.
Use a block of wood or a wooden mallet to drive the wedge into the slotted end. This creates even pressure on the wedge to keep it from splitting. Cut the remaining wedge and excess handle off. I leave about 1/8″ to 1/4″ above the head.

Metal wedge across the wooden wedge
Drive a metal wedge small enough to expand the wood without splitting the handle. Hardware stores sell metal wedges in various sizes for your application. Don’t use nails or screws. Ever seen an ax-head with nails bent over the top edge in an attempt to keep it mounted? NOT pretty… or safe!
Counter sink the metal wedge with a punch. Some folks skip the metal wedge for worries of splitting the handle at the top of the eye. A proper sized metal wedge shouldn’t split the kerf portion. I like the added security.

If your haft came from a box store, it’s likely varnished. Sand the varnish off with 180 grit sand paper. Apply 2 or 3 coats of linseed oil to the wood. Generous amounts should be used at the top eye area.

Applied to latex gloves and spread on the haft
Latex gloves come in handy for this task.

Nothing like a woodsman’s well-hung ax!

Not bad for an “almost free” yard sale find!
Keep Doing the Stuff!
Todd
P.S. – You can also connect with us on Twitter, Pinterest, Google +, and our Facebook page. The Doing the Stuff Network community can be found here: Pinterest, Google +, and Facebook. Lots of good stuff going on here… check it out!
P.P.S ~ If you find value in our blog, DRG and I would appreciate your vote on the “Top Prepper Sites“! You can vote daily by clicking here or the image below. Check out all the other value-adding Prepper Sites while you’re there.

Thanks for sharing the stuff!
Copyright Information: Content on this site (unless the work of a third-party) may be shared freely in digital form, in part or whole, for non-commercial use with a link back to this site crediting the author. If you are interested a third-party article, please contact the author directly for republishing information.


Todd, This is a wonderfully thorough and practical post!
It could easily take a beginner all the way through to a finished, high quality, (beautiful), and fully functional tool that will last for years. You are an excellent teacher.
LikeLike
Morning Dan, really appreciate you’re kind words!
Taking it out to the woods today for some dirt time.
LikeLike
Good post Todd!
LikeLike
Thank you and glad to hear that!
LikeLike
Are you saying not to use reddish heart hickory but to use white sapwood from hickory?
What is the use of the boiled linseed oil?
I have gone to Lowe’s and TSC looking for a hoe and shovel handle, but the guys seem confused as to what the wood is. Would the same apply about the grain of the handle? I have never chosen anything like this and have no one to help me. But, when guys are confused about what they are selling, I am not confidant enough to buy. At what store can I be assured of finding a good handle for garden tools.
I know this is not about garden tools, but I figure you know more than I.
Thanks.
LikeLike
This applies mostly to striking tools like hammers and axes. Box store employees rarely have knowledge about the finer things. 🙂 I’ve used heartwood handles before. They work, but the white sap wood of hickory handles is better.
The linseed oil is applied to the wood to help preserve the fibers and prevent it from drying and cracking. Restores and makes the wood more resilient.
The important part of handle selection is the grain orientation. Avoid the horizontal run and find vertical. Hickory is time tested and has unique qualities other woods don’t for striking tools.
I wouldn’t be that concerned about heartwood (red) for hoes and other garden tools. Let me know what you find.
Thanks for the comment, Parsimony.
LikeLike
As a full time fireman, I spend 48 hours at the station . To pass the time when not running calls , or other duties I started reviving old axes. Its been a year and a half now, and I learn something new w/ every axe. I tend to scour antique stores, and have scored some amazing pieces of steel. Including a 120 y/o mint broad axe .Very satisfying and manly. I highly recommend” a axe to grind” on you tube. There is much old school knowledge to be gleened. Good job pointing the grain direction, and wood part out. Several early axes of mine reflect that early lack of knowledge. Another satisfying thing to do is make a leather sheath for your axe. Finally the other positive aspect of linseed oil, is that it provides a good sticky grip. Enjoyed the post thank you.
LikeLike
Old tools, especially cutting tools, are a pleasure to find. The adze and froe picutred were found at antique stores. I’ve found better priced tools at estate and yard sales.
Glad to meet a fellow ax-man that appreciates the finer points of restoring old axes. Thank you for stopping by and commenting!
LikeLike
A lindseed oil finish should never be sticky; that means too thick a coating has been applied for it to oxidize, and thus harden properly.
The time-honored method is to apply many thin coats, allowing the oil to cure between applications. Wipe on a nice heavy coat, let it sit for a few minutes, then wipe it almost completely off. Do this initially once a day for a week, then once a week for a month finally once a month for a year; thereafter a once-yearly application should suffice.
This will result in a satin-like, highly protective finish that is still very grippabe. As a bonus, unlike a sticky uncured oil finish or factory lacquer finish, a proper oil finish greatly minimizes friction blisters under heavy use.
LikeLike
Pingback: Sharp Sherpa Tip: Processing Wood Safely with Your Ax | Survival Sherpa
Pingback: The Art of ‘Smoothing It’ in Struggleville | Survival Sherpa
Pingback: The Art of ‘Smoothing It’ in Struggleville | The Daily Sheeple
Pingback: The Art of ‘Smoothing It’ in Struggleville | The Daily Drudge Report
Pingback: The Art of ‘Smoothing It’ in Struggleville | What The Government Can't Do For You
Pingback: 14 DiY Projects for Wilderness Self-Reliance | Survival Sherpa
Pingback: 14 DiY Projects for Wilderness Self-Reliance | The Daily Sheeple
Pingback: Born Again Tools: Giving New Life to an Old Ax | Survival Sherpa
Pingback: Born Again Tools: Giving New Life to an Old Ax | Patriot Rising
it is an old rule of thumb between craftsmen, timmermen and handymen: a tool must fit your hand in form, style, balance and weight.. therefore choose carefully and adapt where needed to your personal needs. this also means a tool fitted for one person might not work well with another one. these tools have to bee personalized.
if not – e.g. being unbalanced – they might be even dangerous to handle (e.g. axes, saws, hammers). this is one of the main reasons why a caring handyman under normal circumstances never will lend his personal tools to others. they might become damaged by different usage.
LikeLike
Pingback: Cutting to the Chase When Choosing an Ax for Self-Reliance | Survival Sherpa
Hello,
I had a guy in Canada put a Iltis Oxhead heavy head hanged on a 19 ” White Hickory Handle, I notice tgere is a crack in the wood on the too of the eye in the wood not the axe head itself. Is this dangerous to use now. Or can I put some wood put in the Crack and somehow force it down, it’s not a real big crack . It doesn’t bother ne, but I worry if this is dangerous to use, because it is a heavy head. Thank You in advance.
Kindest Regards,
Paul’ie
LikeLike
If it’s hung right the cracks in the wood in the eye shouldn’t be a problem. Be sure to keep the handle oiled up.. in the eye too.
LikeLike
I’m no expert but I think you mounted the head upside down. At least it appears that way from the pictures. It appears the head was upside down on the old haft and you just installed it the same way. Where I come from not many people grow beards from their forehead (although living in California I’ve seen some strange things). Everything else looks correct.
LikeLike
You know, Matt, I’ll have to check it and let ya know.
LikeLike
You know, Matt, I’ll have to check it and let ya know.
LikeLike
Love the article about hanging a new axe handle. I’m restoring my grandfathers old axe and had one question for you. Did you trim the wood wedge and insert the metal wedges right after gluing the wood wedge (while glue was still drying) or did you wait until the glue was fully dry (like the next day for example)
Thanks in advance!
Dan
LikeLike
Hi Dan, I’ve done it both ways and haven’t noticed any difference in either technique. Most times now I don’t even use a metal wedge in my working axes.
LikeLike
Thank you I appreciate the response!!
Dan
Sent from my iPhone
>
LikeLike