
by Todd Walker
Imagine the first human who made fire from scratch.

We have no way of knowing the gender of this hero, but I’m sure her clan celebrated her curious discovery well into the night! We’ll call her Pyrojen.
Scouting for berries by the stream that day, she threw a fist-sized rock at a slithering, scaly animal. Snake was a delicacy during berry season. Her projectile missed its mark. Hunger has a way of improving our hunter-gatherer craft. She threw more stones at random targets in the creek bed.
Still missing her target, Pyrojen’s frustration turned to anger, then to rage. She pitched a flailing fit while breaking rock on rock. And it happened. Sparks flew from two random rocks which lit her curiosity.
Word spread to nearby tribes huddled and shivering in dark, damp primitive shelters. Like a moth drawn to a flame, they came. Wondering as they wandered towards the glow if they too might learn to capture this primordial, glowing ember. And the rest is history.
This is where the term pyromaniac originated. 😉
Our fascination with fire is nothing new. For millenniums, men and women have stared at flames. Fire was man’s first TV. Besides being mesmerizing, fire from scratch opened a whole new world and we’ve been creatively using it’s power to make other useful stuff like glass, pottery, and weaponry.
We had three generations in our house last week. I offered to show our oldest grandson (almost 7) how to start a friction fire. He was not interested… yet. His bow and arrow held his attention. But our son jumped at the chance.
Here’s how he started his first friction fire using the bow drill method. If you’ve ever wanted to created fire by friction, the bow drill is the most efficient way. There are subtle nuances involved which can only be mastered by Doing the Stuff!
Ready to make ancestral fire?
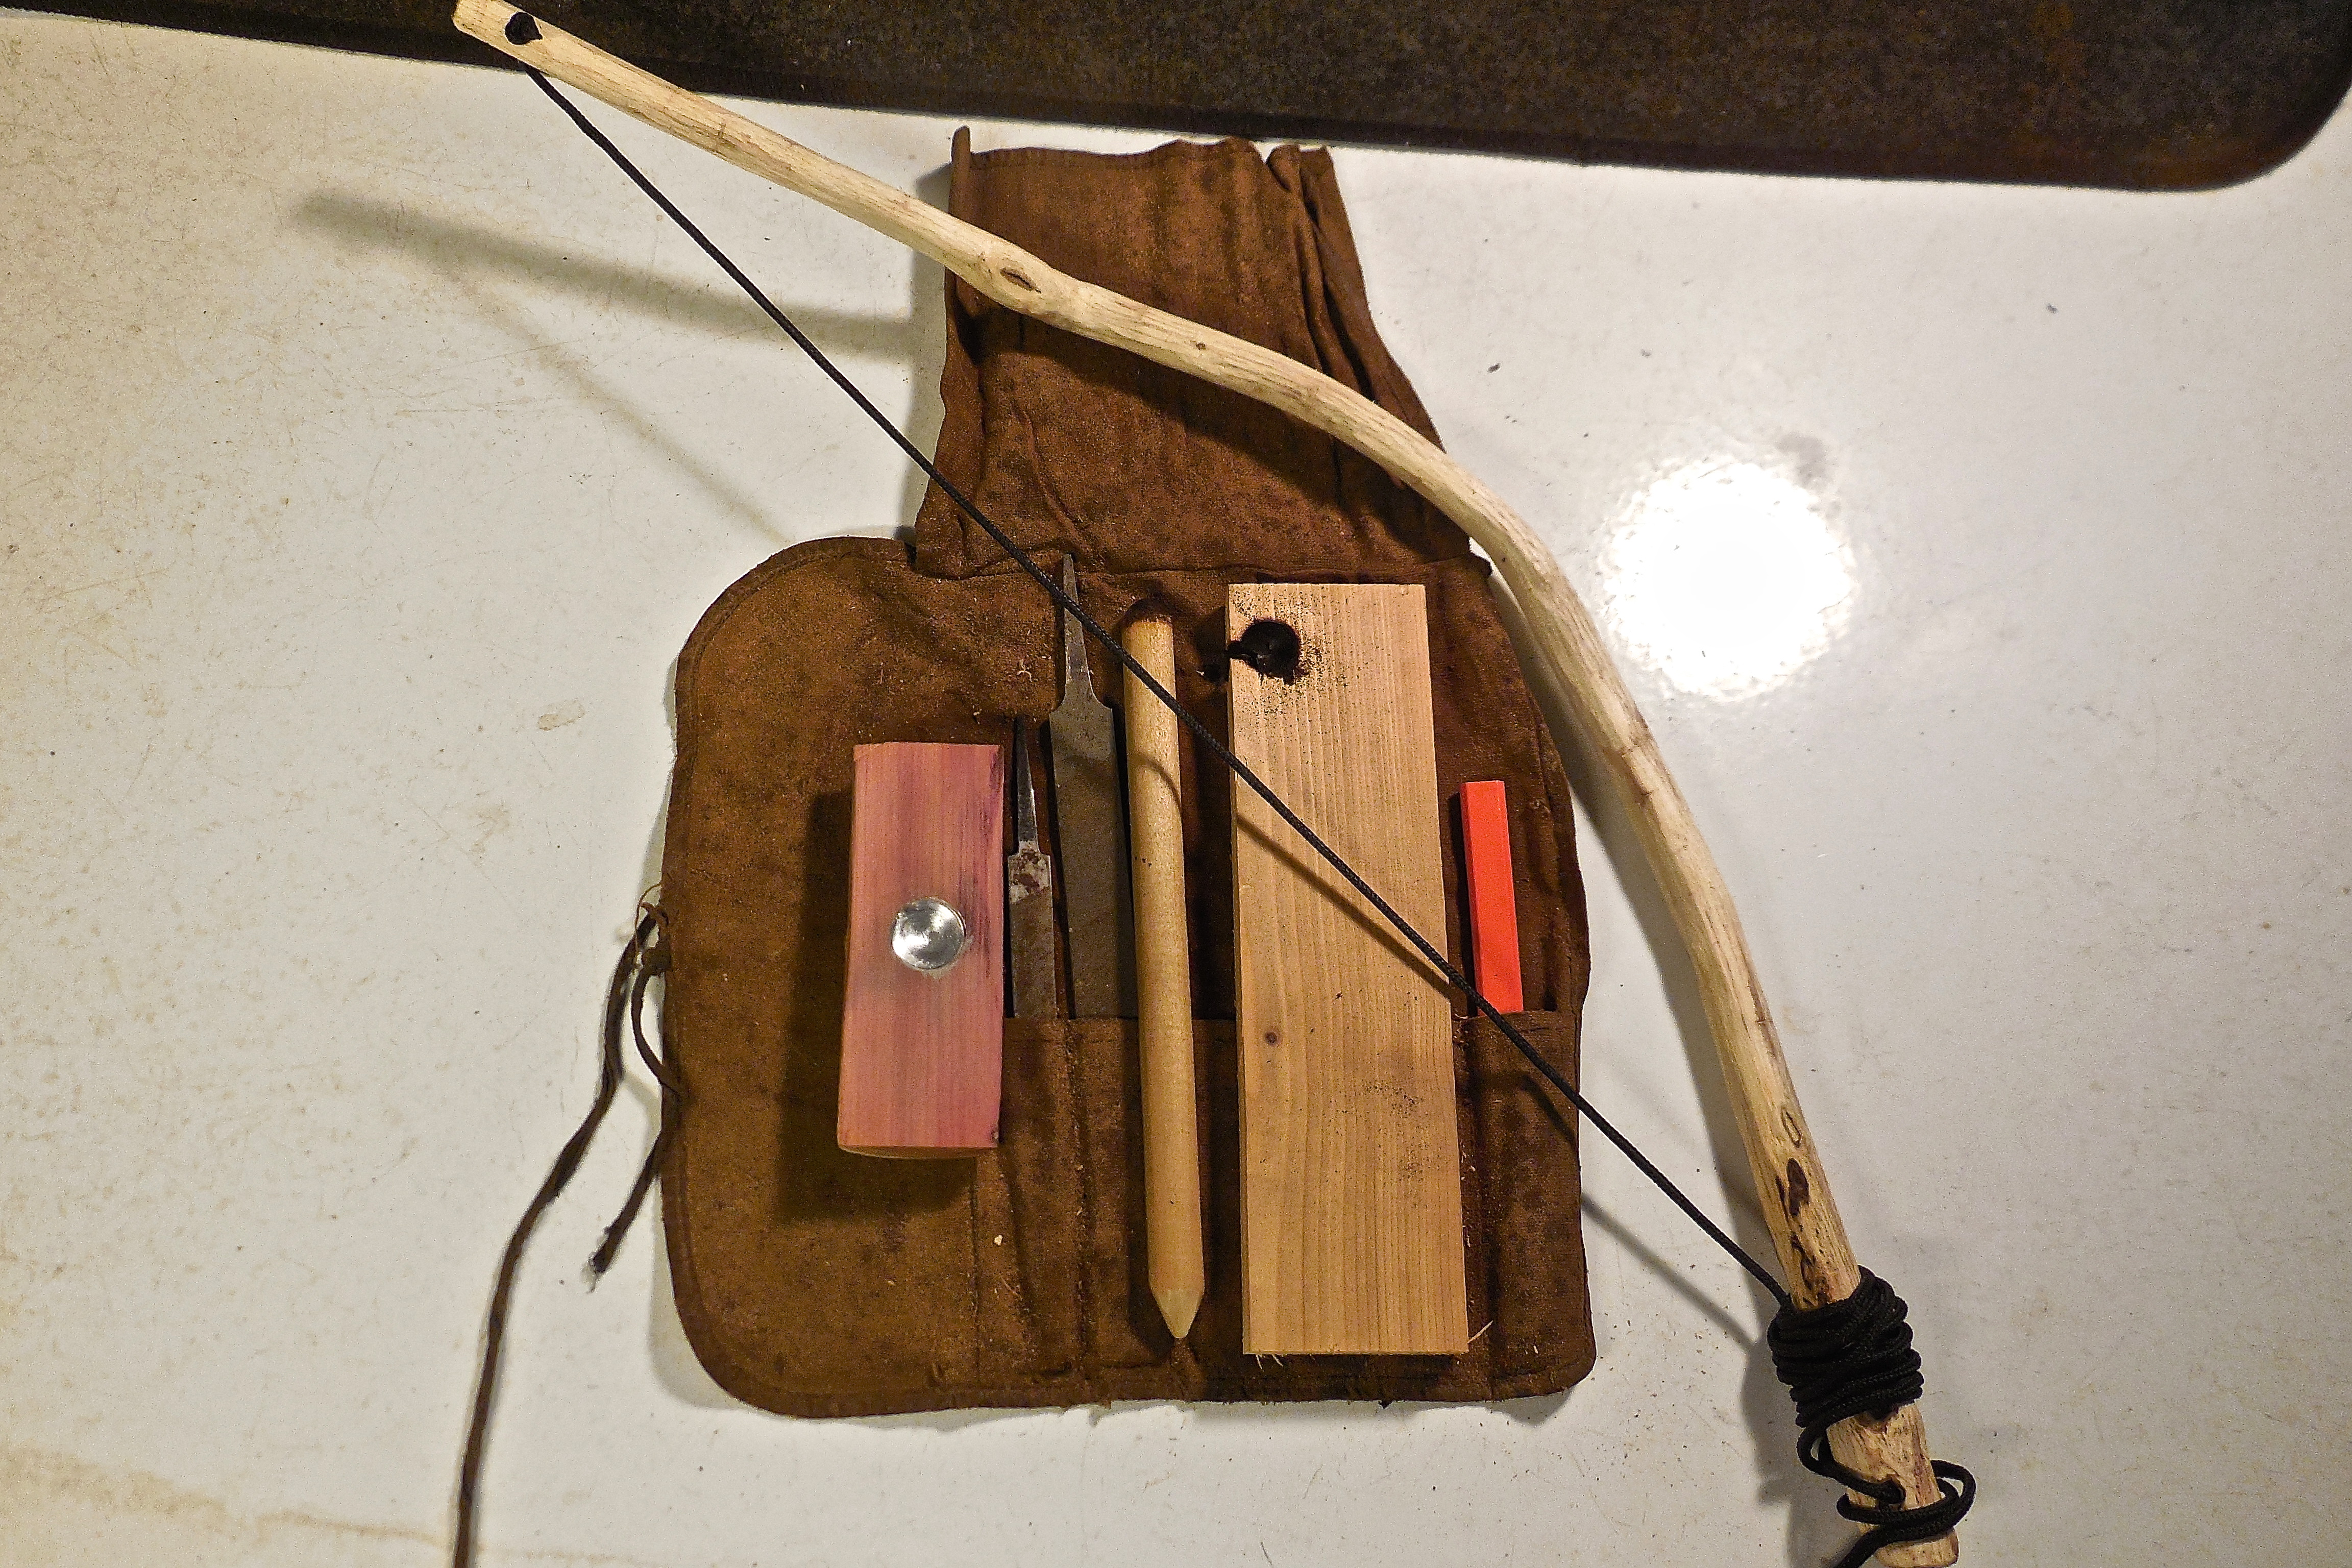
Gather the Stuff
Though you can make a bow drill set from natural material in the bush, this is my practice set I use at home. It’s better to practice in a controlled environment to perfect your skills than waiting until you absolutely need them.
I’m planning a tutorial on making a bow drill in the woods. Stay tuned!
Here’s the stuff what you’ll need for the bow drill method…
- Fire hearth (board)
- Bow and bow-string
- Spindle (drill)
- Handhold socket

Friction fire kit
Fire Hearth

Select wood that is free of moisture and resins. I had a scrap piece of cedar 1×4 board left over in my shop. I ripped it down to 2 1/2 inches wide by about a foot long. The board measures about 3/4 of an inch thick. Anywhere between 3/4″ to 1/2″ is a good thickness for your hearth.
Spindle

About 8 inches long
We used a thumb-sized dowel rod made of poplar. The length of your spindle should be about 8 inches. Without a measuring device, make the spindle about the length from the tip of your thumb to the tip of your pinky finger.

The business end
There are two ends of the spindle. On the business end (where you’ll create the primordial ember), chamfer a slight bevel on the entire edge to fit into the pivot you’ll create in the fire board with your knife. This pivot will be ‘burned in’ by friction to create a socket for your spindle.
Whittle the opposite end to a point. The pointed end decreases the friction on the handhold socket.
Handhold Socket

Since my practice set gets lots of use, I made a metal socket and secured it with epoxy.
I created my handhold from a piece of cedar leg I shaved down when I made DRG’s cedar bench. I split a smooth, rounded 4 inch piece and made a pivot hole that would accept a “knock out” from a metal receptacle box.
You could use a coin of some kind for the socket. Or you could burn a socket in the handhold with your spindle. A round stone with a dimple would also work.

Ball pen hammer, 9/16 ” socket, and a vise made the metal divot

Cordage
We used the quintessential survival cord – 550 paracord – for our bow-string. You could use tarred bank line, natural cordage, braided dental floss, animal sinew, or any strong line.
Bow
Bow and bow-string
The length of your bow should measure from the tip of you outstretched finger tips to your arm pit. Use a limb with a slight bend. My bow (oak) has a large bend but it’s what I had available. I’ve seen bows work that were perfectly straight.
If you have a boring tool (awl on your Swiss Army Knife) or a drill and bit, drill a hole about an inch from both ends of the bow. Away from civilization, just cut a 1/4″ notch on the back of the bow where you would have drilled holes. Wrap the cord around the notch to hold the bow-string in place.
Burning In Your Socket
Place your spindle on the fire board so that the edge of the spindle is about 1/4 inch from the edge. Tilt the spindle and make a mark where the center of the spindle would touch the board. Now make a pivot hole with your knife that will accept the drill. Spin the board with the knife point in the pivot until you’ve created a shallow hole the diameter of your spindle.
Twist the spindle into the bow string and slowly burn a hole in the board. This creates a socket in the fire board that will mate with the drill.
Notch the Socket
Once you’ve burned in a socket hole, cut a notch on the edge of the board that runs at a 45° angle from the center of the hole. The notch should cut into the burned hole about 1/8th of an inch. The notch is used for air flow and collecting charred cellulose dust from process of friction.
Rubbing Sticks Together
I’m right-handed and built my bow drill to allow my students to see the process while facing me. That is why the notched holes are facing away from the fire-maker. If you’re left-handed, just flip this set around and the holes face you as you place your right foot on the board.
Before starting your bow drill, place a dry leaf, piece of paper, or bark under the edge the fire board to collect the ember. This will be used to transfer the primal ember to your tinder bundle. (It’s a good practice to lay a dry barrier under the complete set to prevent moisture from entering your fire hearth).
With your bow sting tight, twist the spindle into the cord with the business end down. Place the drill in the socket on your fire board, place handhold on top of spindle, and brace your off-hand against your shin for stability and pressure. This technique also helps you keep your drill vertical.
Now begin to spin the drill with long, smooth strokes while applying pressure on the handhold. The correct amount of pressure takes practice. Use the entire length of the bow string to rotate the spindle.

Our son creating smoke
Not too much pressure in the beginning. You’ll begin to see charred dust fill the notch in your fire board. Once the notch is almost full, you’ll pick up your pace with the bow. You’ll need to create a temperature around 800°F to create an ember from the char dust.
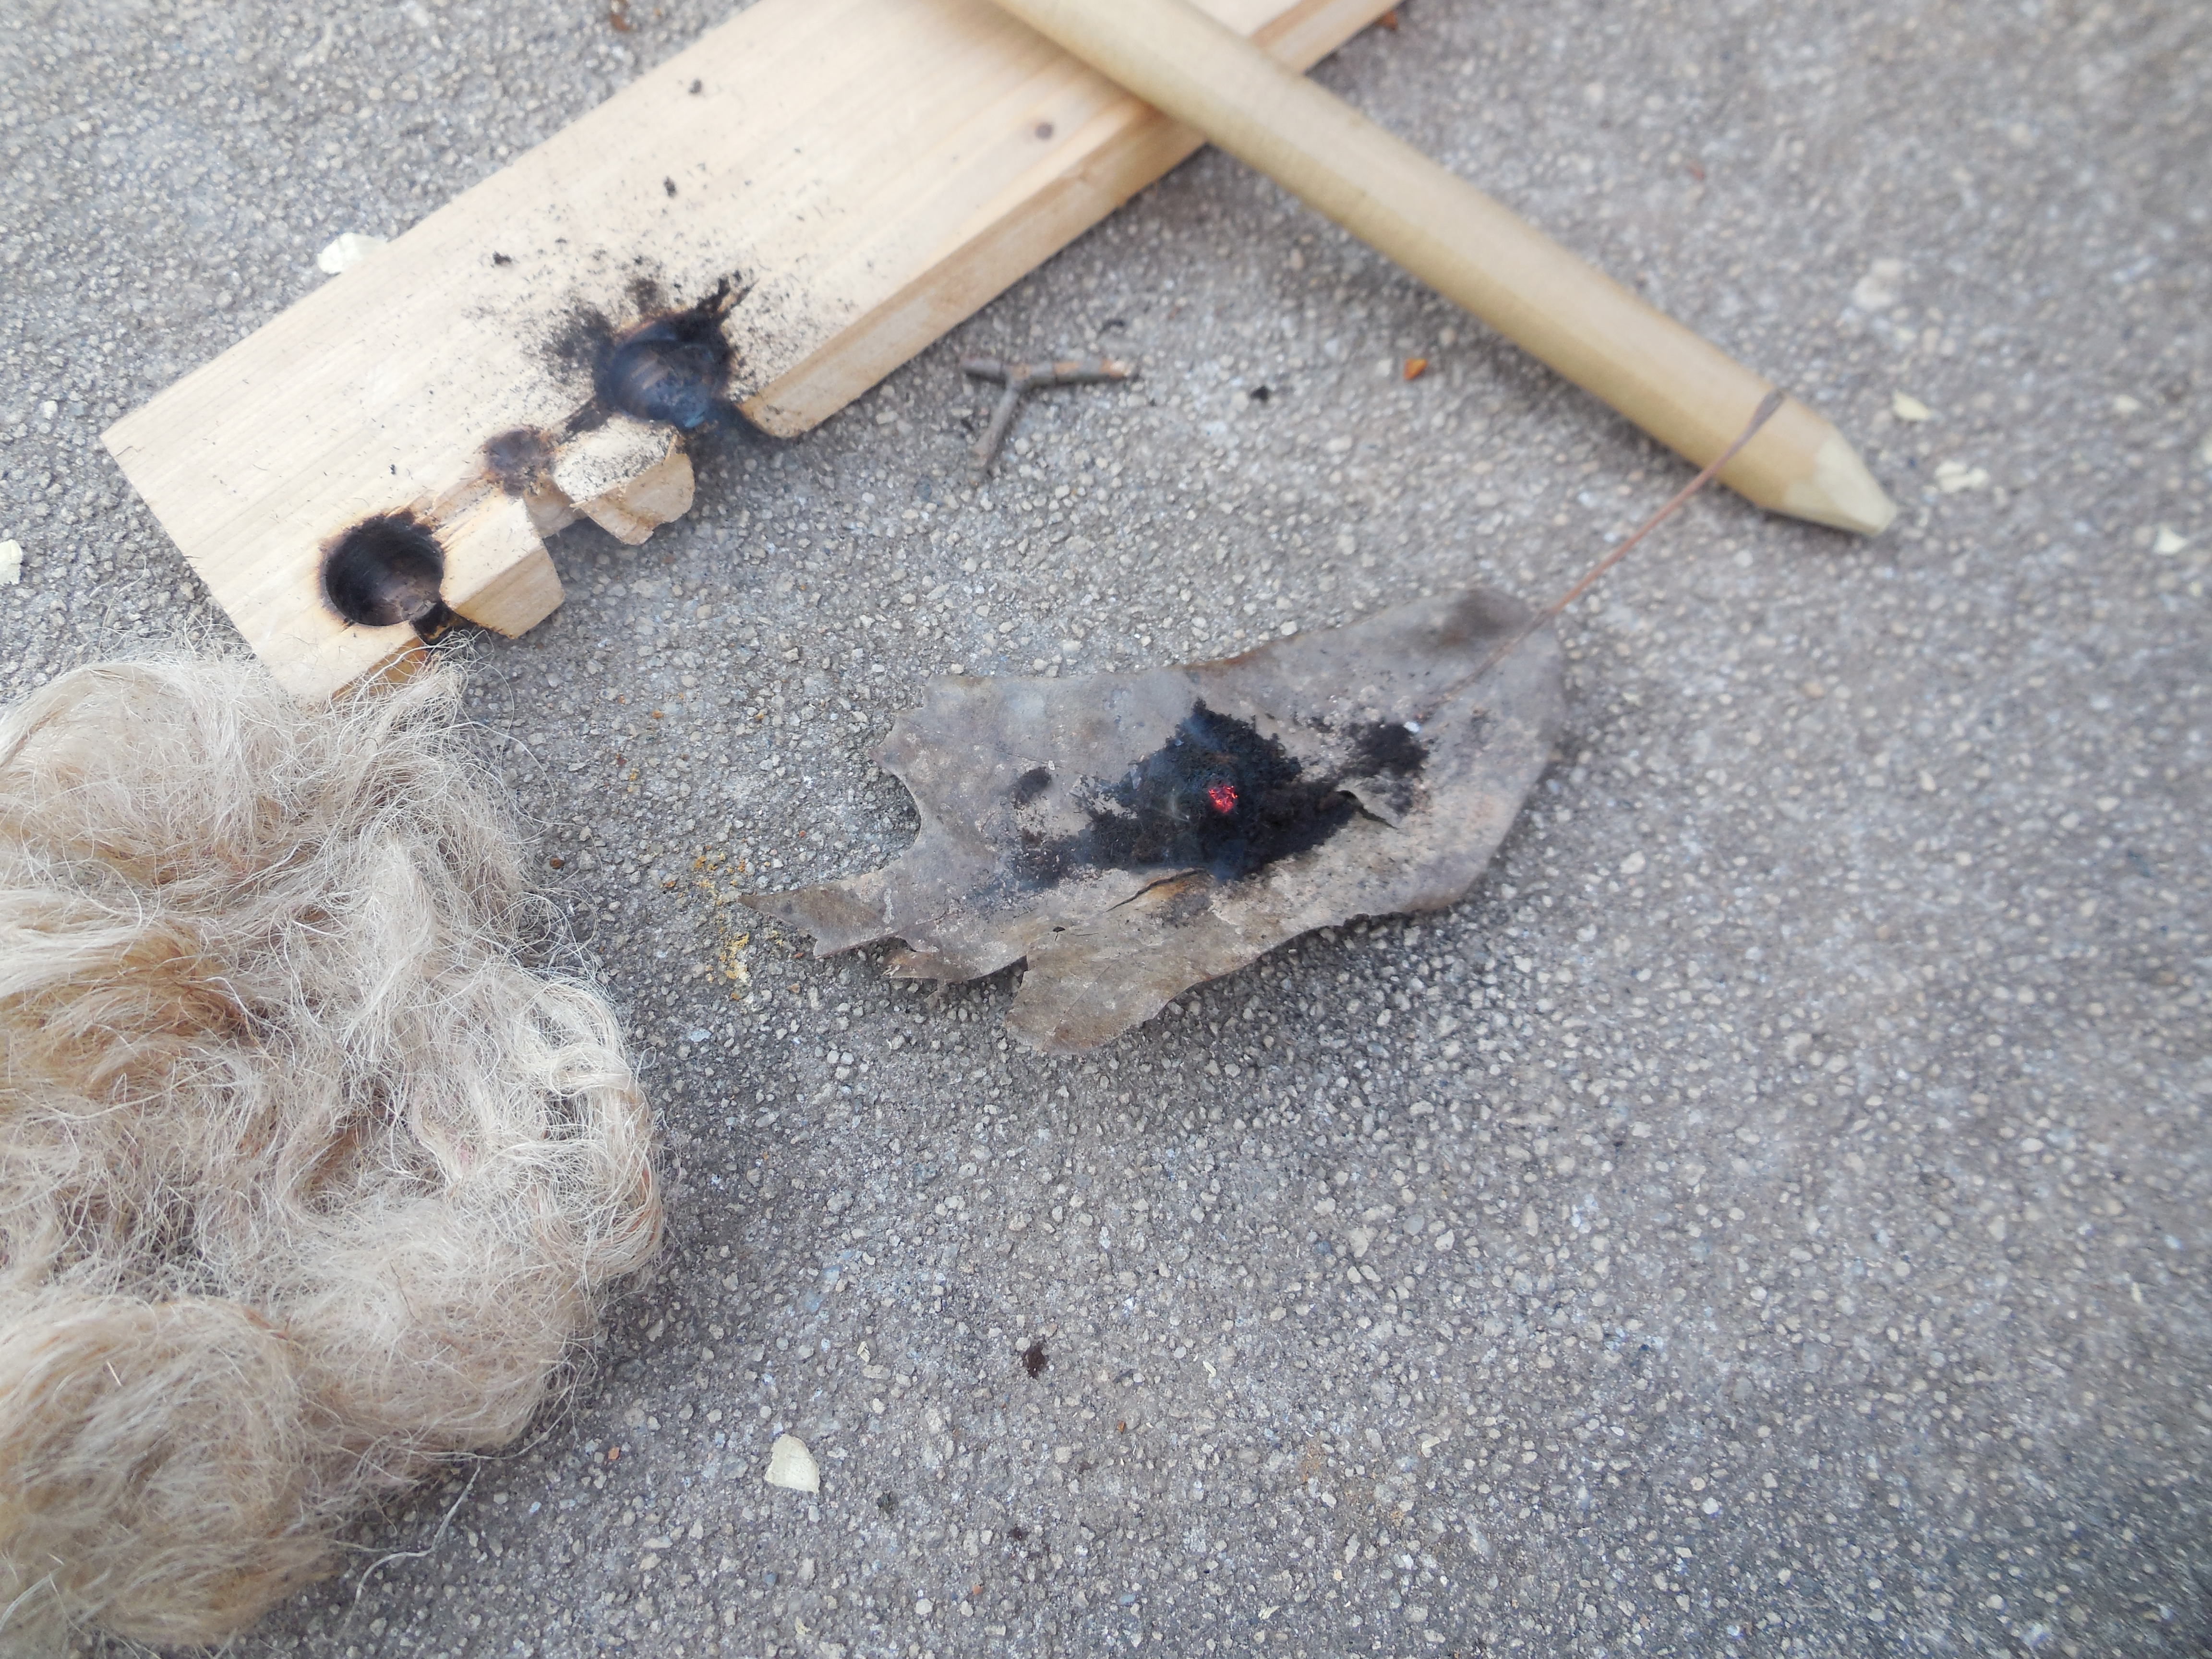
A successful ember
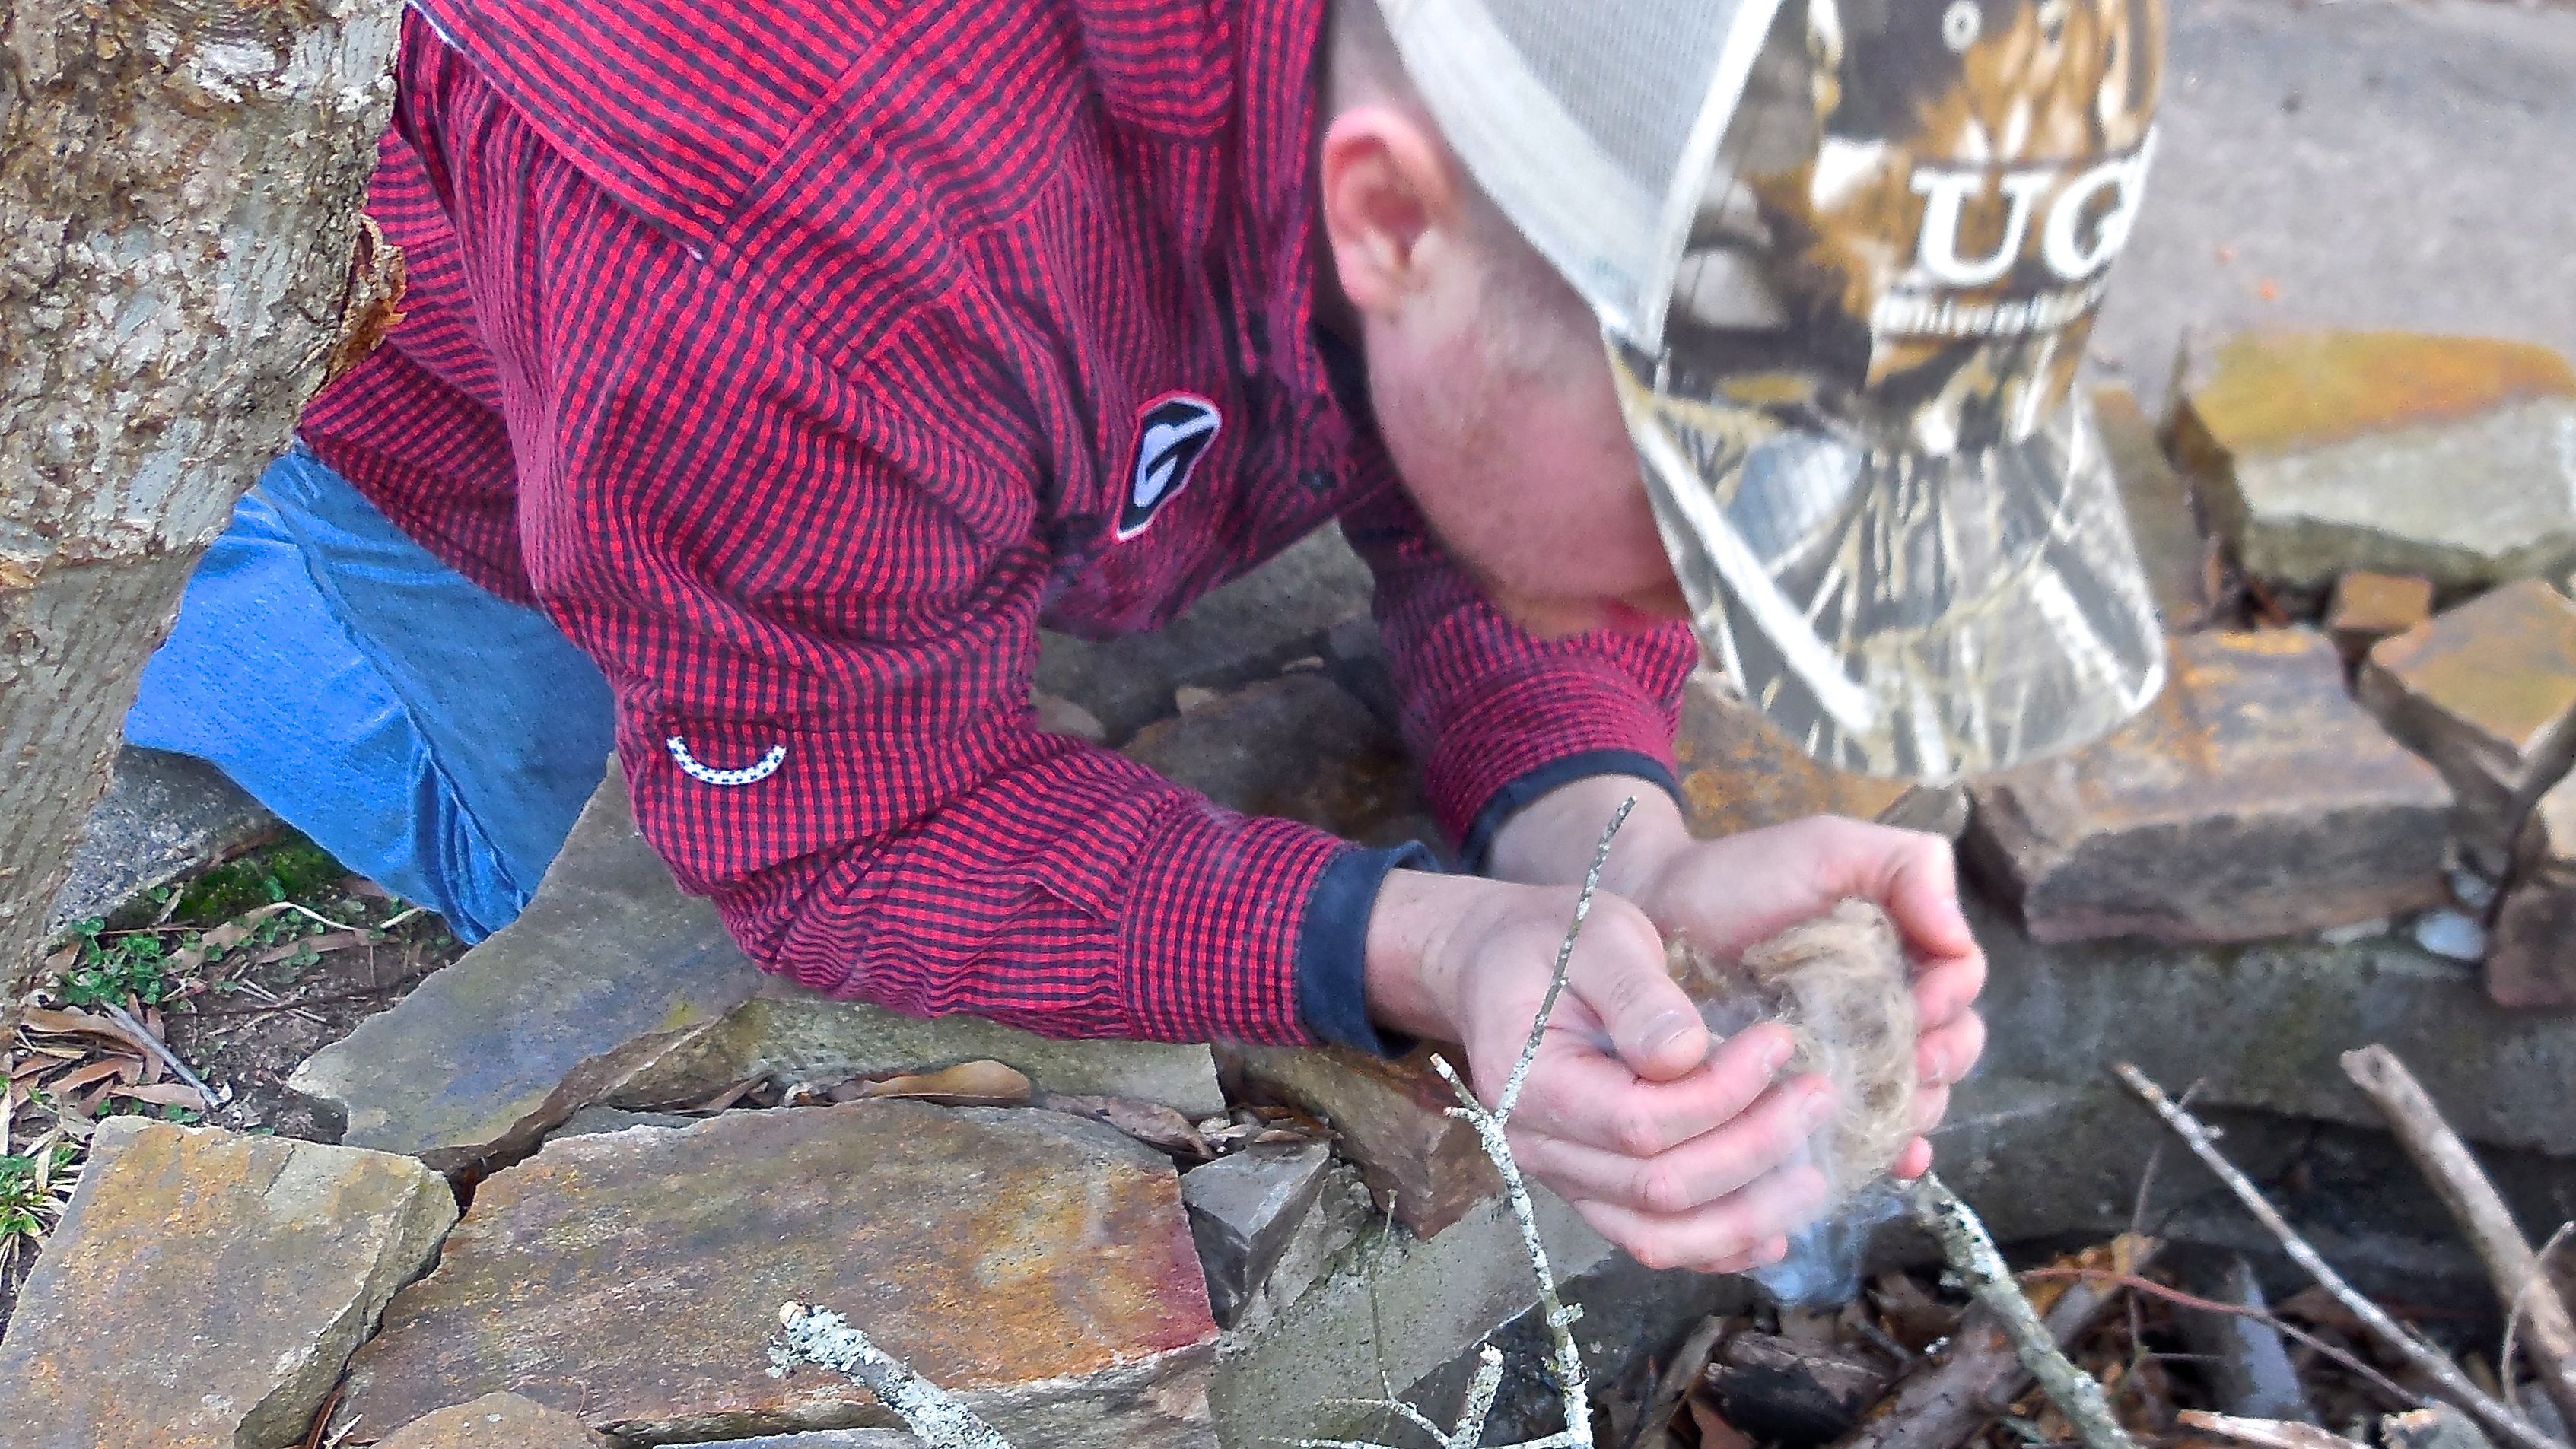
Messaging (blowing) the ember inside the bird’s nest (tinder bundle)

His first primitive fire!!

Making char material to ensure future fires when using flint and steel or a ferro rod
This method of making fire is a spiritual experience that connects you to our ancient ancestors. It’s also a great way to connect with your family now!
Keep Doing the Stuff with fire!
Todd
P.S. – You can also keep up with the Stuff we’re Doing on Twitter, Pinterest, Google +, and our Facebook page. Ready to trade theory for action? Join us in the Doing the Stuff Network on these social media sites: Pinterest, Google +, and Facebook. Use the hashtag #DoingTheStuff when sharing your stuff on Twitter.
P.P.S – If you find value in our blog, DRG and I would appreciate your vote on the Top Prepper Sites! You can vote daily by clicking here or on the image below. Check out all the other value-adding Prepper sites while you’re there…

Thanks for sharing the stuff!
Copyright Information: Content on this site (unless the work of a third-party) may be shared freely in digital form, in part or whole, for non-commercial use with a link back to this site crediting the author. All links in articles must remain intact as originally posted in order to be republished. If you are interested a third-party article, please contact the author directly for republishing information.


Good to know, I want to perfect it this summer.
LikeLike
Awesome, mentoring the young. I have made it my sons responsibility to build the fires in our stove, most night’s. The bow drill has been fascinating for me, as I have been trying out most of our local tree’s and tinder to find the most efficient tinder. As your primitive fire skills improve, making fire w/ a bic becomes too easy. Thanks for the read.
LikeLike
Pingback: 5 Must-Have Survival Kit Items That Won’t Require a Mule for Conveyance | Survival Sherpa
Pingback: 5 Must-Have Survival Kit Items That Won’t Require a Mule for Conveyance | TheSurvivalPlaceBlog
Pingback: Primitive skills - So Easy a Caveman Can Do It
Pingback: Primitive Skills – So Easy a Caveman Can Do It
Pingback: A DIY Fire Bow Kit On Training Wheels | Survival Sherpa
Pingback: Backyard Bushcraft Skills: No Wilderness Required | Survival Sherpa
Pingback: Plans Fail → Skills Endure | Survival Sherpa
Pingback: Plans Fail → Skills Endure - Wide Awake America
Pingback: Plans Fail → Skills Endure | TheSurvivalPlaceBlog
Pingback: The Ultimate Guide to Making Fire - Survival at Home
Pingback: 3 Ways Camping Can Help You Survive a Disaster
Pingback: 5 Must-Have Survival Kit Items That Won’t Require a Mule for Conveyance | ROWAN OATH KEEPERS
Pingback: 49 Outdoor Skills and Projects to Try When Camping | Survival Sherpa
Hello!
I liked your article very much; thanks for writing it!
After having taught dozens of Boy Scouts (and a couple of Girl Scouts as well) to make “matchless” fires, please allow me to share a suggestion for some slight alterations to the technique you are using in the “Messaging (blowing) the ember inside the bird’s nest (tinder bundle)” picture shown above…
1. Instead of cupping the Bird’s Nest in your palms, put it on the tips of your fingers.
2. Instead of “looking down” into the Bird’s Nest, raise it above your face.
(If you are Catholic, or have been to Catholic Mass, we are talking the same basic position in which you may have seen a Priest holding up the Host during consecration.)
3. Once in this position, you can blow “up” into the bird’s nest, past the “heels” of your hands, towards your finger tips. There are multiple benefits to this configuration.
This position lets the smoke go “up, up, and away” from your face and gets a good “draft” going through the Bird’s Nest. Basically, you are not “fighting” the natural thermal convection currents of the system.
Having the Bird’s Nest on your fingers, instead of in your palms, not only allows for air flow up and through the tinder, it allows you to “fold” the nest over and gently “crush” it against the ember you are trying to bring to flame. As you continue feeding air into the system, it may happen that the tinder burns away from the ember without getting the flame going. With the Nest on your fingertips, you simply keep “curling” the edges towards the center to keep fresh fuel in physical contact with the ember.
Finally, when the Bird’s Nest actually flares up, it is on TOP of your finger tips — with the heat going up. Depending upon the actual material used, you can hold the flaming Nest for a L-O-N-G time, without burning yourself, when your fingers are below the heat source (My personal record is 57 seconds!)
I hope you find this description useful. Being able to hold the nest for at least 20 to 30 seconds makes it a lot easier to ignite your fire lay.
Sincerely,
Larry Perkins
Scoutmaster
BSA Troop 202
Deer Park WA
P.S. Yes, that IS a valid email address I put into the contact area this form!
LikeLike
Pingback: Made by Hands: Make it or Buy it? | Survival Sherpa