
by Todd Walker
Being the son of a plumber, I’ve witnessed many inventive ways to stay warm while working on cold steel in frigid winters atop a 700 foot tall powerhouse. From modern acetylene torches to alcohol stoves, plumbers get creative when it comes to heat sources.
Before the time of pressurized gasoline blow torches, alcohol was used as fuel for melting lead and soldering. However, at some point in history, before the modern thermos came about, a smart plumber poured cold coffee from his makeshift milk bottle thermos and slurped cold soup from his lunch pail. This was his ah-ha moment! Hummmm, just add some alcohol to a container stuffed with cotton rags and set it on fire! And the plumber’s stove was born. At least that’s the story I heard told.
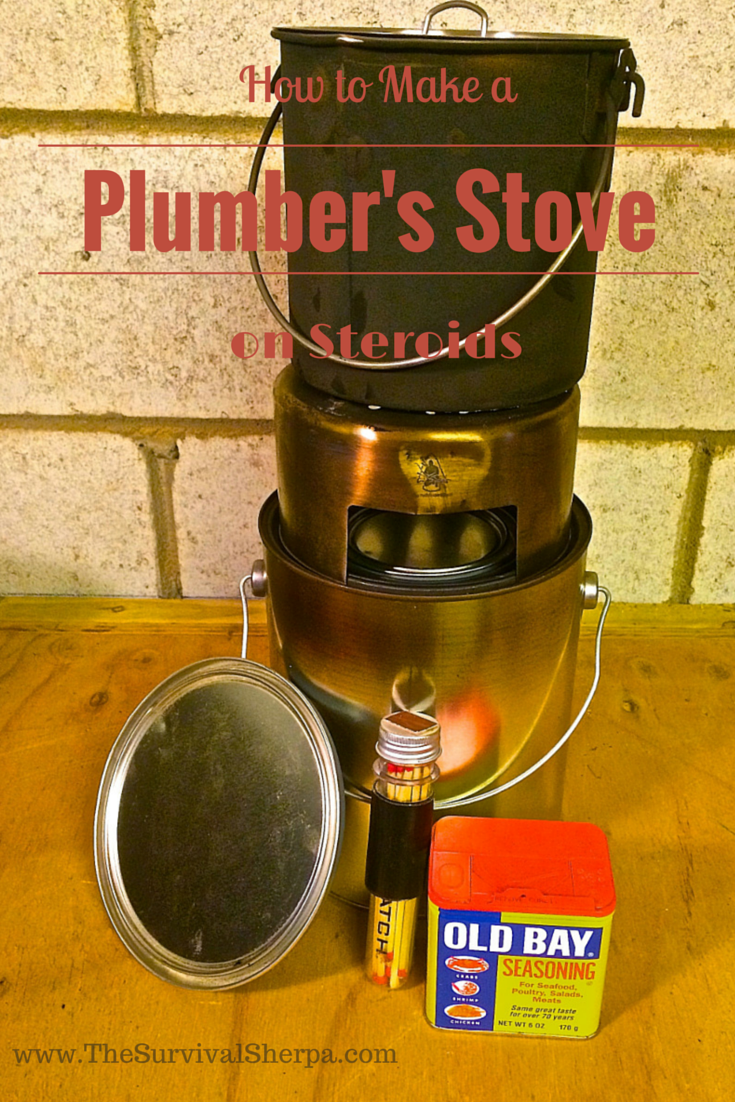
I built a pint-sized plumber’s stove 7 or 8 years ago. It’s a lightweight, self-contained, and portable stove for backpackers (ultra-lighters excluded) and campers. I last used it 5 years ago. Upon re-opening, the denatured alcohol lit up with no problem. I didn’t like the fact that I had to loosen the hose clamp and slide the pot holder down to remove the paint lid. A small annoyance really.
Joshua Shuttlesworth, a fellow self-reliance blogger and Pathfinder brother, happened to post his brilliant version… a larger DIY Hobo Stove, as he dubbed it. He used a gallon paint can and a #3 size can (45 ounces). He has a fancy can opener that removes the can lid in a way that you can seal the can with the lid after it’s been removed. Wish I had one… but I don’t.
But I did have an empty quart paint can nesting in a gallon paint can I’d planned to use for another project. This larger version would feed and heat a whole crew of hungry plumbers!
Check out our video at the bottom of this post to see the Plumber’s Stove on steroids in action.
Here’s how to make your own…
Gather the Stuff
- One gallon metal paint can – box stores sell new empty cans or you could clean an old can
- One quart metal paint can – same as #1
- Platform for quart can inside the gallon can – explained in Step #3
- Roll of toilet paper (cotton balls or 100% cotton material works too)
- Bottle of isopropyl alcohol or denatured alcohol
- Pathfinder Bush Pot Nesting Stove – not required but if you already own one, it fits perfectly in the grooved lip of gallon paint cans
Assemble the Stuff
This is the easy part.
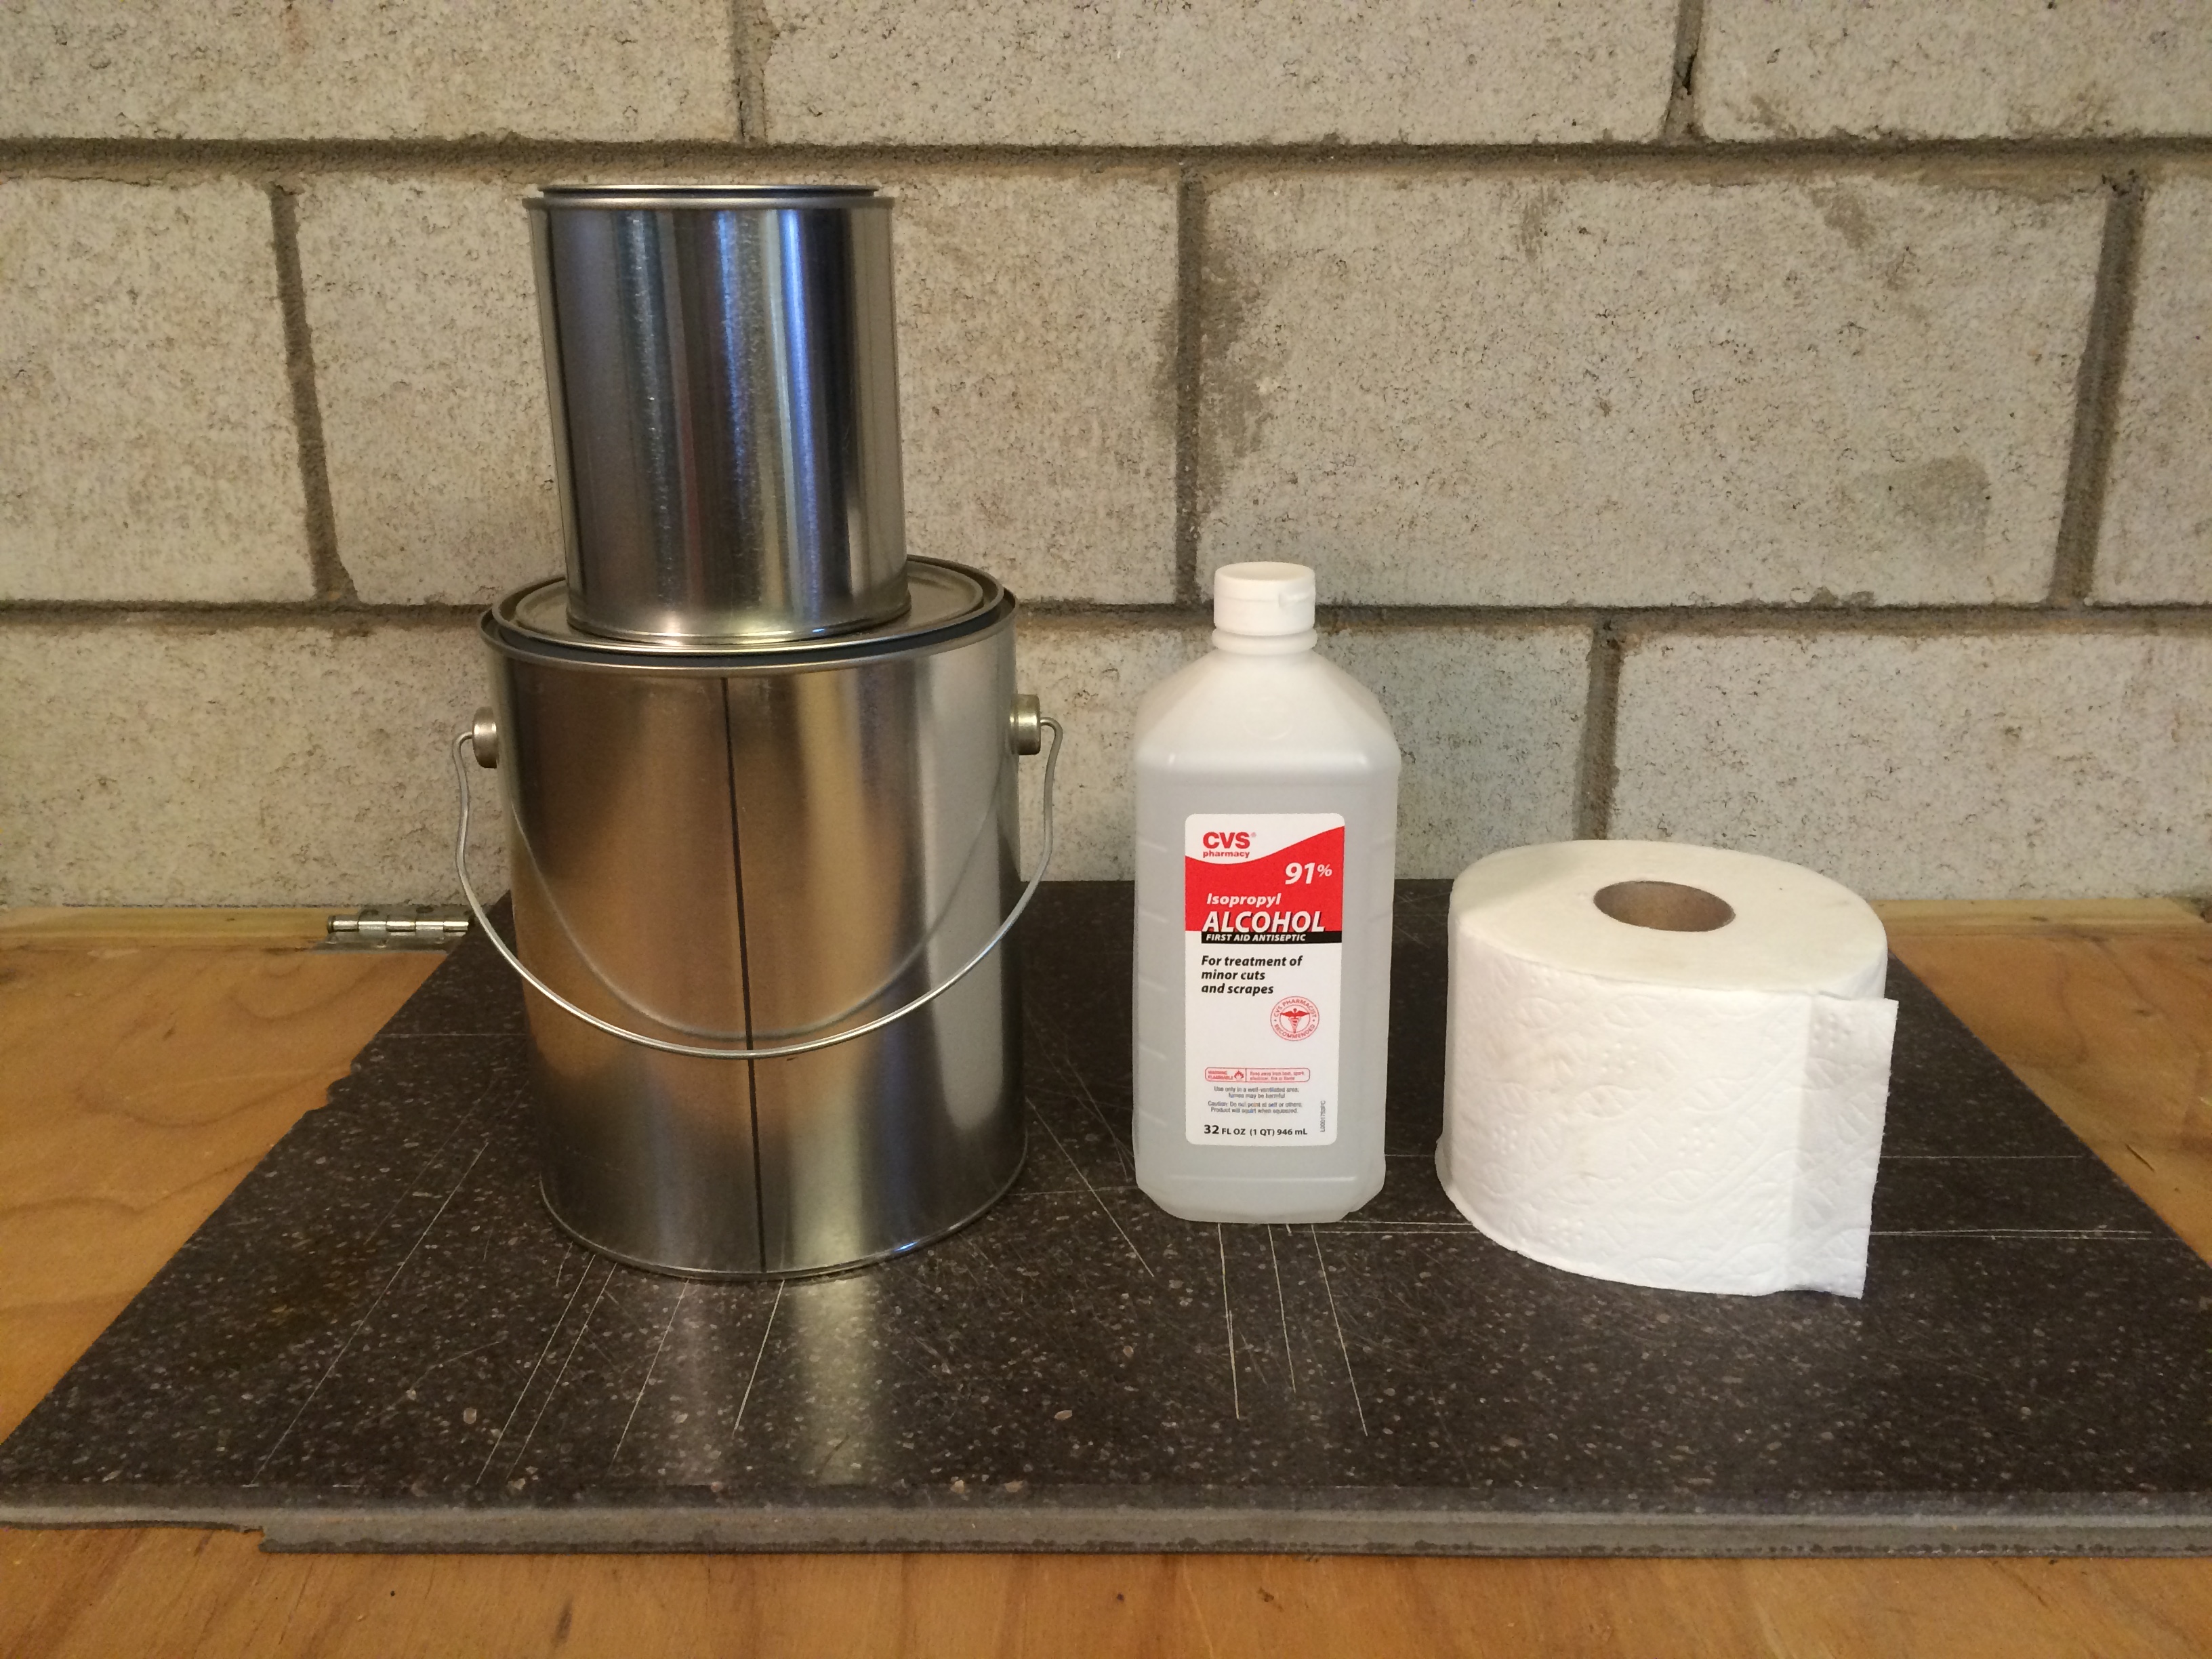
Step 1: Stuff the Can
Remove the cardboard tube from the toilet paper roll. Grip the edge and pull the tube out of the center. Smashing the roll a couple of times seems to loosen the tube enough to slide it out.
DRG buys the larger rolls of TP which wouldn’t fit in the quart can. I removed excess TP from the roll by sliding my finger between the sheets about a 1/2 inch from the outside and ripped it free of the roll. Squeeze what’s left of the roll together and stuff it into the quart can. Place the excess in a ziplock bag and toss it into your camping gear for the call of nature.
Step 2: Add Fuel
Pour the alcohol of your choosing in the TP stuffed quart can. My small plumber’s stove contained denatured alcohol over cotton and burns much cleaner than the 91% isopropyl.
WARNING: Do NOT use gasoline or other highly flammable petroleum-based fuels/accelerates! You’ll explode into flames if you do so.
The quart can held a little less than one 32 ounce bottle of alcohol. Allow the TP to absorb the fuel until completely saturated.
Step 3: Insert Quart Fuel Can
On Joshua’s Hobo Stove, his #3 tin can was tall enough for the flames to breathe oxygen. On my shorter quart fuel can, the flame would not stay lit inside the gallon can for more than a couple of minutes. To remedy my vertically challenged container, I elevated it a few inches by sitting it on a metal bowl I’d bought at a yard sale for a quarter. A large, empty tuna can would probably work too. As an added plus, you’ve got another useable container inside your stove.
Step 4: Ignition
Light the fuel can. Ferro rod sparks will ignite the fumes inside the can. If using a match or lighter, be careful to keep your hand to the side of the stove opening while lighting.
If you plan to use a Pathfinder Nesting Stove to hold cook pots, now is the time to place it on top of the gallon paint can. The flames from the fuel can will reach a foot or more in height.
A common man stove top can be made by adding coat hanger wire across the opening for pots to rest. Or cut a piece of sheet metal 4 inches wide with 1/2 inch notches on the top edge and securing it to the gallon can with a few hose clamps coupled together. You would lose the can’s bail handle but you’d have a functional stove top. The picture of my small plumber’s stove will give you an idea of how to make your own cook top.

Step 5: Cook Stuff

As a test, I boiled about 62 ounces of water in my Pathfinder Bush Pot in 17 minutes inside my shop. Note: Use the plumber’s stove only in a properly ventilated area to avoid carbon monoxide poisoning.
I also tested the boil time with the same amount of water in my backyard bushcraft area with the same results. I thought lifting the Bush Pot about a half-inch over the stove top via my outdoor kitchen tripod would decrease the boil time. Still took about 17 minutes inside and outside.
Thanks again to Joshua for his tutorial that spurred me to make the Plumber’s Stove on Steroids! Overall, I’m very pleased. This stove would be useful as an alternative heating/cooking option when car camping, at deer camp, as a car emergency kit, or added to your emergency preparedness stocks at home.
Here’s our video of the stove in action:
Keep Doing the Stuff of Self-Reliance,
Todd
P.S. – You can also keep up with the Stuff we’re Doing on Twitter, Pinterest, Google +, YouTube, Instagram, and Facebook… and over at the Doing the Stuff Network.
P.P.S – If you find value in our blog, Dirt Road Girl and I would appreciate your vote on Top Prepper Sites! You can vote daily by clicking here or on the image below. Check out all the other value-adding sites while you’re there… 
Thanks for Sharing the Stuff!
Copyright: Content on this site (unless the work of a third-party) may be shared freely in digital form, in part or whole, for non-commercial use with a link back to this site crediting the author. All links in articles must remain intact as originally posted in order to be republished. If you are interested a third-party article, please contact the author directly for republishing information.


Pingback: How to Make a Plumber’s Stove on Steroids for Cooking and Warmth | Modern Homesteader
Take a dollars store stainless steel vegetable steamer. Elevate it. Open it up so it is a little smaller than the base of your pot. Use 2 or 3 hexamine tablets and guess what your boiling water in no time. I use this fishing camping. I can cook or boil water in a mater of minutes and it doesn’t weigh nothing. Peace Brother enjoy BK
LikeLike
Great idea, BK! That’s a great option for lightweight stove gear, brother!
LikeLike
Have you made one of these “plumber’s stoves” out of recycled paint cans or do you make them out of new cans? if so, how do you recommend removing the paint? Do you think the paint cans would make a good “bush pot”?
LikeLike
Good to hear from you Caroline! Hope all is well. The small plumber’s stove was a used paint can. I remember cleaning it out by a little scrubbing. I suppose you could burn it out in a campfire too.
In a pinch, I’d use the one gallon bucket as a bush pot for sure. Not on a regular basis though. Not sure what the metal would do on the seams. A buddy of mine made a rocket stove from a plastic 5 gallon bucket and filled around the pipe with concrete… not to lightweight but it works. I like the idea of using vermiculite and clay. That may be my next stove project. Thanks for sharing the link.
LikeLike
Have you seen this 5 gallon metal pail rocket stove? It would be another alternative if you didn’t have a source of alcohol.
http://www.rootsimple.com/2012/03/a-rocket-stove-made-from-a-five-gallon-metal-bucket/
LikeLike
Pingback: Prepper News Watch for February 13, 2015 | The Preparedness Podcast
Pingback: How to Make a Plumber’s Stove on Steroids for Cooking and Warmth - Prepared Bloggers
Where can you find denatured alcohol? Most places tried sending me to the alcohol aisle. And gave me a blank look when I said you couldn’t drink it.
LikeLike
Lol, go the paint section of hardware stores. If they don’t have it, it’s not a real hardware store. And don’t drink it😜
LikeLike
paint dept of any hardware store or order from Amaxon
LikeLike
a little heads-up re: alcohol: check local prices and availability.
“Denatured Alcohol” is usually ethanol with just enough methanol added to make it poisonous (and non-taxable as hooch). It is getting harder to find as more and more paint/varnish goes to water-based.media.
Isopropyl (“rubbing alcohol”) is propanol (and water). You can find it cheaply on every pharmacy aisle, and it works just as well (for me, anyway, YMMV). Check the label. You’ll usually find bottles marked “50%”, “75%” and “91%”. Go with 91% – why pay for water? Usually just a couple pennies difference in price. Great stuff – stove fuel, first aid disinfectant, non-stinky charcoal lighter.
I like to store/carry mine in stainless steel ‘water’ bottles. (5 years and no gasket deterioration so far). Stick with one color (like red) for non-drinkable fuel. Maybe even some sort of tactile covering (some ranger bands, or something) just so you don’t grab the wrong bottle in the dark.
LikeLiked by 1 person
Good tip, Wyzyrd! Thanks for sharing.
LikeLike
I have just finished making a alcohol stove from a pop can. I used methyl hydrate which is 99.9%. It boiled 2c of water in about 5 minutes. Here’s a video on how to do it:
I’m email you a picture! 🙂
LikeLike
That’s the easiest alcohol stove I’ve ever seen! Thanks for sharing that with us, Caroline! BTW, what email did you send that too? One of my accounts is messed up and can’t receive mail.
LikeLike
I send to Todd Walker . Is that one still good?
LikeLike
Sorry, that was SurvivalSherpa@gmail.com.
LikeLike
Got it. Awesome job,girl! 5 minute boil time right?
LikeLike
About 5 minutes for 2c. I didn’t time it though. I stopped wearing a watch years ago. 🙂
Also, the methyl hydrate we can get around here (used as a de-icing agent) is 99.9% wood alcohol so it doesn’t have added water. Maybe, this gives a somewhat hotter flame. (???)
http://en.wikipedia.org/wiki/Methanol
LikeLike
Very ingenious good work
LikeLike
Great stuff! I wonder how many years pre-made alcohol filled stoves can sit?
LikeLike
Thanks for stopping by and commenting! With a good seal on the container, I’d think many years. That small plumbers stove I showed wasn’t used for several years and lit right up.
LikeLike
Pingback: Skills Might Not Always be Better than Stuff | The Prepper Dome
Pingback: Made by Hands: Make it or Buy it? | Survival Sherpa
Pingback: Made by Hands: Make it or Buy it? | OffGrid Survival Website
Pingback: How to Make a Plumber’s Stove on Steroids for Cooking and Warmth
Pingback: 27 Basecamp Projects Guaranteed to Elevate Skills and Fun in the Woods | Survival Sherpa
Can’t wait to make one of these for my car kit! Thanks for the great vid, Todd. 🙂
LikeLike
Many thanks for reading and watching the stuff, Sarah! Let us know how it turns out.
LikeLike
Pingback: How to Straigthen, Haft, and Fletch River Cane Atlatl Darts | Survival Sherpa
Pingback: Skills Might Not Always be Better than Stuff – Prepper Ways
So creative of you, thank you for posting this.
LikeLike
Glad to. Hope it helps. Thanks for letting me know.
LikeLike
Pingback: How to Make a Plumber’s Stove on Steroids for Cooking and Warmth | Living Green Frugally