
by Todd Walker
When I first discovered this old device, my mind was officially blown at its simplicity. Peter Follansbee makes furniture with 17th century hand tools. His work and research is fascinating! If you search the term “Paring Ladder”, you’ll find his article which is responsible for the idea of this post. You won’t find much else on the internet about this apparatus.

While carving a handmade ax handle in my shop with hand tools, my shaving horse and bench vise proved essential for the process. Lugging my shaving horse to the woods is not something I’d find enjoyable. I modified the paring ladder’s traditional design to meet my need for making wooden stuff at camp.
Woodcraft and bushcraft projects hone self-reliance skills and make camping comfortable. For this build, you get to work with sharp objects in a scenic setting, cutting stuff, lashing stuff, and shaving stuff. What’s not to like?
Hopefully our video will explain the process…
Here’s how to build a shaving horse alternative from stuff found in the woods…
Gather Stuff
- Uprights/Rails ~ I used two standing dead cedar saplings; one was about 3 inches in diameter, the other was 2 inches. Young cedars grow straight. Tulip Poplar (Magnolia) is another straight grower.
- Rungs ~ wood for two ladder rungs. The traditional paring ladder has 3 rungs (I don’t know why).
- Platform ~ a board used as the work surface which supports the working stock. I split and hewed a 5-6 inch diameter dead cedar log which was about 4 foot long.
- Cordage ~ paracord, tarred bank line, or any strong lashing material.
- Tools ~ ax, knife, saw, wooden maul, wood wedges, and draw knife.
Step #1: Harvest Uprights
Cut two uprights about 8 foot long with an ax or saw. Once down, de-limb the rails by cutting from the trunk end of the tree toward the top of the tree. Removing limbs in this fashion prevents the limb from splitting strips of sap wood off the pole.
You can save the tops of the saplings for ladder rungs if they are large enough (2+ inches diameter). I used two split staves of cedar from half of the log used to hew my platform board. I’ll explain in a later step.
Step #2: Lash the Uprights
With the rails even and laying side by side, apply a tripod lash about 18 inches (elbow to finger tip) from the top of the poles. Below is our Tripod Lashing tutorial if you need to learn this knot.
Once you’re done lashing, spread the uprights to make a “V” at the intersection. Lean the “V” against a tree with the bottom spread wide and about 3 to 4 feet from the base of the tree.
Step #3: Attach Rungs
Measure down (eyeball it) about a foot below where the poles cross and make a score mark for the location of the first rung. Use either a square or diagonal lashing to secure the rung to the rails. Check out our square lashing tutorial for assistance.

Add a second rung about a foot below the top rung in the same manner as above. This rung will be longer than the top rung since the base of the uprights are spread apart.
Step #4: Hew a Platform Board
I had originally planned to bring a 2 x 6 of dimensional lumber to camp for this piece. I was glad I forgot. This gave me an opportunity to split and hew a 6 inch diameter cedar log (maybe 5′ long) left over from when I built my shelter two years ago.
Lay the log to be split on the ground. I like to place long logs in a “Y” branch on the ground when splitting. Start a split in the log with your ax. Continue the split with wooden wedges until the two pieces are separated. Repeat the process to split off a section of one half log to form a board about 2 inches thick.
Of course, my cedar log was twisted and didn’t cooperate when I tried to split off a board. It split into two wedged billets. Not wanting to chance the same fate for the other half log, I hewed the round side down with my ax.
A Possum Mentality Note: Save all the wood chips and bark for future fire tinder/kindling.
Your platform board should be long enough to fit between the two rungs with the lower end reaching mid-thigh when in place. Your thigh will press down on the board to create the pinching pressure needed to secure stock in the shaving ladder.
Step #5: Notch the Platform Board
Place the platform board between the two rungs. Test the fit and length so that the bottom of the platform board reaches your thigh and about 4 inches extends past the top rung. Score the bottom of the board where it rests on the second rung.

Seven notch fits the wedged rung perfectly
Satisfied with the fit, remove the board for notching. Use your ax and a maul or baton and make a notch where you marked. The notch should be about 3/4″ deep. Not deep enough to compromise the boards strength, yet deep enough for the board to bite into the rung.

A view from underneath
Since my rungs were made of wedged billets, I cut a seven notch which mated very well with the rung. If using round rungs, be sure to carve the notch enough to fit securely.
Slip the platform board in place with the notch on top of the second rung. The notch should keep the board from slipping in use.
Step #6: Use Your Shaving Ladder
Lift the bottom of the board on the fulcrum (second rung) and place the wood you want to shave between the board and the top rung. Release the board to rest against the top rung.
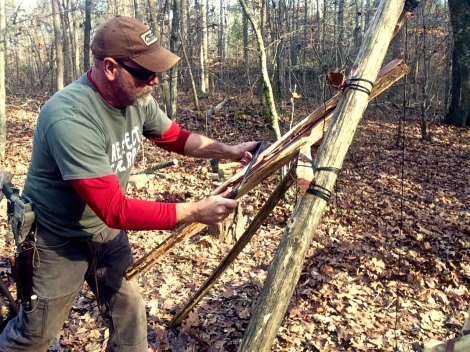
Pinch the work piece with pressure from your thigh
Put downward pressure on the platform board with your thigh to pinch the wood against the top rung. Use your draw knife to begin shaving. To turn your work piece, lift the platform to release pressure, turn the wood, and shave some more.
To adjust the height of the platform, raise or lower the ladder on the tree. There are more ideas I’d like test with the shaving ladder. I’ll update you when I do.
Straight grained green wood is a pleasure to carve on this paring ladder. I also shaved a piece of seasoned cedar with no problems… except for the occasional knot. All sorts of camp crafts can be made using a paring ladder.

The paring ladder held a section of seasoned Beech in place with little effort
Even in your shop or garage, it won’t take up as much room as a shaving horse. For a shop shaving ladder, I’d actually make the ladder more permanent and designed like the one in Peter’s blog from the first paragraph.
If you’ve ever used a paring ladder, I’d really like to hear your ideas and learn some new tricks.
Keep Doing the Stuff of Self-Reliance,
Todd
P.S. – You can also keep up with the Stuff we’re Doing on Twitter, Pinterest, Google +, YouTube, Instagram, and Facebook… and over at the Doing the Stuff Network.
P.P.S – If you find value in our blog, Dirt Road Girl and I would appreciate your vote on Top Prepper Sites! You can vote daily by clicking here or on the image below. Check out all the other value-adding sites while you’re there… 
Thanks for Sharing the Stuff!
Copyright: Content on this site (unless the work of a third-party) may be shared freely in digital form, in part or whole, for non-commercial use with a link back to this site crediting the author. All links in articles must remain intact as originally posted in order to be republished. If you are interested a third-party article, please contact the author directly for republishing information.


Pingback: A Glorified Shaving Horse: How to Build a Paring Ladder in the Woods – Survivalot
Ill be heading back into the woods as soon as i can to build this. Great article thats two projects that you have given me since i started reading your blog the other week
Thanks for such a great site
John
Nova scotia, Canada
LikeLiked by 1 person
I’m so glad you like the project and our site, John! Let us know how it turns out for you up there.
LikeLike
Genius in simplicity. Peter Follansby is quite a talented guy. Great find and great post.
LikeLike
Thank you, George. He does some amazing stuff with wood!
LikeLike
Pingback: Survival News 12/12/15 - Survival By Preparedness
Great skills my friend!
The forest offers all the resources we need.
We have only to learn how to use them.
You show us another good lesson!
Beautiful post!!!!
Thanks Todd!
LikeLike
Thank you, brother!
LikeLike
Pingback: Prepper News Watch for December 14, 2015 | The Preparedness Podcast
Pingback: 27 Basecamp Projects Guaranteed to Elevate Skills and Fun in the Woods | Survival Sherpa
It’s good to see other people using them! I work at Plimoth Plantation as an Historic Arts and Trades Artisan, and have used and repaired the paring ladder in that article. They’re great tools that were once a mainstay of the cooper’s trade, but make short work of clapboards, and other riven stock. Kudos on taking this device into more than just a reproduction setting!
LikeLike
I stop and look at various “green woodworking” and bodger sites
when I saw this on follansby’s site I thought that this would be simpler than building a shaving horse
I had a ladder in the barn, some rope and a 1×8 so I just used them to build an expedient paring ladder…the rope kept the 1×8 from wandering about
it made a pleasant change from handholding staves for bark removal
interesting post as always
LikeLike
Love this! Have been meaning to make a shaving horse for a long time, this design will do me just fine 🙂
(oh, by the way, just to be a pedant….it’s pronounced pairing – sorry, but with the surname of Parr, I felt the need to correct LOL)
LikeLike
Thanks, Mike, for the comment and correction. 🙂
LikeLike
Pingback: How to Build a Carving Bench from a Log (Rope Vise Plans Included) | Survival Sherpa
Pingback: How to Build a Carving Bench from a Log (Rope Vise Plans Included) - The Prepper WebThe Prepper Web
Pingback: The Self-Reliance Manifesto - The Organic Prepper
Pingback: The Self-Reliance Manifesto: More Than 300 Resources to Guide You on the Path to Radical Freedom | From the Trenches World Report
Pingback: The Self-Reliance Manifesto | Michigan Standard
Pingback: The Self-Reliance Manifesto | We Seek the Truth!
Pingback: The Self-Reliance Manifesto: More Than 300 Resources to Guide You on the Path to Radical Freedom - Patriot Rising
Pingback: The Self-Reliance Manifesto: More Than 300 Resources to Guide You on the Path to Radical Freedom | TheSurvivalPlaceBlog
Pingback: The Self-Reliance Manifesto: More Than 300 Resources to Guide You on the Path to Radical Freedom – Tactical Buzz
Pingback: The Self-Reliance Manifesto: More Than 300 Resources to Guide You on the Path to Radical Freedom | Family Survival Headlines
Pingback: The Self-Reliance Manifesto: More Than 300 Resources To Guide You On The Path To Radical Freedom | | Quantum Reality
Pingback: My Top 4 Most Useful Basecamp Builds | Survival Sherpa
Pingback: Wild Resources: Only a Fool Comes Home Empty Handed! | Survival Sherpa
Pingback: The Top 7 Survival Sherpa Articles of 2016 | Survival Sherpa
Pingback: The Self-Reliance Manifesto: More Than 300 Resources to Guide You on the Path to Radical Freedom | Ready Nutrition
Pingback: The Self-Reliance Manifesto: More Than 300 Resources to Guide You on the Path to Radical Freedom | The Olive Branch Report
Pingback: The Self-Reliance Manifesto: More Than 300 Resources to Guide You on the Path to Radical Freedom - The Survival Place Blog
Pingback: The Self-Reliance Manifesto: More Than 350 Resources to Guide You on the Path to Radical Freedom - United Push Back
Pingback: The Self-Reliance Manifesto: More Than 350 Resources to Guide You on the Path to Radical Freedom - geopolitic
Pingback: The Self-Reliance Manifesto: More Than 350 Resources to Guide You on the Path to Radical Freedom - via NAMELY LIBERTY
Pingback: The Unfathomable is Upon Us – Yet, There Are Ways to Prepare – Dispatches from the Asylum