
by Todd Walker
As an eighth grade math teacher, a lot of the stuff we teach kids makes no sense. Students rarely get a chance to apply mathematics in the real world. We’re too busy pushing through the state mandated curriculum to get our hands dirty applying the concepts being taught.
A little dirt time in the woods or a homestead would go a long way in helping students (and teachers) trade theory for action. So put on your boots. School of the Woods is in session!
Like any other skill, estimating distance takes practice. The method I used in the video below is based on the Pythagorean Theorem → a² + b² = c². Don’t freak out about the formula. We won’t even use it!
Here’s the cool thing about this method…
There’s no math calculations involved! No square roots, no dividing, no multiplication, no algebra. If you can walk a straight line and count simple steps, you can use this method to estimate distance. In fact, all you really need is a stick.
Estimating Distance with Right Triangles
Estimations are more than guessing. They are based on calculations and useful for many tasks in bushcraft, homesteading, and outdoor self-reliance.
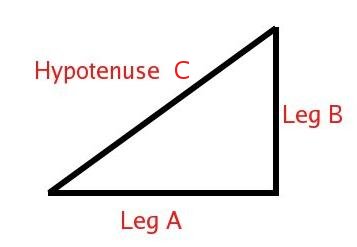
Here’s a quick refresher on geometry terms we’ll be using. A right triangle has two short sides called legs (a & b). The long side of the triangle is the hypotenuse (c).
What if you needed to ford a river, build a fence, or erect a foot bridge over a creek in the woods? I’ve never seen any of my woodsmen friends pull out a 100 foot measuring tape from their pack. But you can get an accurate estimation of width without a measuring device.
Here’s how it works…
Step #1 ~ Locate a Landmark
Note: This method requires a fair amount of open space along side the river or creek. Hilly terrain will affect your estimate as well.
Drive a stick in the ground to mark Point A
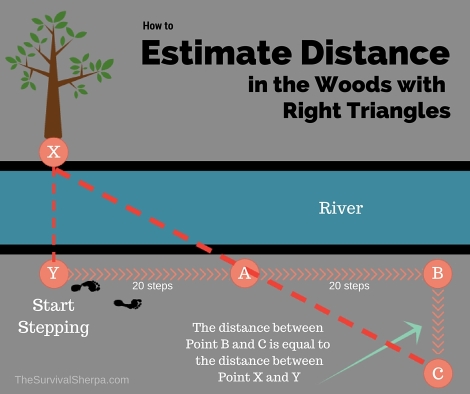
Spot a landmark (tree or rock) across the divide you intend to cross (Point X). Standing directly across from the landmark, mark the ground with a stick or scrap of your boot. Point Y is where you begin counting your first 20 steps.
Step #2 ~ Start Stepping
Turn 90 degrees away from Point X and take 20 steps in as straight a path as possible. Drive a stick in the ground at your 20th step. This is Point A. The stick should be tall enough to see later in this exercise. You may want to tie a bandana or other material to make it easy to spot.
Step #3 ~ More Stepping
Continuing in a straight path from Point A, take 20 more steps. Mark this spot as Point B with a small stick or rock.
Step #4 ~ Turn 90º
Standing on Point B, turn 90º with your back towards the river or ravine. Begin walking perpendicularly away from the river. Be sure to count your steps. As you step, look back towards the stick on Point A. Stop when you visually line up with Point A and Point X (the landmark across the river). This is Point C on the diagram.
The number of step from Point B to Point C is the approximate distance across the divide.
In an emergency situation where you may need to cross a river or creek, a tree could be felled to help you safely navigate the divide. Knowing the width of the river or creek now, how can you estimate the height of a tree you’ll need to bridge that gap?
We’ll cover estimating height on our next post. Stay tuned!
A little update. I used my video in Math class yesterday. Afterwards, we went outside to test the theory in the real world. Have some fun and take your kids out and practice this self-reliant skill.
Keep Doing the Stuff of Self-Reliance,
Todd
P.S. – You can also keep up with the Stuff we’re Doing on Twitter, Pinterest, Google +, YouTube, Instagram, and Facebook… and over at the Doing the Stuff Network.
P.P.S – If you find value in our blog, Dirt Road Girl and I would appreciate your vote on Top Prepper Sites! You can vote daily by clicking here or on the image below. Check out all the other value-adding sites while you’re there… 
Thanks for Sharing the Stuff!
Copyright: Content on this site (unless the work of a third-party) may be shared freely in digital form, in part or whole, for non-commercial use with a link back to this site crediting the author. All links in articles must remain intact as originally posted in order to be republished. If you are interested a third-party article, please contact the author directly for republishing information.


Pingback: How to Estimate Distance in the Woods with Right Triangles – Survivalot
sheesh reading didn’t help…i was one of those “charming” students who my teachers felt sorry for and passed me after 3 yrs in 9th grade math *just for trying…BUT i can walk into a room and, at a quick glance, tell you how many sheets of dry wall you will need to get the room done 😉
LikeLike
You’ve got lots of skills, my friend! Even if math ain’t one of them 😉
LikeLike
Well Sherpa, you did it again. You managed to put into words,and practice, an easy reliable method of utilizing more of that ‘useless’ knowledge that we acquired in school. Another great article.
LikeLike
Haha, I appreciate the kind words! I have to break it down enough for me to understand 😉
LikeLike
Pingback: Prepper News Watch for January 6, 2016 | The Preparedness Podcast
This is a great idea for a survival scenario and … without the ‘classic’ military Mills compass.
Knowledge is the key, always!
Thank you again brother !
Mattia
LikeLike
A compass is a handy tool in the woods for more than direction, as you already know, Mattia. My students really enjoyed practicing this method at school this week. Next up is estimating height. 🙂 Take care, my friend!
BTW, I started my first kuksa from a cherry burl. Got the bowl started and the wall broke off. Ugh!
LikeLiked by 1 person
Absolutely true Todd! I can’t wait the new lesson!!!!
Noo! So do you have to restart another project?
LikeLiked by 1 person
This is one of those things that makes complete and utter sense, and yet I won’t be able to wrap my head around it *until* I go out and try it. Sometimes I just can’t learn without doing. Thanks for sharing the technique, I would never have thought of it, but your presentation of this made it incredibly clear, so I’m confident that once I go experiment with application, it will all click into place in my head! Thanks!
LikeLike
It’s all about doing the stuff, brother. That’s the only way I learn and retain a skill. Let me know if it makes more sense once you do it. Thanks, wade!
LikeLike
Reblogged this on Starvin Larry.
LikeLike
Pingback: 4 Easy Ways to Estimate Height in the Woods | Survival Sherpa
It will be hard for people to walk in 90 degrees to make this system work though. if they remember 3,4,5 for A,b,c they can probably make a better 90 degree turn at points y and b. also they must use a sight stick to make the Y-A-B line straight also. If you place a sight stick further away from Y and sight through Y to x, it ill make it easier to make an accurate 90 degree turn, which, of, are critical in the woods.
LikeLike
Pingback: The Top 7 Survival Sherpa Articles of 2016 | Survival Sherpa