
by Todd Walker
My uncle Emmett introduced me to woodcarving in grade school. He taught me to carve a “ball in a cage” from a single block of balsa wood in the church basement. Years pasted as did my interest in wood carving. It’s funny how our interests come full circle in life.

After 40 years, I was reintroduced to the traditional skill of greenwood carving. Local, sustainable trees are used to make objects for everyday use while learning old-world skills. Handmade spoons, cups, and bowls are hidden within these renewable resources.
For over a year now, I’ve been whittling on wood to create something more than a camp pot hook. It’s all part of my addictive journey of self-reliance and…
Freedom from Electricity
Do I love and use electricity? You bet!
However, my personal space in the woods is my favorite location for carving… or doing most anything else. Dependence on electricity is not an option. Out there I’m transported back to a time of Doing the Stuff with cordless-tools held by hands, my hands. My collection of simple hand tools overshadows my skill level. I’ll keep Doing the Stuff until my skills catch up.
One tool my semi-permanent shelter was missing is a dedicated carving bench. Add this to my Paring Ladder, and a future pole lathe, and my no-electric-power shop in the woods will be fully functional. The forest provides the raw building materials. It’s my job to collect them.
I’ve included a video tutorial for those who prefer moving pictures.
Here’s what you’ll need to make your own…
Carving Bench from a Log
Material and Tool List
- A hardwood log about 2 to 3 feet long and 10 to 12 inches in diameter
- 4 poles for legs and a few other sticks along the way
- Wooden pegs for the peg holes – again, more sticks
- Cordage – something for the rope vise and smaller stuff for lashing
- Chainsaw or crosscut saw – depending on how vigorous of a project you desire
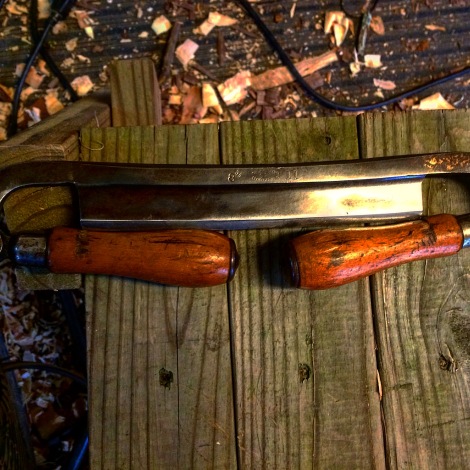
- Ax and knife – a drawknife is optional but really useful if you’ve built a paring ladder
- Auger – 1 inch minimum
Ideas for this design came from photos of two Facebook groups of which I’m a member:
- The Pathfinder School Learning Center (Dave Canterbury’s work bench in particular)
- Craftsmen on Spoon Carving, Green Woodworking and Sloyd
I highly recommend both groups if you’re on Facebook and pursuing self-reliance.
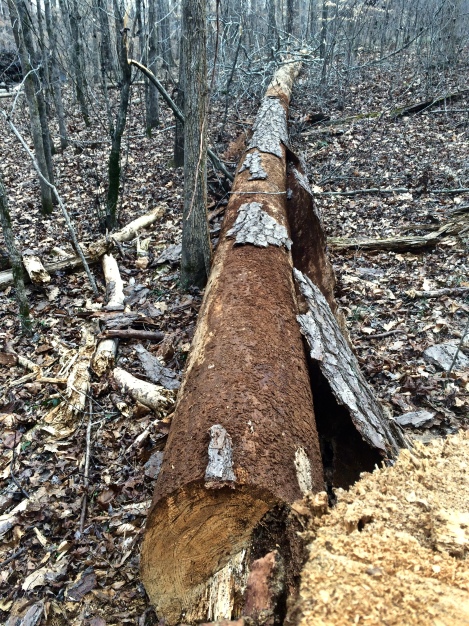
Step 1: Cut a Log
The reason I carried my chainsaw to the woods that day was to cut some dead cedar for a couple of sitting bench projects. Another heavy cutting project was a huge dead pine, not within reach of my shelter, but adjacent to a spot boy scouts camp. It needed to be felled. I also needed a hefty log for a carving bench.
The pine widow maker is down. Talk about a fat lighter’d resource!
I cut a limb off a red oak downed by a storm a year ago and hauled it back to base camp. Whatever tree you use, it should be hardwood and about the dimensions given above.
Step 2: Cut Notches
Make three perpendicular cross cuts almost halfway through the log. The first cut will be about 5 inches from one end. Now cut at a 90 degree angle from the end of the log to the base of the first cut to remove this section of wood. This will be the end shelf of your bench and platform for the rope vise.
Make the second cross-cut 5-6 inches from the first cut. The third cut goes in about 18 inches (depends on how much flat work space you want) from the second cut. The space between the second and third cut will become your middle bench area.

Save the half-moon sections for spacer blocks… or firewood.
Score a line connecting the bottom of the second and third cuts along the sides of the log. Make several cuts about 2 inches wide on the middle section of the log down to the scored lines. Strike the 2 inch sections with the butt of your ax or maul to break them loose. Remove and save these half-moons as spacers for wedging stock on the bench.
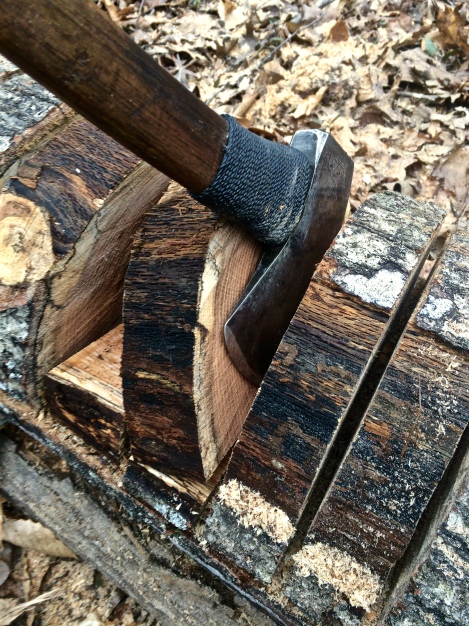
A good smack with an ax usually removes the half-moon blocks.
The base of the middle section will be uneven after removing the half moons. Use your ax to hew this section of your bench smooth. Use a wooden maul to hammer the ax through hard-to-reach sections until the surface is relatively flat.

Hewing the work surface.
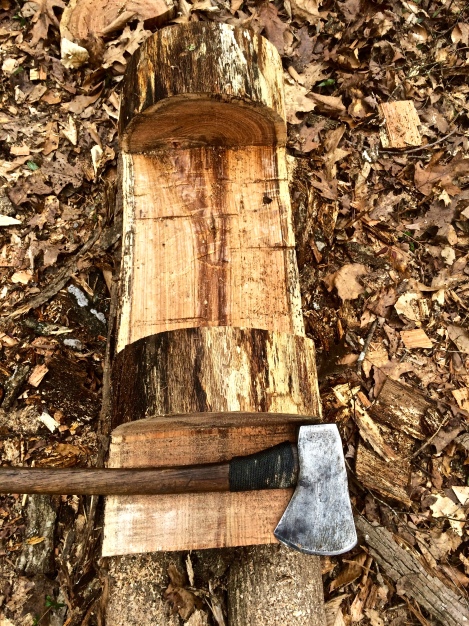
Ready for holes.
Step 3: Bore Holes
Use a timber framing auger or brace and bit to bore a hole all the way through the center of the end shelf. This hole will serve as part of your rope vise. My auger is a vintage 1-1/4 inch timber frame tool DRG and I found at an antique store. I’d say one inch holes would be the minimum for this kind of project.
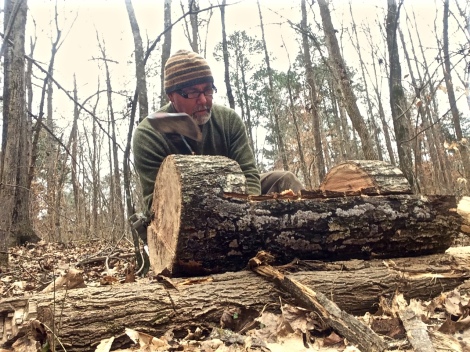
Two parallel logs work well to hold the bench steady when crafting.
Lay the bench down on two other logs as supports. Bore 4 to 6 holes in the middle section of the bench. Make these peg holes about 2 knuckles deep. I marked my auger bit with duct tape at the two-inch mark as a depth gauge. Two holes should be about 4 inches from one wall in the middle section and about 4 or 5 inches apart crosswise. Repeat the hole spacing on the other interior wall of your bench. I added two more peg holes in between these four holes for added adjustability.

The best shot I had of the peg holes.
Debark the log with your ax. Turn the bench over with the work surface parallel to the ground on top of the support logs. Bore holes at each of the four corners to accept your bench legs. Use the same depth gauge for these holes you used for the previous holes. However, you need to angle these leg holes out from the center line and middle of the log.

A leg for each corner.
Here’s a tip for keeping the legs in line with one another. After boring one leg hole, cut and prepare a leg and insert in the first hole. Now you have an angled leg to visually line up the opposite leg hole as you bore the remaining holes. Move the leg to another hole as needed to sight your angles.
Step 4: Make Legs
Since I have a good supply of standing dead cedar, I used 2 to 3 inch diameter poles for my legs. Plus, cedar is rot-resistant. I cut my four legs longer than I thought was needed and trimmed them to proper length later.
I used my paring ladder and my new foldable draw knife to taper the narrow end of each leg. An ax and/or knife is all you really need, though. The tapered end should fit in your leg hole snugly at the one inch mark. You’ll drive the legs into the holes later for a secure fit.
Step 5: Cut Legs to Height
When your satisfied with the final leg length for your bench height, pound the legs into the holes with an ax or maul. Chamfer the ground-end of the legs to help prevent “mushrooming” as your strike these ends.
I cut my legs so that my bench is about waist height. This may prove to be too high. I can always trim the legs but can’t add wood back to the legs.
Step 6: Build the Rope Vise
I had originally thought I’d use a loop of rope held down with my foot to secure stock on the end shelf. However, the tensioning device for my take down bucksaw came to mind as I kneeled on the ground measuring my rope.
Ah ha!
Cut a cross brace and attach it to the two end legs under the end shelf. Tie the two intersections with square lashing about a foot off the ground. Tarred mariners line works great for this application.
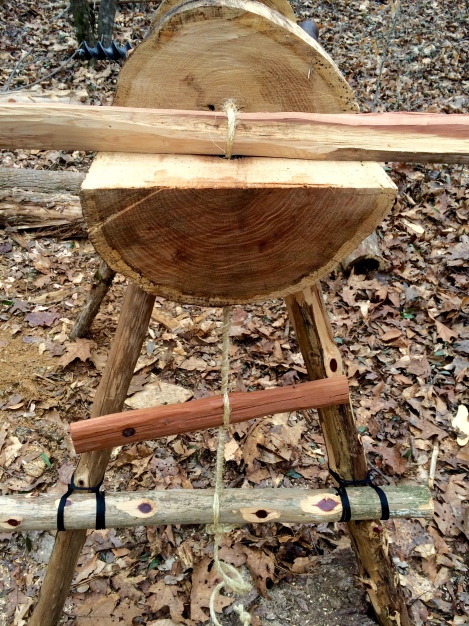
Fully assembled rope vise holding stock on the end shelf.
Feed a loop of rope through the end shelf hole from the underside of the bench. Place a stick in the loop on top of the end shelf to prevent it from dropping out of the hole. Tie the loose ends of the rope around the cross brace. I used a fisherman’s knot. Leave enough slack in the loop for spoon blanks to fit in the loop on top of the end shelf.
Next, cut a stick that will serve as a winding paddle in your rope. The paddle needs to be long enough catch on the bench legs, but not so long that you can’t twist it between the legs. Insert the paddle in the middle of the rope with stock in the loop on the end shelf. Now wind the rope tight and allow it to rest on one or both of the legs.
If the stock on the end shelf is loose, twist the rope a few more times. This rope vise allows you to hold down wood very securely. This vise is not a quick release system but it will hold what needs to be held.
Step 7: Cut Pegs
Cut two to four pegs measuring about 4-5 inches above the work surface when inserted in the peg holes. Taper each peg end as you did the legs. The only difference is that the pegs are smaller in diameter.
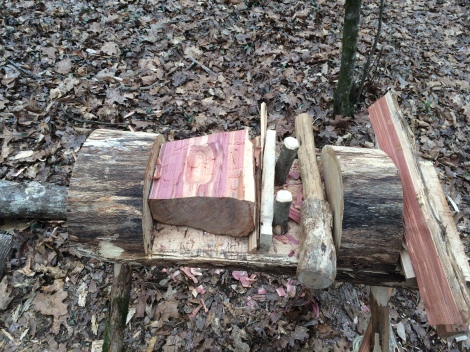
Pegs with wedges shimmed to hold a large block of cedar firm. I started gouging a bowl on this stock.
The adjustable pegs on the middle section gives you options for a variety of wood sizes. Simply move pegs to fit the width of your work piece. Cut a few wooden wedges and shim the stock tight between the pegs and end wall. You could also shim pieces between any configuration of pegs on the work bench surface. This center section will be an excellent way to hold larger projects like bowls and kuksas. Plus, I now have another flat, horizontal surface which always comes in handy around camp at supper time.
Your bench is ready for work!
Keep Doing the Stuff of Self-Reliance,
Todd
P.S. – You can also keep up with the Stuff we’re Doing on Twitter, Pinterest, Google +, YouTube, Instagram, and Facebook… and over at the Doing the Stuff Network.
P.P.S – If you find value in our blog, Dirt Road Girl and I would appreciate your vote on Top Prepper Sites! You can vote daily by clicking here or on the image below. Check out all the other value-adding sites while you’re there… 
Thanks for Sharing the Stuff!
Copyright: Content on this site (unless the work of a third-party) may be shared freely in digital form, in part or whole, for non-commercial use with a link back to this site crediting the author. All links in articles must remain intact as originally posted in order to be republished. If you are interested a third-party article, please contact the author directly for republishing information.


Beautiful work Todd! I followed also the work-in-progress in your instagram.
It’s a very reliable tool made in ‘pioneer style’.
Again…and again and again a great tutorial!
Mattia
LikeLiked by 2 people
Thanks, brother! It’s a fun journey together, this self-reliance stuff 🙂
LikeLiked by 1 person
Yes a wonderful journey, full of new discoveries!
LikeLike
This is fantastic. I love reading your stuff, and though i don’t have a place to set up a permanent camp at the moment, I’m learning a lot about what I can do, and experimenting with that knowledge here and there! Thanks for sharing!
LikeLike
Really appreciate your kind words and friendship, Wade. Glad to share what I’m doing with folks!
LikeLiked by 1 person
The windlass clamping system you made for it is a great idea.
LikeLike
Thank you, Andy! Just checked out your sites and really like what you guys are doing… especially with kids 🙂
LikeLiked by 1 person
Thanks
LikeLiked by 1 person
Pingback: Survival News 02/26/16 | Survival Pulse | Daily Survival & Prepper News
Pingback: The Self-Reliance Manifesto: More Than 300 Resources to Guide You on the Path to Radical Freedom - Patriot Rising
Pingback: The Self-Reliance Manifesto: More Than 300 Resources to Guide You on the Path to Radical Freedom | TheSurvivalPlaceBlog
Pingback: The Self-Reliance Manifesto: More Than 300 Resources to Guide You on the Path to Radical Freedom – Tactical Buzz
Pingback: The Self-Reliance Manifesto: More Than 300 Resources to Guide You on the Path to Radical Freedom | Family Survival Headlines
Pingback: The Self-Reliance Manifesto - The Organic Prepper
Pingback: Woodworking Bench Vise | Purathrive review
Pingback: Wild Resources: Only a Fool Comes Home Empty Handed! | Survival Sherpa
Pingback: The Top 7 Survival Sherpa Articles of 2016 | Survival Sherpa
Pingback: How to Build a Carving Bench from a Log - TheSurvivalSherpa...... - Woodwork Cafe
Pingback: The Self-Reliance Manifesto: More Than 300 Resources to Guide You on the Path to Radical Freedom | Ready Nutrition Official Website – Healthy Living, Food Storage, Preparedness, Recipes And More
Pingback: The Unfathomable is Upon Us – Yet, There Are Ways to Prepare – Dispatches from the Asylum