
by Todd Walker
Atlatl Series (Part I) – Ancient Atlatls: How to Make a Down-N-Dirty Spear-Thrower
Having built an atlatl in Part I, you now need to make a straight stick to launch. In this tutorial, we will make river cane atlatl darts from scratch. Even if you haven’t made an atlatl, primitive archery enthusiasts can use the same technique in arrow making by adjusting the nock end for a bow string.

Atlatl Darts
I was called out by a gentleman about using the term “spear-thrower” in the title of my first post on making atlatls. If you’ve read my article, you quickly find that the projectile thrown from an atlatl is a flexible dart. Spear conjures images of a caveman tossing a heavy, rigid sapling at prey or predator. Atlatls propel a light, flexible spear (dart). I often wonder about the paleo-genius who first discovered and leveraged this technology without the benefit of modern physics. He probably opened a cave classroom illustrating his invention on stone walls.
A month after my atlatl class with Scott Jones (Workshops at the Woods), he offered the companion class on making atlatl darts and arrows with his friend and fellow Georgian, Ben Kirkland. Both of these gentlemen are experts in primitive technology and excel in effectively sharing tribal knowledge.
River cane is said to be our modern day equivalent of plastic to indigenous tribes in the southeastern United States. Scott made several river cane practice darts for our class to throw. We added duct tape fletching which I’ve used before to make expedient arrow fletchings. Before adding feather fletchings, duct tape can be applied to test the dart’s flight. Satisfied with the performance of a dart, you can easily remove the tape and fletch the shaft with real feathers.
Heat and Bend…
No matter what material you choose for your shaft, straightening darts or arrows require heat – not by hanging them from barn rafters as Scott has been told by the uninitiated. His mantra on the laborious process is… “Get off your ass, go out and start a fire, and straighten your d*mned arrows.” On that 90 plus degree day in July, we built the fire and sweated to un-bend cane in pursuit of a straight dart.
Here’s what you’ll need to straighten shafts:
- River cane
- Leather gloves
- Leather knee pad
- Knife and/or fine-tooth saw
- Fire
A roaring fire is not required to heat and bend shafts. In fact, I retreat to my shop in the Georgia heat and use my DIY Plumber’s Stove and/or a soldering torch. Call it cheating if you like, but I’ll take a cool shop with a small fire when straightening lots of shafts in the summer.
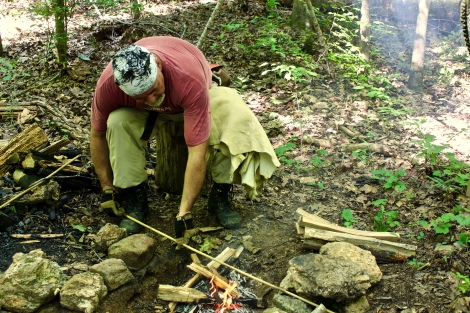
Keep the cane moving through the flames
As for cane size, the large end (growth nearest the ground) should be approximately 1/2 inch in diameter. The small end will likely be about 1/4 to 3/8 inch (pencil-size) at about six to seven feet. The large end will be the forward end of your dart with the smaller end serving as the nock. Before cutting to length (6-7 feet), leave extra cane on both ends for gripping in the heat and bend process described below.
Take a seasoned length of river cane and remove the branches and leaf sheaths. I break off the branches with my hand in a swift, downward motion and carefully trim the stubs even with a sharp knife. Use of a thumb lever with your knife to gain needed control to prevent accidentally cutting into the shaft.
Now begins the repetitive process of heating and bending. Sight down the shaft to locate bends. Move the bent section of cane through the fire in a constant motion. How long? Until the area is evenly heated. Experience will be your best guide. Leather gloves are recommended.
Once heated, place a folded leather pad or insulation layer over your knee, apply gentle pressure to the bend in the same fashion you’d use to break a stick over your knee – only with less pressure. I found a slight rolling motion against the knee yields good results. Allow the heated shaft to set for a few seconds on the knee before checking for straightness. Sight for more bent areas and repeat… and repeat… and repeat… and… repeat. You’ll eventually create a straight dart if you stick with the process.
Cut Cane to Length
There are no set design formulas for atlatl dart lengths. The acceptable guideline from experienced dart-throwers is about three times the length of your atlatl.
Once you have a straight shaft, beaver-chew with a knife through the cane to prevent splitting. Beaver-chewing is to make a series of shallow cuts around the circumference at the cutoff point. Make a few passes until the cane easily snaps off. A fine tooth saw works as well.

Shirtless Scott Jones going the abo route and cutting cane by abrading with a stone. It was hot that day!
Leave enough hollow portion on the small end of the cane for a nock to mate with the spur end of your atlatl – 3/8 of an inch ought to do it. You can always take more stock off but can’t put more back on. Chamfer the inside of the nock with the tip of your knife to form a female funnel of sorts. Test the fit on your spur and tweak as needed to insure a solid fit. If you’re using a “quickie” bamboo atlatl described in Part I of this series, detailed attention to the nock is not as important.
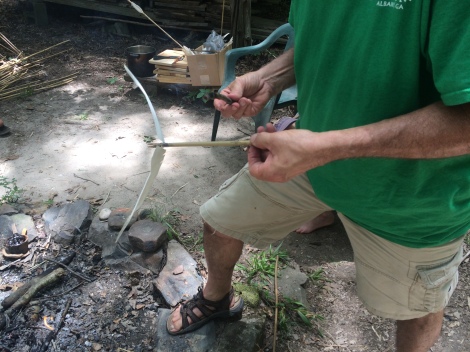
Hafting Darts

Scott preparing to haft a stone point.
On the business end of the dart (large end), leave enough cane (4-6 inches) past the last node joint to haft a point or insert a fore shaft. Another interesting technique Scott demonstrated for hafting was to use a short, larger diameter section of cane or bamboo with a stone point attached. This short female fore shaft is slipped over the outside of the shaft instead of being inserted into the hollow end of the dart as I had only ever witnessed.
Material and Tools
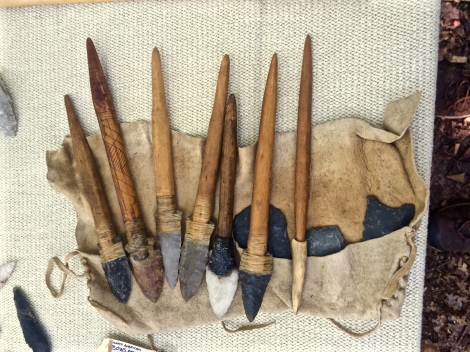
- Points: Stone, bone, antler, hardwood, gar scale are good material
- Glue: Pine pitch glue, hide glue, hot melt arrow point glue (commercially available), or a regular glue stick
- Lashing: Animal sinew, artificial sinew, waxed thread, even dental floss will do
- Knife
- Fire
- Duct tape
To add forward weight to practice darts, several methods can be used without a permanent hafting job. This is where duct tape becomes your friend… again! Scott described the use of duct tape by primitive practitioners as “modern man’s rawhide.” Fill the hollow forward end with sand or BB’s and tape it closed. An old nail can also be inserted in the hollow and taped.
For permanent points hafted directly to the dart end, bore a 1/8 inch hole about half an inch from the end of the dart. Bore a second hole directly opposite and on the same plane as the first hole. With the tip of your knife inserted in one hole, cut toward the end of the cane. Cut until you’ve removed a straight section of the cane. Repeat on the opposite hole. Widen the section as needed to accept your chosen point. Dry fit the point and adjust the width. A gar scale may seat fine without widening the slot.
Once satisfied with the dry fit, heat your glue and apply a glob into the slot on the shaft. While the glue is hot and pliable, insert the point in the slot. Reheat over the fire if necessary to line up the point with the shaft.
Make a few wraps of sinew around the slot/point connection for a secure hold. Before applying the sinew, wet it thoroughly in your mouth with saliva. This moisture activates the natural glue in the fibers. No need to tie-off natural sinew. It will stick when applied and shrink as it dries. Hide glue can be applied to the wrap afterwards to add hold and prevent moisture from effecting the sinew. Other cordage material must be tied.

A dogwood fore shaft inserted in one of my atlatl darts
Adding a male fore shaft to the end of your dart requires less precision. Make two splits on the forward end of your dart in a cross hair configuration (perpendicular to one another). The splits should be about 1.5 to 2 inches in length. When wrapped with sinew, these splits will act as a grip on the fore shaft like a drill chuck on a drill bit. Scott noted that fore shafts are likely to split the end of your dart anyway. This method creates a controlled spit and added purchase.
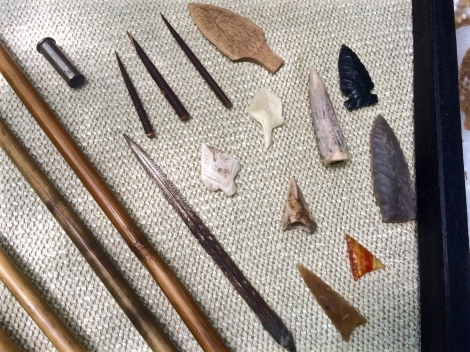
A collection fore shafts at Scott’s class
Fore shafts can be carved from wood, bone, antler, or anything you can imagine. They need to be tapered to fit the end of your dart but not so much that the tip of the fore shaft contacts the end node of the shaft.
The long barbed point left of the stone points is a stingray barb which was used by aboriginal people in coastal areas.
Fletching Darts
Duct tape makes a field expedient and serviceable fletching. Tape two pieces to the nock end of your dart so that they stick to each other around the shaft. Trim the edges to shape and you have a fletched dart. If the dart performs well, leave the tape or remove it and use real feathers for the fletching.
Not all feathers are legal. Using eagle, hawk, owl – (raptors), or birds covered under the Federal Migratory Bird Act could land you in legal trouble with big fines. Here’s a link to get you started researching legal feathers.
In this tutorial, I’m using legally harvested wild turkey tail feathers. The method used is called Eastern Two Feather fletching.
Ben Kirkland demonstrating the Eastern Two Feather fletching technique. Notice the two goose feathers attached at the nock end of his arrow.
Material and Tools
- Feathers
- Scissors or knife
- Glue
- Sinew
Use two feathers curved in the same direction. Make two cuts about an inch from the tip of the feather perpendicular to the feather shaft (rachis). If using scissors (which are recommended), cut in the direction from feather tip to the base of the feather. Cut in the opposite direction if using a sharp knife of flint flake.

Cuts made for the Eastern Two Feather fletching.
Trim down both sides of the shaft to the previous cuts leaving only an inch or so of bare shaft. Now trim down both sides of the shaft leaving 3/4 inch of vane on both sides. Grip the inside curved vane (concave part) and strip towards the base so that about 2 inches of vane is left on the tip-end of shaft.
Measure the desired fletch length by placing the feather in your outstretched hand. Your length from the tip of your index finger to the inside of your thumb is a good length – about 5 inches give or take. Remove the portion of the long vane at that point by pulling toward the base.
With a sharp knife on the shaft at the point where the end of the short vane connects, make an angled cut to the center of the shaft. Carefully flatten your knife and cut down the center of the shaft through the hollow end of the feather. Cut the half-shaft off about one inch past the large vane.
One method of attaching the fletching is to bend the tip end of the feather shaft toward the outside of the feather. Unfold the stem and place it on the dart with the outside of the feather facing up and past the nock end of the dart. Heat the dart shaft area where the fletching will be attached. Apply a small amount of pitch glue on the shaft to hold the feather in place. Repeat this step for the second feather. The position of the fletching doesn’t need to line up on darts like they would on an arrow shaft’s nock. Just attach them directly opposite of each other near the nock end of the dart.
With the vanes temporarily attached, apply sinew wraps to hold permanently. Fold the feathers back over on top of the dart. Twist the fletchings 45 degrees around the dart shaft. This causes the feathers to spiral around the dart shaft. Pull the vane shafts tight and repeat the previous step to attach this end of the feathers.
Safety Note: When applying feathers to archery arrows, make sure the forward ends of the fletching are flattened and completely covered with sinew. Any exposed feather shaft will rip through your arrow rest (skin) on release causing much pain.
Making your own darts and arrows is a time-consuming journey. However, learning to reproduce a deadly primitive weapon from scratch is quite satisfying!
Keep Doing the Stuff of Self-Reliance,
Todd
P.S. – You can also keep up with the Stuff we’re Doing on Twitter, Pinterest, Google +, YouTube, Instagram, and Facebook… and over at the Doing the Stuff Network.
P.P.S – If you find value in our blog, Dirt Road Girl and I would appreciate your vote on Top Prepper Sites! You can vote daily by clicking here or on the image below. Check out all the other value-adding sites while you’re there…

Thanks for Sharing the Stuff!
Copyright: Content on this site (unless the work of a third-party) may be shared freely in digital form, in part or whole, for non-commercial use with a link back to this site crediting the author. All links in articles must remain intact as originally posted in order to be republished. If you are interested a third-party article, please contact the author directly for republishing information.


Pingback: Primitive Preps: Craft a 3-in-1 Tool from One Hand Drill Spindle | Survival Sherpa
Pingback: Friction Fire Hack: Get Consistent Coals Using a Hand Drill | Survival Sherpa
Pingback: Wild Resources: Only a Fool Comes Home Empty Handed! | Survival Sherpa
Awesome instructions! Harris in RD
LikeLike
Many thanks, Ashley.
LikeLike
Pingback: Our First Year of Building Self-Reliance Skills at RISE Academy | Survival Sherpa