
by Todd Walker

There are many scenarios where you may be separated from your backpack and gear. Tipping a canoe or tumbling down a ravine come to mind. These types of accidents can quickly relieve you of the gear which makes for a comfortable wilderness outing. Having essential gear in your pockets and attached to your belt could turn your luck around, and, not being too dramatic here, could literally save your life.
I leave my main pack at base camp on short scouts on backcountry outings. Depending on the purpose of my trek, I usually grab my canteen set and head out. Of course, the ring belt I made is secured around my waist… always! No matter what happens to my other gear, essential stuff is attached to my ring belt. That’s right, I wear two belts: 1.) A traditional belt to prevent me from looking like a hip-hopper “who be sagging” in the woods; 2.) My ring belt to keep self-reliance tools secure and accessible.
Here is what’s on my belt…
Belt Kit Items
First, let’s look at the ring belt itself. I bought a strip of leather and crafted the belt using a D-ring, Chicago screws, and waxed thread. It’s a simple design I first learned from Justin Wolfe at Wolfe Customs. To make your own, use a leather belt blank which measures about 20 inches longer than your normal belt. Attach a ring or D-ring and your set.

My D-Ring belt after completion.
To tie a ring belt, thread the end through the ring around your waist. Run the end under the belt from the bottom creating a loop. Pass the end back through the loop and cinch tight. If you don’t have a ring belt, traditional belts will work. However, one advantage of ring belts is their ability to be worn over heavy winter clothing for easy access to frequently used tools in the field.
One alternative use for the leather ring belt is a strop for cutting tools. Loop the belt around a tree and pull tight. Strop your knife by moving the blade up and down the leather with the cutting edge facing the opposite direction of the stropping motion.
Knife
Arguably one of the most important tools for outdoor self-reliance, a sharp knife is essential. Whatever knife rides on your belt, testing its abilities and limits is paramount. Before depending on a particular knife, put it through blue-collar woodcraft work for several months. By the end of your test period, you’ll know whether or not it fits your needs.

The Genesis on the left is Dirt Road Girl’s knife… which I’ve been testing for over a year now.
If you’re just new to bushcraft/woodcraft, I’d recommend reading my article on Bloated Bushcraft to give you some perspective on knives and skills.
My main belt knife is a L.T. Wright Genesis I purchased for my lovely Dirt Road Girl at the 2015 Blade Show. Ya see, I’m just running it through its paces to see if it’ll be dependable for her. 😉 This article isn’t a Best-Knife discussion. There’s no such thing. However, I have found her Genesis to be very robust and resilient over the last year in the field.
Fire Kit
At our last Georgia Bushcraft Campout, I was fortunate enough to win a really well crafted possibles pouch made by Reliance Leatherworks in a fire challenge. This pouch replaced an old military pouch I carried for five years which had previously housed my fire kit.

Possibles Pouch Fire Kit: 1) Possibles pouch, 2) Pouch for flint and steel, lighter, fat lighter’d, tonteldoos, and char tin, 3) Tonteldoos, 4) Char tin, 5) Flint and steel, 6) Bic lighter, 7) Magnifying lens in leather pouch atop birch bark container from Siberia, 8) Fat lighter’d, 9) tinder
The contents of my fire kit pouch consist of multiply methods to burn sticks.
- Bic Lighter – open flame ignition
- Flint and Steel – spark ignition
- Tonteldoos (Tinder box) – redundant spark ignition
- Magnifying Lens in a birch bark container with a small bed of dried natural tinder – solar ignition
- Char Container with charred material – next fire kit
- Small piece of Fat Lighter’d – the best natural fire starter in south
- Sure Fire material – commercially made fire starter that will burn floating in water
You may have noticed that my ferrocerium rod is not in the pouch content list. The reason is that I carry a rather large ferro rod in a leather sheath alongside my folding saw. More on those items later.
The idea behind a good fire kit is to carry multiple methods of starting a fire in various weather conditions. Having different ignition sources gives you options. You can read about the advantages and disadvantages of each source in our Bombproof Fire Craft Series.
Ferrocerium Rod and Folding Saw
Being resourceful, I shop antique stores, thrift shops, and yard sales. I found a one-dollar leather sheath which was used to hold screw drivers and re-purposed it to hold my Bacho folding saw and large ferro rod. A carabiner connects the sheath to my belt. A pair of leather work gloves also hang from the carabiner.
For a handle on my ferro rod, two feet of one inch Gorilla Tape is wrapped around the end of the rod with a loop of paracord taped into the wrap. Here’s my reasoning for this handle:
- Extra Gorilla Tape is never a bad thing
- Epoxied handles tend to come loose with heavy use over time – not so with this tape
- The loop allows me to clip the rod to the carabiner on the ring belt and insert into the folding saw sheath

The paracord loop is secured to my belt through the carabiner on my saw sheath
Sidearm
I carry a sidearm in the woods and everywhere legally allowed. You just never know what you’ll walk up on in the woods. Four-legged predators don’t concern me much in Georgia. Walking to my base camp recently I saw gang graffiti painted on rocks in the pristine creek. Just up the creek my semi-permanent shelter was tagged in red spray paint as well. This happened on 70 acres of private land.
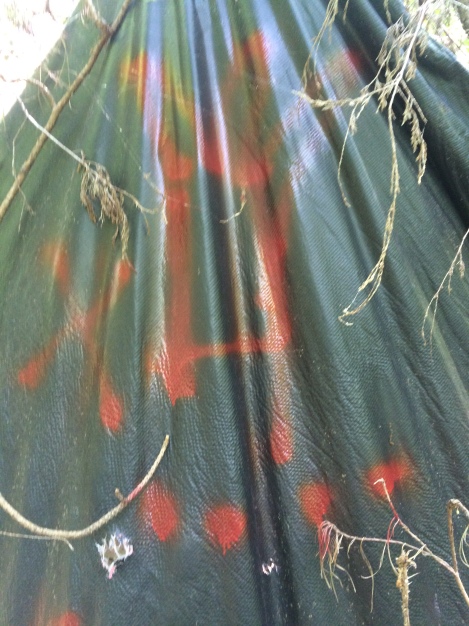
Gang tags on my shelter
Not all who wander the woods are there to enjoy nature. Paying attention to human nature, I choose to pack heat in the back country.
Pocket Stuff
Pants pockets serve as a redundant reservoir. I carry a Swiss Army Knife, chap stick, and a mini Bic lighter in one front pocket. My truck keys are in the opposite pocket with a spare ferro rod attached. My wallet is in my back pocket. Yes, my wallet contains survival items like duct tape. My cell phone rides in the opposite pocket. Even without cell service in the hinter boonies, the camera feature is invaluable to me in documenting my adventures.
Canteen Kit
I can attach my 32 ounce canteen kit to my ring belt if necessary. However, I prefer wearing it over my shoulder with a paracord shoulder strap for emergency cordage. The front pouch of the carrying case has redundant fire starters, an EmberLit stove, and an eating utensil.
My backcountry belt kit, coupled with the last two items mentioned above, gives me essential tools to enjoy my time in the woods. What do you wear on your backcountry belt?
Keep Doing the Stuff of Self-Reliance,
Todd
P.S. – You can also keep up with the Stuff we’re Doing on Twitter, Pinterest, Google +, YouTube, Instagram, and Facebook… and over at the Doing the Stuff Network.
P.P.S – If you find value in our blog, Dirt Road Girl and I would appreciate your vote on Top Prepper Sites! You can vote daily by clicking here or on the image below. Check out all the other value-adding sites while you’re there…

Thanks for Sharing the Stuff!
Copyright: Content on this site (unless the work of a third-party) may be shared freely in digital form, in part or whole, for non-commercial use with a link back to this site crediting the author. All links in articles must remain intact as originally posted in order to be republished. If you are interested a third-party article, please contact the author directly for republishing information.


AWESOME!!! I still REEEEEAAAALLY want you to conduct some workshops at LittleRose Nature School. You can do anything you want! Any time you want! Ready? Let’s put our heads together. love to you and Lizzie….😘❤️
LikeLike
Heck yeah! We talked about it for a while now and I need to come up with a class or two for you. Love you back, sweetie!
LikeLike
That really sucks about the graffiti.. Some people just can’t leave well enough alone.
LikeLike
Sure does, John. Don’t know how I would have handled it if I had walked up and saw them doing it. Might not have ended well.
LikeLike
I have used the belt for years my brother in law thought it was nuts but at deer camp it’s,do you have that old buck folder got a lighter need your old 38 to finish the deer. Do you have a water bottle I have to wash up after the field dressing they think it’s useless but they never have their packs some people’s kids.
LikeLike
Great idea 🙂 A quick and cheap and light possible addition is a leather and steel hammer loop from your local hardware store. Slides right onto the belt, and a great spot for carrying a hatchet or hammer or adze, or even bbq tongs (don’t laugh – I cook outdoors a lot)
LikeLike
Lol, I’m laughing cause I like to cook outdoors too! I lost an hatchet on a belt loop like that once. The loop was too big for the ax. Great idea if sized right.
LikeLike
as nice a job as you do stitching you really can skip the Chicago screws or go with smaller diameter rivets
personally I glue and stitch
an alternative to the single d-ring and knot is use two rings d- or round and cinch your belt around your waist
it works for either leather or fabric but particularly well when using bridle leather straps ( they become quite supple and don’t require dyeing)
one other option…extend the tag end of your buckle fold a few inches past the stitching…usually three to six inches…stitch the end but leave the loop you have created open
you now have a holster for pistol or tool…if they still exist Bandera did something similar years ago…kind of a static Yaqui slide
interesting post as always
LikeLike
Thanks, Craig! Great tip for added utility.
LikeLike
Well now I saw a couple of times on your earlier vids of a length of belt hanging off your waist and wondered, WITW? Mystery solved. Thanks again for sharing your knowledge. It is greatly appreciated.
LikeLike
There ya have it, Harry. Glad it cleared up the mystery. Many thanks!
LikeLike
No first aid? Bandaids? Just a rag?
Anyway, very good work!
Cheers
LikeLike
I usually carry first aid items in my pockets not the belt. Thanks for comment, Marcelo!
LikeLike
Pingback: The Top 7 Survival Sherpa Articles of 2016 | Survival Sherpa
Thanks a lot for this excellent , very useful site . . . .
Michael (Odins Forest, Germany)
LikeLike
You’re welcome, Michael. Glad you found us, sir!
LikeLike
Using that belt as a strop works well, but it’ll work even better if you have some red rouge on it. Just rub a bar of rouge into about a foot’s length of the inside of a belt, until it’s got good color; it’ll put a super-sharp edge on your knife. White diamond bar works better for those hard stainless knives. Be warned, either will eventually stain clothing a bit.
LikeLike
A good tip, Fixer. I have tried to keep green compound on the inside of my belt but as much as I sweat, it disappears, lol. I think I’m going to make me a paint stick strop for my haversack. Light and easy to carry.
LikeLike