
by Todd Walker

Three 21 foot logs, the crowning roof logs, lay on the ground debarked with pine sap oozing like beads of sweat. They would serve as my ridge pole and two top plate logs. Then it happened…
The landowner’s son, my good friend, walked to the cabin site and told me that the family was putting the land up for sale. I was shocked, not so much about the fate of my “practice” log cabin, but because he was raised on this beautiful land his entire life. He apologized about all the work that I had put into the cabin.
“It’s a practice cabin, buddy,” I said.
A year and a half of felling, bucking, skinning, stacking and pinning logs together. My options were limited. Let it sit unfinished and eventually rot to the ground. Or move it. DRG and I moved to the property across the road just a few months ago. Yep, that would be its new location.
Weeks before the news, I had arranged a work day with a group of our friends to finish up the walls. The building party turned into a demolition day. Each log was labeled and numbered to make reassembling the log puzzle less confusing. Stick by stick, the team worked all day to tear down 1.5 years of work, some of which they helped build.

Many thanks to these fine friends on demolition day!
Deja vu
After the dust settled, the job of rebuilding began. I figured reassembly would take less time. I was right.
Foundation
I decided to go back with dry-stack stone piers for the foundation. This would save money since the land had plenty of stones for stacking. Boulders I couldn’t physically lift, there were several, I used my rope come-a-long to inch them onto a trailer. My friend’s tractor would have made this task a breeze, but it was in the shop for repairs.
One lesson learned from the first stone foundation was I didn’t need to be exact on stacking each pier. I got them close to level using a water level and tweaked them as needed once the sill logs were on top. Dimensional lumber would require each pier to be exactly the same height. If you enjoy putting puzzles together, this job is for you.

Dry-stack piers
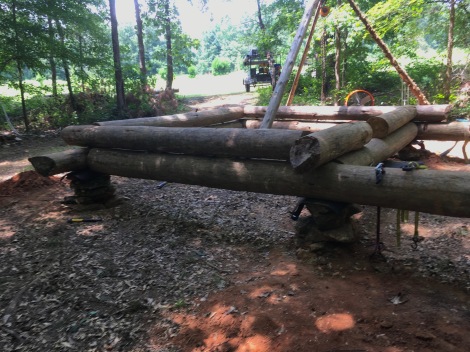
Sill Logs
I needed to start stacking logs. The challenge was to transport the two 1,000 pound, 18 foot sill logs from the previous site to their new home. My log hauling operation consisted of Donkey Kong (4-wheeler) and Junior (LogRite Arch). This duo had successfully hauled all the other cabin logs across the creek, up a 75 yard incline which makes young men huff and puff, and across the road to my place.
I crossed my fingers and headed toward the creek with a sill log in-tow. Donkey Kong crossed the creek and stalled with its front tires off the ground. The opposite end of the long log was stuck on the other side of the creek. I knew then that I was in for a long afternoon of winching up a steep hill. After five winching episodes, we made it to the top! And in 90+ degree Georgia heat with high humidity. I was soaked.
I rebuilt my lifting tripod at the new site, hung the chain fall, and started setting sill logs. The first row is important and takes the longest to get set. To square the corners, the Pythagorean Theorem was used to form a 3-4-5 triangle at each corner.

From the first build: The corner nail is near the head of the hammer where the two chalk lines intersect. The tape measure forms the hypotenuse of the right triangle.

Five sill logs set and squared at the new site.
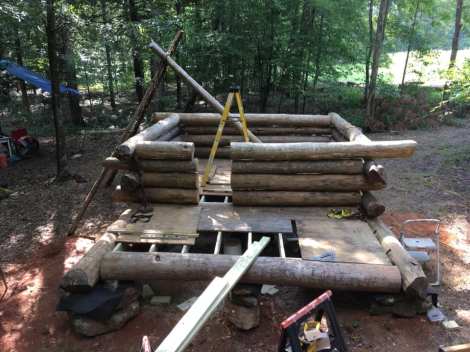
Log Courses Going Up
Before disassembling the cabin, each log was labeled to make putting it back together a no-brainer. It’s like paint by numbers.

Logs staged in order for assembly.

A fine sight!

Four rows complete!
Every log you see was felled and bucked with an ax, with a few back cuts using a one-man hand saw. Logs were debarked with a barking sud or draw knife. Most of the assembly on the original site was done with a brace and bit and sledge hammer. I chose this pioneer method the first time around. On the rebuild, I’m running power tools with a generator. The use of modern tools has sped up the process considerably. I even have a shop fan to move hot air around the new site.
Floor Joists
Those who have followed this log cabin build may remember the hand-hewn log floor joists on the first build. I made the decision to abandon this floor system. Why? Two reasons…
- During disassembly, we discovered that one sill log notched to accept the floor joists had significant decay. This log came from a dead-standing pine tree which seemed to be solid. I opted to replace it with another log.
- Even if the sill log had remained solid, I quickly realized that the alignment of the two notched sill logs had to be perfect to accept the hewn log joists.
Pressure treated lumber was used as joists. It was cheaper on some boards than non-treated. Plus, I’m not sure how long it’ll take to get a roof over the cabin. The old plywood subfloor was salvaged and tacked on the new joists as temporary flooring.

Shimmed and screwed rim joists.
Installing flat boards on round logs had a few challenges. There are gaps between the two, some almost 1.5 inches. I used shims to keep the 2×8’s rim joists plumb. Six inch screws secured the joists where large gaps appeared. Joist hangers were set on 16 inch centers for the 10 foot run on the floor.
Temporary flooring with lifting tripod .

The front porch joists are 2×6’s to cover a span of less than 6 feet.
We’ll keep practicing until we finish this log cabin. We’ve been here before.
Keep Doing the Stuff of Self-Reliance,
~ Todd
P.S. – You can also keep up with the Stuff we’re Doing on Twitter, Pinterest, YouTube, Instagram, and Facebook… and over at our Doing the Stuff Network.
P.P.S – If you find value in our blog, Dirt Road Girl and I would appreciate your vote on Top Prepper Sites! You can vote daily by clicking here or on the image below. Check out all the other value-adding sites while you’re there…

Thanks for Sharing the Stuff!
Copyright © by Survival Sherpa: Content on this site (unless the work of a third-party) may be shared freely in digital form, in part or whole, for non-commercial use with a link back to this site crediting the author. All links in articles must remain intact as originally posted in order to be republished. If you are interested a third-party article, please contact the author directly for republishing information.


Awesome Post! Keep em’ Coming!
LikeLike
Many thanks.
LikeLike
Thanks for taking the time to post such great pictures and videos. It allows us would-be homesteaders to settle vicariously in your cabin. Great job my friend!
LikeLike
Next time you and Brenda are in these parts y’all need to stop in and sit on the front porch. Thank you, my friend!
LikeLike
Thank-you for the invite. Perhaps on our next trip around the sun.
LikeLiked by 1 person
Pingback: If You Build it, They Will Come | Survival Sherpa