by Todd Walker
Containers made from tree bark existed long before plastic bags, cardboard boxes, and canvas haversacks came about. With every trek in the woods, I find useful resources. That glob of pine sap, stones, bones, or wood somehow ends up going home with me (much to the chagrin of Dirt Road Girl).
It’s a condition which I wish to never be cured.
Scott Jones sums up this affliction with this quote in his book, Postcards to the Past…
“The Eskimo say that only a fool comes home empty handed!
~ Lewis Binford, in Looking at Currated Technologies – 1979
If you suffer from this same condition, you’ll need a something to transport your found treasures back home or to your camp. While any container will usually work, nothing compares to a handcrafted bark container for both functionality and aesthetics for us out of doors types.
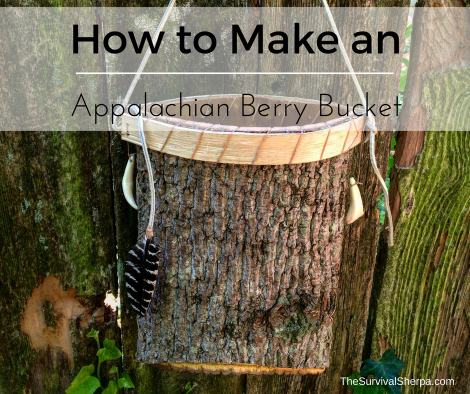
Traditional Berry Buckets
The best time to harvest tree bark is when the sap is rising in late spring and early summer. I know, I meant to post this tutorial in June. You’ll have to wait a few months to skin a tulip tree ((Liriodendron tulipifera). So bookmark this one for when the sap starts to rise again.
Material and Tools
- Knife – about all you really need
- Ax or saw if you plan to fell a tree
- Awl or drill
- Cordage
- Tulip Poplar tree
- Rim wood
Find the Right Tree
Tulip Poplar is a fast growing (soft) hardwood with many uses in the southeastern United States. Other candidates for bark containers include; basswood, cedar, white birch (which we don’t have in Georgia), and others.
You’ll know you’re barking up the tree at the wrong time once you’ve attempted to peel the bark off. If the sap isn’t rising, the bark won’t come off easily. I look for young tulip poplar trees growing under dense canopies. They tend to grow straight with fewer lower limbs and have thinner bark. A 6 to 7 inch diameter tree is ideal.
To fell or not to fell… that is the question. I’ve done both. For smaller containers like my knife sheath, I simply cut a patch of bark off the tree.
You’d think completely girdling around would doom a tree to death. However, as a test this past spring, I removed a section of bark from the entire circumference of a small tulip tree (5 inches in diameter) and it still has its green leaves in early October. Sweetgum (Liquidambar styraciflua) is similarly resilient tree.
[Edit: A fellow woodsman commented on the above paragraph who is concerned that people with access to public land only would take my statement as scientific fact and start completely girdling trees. My actions are not scientific and should only be done on land you own. I was totally surprised that the tree is still living after removing bark from the entire circumference. Also, this particular tree was in a thick grove of tulip poplars. Please, only take trees from private land keeping forest management in mind.]
Score and Skin
Score the bark down to the sapwood with a knife or hatchet. I use a solid stick to strike the back of the blade after a free-hand score mark has been applied to the bark.
Once scored, press the tip of your knife into one corner and lift to separate the outer and inner bark from the sapwood. From that point, I use a wedged stick to run along the edge to loosen and lift the bark. With a gap created, you can use your fingers to further separate the bark from the tree. Warning: There are little spikes under the bark which will draw blood. Go slow and be careful bare handed. Gloves are recommended, but I enjoy the texture and feel of wet sap and bark.
If harvesting large quantities from felled trees, I use a wedged stick to separate bark instead of bare hands. When you’re near the point of full separation, you’ll know the bark is free when you hear a distinctive, satisfying snap sound.
Cut to Length
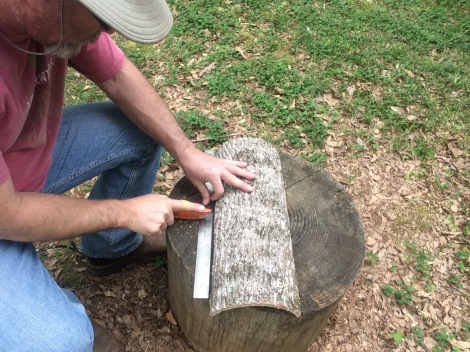
Place the bark flat on a level surface and cut to length. The length of bark should be a bit over double the intended height of your bucket. Trim all edges smooth to create a long rectangle.
Score a Football
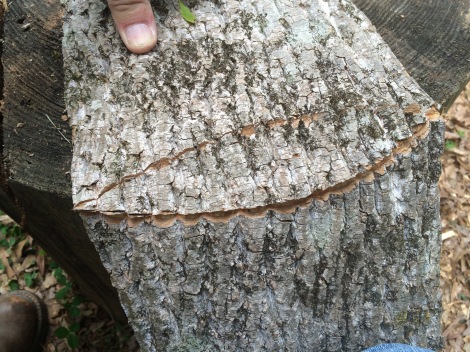
With the outer bark facing up, measure and mark the mid-point of each long side of the rectangle. Use your knife to score an arch which runs from side to side. Repeat this step to form a football shape on the outer bark. Be careful to not cut through the inner bark. This layer of bark acts as a hinge when folding the basket sides together. When scoring in my shop, I use a utility knife with a about 1/8 inch of blade.
Turn the bark over with the inner bark facing up. Place your hand on the middle of the bark and gently pull one long end to a vertical position. Now fold the other side. Your berry bucket is taking shape.
Bore Edge Holes
Use an awl or drill to bore a line of holes on both edges of the bucket. The spacing is up to you. I usually leave an inch and half to two inches between holes which are placed about 1/2 to 1 inch from the edge. The hole diameter should be large enough to accept your cordage/lacing.

My friend, James Gibson (Knob Creek Forge), traded this handmade awl to me
Lace Edges
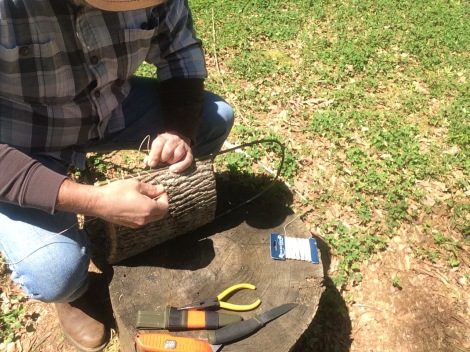
Artificial sinew makes strong lacing. It can be purchased online or at craft stores. I’ve also used tarred bank line, leather, and a few other types of string. The artificial sinew can be threaded into a leather stitching needle to make quick work on this part of the project. I’ve seen some buckets laced with other inner barks like hickory (Carya).
Note: As the bark dries, it will shrink and the lacing may need to be re-tightened.
Start lacing at the bottom edge near the football cut with the edges joined together. Tie off with a simple overhand knot and run the stitching up the edge. Make a pattern if you like. Secure the lace at the top of both seams.
Add a Rim
Cut a flexible stick long enough to form a rim around the top opening of your bucket. I like to use two thin strips of white oak about the size of a hardware store paint stirrer. Thinned enough, they flex just right and add a little contrast. The rim will prevent the bark from curling in as it dries.
Bore another series of holes along the rim edge. Place the rim wood pieces on the edges and lace them in as you did the sides. Leave enough lacing on both ends to make loops if you plan to add a carry handle made of rope. If you’re using two rim pieces like mine, you’ll need to bore holes in the ends to tie them together to hold the form you want.
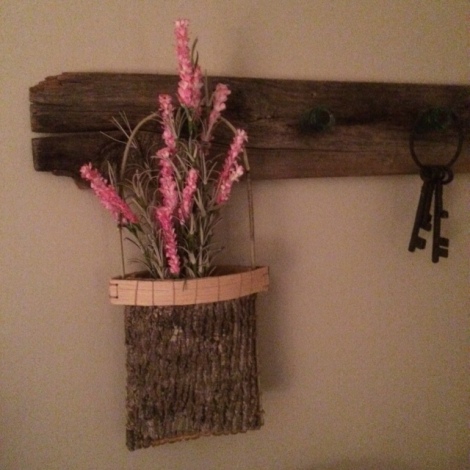
I made a handle out of river cane for Dirt Road Girl’s berry bucket. It hangs in the living room with dried flowers as a conversation piece. Looks pretty too!
Other Bark Containers
Once you’ve made one berry bucket, you’ll want more. With a bit of creativity and imagination, you can begin making many functional and aesthetically pleasing alternative containers from tree bark.
Keep Doing the Stuff of Self-Reliance,
Todd
P.S. – You can also keep up with the Stuff we’re Doing on Twitter, Pinterest, Google +, YouTube, Instagram, and Facebook… and over at our Doing the Stuff Network.
P.P.S – If you find value in our blog, Dirt Road Girl and I would appreciate your vote on Top Prepper Sites! You can vote daily by clicking here or on the image below. Check out all the other value-adding sites while you’re there…
Thanks for Sharing the Stuff!
Copyright © by Survival Sherpa: In light of the recent theft of all my content by a pirate site, my sharing policy has chanced. I do not permit the re-posting of entire articles from my site without express written consent by me. My content on this site may be shared in digital form (200 words or less) for non-commercial use with a link back (without no-follow attribute) to the original article crediting the author. All photos, drawings, and articles are copyrighted by and the property of Survival Sherpa. You are more than welcome to share our photos and articles on social media for educational purposes as long as you link back to the original article/photo with credit to the author.





TY ❤
LikeLike
Your very welcome!
LikeLike
Good. Hadn’t thought of it.
LikeLike
Very nice!
LikeLike
Many thanks, James!
LikeLike
Wonderful creation! Very excited to make this! Thanks for sharing this with us! New to me!
LikeLike
Glad you enjoyed the post! Remember to wait ’til the sap is flowing in the spring.
LikeLike
Pingback: Make Your Own Appalachian Berry Bucket | The Homestead Survival
I need an article, book or video on German hand carved buckets from th e 1800’s
LikeLike
Have you tried Google?
LikeLike
Pingback: Our First Year of Building Self-Reliance Skills at RISE Academy | Survival Sherpa
this is so cool thanks now I wont get a bad grade:)
LikeLike
Just to confirm, removing the bark from a tree all the way around will kill it – it’ll just take a while to die, which is why there were still living leaves on the one this author ring-barked.
LikeLike