Retirement (June 2022) has me reflecting on my lifework. The dust-covered rocking chair overlooking the pond tells me that it ain’t over. In between working on my new log cabin, I’ve been building my next adventure, the Survival Sherpa School!
Often when you think you’re at the end of something, you’re at the beginning of something else.
~ Fred Rogers
December 2022 marks the 11th birthday of this blog. While writing over 600 articles here, I’ve never made a dime from the blog. I’m not more virtuous than others by offer all this free information over the years. I don’t hate money, it’s just the model I chose from the beginning.
However, the Survival Sherpa School is a separate site with a mission to offer hands-on classes to help you learn, prepare, and survive. With the help of my good friend, Melonie of Mel of the Mountains, we now offer a variety of classes on many primitive and traditional skills from bark baskets to hide tanning. I’ll be adding more class content in the near future.
Do me a favor and go check out the site to see what may interest you or someone you know.
While you’re visiting the Survival Sherpa School, hit that Subscribe button to join our community. You’ll be the first to be notified of upcoming classes, events, and exclusive content you won’t see on this blog, YouTube channel, or social media.
Some of our followers have been here from the very start and I can’t thank you enough for all your faithful support! We’ve learned a lot together through the magic of the internet. I’ll continue to post value-added content here, don’t worry.
After our Appalachian Bark Basket class at Little Rose Nature Adventures, we’ve taught three more classes in two states (GA and NC)! Below are some highlights of the experiential learning going on.
Appalachian Bark Baskets
More than an arts and crafts class, these eager students learned the context of making natural containers which their ancestors used many years ago.
Firecraft Essentials
Fire is life and learning many methods to achieve a sustainable fire is essential.
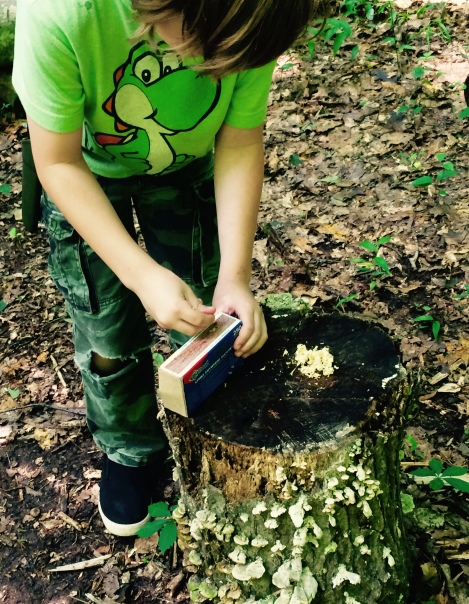
Modern ferrocerium rod in action.
Although we teach primitive and modern techniques, we stress that your fire kit should be simple enough that a five-year-old can use it.
Homeschool Co-op Demo in North Carolina
Melonie demonstrating the utility of turning raw animal hides into useful material for clothing and gear.
Axmanship 101
Students discovered and practiced hands-on techniques to safely fell, limb, buck, and split wood with their ax only. Thanks to Georgia Bushcraft, LLC for hosting this class.
Georgia Bushcraft Fall Gathering
A few of the classes we taught at this years fall gathering. Mel of the Mountains showing students how to make their own buckskin medicine pouches.
Two ladies getting their hands dirty practicing the Flip-Flop Winch.
As you can see, we’ve had a busy schedule recently! If you’d like to stay up to date on future classes and content, be sure to subscribe to our email list here. By the way, we will travel to you or your group’s location for classes and personal instruction.
I’d also like to thank my long-time blogging friend, Patrick Blair of NinjaWolf Studios, for his expert work in building the new Survival Sherpa School website! Be sure to check out Southern Dreams Homestead where he and Jessie are building a self-reliant urban homestead right here in Georgia.
P.P.S – If you find value in the blog, I would appreciate your vote on Top Prepper Sites! You can vote daily by clicking hereor on the image below. Check out all the other value-adding sites while you’re there…
My last cabin update on the blog was from November 2019. Work had stopped on the cabin since DRG’s passing in March of this year. People asked me when I would get back to building the cabin and I’d respond, “When I get motivated again.” Well I’m finally motivated.
July has typically been a very productive month for me on the log cabin build. This holds true for 2020 as well. What follows is a series of photos highlighting the progress.
The swinging porch bed. A whole new how-to post is upcoming on this one.
I built this red cedar rope swing to add to the cabin site. The air mattress is queen size and really too tall for the swing. However, after extensive testing, it works just fine!
Mosquito netting is a must when napping!
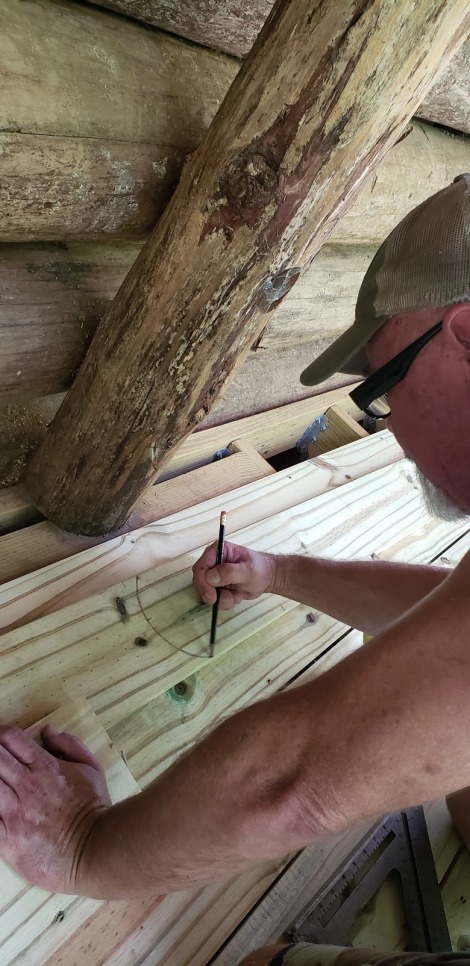
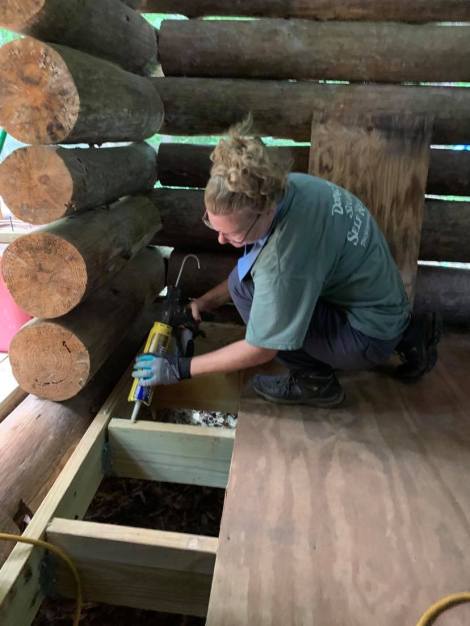
Flooring
The porch needed something other than old, temporary plywood with spotty coverage. I went with 1x6x12 pressure treated boards. Melonie was nice enough to lend a hand on both the porch and the subfloor inside the cabin!
The finished porch floor.
Mel laying down the glue.
Subfloor complete!
Front Door
I had been carrying a salvaged heartwood pine door around for about 15 years. I knew I would use it on the cabin as soon I started this project. Philip helped me hang this with hand-forged hinges, hasp, and nails gifted and made by Tim at Oxbow Farm. What a great craftsman and friend!
Hammering cut nails into the hinge holes.
Cut nails
Front door finished!
Gable and Loft Floor
To expedite the build, I decided to go with T1-11 plywood to cover the gable ends. I also used this material upside down on the loft floor so the bead board would be visible from the porch below.
Taking a break on the newly laid loft floor.
One of the stained glass windows DRG bought several years ago. Thought it would go well as the center window of the cabin.
Log Steps for the Front Porch
Dimensional lumber would have been an easy choice for the steps. No, we needed to stay with the rustic look. I spent the morning walking the woods to find dead-standing red cedar the right diameter for the stringers and steps. Once hauled back to the cabin, I used my chainsaw mill to make the steps.
Notching stringers to accept the half-round log steps.
Step one.
Satisfied and taking a break on the second step.
Still has some tweaks we want to make but it’s a functional set of rustic steps!
Thank you friends and family for the outpouring of love and support over the years, and especially since my lovely DRG passed away. You are simply the best!
P.P.S – If you find value in our blog, Dirt Road Girl and I would appreciate your vote on Top Prepper Sites! You can vote daily by clicking hereor on the image below. Check out all the other value-adding sites while you’re there…
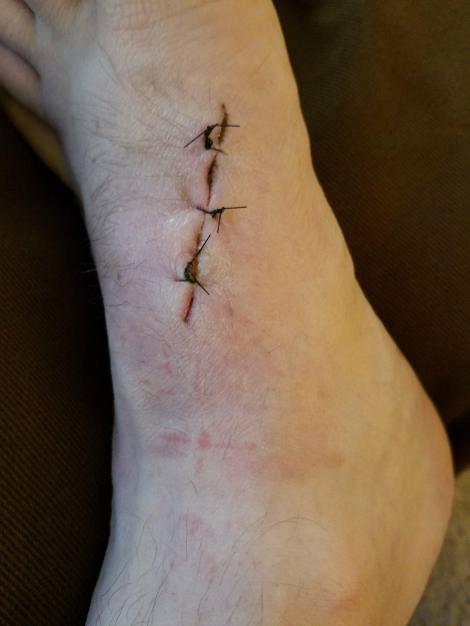
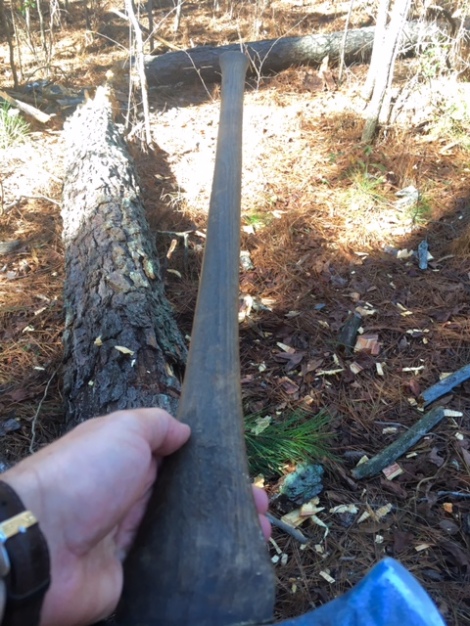
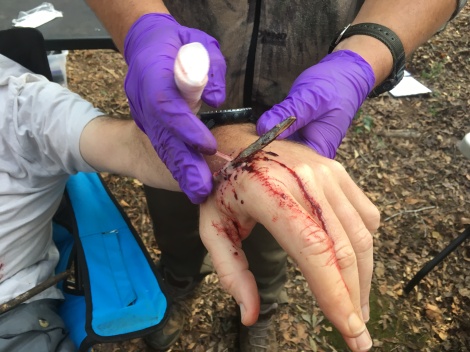
On the heels of my ax-work classes at the Georgia Bushcraft Spring Gathering, I wanted to cover some of the risks of swinging a tree clever. It’s our job to mitigate some of the risk. Even then, accidents happen.
At the Gathering, my buddy, Karl, shared a recent ax injure he incurred when his ax glanced from the wood he was splitting. He graciously, or not so gracious if you have a weak stomach, allowed me to share his injure here for educational purposes.
********* WARNING: GRAPHIC PHOTOS OF BLOOD AND A OPENED FOOT **********
The ax glanced and struck Karl on the top of his left foot severing one bone completely and halfway through the second bone.
The two bones circled took the brunt of the blow.
A nasty ax gash.
Shoes, even leather boots, aren’t much of a deterrent to a sharp ax.
Stitched and cleaned up.
The photos above make it crystal clear how dangerous a moving ax can be. However, not all injuries to wood choppers come from the business end of the ax meeting flesh, or from negligence. Trees don’t always cooperate. They’re known to drop dead limbs on unsuspecting victims below. Trees and axes are not to blame. They do what they do without malice or remorse.
Taking an ax to the woods with the intent of chopping is serious business. 99% of my ax work is done alone in the woods. Even though I try to employ best-practices, the risk of becoming a victim is always in the forefront of my mind. I’m no expert and my ax-related advice should not be trusted but verified through experience.
5 Deadly Sins of Ax-Work
Vernon Law is credited with saying, “Experience is a hard teacher because she gives the test first, the lesson afterward.”
We can never eliminate all the dangers of swinging an ax. We can only lessen the gravity of missing the mark through commonsense risk management. The good news is… true repentance will change your actions, and, hopefully, save you from the pain of these painful mistakes.
1.) Arrogance
“Only the penitent man shall pass.” ~ Indiana Jones and the Last Crusade
The toughest woodsman is no match for tonnes of wood crashing to the forest floor. Even a wrist-size limb falling from 50 feet above can crush a shoulder or skull. While toughness is a fine virtue, be humble. The moment an axman approaches his work with superiority and a been-there-done-that attitude is the moment he gets blindsided.
There’s a fine line between confidence and arrogance. Confident ax skills inspire. Arrogance will get you hurt or killed. This holds true more so for seasoned axmen than beginners, and, in my experience, men over women.
2.) Entanglements and Hang Ups
Any obstruction in the ax swing arc must be cleared before work begins. Check overhead for nearby limbs and vines which may snag and deflect an ax in mid swing. I’m obsessive about removing the smallest twig when standing on top of logs to buck. I figure if I’m swinging inside my frontal zone (described below) inches from my feet, I can’t afford a stroke to veer.
A screen shot from a recent video of an overhead limb which snagged my ax.
Fell enough trees and you’ll have one hang up mid-fall. My first strategy, if the tree butt didn’t release from the hinge, is to try to free it from the stump. Some times the impact on the ground will jar the hang up loose. If not, I’ve had some success moving the butt of the tree backward using a long lever pole. Place the lever under the butt end and lift repeatedly to slide the tree butt backwards until it releases.
A safer and less strenuous way is to use a come-along attached to an anchor behind the tree stump. Without a modern come-along, a powerful winch can be made from two logs and a rope/cable. Ratchet the tree butt until it releases. You may be tempted to cut the offending tree which caused the hang up. This is a high-risk endeavor. Be sure to have all your medical/life insurance up to date. You and/or your surviving family will likely need it.
One hazard I hope to never encounter again was the yellow jacket sting between my eyes on my downward stroke in the video below. You’re only defense is to run like you stole something!
3.) No Exit Strategy
When felling trees with an ax or saw, preparing two or three escape routes is wise. When the tree begins its decent, get out of Dodge on a pre-determined path. The safest exit is at 30 degree angles from the back notch of the tree. Put your back against the tree and extend your arms like you’re about to give your mama a hug. Your arms are pointing to your best escape paths. Next safest is in a line opposite of the direction of fall. If this path is chosen, or the only option, put great distance between you and the stump to prevent a kickback from nailing your body to the ground.
Escaping perpendicular to the line of fall increases the risk of being struck by falling limbs from adjacent trees. I’ve witnessed trees “jump” and roll several feet to the side of the stump hinge by contacting adjacent tree limbs during the fall. Another overlooked danger is a dead spot halfway up the tree which breaks and falls back toward the woodsman as the bottom half falls in the direction of its lay. Be vigilant, drop your ax, and sprint for your life.
Fortunately this log snapped halfway up and fell sideways from where I was standing.
4.) Violating the Frontal Zone
There are two basic ax swings: lateral and vertical. Certain guidelines should be followed for each swing. Take a look at the diagram below to better understand your frontal zone.
Adapted from The Ax Book
In The Ax Book, which I recommend you devour until the pages are dog-eared, Dudley Cook describes the frontal zone as two parallel lines running along side the outside edges of your feet when chopping. All lateral swings should be outside the parallel lines, always. The inertia of an ax in full, extended-arm swing only stops when acted upon by an external force. The ax head has a stopping point, and that point could be your body if you disregard the frontal zone guidelines.
There are two relatively “safe” strokes one can make within the frontal zone: a.) backed up, and b.) bucking. The backed up stroke is what beginning choppers are most familiar – splitting wood on a chopping block. The solid chopping block offers a backstop for the moving ax. Of course, as in Karl’s case above, there remains inherit dangers. Watch our video below to gain some safety tips for splitting firewood, the most common ax-work of campers and homesteaders.
Bucking is simply separating a log into lengths. The diameter of the log to be bucked determines my technique. Larger diameter logs (12+ inch range) allow me to stand on top to cut two V notches. Swings are always below my feet. If I miss my intended target below my feet, my body is out of harms way.
I stand on the ground to buck smaller diameter logs. The log itself is my back up. Accuracy is essential at the top of the bucked notch when your feet are on the ground. Even though the log is between you and your legs, miss the top of the notch and you now have a non-backed up swing in the frontal zone… and a very bad ending.
Another video of ours demonstrates the importance of accuracy on the top of notch cuts when bucking on the ground…
A third stroke in the frontal zone, which I’ll mention, but do not recommend, is the most dangerous and best performed with a saw. Situations arise where a high limb needs to be removed. My risk management strategy is to choke up on my ax handle with one hand and strike the limb at a 45 degree angle without completely severing the limb. A few lighter followup blows usually separates the limb. My forward hand gives me more breaking power as the ax follows through.
5.) Washed in the Blood
“All bleeding eventually stops. The challenge is stopping blood loss before the supply runs out.”
Injuries related to axes and trees can be deadly. A first aid kit should be in close proximity to your work area. One item which you should consider carrying on your person is a tourniquet. If a catastrophic ax wound occurs where sever bleeding will result in death, this is your only option to see your family again. Practice applying this device on your own body before you actually need it.
A personalized first aid kit will treat the most common injuries such as scrapes, bumps, blisters, and bruises. I carry large sterile bandages, gauze rolls, and Band-Aids. My tourniquet fits in my cargo pocket of my kilt or pants. A few other items I include in my ziplock first aid bag are:
Acetaminophen for pain
Wound dressing
Tweezers and needle – mostly for tick removal, ugh
Aspirin, proven to assist in heart attack treatment
Diphenhydramine (Benadryl) for stinging/biting insects – plantain isn’t always available in the woods and I don’t react well to stings
A sharp hunk of steel flying freely through space is a scary sight… if you happen to spot it. It’s like shooting an arrow straight overhead and wondering where it will stick. Ax heads give an ample warning to observant axmen. A slight gap appears where the ax eye was seated on the handle. Continuing work with this slight slippage is full of hazards. Stop, re-seat the head, and pound a metal step wedge into the top of the handle. My working axes aren’t pretty, but they are tightly fit cutting tools.
Step wedges added in the field on my favorite double bit. Looks gnarly but hold this working ax head on securely.
Don’t lose your head! Take great care to keep your ax sharp and securely attached to the handle.
If you’re even slightly tempted by any of these deadly sins, put your ax down before you meet your Maker.
P.P.S – If you find value in our blog, Dirt Road Girl and I would appreciate your vote on Top Prepper Sites! You can vote daily by clicking hereor on the image below. Check out all the other value-adding sites while you’re there…
More and more people are getting back to nature to enjoy its beauty and benefits. The list of outdoor activities seems endless. With these pursuits comes risk of injury. Common injuries like scrapes, sprains, burns, bites, and blisters can turn serious in remote locations. I’ve had my share of bumps, bruises, stings, and close calls. Thankfully, none were life threatening… but could have turned sideways quickly.
Note: All injuries depicted look real but are not. If you’re queasy about blood and guts, you may want to reconsider reading the rest of this article.
A skill set I’ve neglected for years is wilderness first aid. Teaching students outdoor self-reliance skills at RISE spurred me on to train with one of the best Wilderness Emergency Care instructors available, Mark DeJong, owner of Off Grid Medic. We were also fortunate to have Michelle Pugh, an accomplished long distance hiker, author of two books of her adventures, and Off Grid Medic staff instructor teaching our class. Their style of teaching fits perfectly in my “Doing the Stuff” wheelhouse. You won’t sit and watch boring power points in a sterile environment. Courses are held where outdoor enthusiasts roam – the woods. Our class was hosted by Georgia Bushcraft, LLC.
Besides imparting real-world knowledge, Mark works his magical moulage abilities by transforming last night’s rib eye bone into a patient’s open fracture. These realistic injuries aren’t for shock value but to help students “train like you fight.” Discovering a bone protruding from the skin or an impalement in a training exercise will give you a clue as to how you’d respond in a real wilderness emergency.
See what I mean? Some of Mark’s handiwork on “Dutch Oven” Bill.
Wilderness First Aid
Urban first responders are equipped with tools and reinforcements to get patients to definitive care within minutes typically. For wilderness rescuers, hospitals and doctors might be hours or days away. Environmental stressors, evacuation over rugged terrain, limited medical resources, and other unknown variables present unique challenges for patient care and treatment.
If you interested in professional training in wilderness emergencies, contact Off Grid Medic. Below are a few things to consider if you’re ever in the role of wilderness rescuer.
You’re Number One
You can’t rescue a victim if you step into a dangerous situation and become one yourself. Before rushing in, assess the situation, location of patient, and possible hazards; dead tree limbs overhead, steep/loose ground, freezing water, etc., etc. Take care of yourself and team before providing care.
As an example, use the Reach, Throw, Row, Go steps to protect yourself in an open water rescue.
Reach: Use when victim is close to shore line and can be reached with by hand, pole, paddle, etc. without having to enter the water.
Throw: Victim is too far away to be reached, throw a line, rope, PFD attached to rope, if the victim is conscious and able to grab the rope.
Row: Rescuers will use a boat/canoe/kayak if Reach and Throw isn’t an option. Get close enough to use Reach, Throw, or lift the victim into the craft.
Go: This is the last and least safe option for rescuers. It may be necessary due to the victim being unconscious or unable to grab a rope.
McGyver Mentality
Even if you are a medical professional, the wilderness changes the game. After your initial patient assessment, a typical first aid kit may not contain every item you’ll need in remote emergencies. Be prepared to improvise… a lot.
Space blankets come in many styles. Buy good quality, sturdy blankets.
Besides a first aid kit, I’ll wager that you probably have the following items in your supplies. If not, consider adding them.
Emergency Shelter: Start with proper clothing for the rescuer, space blanket (not the cheap mylar sheets), control body temperature, body wrap for victim, shield from elements, signaling device (orange), etc.
Duct Tape: Wound closure (butterfly stitches), splints/wraps, slings, neck/head immobilization, fire starter, and uses too long to list here.
Ziplock Baggies: Exam gloves, wound irrigation, occlusive dressing for large burns, sucking chest wound taped on three sides, and more.
Rope/String: Splinting, litter bed, lashing a litter together, emergency shelter, etc.
Bandana/Cotton Material: Bandages, sling, splint padding, dressing, wet dressing, etc.
Metal Container: Disinfect water for hydration via boiling, cooking, warm liquids, hot/cold pack, etc.
Fire Kit: Emergency tinder, lighter, road flare (not joking), signaling, warm patient and rescuers, comfort, cooking (unexpected stay), water disinfection, etc.
Knife/Saw/Ax: Tools to make other items for rescue (litter, fire, etc.), remove insect stinger, collecting firewood, etc.
Head Lamp: You’ll need your hands free to attend to a patient in dark conditions.
Compass: Preferable one with a mirror and magnifying lens – all kinds of uses beside navigation.
To Splint or Not to Splint
Sprains, strains, and closed fractures are not always distinguishable. Open fractures are easier to diagnose since the bone protrudes from the skin. A closed fracture may not show deformity in a limb. The rule of thumb is to splint if a limb is painful, swollen, or deformed – this applies to sprains and strains. Immobilize the limb(s) before the patient is evacuated.
Makeshift splint by Mike and Jessica. Interesting note: I taught Mike middle school P.E. in 1985. Man, I’m old!
We learned to splint limbs with resources on hand and materials from the wilderness. Without a modern SAM Splint, you’ll have to get creative. Two sticks, cordage, and a shirt stuffed with leaves will pad and immobilize an arm or leg.
SAM Splints are great to have in your pack.
Mark demonstrating the B.U.F.F. splint – Big, Ugly, Fat, Fluffy – on Michelle.
Slings for an arm/shoulder/collar-bone injure have to offer support and keep the limb secured to the body. Through hands-on experimentation, my partner and I found that zipping her arm inside her light jacket created a snug fitting sling which was comfortable and warm. There’s more than one way to sling a limb.
Another diy sling.
Transporting the Victim
Depending on location and terrain, rescue reinforcements may be far way or unable to respond in remote areas. You’re injured friend will have to be carried out. A makeshift litter can be made from poles and string.
Happy people carrying a litter full of Casey.
Two Litter Options:
Large group of 6-8 people
Small group with as few as 3 people with backpacks
Large Group: Cut two saplings about 8 feet long and sturdy enough to carry weight. Cut 5-6 sturdy cross pieces about 5 feet long. Position the two long poles parallel next to the victim. Place the cross poles under the long poles at intervals which support the head, mid back, hips, knees, and feet. Lash the poles together using square lashing or any knots to secure them in place. If time is an issue, or cordage is sparse, use a jam knot with two short pieces of bank line or paracord.
Demonstrating square lashing and jam knot techniques.
Transfer the patient to the litter. Team members lift at the extended cross poles and walk.
Small Group: Use two saplings as above. If sturdy rope is available, wrap the rope around the poles to create a bed. The pole ends are tucked into the lower part of the shoulder straps of two backpacks. This allows two people, with proper fitted backpacks, to transport a victim.
Two poles inserted in the backpacks straps to carry our patient on a rope litter. Obviously, they wouldn’t be facing each other if not in the class.
The culmination of our three-day, 20 hour training was a nighttime rescue. I mentioned that Off Grid Medic likes to keep it real for “train like you fight” scenarios. Mark and Michelle didn’t let up and provided excellent, realistic, hands-on training the entire weekend!
If you’re a camper, hiker, woodsman, or Scout leader, consider learning wilderness first aid. This is an entry-level course into the world of wilderness emergency care. Contact Markfor next-level courses and continuing education. I offer my highest recommendation to the Off Grid Medic team for their professionalism, knowledge, and real-world training.
P.P.S – If you find value in our blog, Dirt Road Girl and I would appreciate your vote on Top Prepper Sites! You can vote daily by clicking hereor on the image below. Check out all the other value-adding sites while you’re there…
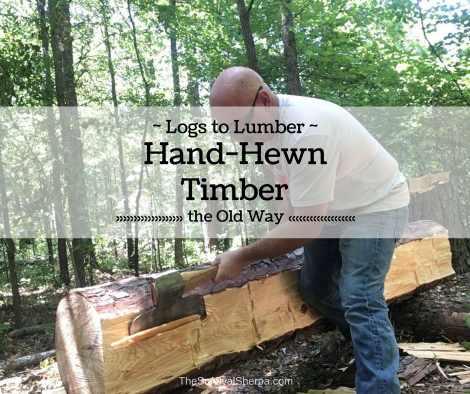
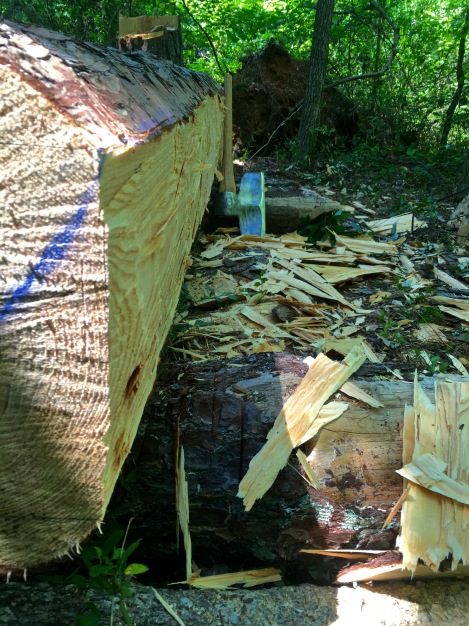
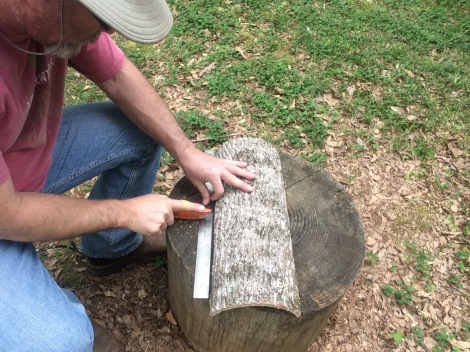
Technology, a modern marvel, keeps our hands clean and our hearts distant from the trees which built and furnish our homes. Very few ever experience turning a log into dimensional lumber with an ax and saw. Those days are long gone except for a few holdouts, myself included. While our production rate is dwarfed by modern milling methods, resurrecting traditional skills is worth every ounce of effort, sweat, blood, and fears.
In 1969, we left the city and moved to the country. The old house at the front of our family farm rested on massive hand hewn timbers. Crawling between the stone pillars at age 7, I still vividly remember the ax-scarred wood, a signature left by men who carved out a living homestead from trees.
It was just an old dilapidated house. But those timbers told the forgotten story of the old ways.
And, like their story, my journey to preserving lost skills continues… in the old ways.
Hewing Timber by Hand
There are three basic steps in hewing timber: scoring, juggling, and hewing. There’s no complicated gear list required to turn round logs into square timber. Here’s what you’ll need.
Tools
Ax(es) – Start with what you’ve got. A dedicated broad ax (hewing ax) is not required.
Saw – Something to cut the end of the log flat. A chainsaw is not traditional but certainly advised if you don’t have a good crosscut saw.
Log Dogs – Two large metal staples to secure the log in place while hewing. A 2×4 nailed/screwed to the log works as well.
Marking Tools – Chalk line and carpenters pencil.
Level – To create plumb and level lines for the layout.
Measuring Device – Measuring tape or ruler for layout dimensions.
Cant Hook – Not essential but helps when moving larger diameter logs.
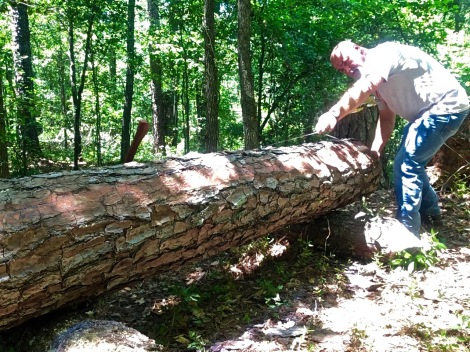
Tree Selection
Tulip Poplar grows fast, straight, and uniform. However, if you’ve ever split this wood, you’ve probably noticed that the grain tends to run off in a spiral fashion to one side of the log. My experience hewing, which is limited, Tulip Poplar caused me to change directions of swinging a few times to follow the grain orientation in such a way as to cut across the grain. This prevented my ax from following the grain deep in the stock.
I’m now experimenting with pine. Whatever tree is used, green wood hews easier than seasoned. A tree with clear grain and no knots (or not many of these rascals) is desirable.
Dog the Log
The first order of business is securing the round log to prevent movement in the hewing process. You’ll need two shorter logs which the longer log will rest on perpendicular. These supports are called cribbing. Larger cribbing logs will lift the work off the ground to a more comfortable working height. Your back will thank you.
Drive one end of a log dog into the long log with the other end driven into the cribbing log. Repeat this step on the opposite end. This process is called dogging the log.
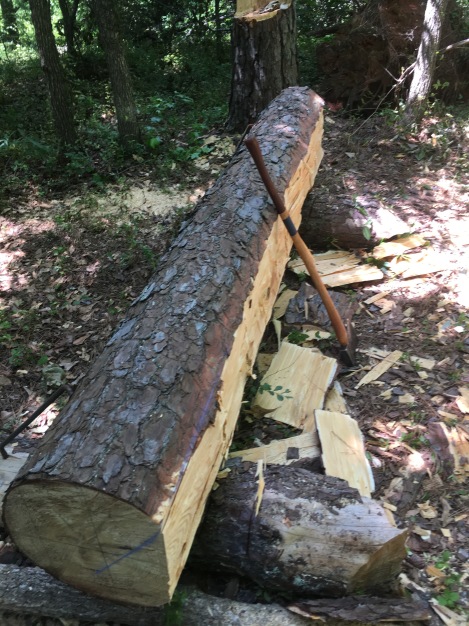
A dogged tulip poplar at my fixed camp.
My crude log dogs are two pieces of rebar which I forged in my shop. This metal is not the best as it can be brittle and break under stress while forging.
Below is our video of the tulip poplar hewn above.
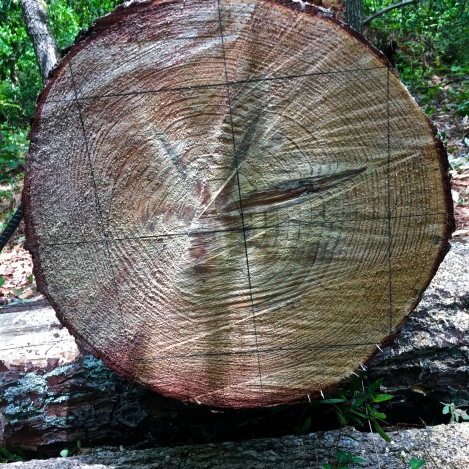
Lay Out Dimensions
Cut both ends of the log perpendicular with a saw. Now you have a smooth surface to lay out the dimensions of your timber on opposite ends of the log.
A 10 x 10 inch square layout on one end of the log.
Start the lay out at the top end of the log (smallest diameter). Measure and mark the center of the log with your ruler and pencil. This may not be in the pith of the tree. Place your level on the mark and draw a plumb line down the middle of the log. Measure over from that line your desired width and make a mark. If you’re finished timber width is 10 inches, this mark would be 5 inches from the center mark. Repeat this layout on the opposite side of the center mark. Use the level to mark both of these vertical plumb lines.
For a 10 x 10 inch square timber, measure and mark from the center line up 5 inches and down 5 inches. Draw the top and bottom lines level. All four lines should be drawn to the edge of the log.
Repeat this lay out on the butt end of the log.
Snap Chalk Lines
Strip or flatten the bark off the log where your chalk line will be snapped. I use my felling ax for this step. Cut a notch or slice on the pencil line at the top edge of the log. Secure your line on the end of the log and run the line through the notch, down the length of the log, and through the other corresponding line notch at the opposite end. Secure the line and snap the chalk line.
Be sure to snap the line vertically to preserve the plane laid out on the end of the log.
Snap the line by lifting and releasing the string vertically. This will create a plumb line down the length of the log. This is the plane you will follow for a squared off timber. Note: If you lift the line out away from the log, your plane will not match your layout on the end of the log.
Scoring
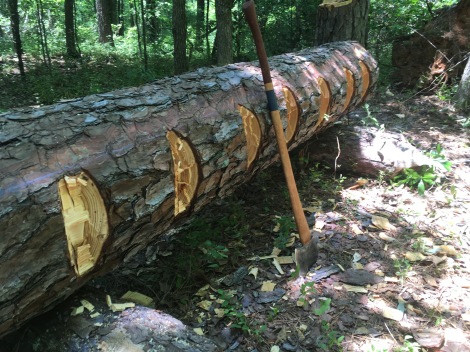
The pine I’m hewing now is the largest diameter (18 inches) I’ve worked. This size is large enough to stand on to score. I’ve only done two types of scoring: slash and juggling (or joggling).
Slash scoring is done by making a series of overlapping ax cuts down the length of the log. These slash cuts are angled (30-40 degrees) into the log and about 3 inches apart down the side of the log. A sharp felling ax with a 36 inch handle is what I use. The longer handle makes reaching the bottom side of the plumb line “easier.” There’s really nothing easy about hand-hewing timber.
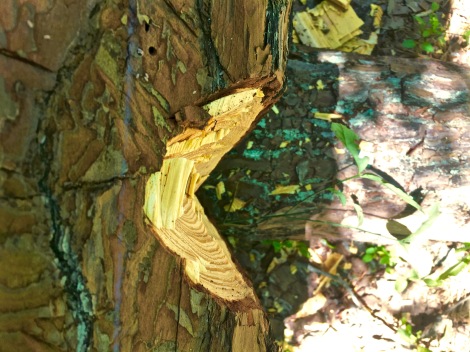
V-notches cut to the line create jogs which are removed in the juggling process. The notches don’t have to be super clean.
The other scoring method I’ve used is juggling. Also called joggling due the joggles protruding between the V-notches down the side of the log. If the log is large enough to safely stand on, step up on the top of the log and cut notches to the line about a foot apart the entire length of the log. Make your notches about twice as wide as the depth needed to reach the line. Standing on top the log gives me a better read on making my notch vertical down the entire plane of the log.
A view from above a V-notch. The blue chalkline is faintly visible to the left.
Slash scoring, in my experience, is best when there is not a lot of wood to be removed to reach the line. With more than a couple of inches to be removed, juggling works better for me.
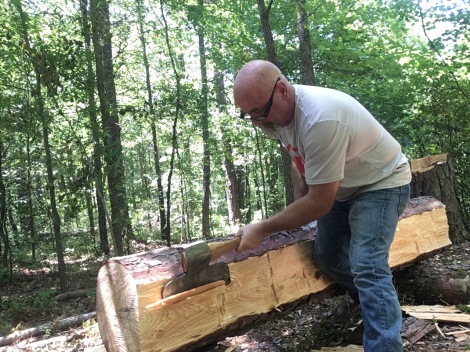
Juggling
You’re now ready to remove the joggles or the slashes, depending on the scoring method used. For simplicity sake, I’ll describe the method for removing joggles. Either way, this step holds the most potential for injury. The reason being, if your juggling on the ground, is that your making powerful vertical ax strokes which are not backed up in your frontal zone.
There are ways to reduce the risk of an ax in the foot. The safest way is to swing from on top of the log to remove the jogs… that’s if the you’re able to stand on top of the log. Be sure to keep your feet behind the chalkline and the swings below your feet.
Jogs removed with a felling by standing on top of the log. I tend to cut too close to line. About a half-inch of wood should be left for the hewing process.
You can remove jogs while standing on the ground. With the log to your left, place your right foot forward and about two feet to the right of the log. Your left foot should be well behind your body with the left leg braced on the log.
I’ve also removed joggles by standing on the opposite of the log. This is very safe but requires that you turn the log at an angle so you can reach the joggles with your ax. This also means the log must be repositioned to plumb before hewing. On smaller diameter logs, straddling the log is an option.
I like using my felling ax to remove joggles. I’ve seen some use a broad ax to do the job. And then again, Tim at Oxbow Farm (link to his YouTube channel) has demonstrated hewing beams using his felling ax only. Do what works for you.
When the joggles are removed, there should be about a half-inch of wood proud of the chalk line. This remaining wood will be removed in the next step.
Hewing
Hewing to the line transforms a round log into square timber. The hewing swing is not a full ax stroke. It’s mostly performed through forearm movement. Hewing is best performed with a circular slicing motion on each swing regardless of the style of ax used.
Reverse this stance if you have a right-hand hewing ax.
Note: The pictures shows me using my broad ax which is hung left-handed. I’ve yet to re-handle it for right-hand hewing. However, when hewing with my felling ax, I hew right-handed, which is described below.
Stand with the log to the left of your body for right handers. Place your right foot forward and away from the log with your left foot back. Brace your left leg against the log for stability. Grip the ax handle right hand forward and left to the rear. The forward hand should be close (6-8 inches) to the ax head.
The traditional broad ax handle in America was short, in the 20 inch range. Handles were steam-bent into S-shapes or dog leg patterns to help the hewer’s knuckles clear the log edge on swings. My handle is straight and causes me to bark my knuckles from time to time.
Start from the top of the log and work towards the butt end. Begin with gentle strokes on the line to separate the remaining wood. Continue to raise and lower the ax in a controlled manner as you follow this kerf to the bottom of the log.
Very thin shavings can be produced using a broad ax.
Each swing should end in a slicing motion. Some of the chips removed will be as thin as potato chips. When your forearms need a break, and believe me, they’ll be screaming, standup and sight down the log edge to check for plumb. I usually notice that my bottom edges have un-hewn wood proud of the plumb line.
The process described above is repeated on the remaining three sides of the log. To hew the opposite side of the log, remove one log dog and reattach it on the hewn side of the log. Removing both dogs at once may shift the log out of plumb. With two sides are hewn flat, the timber will lay steady on the cribbing. If the cribbing is level, the remaining two sides can be hewn plumb. Adjust as needed.
The hewn surface isn’t as smooth as I’d like on the first pass with the broad ax. It needs a another pass to help smooth out the side.
My journey in the traditional skill of hand-hewn timber has just begun. I’m rewarded with useable timber, rough to experienced hewer’s standards, and a deeper connection to simple technology and the old ways.
P.P.S – If you find value in our blog, Dirt Road Girl and I would appreciate your vote on Top Prepper Sites! You can vote daily by clicking hereor on the image below. Check out all the other value-adding sites while you’re there…
What’s in your pockets? If you look at the popular trend of pocket dumps on social media, the answer appears to be everything, except the kitchen sink. I seldom see fire tools in these pocket dumps. Of course, our Everyday Carry items will look different depending on our jobs, lifestyle, and skill level.
Several of us from the Prepared Bloggers are sharing different EDC (Everyday Carry) items we never leave home without. Being the pyro that I am, I choose fire. Be sure to read the other value-adding articles by my friends in the links below this article.
The concept of carrying essential items on one’s person is smart habit. If ever separated from your main preparedness kit, the stuff in your pockets, plus your skillset to use said items, may be the only tools available.
The tool doesn’t determine your success. Your skills determine the tool’s success.
The quote above applies to preppers, survivalists, campers, carpenters, homesteaders, accountants, school teachers, and, well, all of us.
Pockets of Fire
If you frisked me, no matter the locale (urban or wilderness), you’d discover a minimum of three ignition sources in my pockets…
Mini Bic lighter (open flame)
Ferrocerium rod (spark ignition)
Fresnel lens (solar)
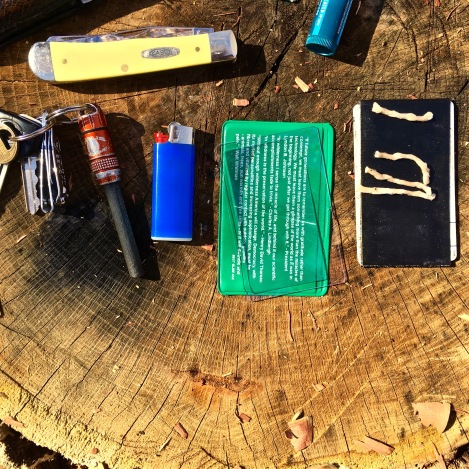
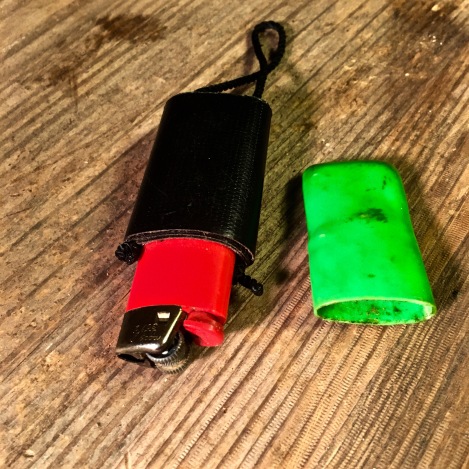
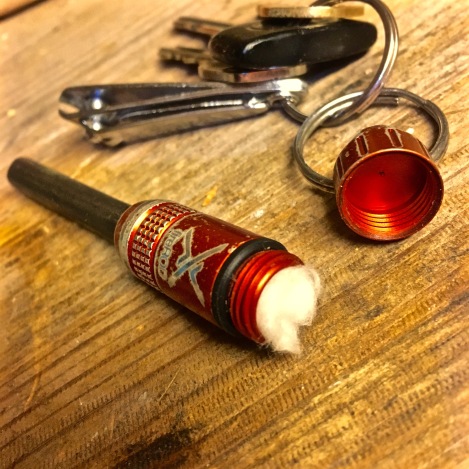
L to R: Key chain Exotac fireRod, mini Bic lighter, wallet fresnel lens, and two wallet tinders: duct tape and waxed jute twine.
Let’s break these down and discuss the advantages, disadvantages, and a few tips to successfully use each fire tool. Keep in mind that these are simply ignition sources and do not guarantee a sustainable fire. For more info on the importance of fire, you may find this article useful.
Bic Lighter – Open Flame
Since a road flare isn’t practical for EDC, I carry a mini Bic. The resemblance of road flares to dynamite puts people on edge, especially law enforcement officers. I do have them in my vehicle kits though.
The times you really need fire is usually when fire is hardest come by. I’ll take an open flame over sparks, solar, and especially fire by friction every day of the week and twice on Sundays! As mentioned previously, you must put in deliberate practice to hone your fire craft skills by actually Doing the Stuff or these fire tools just look cool in pocket dumps on Instagram.
To learn more on building sustainable fires, browse our Fire Craft Page.
Cold hands loose dexterity and make normally simple tasks, striking a lighter, difficult. Modify your EDC lighter by removing the child-proof device wrapped over the striker wheel. Pry it up from the chimney housing. Once free, pull the metal band from the lighter. Two metal wings will point up after removal. Bend the wings down flat to protect your thumb when striking the lighter.
What if your lighter gets wet?
On a recent wilderness survival course, I taught our boy scout troop how to bring a wet lighter back to life. Each threw their non-child-proofed lighter into the creek. After retrieval, they were instructed to blow excess moisture out of the chimney and striker wheel. Next, they ran the striker wheel down their pant leg several passes to further dry the flint and striker. Within a few minutes, lighters were sparking and each scout had a functioning fire tool again.
The lighters I carry in my bushcraft haversack and hiking backpack are more tricked out than my plain ole’ EDC Bic. Here’s a few ideas I’ve picked up for adding redundant lighters which may be of interest…
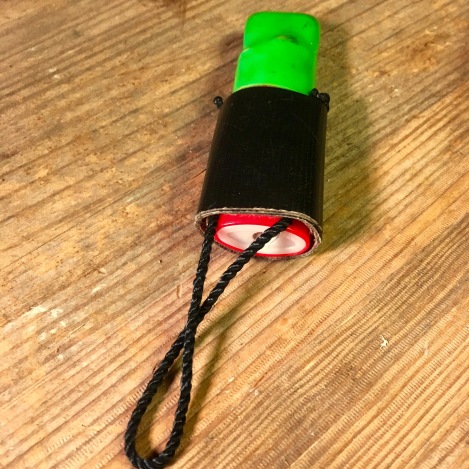
This full-size Bic is wrapped in duct tape holding a loop of cord which attaches inside my haversack. The green cap (spring clamp handle end) idea came from Alan Halcon. It keeps moisture out and prevents the fuel lever from being accidentally depressed.
The cap removed reveals the child-proof device missing.
Advantages
A mini Bic will give you approximately 1,450 open flames.
A wet Bic can be back in service within a minute or so.
It’s difficult to monitor the fuel level unless the housing is clear.
They are consumable… eventually.
Extreme cold limits a Bic. Keep it warm inside a shirt pocket under your overcoat.
A mythical disadvantage is that lighters won’t work in high altitudes. If Sherpas use them on Mt. Everest, this lowland sherpa is sold.
Ferrocerium Rod (Firesteel)
In the bushcraft/survivalist/prepper community, ferro rods have the hyped reputation of being a fail-safe fire maker. The device is simple and won’t malfunction, they say. Scrap the metal off the rod, and, poof, you have a fire, even in the rain. Sounds good but don’t buy the marketing hype!
“Much of the social history of the Western world, over the past three decades, has been a history of replacing what worked with what sounded good.”
~ Thomas Sowell
In my experience teaching both children and adults, using a ferro rod for the first time ends in failure more times than not. Yet everyone is told to add one to their emergency fire kits. I carry a small one on my key chain because I enjoy practicing fire craft skills. They’re a novel way of making fire but, like any skill, require practice to become proficient.
The fireROD by Exotac has a watertight compartment which will hold a full cotton makeup pad for tinder.
Of these three ferro rod techniques – push, pull, and thumb lever – the latter is my favorite on softer firesteels. It offers more accurate placement of sparks. The drawback is that the thumb lever requires more fine motor skills and coordination which go bye-bye in an adrenaline spiked emergency scenario. That’s why I carry a Bic!
If you’ve never tried the thumb lever technique, here’s a short video demonstration which may help…
One of the many reasons I practice fire by friction is the fact that it teaches the importance of preparing proper tinder material. Marginal tinder takes more heat to combust. Even with 3,000 degree ferro rod sparks, you may fail to ignite damp, finely shredded tinder. The amount of heat needed for ignition depends on the amount of surface area compared to its volume. Think in terms of small hair-like fibers. When you think you’ve got fine tinder, shred it some more.
Even without a “proper” striker or knife, any object hard enough to scrap metal off makes a good substitute.
A ferro rod/metal match is not my first choice in fire starters. It’s a fun bushcraft tool to use though.
Advantages
Scraped with a sharp rock, broken glass, or any object sharp enough to remove metal particles, 1,500º F to 3,000º F sparks spontaneously combust as they meet air.
Sparks even in wet conditions.
The average outdoors person will never use up a ferro rod.
Can ignite many tinder sources.
For more info on ferro rods, click here. My EDC rod is way smaller than the one in the link.
Disadvantages
They are consumable… eventually.
They’re difficult to use if you’ve never practiced with this tool.
Intermediate skill level needed.
Fresnel Lens
A quality fresnel lens is useful for starting fires, examining plants and insects, splinter and tick removal, and reading navigational maps. I carry a 4 power lens in my wallet. It takes up about as much space as a credit card. I ordered a 3-pack from Amazon for under $7.
Sunshine is loaded with electromagnetic energy in the form of photons. A fresnel lens simply harnesses the energy to a focused point creating enough heat to start a fire.
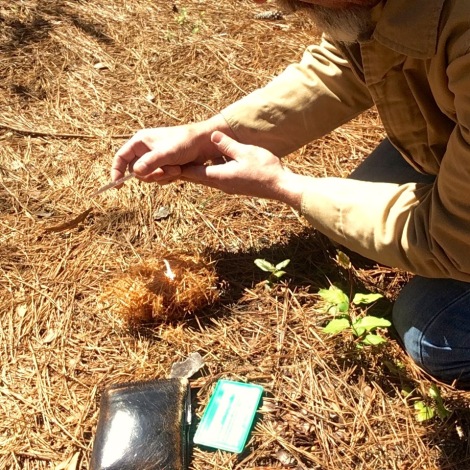
A few tips I’ve learned may help here. Not all tinder material will combust. You’ll get smoke and char but may never have an actual flame. In the short video below, within a second you’ll see smoke on crushed pine straw. Once a large area was smoldering, I had to blow the embers into a flame.
Increase your odds of solar ignition by keeping the lens perpendicular to the sun’s rays and the tinder. Move the lens closer or further away until the smallest dot of light strikes the target. Brace your hand to steady the spot of heat. Smoke should appear almost immediately. Afternoon sun is stronger than morning sun. Keep this in mind when practicing this method.
Keep the lens perpendicular to the sun’s rays to concentrate the most radiant energy on your tinder.
Just for fun, I discovered that cocoa powder, which I carry in my bushcraft kit, makes a useable coal with solar ignition. Have fun playing and experimenting with fire!
Advantages
Beginner skill level. Ever drive ants crazy with one as a kid?
Can ignite different tinder materials
Lightweight
Saves other ignition sources on sunny days.
Never wears out. Always protect your lens from scratches and breakage.
Disadvantages
Dependent on sunshine.
May only create an ember which can be coaxed into flame.
EDC Fire Tinder
Duct tape and waxed jute twine ride alongside my fresnel lens in my wallet. You’ll also find a full-size cotton makeup pad stuffed inside the cap of my ferro rod. Wrapping a few feet of tape around an old gift card gives you an emergency tinder source for open flame ignition. Setting fire to a foot long strip of loosely balled duct tape will help ignite your kindling. There are so many multi-functional uses of duct tape, fire being one of them, that you should always carry at least a few feet in your wallet.
The waxed jute twine can be unravelled to create surface area for spark ignition. Unraveled, it can also be used as a long-burning candle wick. Either way, it’s nice to have another waterproof tinder in your pocket/wallet. Here’s a link if you’re interested in making your own waxed jute twine.
If all you have for ignition is a ferro rod, duct tape will ignite, but again, don’t count on it if you haven’t practiced this method. See our video below…
It never hurts to have multiple fire starting methods on your person. Drop us a comment on other EDC fire starters that I haven’t mentioned.
Be sure to scroll down and check out the other articles by my friends at the Prepared Bloggers.
P.P.S – If you find value in our blog, Dirt Road Girl and I would appreciate your vote on Top Prepper Sites! You can vote daily by clicking hereor on the image below. Check out all the other value-adding sites while you’re there…
Everyday carry, or EDC for short, refers to items that are carried on a regular basis to help you deal with the normal everyday needs of modern western society and possible emergency situations.
Some of the most common EDC items are knives, flashlights, multitools, wallets, smartphones, notebooks, and pens. Because people are different, the type and quantity of items will vary widely. If you have far to travel for work or have young children, your EDC could be huge!
But, even if you’re just setting out for a walk around the neighborhood, taking your essential items with you in a pair of cargo pants with large pockets, may be all you need to be prepared.
Follow the links to see what a few of the Prepared Bloggers always carry in their EDC.
Shelle at PreparednessMama always carries cash, find out why and how much she recommends.
I recently took three of my students on a scout through a patch of woods surrounding our school to select a route to simulate the Trail of Tears they were studying. This was nothing close to the tragic event of the Cherokee people being rounded up and forcibly removed from tribal homelands. For our students, a short walk in the woods was better than sitting in a cramped desk reading about this dark time in our country’s history.
Students hit the trail with their belongings; books, book bags, and whatever they wore to school. Many were ill prepared for the mid-30 degree weather. Our first stop was a persimmon tree with fruit in different stages of ripeness. The bravest students shared in the bounty with me.
There is no way to carry enough provisions to sustain you on a grueling 800 mile journey. Foraging was essential. The inner layer of bark from a pine tree was also sampled. A few of the students chewed the uncooked phloem (inner bark) like chewing gum. When cooked over a fire, this layer of bark provides food filled with nutrients and vitamins. Adding a cup of pine needle tea from said tree will boost vitamin intake.
A quick demonstration of the essential tool of humanity, fire, came at the end of our simulation. Flint and pyrites were the precursor to modern flint and steel which the Cherokee obtained through trade. Further in the past, friction methods would have provided fire.
There were no convenience stores or outfitter shops along the way to Indian Territory. The logistics of moving groups of a thousand or more souls (new born to elders) through a rugged landscape in modern times would be a nightmare. We can only imagine the horrible conditions encountered in 1838. While some were fortunate to have a horse or wagon for conveyance, the majority carried their burdens on foot.
We can only imagine the hardships faced during their forced removal. Our brief exercise was instructive. Many questions came throughout the walk. Collecting resources for food, clothing, and shelter to sustain one family, much less groups of 1,000, would take extensive knowledge and experience which Native Americans had used for thousands of years.
Only a Fool Comes Home Empty Handed!
In Postcards from the Past, Scott Jones, my friend and prehistory mentor, offers the perfect quote describing me in this Eskimo saying, “… only a fool comes home empty handed!”
Rock On
Making expedient cobble stone tools using bipolar percussion at one of Scott Jones’ workshops.
In the view of a tenderfoot, the basketball-sized rock we spotted on our initial scout trip was nothing special. It was just a heavy rock. All three of the young men looked at me like I was crazy as I hoisted it to my shoulder and continued walking. Midway back I passed my burden to one of them. One doesn’t simply walk past a piece of chert that size. One either carries it home or remembers the location for later retrieval.
Below is a 34 second video I shot using the rock to start a fire…
Chert, a sedimentary rock, was a favorite stone for prehistory tool makers. Today its curvy conchoidal fracture and hardness allows modern flint-knappers to shape primitive projectile points and cutting tools. Chert can be found in earthy colors ranging from white to black with a waxy, smooth luster when fractured. Quartz and quartzite are rocks I carry home often.
Sticks and Bones
My favorite wood types are those who swallowed fire, as Mark Warren says. Fast-growing soft woods such as cedar, tulip poplar, basswood, sassafras, white pine, willow, and mimosa to name a few, are more porous. When rubbed together skillfully, they readily give up the fire they swallowed.
My tree collection, much to Dirt Road Girl’s chagrin, takes up a sizable portion of our backyard. Lots of Eastern Red Cedar continues to be added for benches and furniture… which makes DRG smile.
Black Walnut split and ready for carving.
Wooden utensils such as spoons, bowls, cutting boards, and kuksas are waiting inside my woodpile. Wood plays a vital role for camp comforts… and not just as firewood. The following wood projects made from trees and other woody plants may help channel your inner woodsman…
Bones are a useful resource I run across from time to time in my woods tramping. A five gallon bucket in my shop contains remains of different woodland critters. Antlers make wonderful tools and functional accents for my leather work. I’m certainly not opposed to pulling to the curb to collect road kill. Some of my most prized roadside finds include beaver, bobcat, and deer.
Wild Pantry
Chanterelles foraged this past spring at base camp.
As noted above, collecting wild food on hikes is a fun way to supplement your food cache. Just remember that every plant is edible… ONCE. This statement isn’t about foraging fear-mongering, of course there are poisonous plants in the wilderness. But with proper guidance from an experienced foragers, anyone can enjoy wildcrafting.
Weeds, plants, clay, and trees were all used before modern medicine for the purpose of healing and preventive health maintenance. Documentation shows that the 19th century Cherokee people used about one-third of the 2,400 species of plants available to them in southern Appalachia for food and medicine.
Below are a few links to articles we’ve written which may help you broaden your view on useful plants for your medicine cabinet:
Our short simulation was simply an attempt to open student’s eyes to life and death on the Trail of Tears. An estimated 15,000 to 16,000 Cherokee started this journey. Even with their extensive foraging knowledge, over 3,000 lives were lost to disease, exposure, and starvation along the way.
It is my hope that our simulation gave our students a small glimpse of this historic tragedy. May we all remember.
P.P.S – If you find value in our blog, Dirt Road Girl and I would appreciate your vote on Top Prepper Sites! You can vote daily by clicking hereor on the image below. Check out all the other value-adding sites while you’re there…
In the context of wilderness survival, the speed at which you are able to build a fire could mean life or death. There are many real-life accounts available where cold and wet people die in the woods.
The purpose of these exercises is not to compete against one another. However, a little friendly competition among friends is always fun. The most important aspect of practicing emergency fire craft and shelter building is the role these skills could one day play in keeping you alive in the wilderness. Plus, they make camping way more comfortable.
Fire means camping in comfort… and there’s coffee involved!
Poor Decisions and Survival Experts
You don’t have to reach “survival expert” level to build a fire or make shelter. Here’s a little something for the self-proclaimed survival experts to think about. My buddy Tommy runs a popular Facebook group and put an interesting spin on this disturbing online trend… something I’d never thought of but makes total sense.
Here’s my paraphrased version…
Expert status takes thousands of hours and experience in a chosen field. Making poor decisions typically lands you in a survival situation. People claiming to be survival experts should also add to their resume, “Poor Decision-Making Expert.” I’ve never seen nor have I heard of anyone being in a real survival situation for 20, 30, or even 40 years and lived to tell about it.
To be an expert in survival, one would have had to be in hundreds of real survival situations. That basically makes one horrible at preparing beforehand. I can’t speak for you, but “Poor Decision-Making Expert” is the last thing I’d want in my bio… or tombstone.
I prepare by practicing in the field with varying conditions. Carrying a few pieces of emergency equipment and developing the skills needed to use said equipment gives you an edge if things go sideways in the woods.
The following speed drills have suggested times to shoot for based on our physiological response to cold. Cold stress has a way of slipping up on you and can overwhelm the body’s ability to thermoregulate. Consequences include impaired performance and even death.
2 Fire Speed Drills
Besides being well clothed for your environment, fire craft may be the most forgiving of all survival skills. Here are two speed drills to help develop proficiency in making life-sustaining fire.
For more info on my philosophy on Emergency Fire Kits, read this article. We can play around with “what if’s” to manipulate and test our skills. But at the end of the day, my trusty Bic is my go-to for fire. That’s only because I don’t have a road flare in my kit. Oh wait… I do, thanks to Alan Halcon’s suggestion. The point of these drills though is to practice different “what if” scenarios.
1.) Five Minute Water Boil
Disinfecting water for hydration can be achieved by boiling. For this drill, you are allowed to use a spark ignition source only. For context, you’re unprepared and only carried one lighter and no sure fire tinder… and the lighter was emptied when the tab was pressed down against that can of sardines stuffed in your backpack.
Flames surrounding all sides of the canteen.
Equipment:
One metal water bottle
Ferro rod and striker
Natural tinder material and sticks off the landscape for your kindling/fuel
Use a large tin can to hold the 32 ounces of water if you don’t have a metal canteen
Timer
Collect tinder, kindling, and fuel size material. This task will consume the most time for this drill. Try to collect these materials in 10 minutes or less. Look for standing dead trees with low hanging limbs. Become familiar with the trees in your locale which produce instant kindling. Resinous trees are a fire-making dream.
Breaking the small twigs, you should hear a distinctive snap signaling a good, dry candidate for fire. I’ve found living Cedar and Beech trees often times have small, dead limbs within arms reach. If you have Hemlocks in your area, you’ll not find a better source of dry, pencil-led size kindling.
Once you have all the necessary natural material collected, start the clock and make your fire lay, ignite your fire, and bring the water to a rolling boil… in under 5 minutes. Remember, time is of the essence.
“Fire don’t care about pretty. It eats ugly. In fact, fire loves chaos.”
For this drill, I’ve found that making a long tubular bundle of small twigs and breaking the bundle over my knee to create an A-frame structure works well. Credit for this technique goes to Christopher Wick’s demonstration at the Pathfinder School years ago. You may want to use gloves for this part.
Chris Wick preparing kindling
Common Water Boil Mistakes:
Natural tinder material not prepared properly for spark ignition.
Kindling too large (not enough surface area to volume ratio) for quick ignition.
Canteen tips over. Lay finger-size sticks flat on the ground to form a flat platform. The stick platform also reduces heat transfer from the cold ground to the metal container.
The fire lay doesn’t surround the canteen. You want flames to contact as much of the canteen as possible.
Blowing or fanning the fire from the top down. Get down low and blow from the bottom of the fire lay… without singeing your eyebrows off.
Now add a variation to this water boil drill. Use a lighter or matches and your favorite emergency fire tinder. Compare your times. How’d you do? Get creative and try doing this drill one-handed to simulate an injury. Try it in the rain, as well.
Here’s what you’ll need. Keep in mind that these are challenge guidelines not competition rules. You’re only competition is you for the sake of testing your skills.
One wood billet (species of your choice) around 6 inches in diameter and about one foot long – I used a standing dead red cedar billet for my challenge.
Sharp ax or hatchet
Sharp knife
Bush pot or tin can large enough to hold one quart of water
Kitchen matches (strike anywhere type)
Timer
There are dangers involved when using a sharp ax. Even more so when using a short-handled ax/hatchet. A bleeding ax wound puts you in a whole new predicament. If you practice this speed drill, know that you are using sharp cutting tools which do not discriminate about what they cut… fingers, shins, and hands included. If you are new to ax and knife work, spend time learning to properly handle these cutting tools. You are responsible for your own appendages.
Take your time and keep it safe. One piece of gear worth considering for beginners is a Kevlar or chain mail glove.
For those experienced in ax and knife work, the time frame for this speed drill is under 10 minutes once you have your wood billet ready. The idea is to create all the needed items, tinder, kindling, and fuel from one log. This drill will come in handy if you ever need to find dry material for fire in a rain-soaked forest.
My first attempt at this drill took over 12 minutes. My second attempt was in the eight minute range. Below is my video of this drill:
Check out this lumberjack competition where a lady smashes all the guys with a time of 3:06!
Don’t get hung up on the stated times for the speed drills. The important thing about timing yourself is that you are able to evaluate your progress in this skill. Let us know if you give these a try.
P.P.S – If you find value in our blog, Dirt Road Girl and I would appreciate your vote on Top Prepper Sites! You can vote daily by clicking hereor on the image below. Check out all the other value-adding sites while you’re there…
Containers made from tree bark existed long before plastic bags, cardboard boxes, and canvas haversacks came about. With every trek in the woods, I find useful resources. That glob of pine sap, stones, bones, or wood somehow ends up going home with me (much to the chagrin of Dirt Road Girl).
It’s a condition which I wish to never be cured.
Scott Jones sums up this affliction with this quote in his book, Postcards to the Past…
“The Eskimo say that only a fool comes home empty handed!
~ Lewis Binford, in Looking at Currated Technologies – 1979
If you suffer from this same condition, you’ll need a something to transport your found treasures back home or to your camp. While any container will usually work, nothing compares to a handcrafted bark container for both functionality and aesthetics for us out of doors types.
Traditional Berry Buckets
The best time to harvest tree bark is when the sap is rising in late spring and early summer. I know, I meant to post this tutorial in June. You’ll have to wait a few months to skin a tulip tree ((Liriodendrontulipifera). So bookmark this one for when the sap starts to rise again.
Material and Tools
Knife – about all you really need
Ax or saw if you plan to fell a tree
Awl or drill
Cordage
Tulip Poplar tree
Rim wood
Very few tools are needed for bark containers
Find the Right Tree
Tulip Poplar is a fast growing (soft) hardwood with many uses in the southeastern United States. Other candidates for bark containers include; basswood, cedar, white birch (which we don’t have in Georgia), and others.
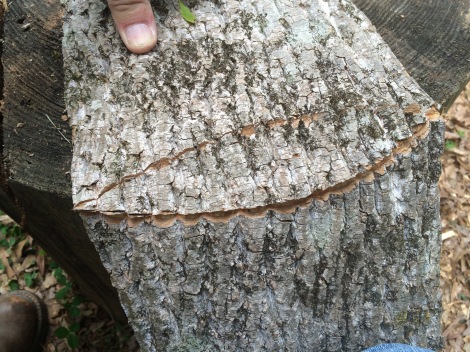
You’ll know you’re barking up the tree at the wrong time once you’ve attempted to peel the bark off. If the sap isn’t rising, the bark won’t come off easily. I look for young tulip poplar trees growing under dense canopies. They tend to grow straight with fewer lower limbs and have thinner bark. A 6 to 7 inch diameter tree is ideal.
To fell or not to fell… that is the question. I’ve done both. For smaller containers like my knife sheath, I simply cut a patch of bark off the tree.
You’d think completely girdling around would doom a tree to death. However, as a test this past spring, I removed a section of bark from the entire circumference of a small tulip tree (5 inches in diameter) and it still has its green leaves in early October. Sweetgum (Liquidambar styraciflua) is similarly resilient tree.
[Edit: A fellow woodsman commented on the above paragraph who is concerned that people with access to public land only would take my statement as scientific fact and start completely girdling trees. My actions are not scientific and should only be done on land you own. I was totally surprised that the tree is still living after removing bark from the entire circumference. Also, this particular tree was in a thick grove of tulip poplars. Please, only take trees from private land keeping forest management in mind.]
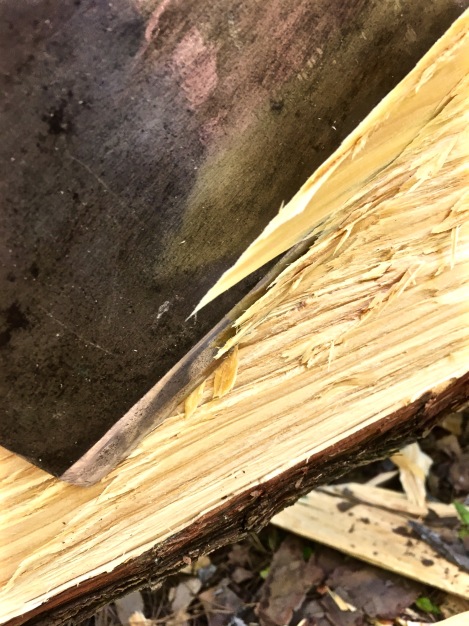
Score and Skin
Score the bark down to the sapwood with a knife or hatchet. I use a solid stick to strike the back of the blade after a free-hand score mark has been applied to the bark.
Once scored, press the tip of your knife into one corner and lift to separate the outer and inner bark from the sapwood. From that point, I use a wedged stick to run along the edge to loosen and lift the bark. With a gap created, you can use your fingers to further separate the bark from the tree. Warning: There are little spikes under the bark which will draw blood. Go slow and be careful bare handed. Gloves are recommended, but I enjoy the texture and feel of wet sap and bark.
If harvesting large quantities from felled trees, I use a wedged stick to separate bark instead of bare hands. When you’re near the point of full separation, you’ll know the bark is free when you hear a distinctive, satisfying snap sound.
Cut to Length
Place the bark flat on a level surface and cut to length. The length of bark should be a bit over double the intended height of your bucket. Trim all edges smooth to create a long rectangle.
Bark length should be double that of the intended height of your container
Score a Football
With the outer bark facing up, measure and mark the mid-point of each long side of the rectangle. Use your knife to score an arch which runs from side to side. Repeat this step to form a football shape on the outer bark. Be careful to not cut through the inner bark. This layer of bark acts as a hinge when folding the basket sides together. When scoring in my shop, I use a utility knife with a about 1/8 inch of blade.
The size of the “football” determines the opening size at the top
Turn the bark over with the inner bark facing up. Place your hand on the middle of the bark and gently pull one long end to a vertical position. Now fold the other side. Your berry bucket is taking shape.
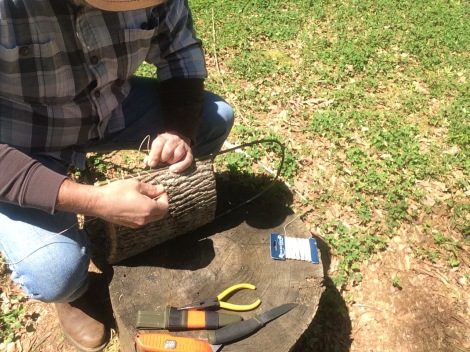
Bore Edge Holes
Use an awl or drill to bore a line of holes on both edges of the bucket. The spacing is up to you. I usually leave an inch and half to two inches between holes which are placed about 1/2 to 1 inch from the edge. The hole diameter should be large enough to accept your cordage/lacing.
My friend, James Gibson (Knob Creek Forge), traded this handmade awl to me
Lace Edges
Artificial sinew makes strong lacing. It can be purchased online or at craft stores. I’ve also used tarred bank line, leather, and a few other types of string. The artificial sinew can be threaded into a leather stitching needle to make quick work on this part of the project. I’ve seen some buckets laced with other inner barks like hickory (Carya).
Stitching the river cane handle into the sides of DRG’s berry bucket
Note: As the bark dries, it will shrink and the lacing may need to be re-tightened.
Start lacing at the bottom edge near the football cut with the edges joined together. Tie off with a simple overhand knot and run the stitching up the edge. Make a pattern if you like. Secure the lace at the top of both seams.
Add a Rim
Cut a flexible stick long enough to form a rim around the top opening of your bucket. I like to use two thin strips of white oak about the size of a hardware store paint stirrer. Thinned enough, they flex just right and add a little contrast. The rim will prevent the bark from curling in as it dries.
A white oak rim to finish off the bucket
Bore another series of holes along the rim edge. Place the rim wood pieces on the edges and lace them in as you did the sides. Leave enough lacing on both ends to make loops if you plan to add a carry handle made of rope. If you’re using two rim pieces like mine, you’ll need to bore holes in the ends to tie them together to hold the form you want.
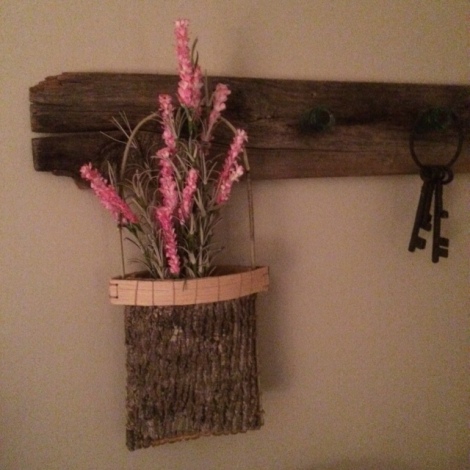
I made a handle out of river cane for Dirt Road Girl’s berry bucket. It hangs in the living room with dried flowers as a conversation piece. Looks pretty too!
This one will probably never transport berries… imagine that
Other Bark Containers
Once you’ve made one berry bucket, you’ll want more. With a bit of creativity and imagination, you can begin making many functional and aesthetically pleasing alternative containers from tree bark.
P.P.S – If you find value in our blog, Dirt Road Girl and I would appreciate your vote on Top Prepper Sites! You can vote daily by clicking hereor on the image below. Check out all the other value-adding sites while you’re there…
Judging comments here and on social media, our last article, Primitive vs. Modern, was well received.
Then I spot this portion of Alan Halcon’s comment in my notifications, “This article really touched a nerve…”
I braced myself to read the full comment from someone I hold in high esteem in the survival community.
If you’re unfamiliar with Alan’s modern and primitive survival skills, you owe it to yourself to check him out at Outdoor Self-Reliance. Anybody who produces consistent hand drill coals in 12 seconds is someone who has my respect. He also holds the record of spinning a hand drill coal in the unthinkable time of… wait for it… TWO SECONDS!
Being familiar with his way of challenging our “best practices” and beliefs in the survival community, I clicked to read more of his comment…
“This article really touched a nerve, albeit in a good way.
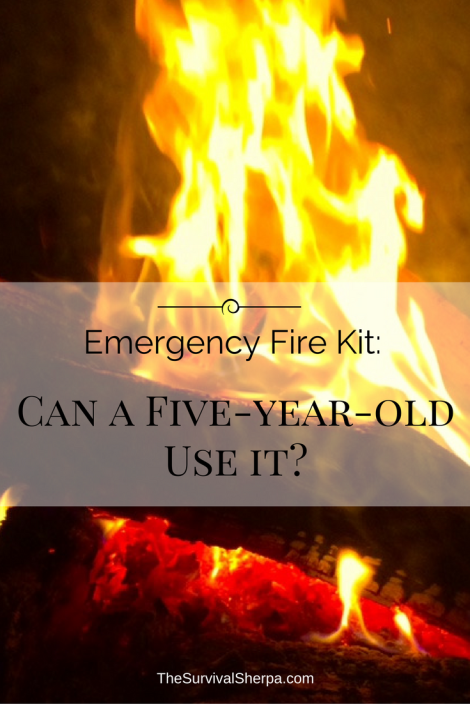
For so long, I’ve constantly said a similar thing— In a survival situation, when I want to start a fire, I want a road flare. During my classes, I share with my students, “My litmus test for a survival fire starting tool is… Can a five-year old use it?” If the answer is no, it has no business in your survival kit…”
Why would the world record holder in fire by friction prefer a road flare over hand drill or bow and drill in a real survival scenario? It’s pretty simple. Fire is life. The times we need fire the most are usually when fire is hardest to come by. There’s not much wood, wet or dry, a road flare can’t bring to combustion temperature.
With that being said, we should re-examine our survival fire kits.
Let’s say you’re somehow incapacitated on a back country camping trip that turned sideways. Your young son or daughter will need to make fire for warmth until rescuers pin point your Personal Locator Beacon. Self-rescue is no longer an option.
An emergency fire kit should have simple, sure-fire methods of combustion. This is not about a fire kit you take to the woods for experimentation. Remember to keep it simple enough that an inexperienced child can make fire.
Before getting into details of ignition sources, I can’t stress enough the importance of surface area to volume ratio. I’ve watched many adults fail to build sustainable fires by not taking the time to prep a fire lay. A soldering torch wouldn’t even get the thing going. Collect or create small stuff first!
Emergency Ignition Sources
If I have to rely on primitive fire methods, I went to the woods unprepared. I’ll admit there may be that rare occasion where rubbing sticks together is your only chance of fire. If the plane crash in the jungle doesn’t kill you, just use the burning debris field as your fire.
Jokes aside, not many of us will be in the above situation. Most of us simply go camping, hiking, or milder outdoor adventures. That doesn’t discount the need to prepare with modern fire tools.
Bic Lighter
The trusty “thumb drill” has thousands of fires in a lightweight container that can be lit with one hand. Every lighter in my kit has been de-child-proofed. Simply bend the safety device out of the metal housing and pull to remove. Flatten the metal wings down flush with the housing and you have a lighter a five-year old can light.
Use a carabiner to attach the duct taped lighter to your kit
This simple step makes ignition easier for adults as well.
The argument often arises about lighters not working in high altitude or when wet. While I can’t speak from personal experience about lighters not working at the summit of Mount Everest, a wet lighter can be made functional again in around two minutes. Blow into the metal housing several times. Work the wheel which strikes the flint by rolling it on your pant leg. Keep this pattern up until your lighter flames.
Matches
Max imitating Pops
If you keep matches in your kit, it would be very wise to teach your children and grandchildren how to strike a match. Even more importantly, build their confidence in starting fires using only one match. This task requires as much special attention to the fire lay as you would in primitive fire making.
Which brings up the whole issue of prepared tinder – both man-made and natural…
Emergency Natural Tinder
Daryl and Kris Halseth run a family business called Dragon Fire Tinderbox. Any of their prepared tinder products weigh very little and provide an emergency source of tinder in your kit. It’s also a great teaching tool to help kindergarten-age children learn what a good tinder material looks like – fine, medium, coarse – and how it burns.
This stuff is a campfire in a bag and can be lit easily with a match or lighter. Spark ignition (ferrocerium rods) work on this tinder as well. However, keep in mind that this emergency fire kit has to be simple enough to be used by a young child.
Dirt Road Girl had trouble with consistent fires using a regular ferro rod. I bought her a Sparky™ Fire Starter for her kit. This device is pressed down to direct a shower of sparks on tinder material one-handed. Open flame is the best choice, but Sparky™ is a good backup.
In an emergency situation, the last thing you want your young child to have to find in the forest is dry, fluffy stuff that will ignite easily. Collect your own natural tinder or buy a bag of Dragon Fire for your kit.
A homemade fire starter which lights as easily as a five-year old’s birthday candle is waxed jute twine. There are no chemical accelerants in this recipe. Simply coat jute twine in wax. Flick your Bic and you have a long-lasting fire starter.
The finished product
Another fine homemade sure fire is cotton balls infused with petroleum jelly. They can get messy so store them in an airtight container in your kit.
Every kid loves birthday candles. I have a tealight candle stowed away in my kit. It takes up the space of about a dollar’s worth of stacked quarters but offers a long burn time to help a child start a fire.
Duct Tape
Wrap a few feet of tape around your Bic lighter and you will always have a dependable source of fire… even if you need to burn stuff in the rain!
Here’s a tip to help your child remove the duct tape from the lighter with minimal struggle… especially if you use Gorilla brand duct tape. That stuff really sticks. Before securing the last half-inch of tape to your lighter, bend it over itself to create a pull tab for little fingers to grab. Not much is as frustrating as trying to find the end of tape on a used roll.
Strip off a foot of tape, wad it up loosely, and set it on fire with the lighter. Duct tape has many survival uses. Fire starting may be the most overlooked.
Emergency Ignition Sources to Avoid
I wouldn’t stake my life on a five-year old starting a fire with solar ignition sources (magnifying lens or fresnel card). I carry one in my fire kit which Max, my grandson, has used to start fires. However, it takes prior practice, good tinder, and full sun to achieve ignition.
Flint and steel is one of my favorite spark ignition sources. The learning curve is too steep for a young child to use in an emergency. You need prepared charred material and hand-eye coordination to prevent injury… something a kindergarten lacks.
As mentioned previously in this article, spark ignition is a good backup if you have experience using the device. I had an experienced ten-year-old Boy Scout and his dad from our troop over at my shelter this summer. I invited him to start his first spark-based fire by scrapping a ferro rod. He succeeded in making fire but only after several attempts and coaching. A great learning opportunity for all of us.
Fire by friction… we won’t even go there.
I just returned from the Foxfire Mountaineer Festival where I had the pleasure of teaching friction fire methods along side of Alan Kay from the TV show Alone. Several adults and a few pre-teens achieved their first fire by friction in a controlled setting with proven friction fire sets. Quite a few failed. Practice primitive but always prepare modern when it comes to emergency fire starting.
Primitive fire starting. Photo by Casey Deming
I certainly encourage you to practice the Emergency Ignition Sources to Avoid with your children in the safety of your backyard or campground. But if your life ever depends on a five-year old starting a fire… stick with a Bic for your emergency fire kit.
Thank you, Alan Halcon, for sparking the common sense idea for this article!
P.P.S – If you find value in our blog, Dirt Road Girl and I would appreciate your vote on Top Prepper Sites! You can vote daily by clicking hereor on the image below. Check out all the other value-adding sites while you’re there…