
by Todd Walker

My regret is that I didn’t watch more quality YouTube videos on my journey of self-reliance. There’s a sea of regurgitated material out there, and, sadly, few quote their sources of knowledge. My latest project was inspired by watching Kelly Harlton build a bucksaw with Mors Kochanski on Randy Breeuwsma’s channel, Karamat Wilderenss Ways.
For larger cutting tasks at base camp, a bucksaw is a thing of beauty and a joy forever. The 21 inch takedown bucksaw I built from scrap dimensional lumber is portable but usually hangs on my shop wall. I needed a dedicated base camp saw stowed away in my shelter.
My first foray into bucksaw building in the woods was a wobbly failure several years ago. The crossbar/upright union was the weak point. Kelly’s design fixed all that. Thank you, Kelly!
Base Camp Bucksaw
Material and Tools
- Knife
- Ax
- Rope
- Wood
- Saw Blade
- Hardware – two bolts, screws, nails, or key chain rings
Step 1: Collect Wood
An abundance of dead cedar surrounds my base camp. A green sapling will work just as well. I used cedar. For the uprights, cut two wrist-size (or slightly smaller) sections measuring elbow-to-finger-tip (approximately 18 inches). The crossbar should be of similar diameter and slightly longer than your saw blade. You will cut this piece to exact length later.
Remove any bark from your chosen wood. The dead cedar I used had only small amounts left. I scraped it off with the spine of my knife and added the “waste” to my tinder pile in the shelter.
Step 2: Prepare the Uprights
Lay the two uprights side by side and compare any bow in the pieces. I purposely used two cedar uprights with slight bows. The concave sides should face each other or inward.
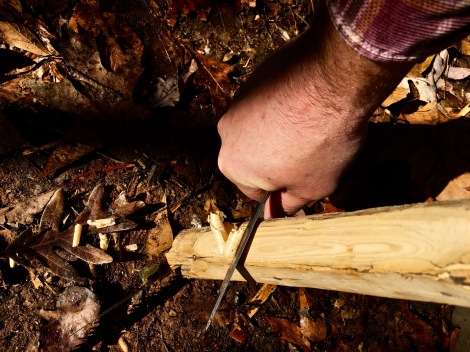
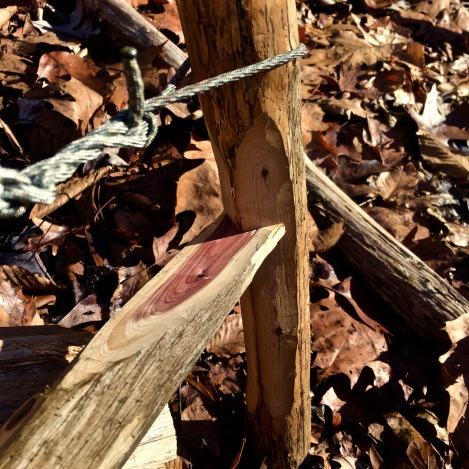
Once aligned, baton your knife down the center end of the upright until a split is created to accept your saw blade. Don’t split too deep or the upright will become two pieces. Repeat this step on the other upright making sure the splits are on the same plane as the previous one.
Carve a shallow V-notch perpendicular to each split at the base of each upright. The notch will allow the bolts or other hardware to seat securely against the wood when sawing.
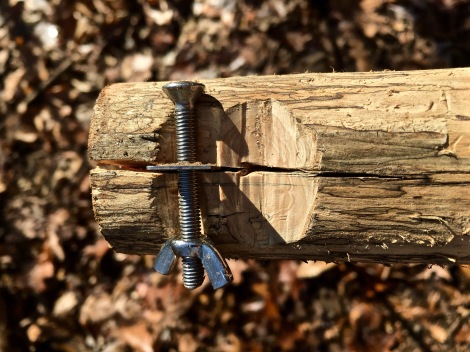
I recommend carving the notch after you check to see how far the saw blade fits inside the split. My first notch is pictured too far above the bolt.
Now you’ll carve down the sides of both uprights to create a 90 degree corner which faces inward. Only whittle away enough wood to make a sharp corner so that the wood is not weakened. This corner should run from a few inches above the blade to over halfway up each upright. Take care to keep the corner edges in line with the blade splits.
Whittle away to form a 90 degree corner
Step 3: Attach Saw Blade
Insert the saw blade into each split on the uprights. Use your knife to open the split slightly to start the blade if need be. Once the saw blade is inserted into both uprights, attach hardware through the holes in your saw blade. Place one upright on the ground while holding the other upright and blade vertical. Step on the bottom upright and tug to tighten the hardware against both uprights.
Lay the saw on the ground and align the uprights perpendicular to the blade.
Step 4: Prepare the Crossbar
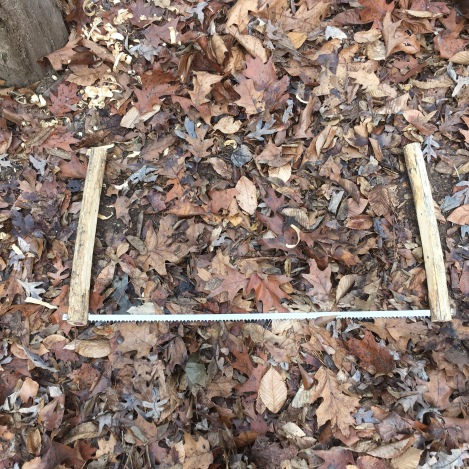
Place the crossbar across the uprights to form an H pattern in the middle of the uprights. With one end aligned at the midpoint of one upright, mark and cut the crossbar to length at the midpoint of the other upright.
Leave the crossbar longer than needed until final measurements.
Next, carve away each end of the crossbar to form a tapering wedge shape. Leave about 3/8th of an inch on the end of the wedge. If using green wood, a knife works fine. I used my ax on the seasoned cedar to expedite the trimming. Again, take your time and keep both crossbar end wedges on the same plane. They should appear identical or very close once carved.
One of the wedged ends of the crossbar.
At the ends of each wedge, carve a 90 degree notch. Again, on softer, green wood, a knife will carve the notch just fine. On seasoned cedar, I used my small saw on my Leatherman tool to remove the bulk of the notch and tweaked them with my knife for final fitting.
Test the fit by placing the crossbar between the uprights. The corner notches should mate without gaps at the union points. If not, trim until they do.

Spaces between these two pieces will cause instability.
Step 5: Make the Rope Windlass
Cut and smooth two paddle sticks about 8 inches long which will be used to tighten the windlass ropes. Set aside for now.
Wrap a length of cordage around the two uprights. Tie the ends of the cords with a secure knot to form a loop. Rope with little to no elasticity is ideal. I didn’t have “ideal” so I used 550 paracord. You’ll need two of these loops so repeat this process.
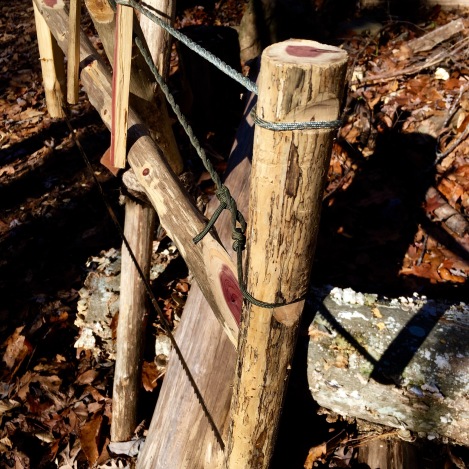
Place one end of a loop near the top of one upright and move the other end to down the opposite upright near the crossbar. Repeat this with the other loop of cord to form an X-shape of rope between the uprights. Make a note of where the loop ends will rest. Now carve shallow notches at those locations where the loops will rest once tightened.
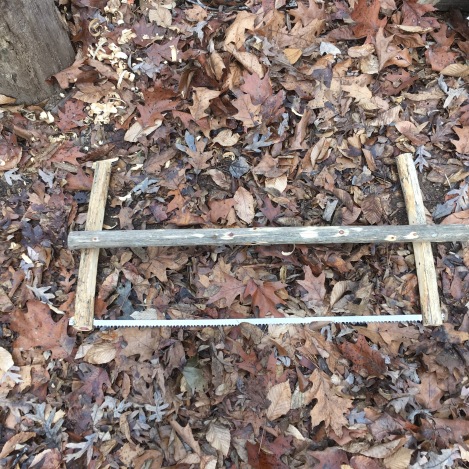
Step 6: Assemble the Saw
Insert a paddle stick between one set of loop cords. Rotate the paddle until slight tension is created. Repeat this process in the other loop cord. Continue spinning the paddles alternately until the saw blade is tight as a hat band. Note: Kelly used smaller paddle sticks on his saw in the video which didn’t stop on the crossbar but on the opposite loop cords. I tried this method and found, due to the length of my saw blade maybe, I needed longer paddles to create more tension. My paddles held tension by resting on the crossbar.
Fully assembled and ready to go.
The crossbar can be adjusted with a few taps to help square the H frame after tensioning the saw. You can also adjust the saw’s throat depth by bumping the crossbar up or down the corner notches on the uprights.
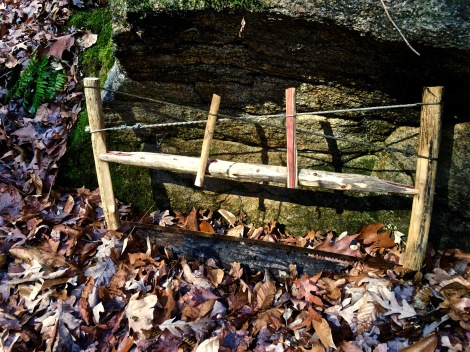
Put finishing chamfer cuts on all the upright ends and you’re ready for some serious sawdust. This 36 inch bucksaw may be overkill for my woodcutting needs in our mild Georgia winters. Still, I think it will come in handy for the log cabin project floating amongst my gray matter.
Below is Karamat Wilderness Ways video of Kelly Harlton’s H bucksaw with Mors Kochanski’s narration and wisdom.
https://youtu.be/U94JgBQSfUU?si=S-o_sBIpr8QAJfke
Keep Doing the Stuff of Self-Reliance,
Todd
P.S. – You can also keep up with the Stuff we’re Doing on Twitter, Pinterest, Google +, YouTube, Instagram, and Facebook… and over at our Doing the Stuff Network.
P.P.S – If you find value in our blog, I would appreciate your vote on Top Prepper Sites! You can vote daily by clicking here or on the image below. Check out all the other value-adding sites while you’re there…

Thanks for Sharing the Stuff!
Copyright © by Survival Sherpa: In light of the recent theft of all my content by a pirate site, my sharing policy has changed. I do not permit the re-posting of entire articles from my site without express written consent by me. My content on this site may be shared in digital form (200 words or less) for non-commercial use with a link back (without no-follow attribute) to the original article crediting the author. All photos, drawings, and articles are copyrighted by and the property of Survival Sherpa. You are more than welcome to share our photos and articles on social media for educational purposes as long as you link back to the original article/photo with credit to the author.


Thanks for shout out, and nice work Todd!
LikeLike
Thank you for solving my wobble, Kelly! I couldn’t get my 36 inch blade to tighten properly with the smaller paddles. I adapted and used longer sticks. Again, many thanks for all you do and share in our community!
LikeLike
years ago I made a couple of frame saws all dolled up and pretty
a friend wanted a PRIMITIVE saw
I cut some hedge (osage orange)
slotted the uprights with my swiss army knife saw blade
drilled pin holes with the awl
then we tried to pin the blade with almost everything finally just used a couple found sixteen penny nails
in keeping with the found motif (and the fact that I hate making cordage) we used some wire from one of my fence splices
surprisingly we got enough tension on the sandvik that he ended up with a working (but very heavy) bucksaw
I think your idea is tidier
the nails and wire are just another way
LikeLike
You sound a lot like my scavenger mentality, Craig. I bet that osage was tough to work but pretty. Good resourcefulness!
LikeLike
it was but we have acres of it
so I guess that’s free
about the scavenger thing…sometimes a person just wants to know…can I?
over the years I’ve had some epic failures but every now and then something works out
LikeLike