This one is considerably larger than my “practice cabin.”
I built my practice log cabin just to see if I could do it and to hone my ax skills. However, the Big Log Cabin is being built to provide a basic human need, shelter. This will be my home base on the land I grew up on. Roots run deep here!
After completing the foundation piers in the scorching Georgia summer, I waited for things to cool down before stacking log walls. Heavy lifting equipment and help needed to be lined up for cool Autumn weather. Everything fell into place.
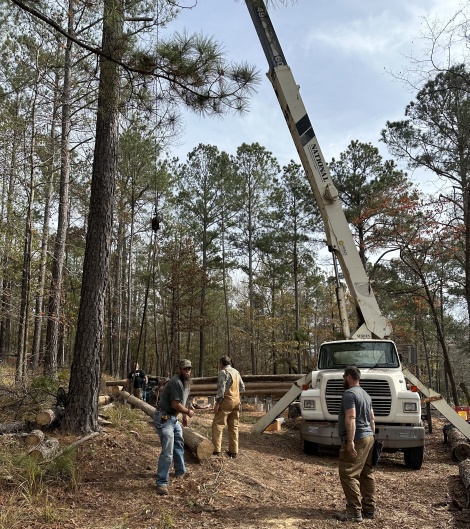
It’s a family thing. I’m thankful to have kin folk with heavy equipment. Chris, my across-the-lake cousin, hooked me up with yet another cousin, Wendy (A & W Mechanical and Fabrication), who was happy to let me use their 20 ton boom truck! This was a far cry better than my tripod and chain fall system I used to set logs on the practice cabin. The boom truck easily handled the two 46 foot sill logs.
On the chilly Friday morning, Donny, Woody, and I began setting the sill logs. Donny operated the crane, among other duties, while Woody and I coaxed the pre-drilled sill logs onto 1/2 inch rebar cemented into the piers. Lining up the holes in the sill logs as they floated over the metal anchor rods took some patient wrangling. Once the rod slide through the hole, we bent the rebar stub over the log to anchor the sill logs to the foundation.
About noon that same day, reinforcements arrived in the form one JJ Morris (Fuel the Fires). With a crew of 4 now, we made good progress and completed 2 courses of logs on the walls.
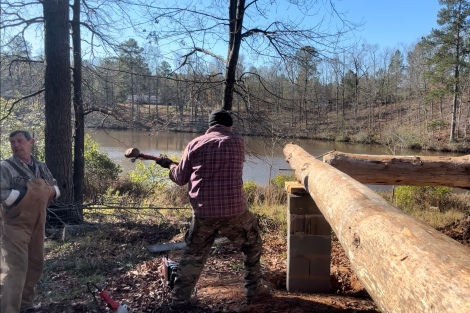
In the Butt and Pass method of log cabin building, each new row of logs has a length of half inch rebar driven through the top log into the log underneath to provide strength and stability to the structure. Each course of logs took about 45 sticks of rebar spaced apart at 30 inches. And each butt joint, the corner junctions, gets a stick of rebar to tie it all together.
This is the most time consuming part of the wall construction, drilling holes through the top log and partially into the lower log with a Milwaukee Hole Hawg 1/2 inch drill. Next comes hammer time! We drove the rebar into the bottom log with a sledge hammer.
By quitting time Friday, we had complete two rows on the walls. That may not seem like much to some, but it was a good day’s work.
Saturday brought more help. Melonie (Mel of the Mountains) arrived and jumped right in to help where needed. She did a lot of lifting of the heavy Hole Hawg to JJ and Woody as they drilled and drove rebar. She also was in charge of filming this monumental occasion.
My cousin, Chris, operated the boom which freed up Donny for ground duty. He mainly operated his tractor to lift and drag logs from the landing to the crane. Of course if you know Donny, he did way more than that… entertaining stories and BS is one of his specialties. Two of my nephews who live on the land, Blake and Kyle, also came to lend a hand.
Five rows of logs were up by the end of the day Saturday!
Building with “carrots” has unique challenges compared to dimensional lumber. You’ll notice in the pic above that the sill log doesn’t rest on the second pier from the left at the bottom… even though the piers are on a level plane. We remedy this by adding blocking to raise the pier to meet the log.
Sunday turned into a short day. I had enough logs on the landings for what I thought would make 8 or 9 rows. After sifting through all the straightest logs the two previous days, reality set in. Many of the logs had warped while laying there since May of ’21 making them unfit for the walls. That was a hard pill to swallow. We ended up only having enough logs to complete six and a half courses. We knocked off around two o’clock.
Before gathering more logs, 30 more logs to complete the walls, I will add more supports for the 2 landings. Too much blood, sweat, and tears goes into prepping straight logs to see them warp in storage. Lesson learned!
Even with the setback, I’m so thankful to my family and friends for their love, support, and hard work on this project! Happy Thanksgiving!
Retirement (June 2022) has me reflecting on my lifework. The dust-covered rocking chair overlooking the pond tells me that it ain’t over. In between working on my new log cabin, I’ve been building my next adventure, the Survival Sherpa School!
Often when you think you’re at the end of something, you’re at the beginning of something else.
~ Fred Rogers
December 2022 marks the 11th birthday of this blog. While writing over 600 articles here, I’ve never made a dime from the blog. I’m not more virtuous than others by offer all this free information over the years. I don’t hate money, it’s just the model I chose from the beginning.
However, the Survival Sherpa School is a separate site with a mission to offer hands-on classes to help you learn, prepare, and survive. With the help of my good friend, Melonie of Mel of the Mountains, we now offer a variety of classes on many primitive and traditional skills from bark baskets to hide tanning. I’ll be adding more class content in the near future.
Do me a favor and go check out the site to see what may interest you or someone you know.
While you’re visiting the Survival Sherpa School, hit that Subscribe button to join our community. You’ll be the first to be notified of upcoming classes, events, and exclusive content you won’t see on this blog, YouTube channel, or social media.
Some of our followers have been here from the very start and I can’t thank you enough for all your faithful support! We’ve learned a lot together through the magic of the internet. I’ll continue to post value-added content here, don’t worry.
After our Appalachian Bark Basket class at Little Rose Nature Adventures, we’ve taught three more classes in two states (GA and NC)! Below are some highlights of the experiential learning going on.
Appalachian Bark Baskets
More than an arts and crafts class, these eager students learned the context of making natural containers which their ancestors used many years ago.
Firecraft Essentials
Fire is life and learning many methods to achieve a sustainable fire is essential.
Modern ferrocerium rod in action.
Although we teach primitive and modern techniques, we stress that your fire kit should be simple enough that a five-year-old can use it.
Homeschool Co-op Demo in North Carolina
Melonie demonstrating the utility of turning raw animal hides into useful material for clothing and gear.
Axmanship 101
Students discovered and practiced hands-on techniques to safely fell, limb, buck, and split wood with their ax only. Thanks to Georgia Bushcraft, LLC for hosting this class.
Georgia Bushcraft Fall Gathering
A few of the classes we taught at this years fall gathering. Mel of the Mountains showing students how to make their own buckskin medicine pouches.
Two ladies getting their hands dirty practicing the Flip-Flop Winch.
As you can see, we’ve had a busy schedule recently! If you’d like to stay up to date on future classes and content, be sure to subscribe to our email list here. By the way, we will travel to you or your group’s location for classes and personal instruction.
I’d also like to thank my long-time blogging friend, Patrick Blair of NinjaWolf Studios, for his expert work in building the new Survival Sherpa School website! Be sure to check out Southern Dreams Homestead where he and Jessie are building a self-reliant urban homestead right here in Georgia.
P.P.S – If you find value in the blog, I would appreciate your vote on Top Prepper Sites! You can vote daily by clicking hereor on the image below. Check out all the other value-adding sites while you’re there…
The cracks and gaps between the logs needed to be filled to make it look like a real log cabin. The process of filling the gaps is called chinking. Before modern products came along, chink was made of mud and/or clay, and straw. Chink serves as an insulator against cold wind, moisture, and insects.
When I started this project in January of 2018, I thought of using Georgia red clay for chinking. That idea lost momentum as the project drug along. I decided to go with masonry mortar. It’s quick, easy and relatively cheap.
I chose to use the Butt and Pass method of log home construction. The folks teaching and using this method recommend masonry cement or mortar for chink. Nothing I read suggested adding anything to the mortar mix to help prevent the chink from cracking over time. Butt and Pass log cabins are not known for settling as other construction styles are prone to do.
My mix ratio of water to one 60 pound bag of mortar was 3.5 quarts to 1 bag. The bag instructions said one gallon per bag. I found that much water made the mortar too wet and had a hard time hanging in the gaps.
We mixed the mortar in a wheelbarrow.
Before slapping any mortar in the gaps, I used my pneumatic framing gun to drive nails 2-3 inches apart in all the cracks between the logs on the outside of the cabin. I dropped the air pressure so an inch or so of the nail stuck up above the wood. Some gaps can be fairly large in the corners due to the Butt and Pass method. I had to get creative there. I then went back and bent the nails vertically to give the chinking something to hold on to.
A lot of nails went into this process.
Once I nailed all the outside gaps, foam (Great Stuff) was sprayed into the large corner gaps. I then stuffed fiberglass insulation into the remaining gaps between the logs. It’s important to not stuff the gaps too full of insulation. There should be a little space between the nails and the insulation in order for the mortar to grab the nails. After the foam set up, I trimmed the bulging foam to make it recessed from the nails.
Now comes the fun part! Experimentation with applying the mortar was frustrating. I tried scooping it in the gaps with the masonry trowel. Most of the mortar ended up on the ground.
Then my good friend Melonie of Mel of the Mountains, who I’m apprenticing under for brain tanning deer hides, came to help with the chinking. She owned a bakery for sixteen years and made extravagantly decorated cakes. While on a scaffold board at the top log of the cabin, I glanced over at her while she was chinking and was shocked at how easily she applied the mortar. When I questioned her ease with this skill, she said it’s the same technique as icing a cake. She held the mortar board up to the gap and swiped the mortar into the gap and smoothed it with her trowel. Amazing! That was a game changer for me.
The same as icing a cake she says.
There’s a learning curve to every skill you’re tackling. Chinking is no different. Having the right tools helps. I used a one and half inch masonry trowel which is rectangular in shape to apply and smooth the mortar. The joints are somewhat convex. A flat finish didn’t appeal to me.
The corners were a challenge to create a smooth finish. The trowel wouldn’t get into the spaces to smooth the mortar. I ended up using my gloved hands to smooth the finish as best as possible. If anyone has a better idea, I’d sure like to hear from you!
Working the mortar with the trowel.
Once the chinking was complete, I stood back and realized that my log building actually looked like a traditional log cabin! A very satisfying feeling came over me.
Satisfied!
Below is the chinking video on my YouTube channel if you’re interested in this sort of thing.
P.P.S – If you find value in the blog, I would appreciate your vote on Top Prepper Sites! You can vote daily by clicking hereor on the image below. Check out all the other value-adding sites while you’re there…
My legs felt like a bowl of jello sliding down an old wash board. I crouched in a non-human silhouette stalking in Ultra Slow Motion. A twig beneath my foot snapped and my prey jolted his head toward the sound. I froze and hoped my screaming quadriceps would support my motionless body until he dipped his head to graze again.
What was my prey? A deer realistically mimicked by our instructor, Mark Warren. This was my first of several classes I’ve attended at Medicine Bow in the north Georgia mountains.
I discovered Mark and his primitive school of earthlore from reading his first book, “Two Winters in a Tipi: My Search for the Soul of the Forest.” With every turn of the page, I knew I had unearthed a rare gem in the mountains of Southern Appalachia. That was over three years ago. To date, Mark has published his fourth volume of “Secrets of the Forest” and two books in a historical novel trilogy on “Wyatt Earp: An American Odyssey.” These books reflect Warren’s lifelong pursuits as a naturalist, instructor of Cherokee survival skills, and wild west history.
Over a year ago, I shared my thoughts on the first book in the Secrets of the Forest series, calling it, “The Best Outdoor Education Book I’ve Read.” I should amend my statement to include volumes II and III in my assessment. Knowing Mark’s passion for archery and canoeing, the last volume in the series, which I’ve yet to read, I’ll bet he saved the best for last. For now, I want to highlight Volume III…
Eye to Eye with the Animals in the Wild and At Play in the Wild
The opening of this article was one of many exercises our class took part of in a two-day class at Medicine Bow. Reading this volume brought back my Real World experience as vividly as the day I studied a one-foot square plot of earth for slight changes Mark secretly made. Revisiting my field notes from the Stalking and Tracking class reveled just how much knowledge and experience had been shared that weekend. However, I had one regret – not taking better notes. Not a problem. I now have at my fingertips his many years of experience in a beautifully illustrated, photographed, and written field guide.
Who would benefit from this book?
The obvious benefit is for hunters pursuing game with traditional archery equipment. Hunting an animal with primitive weapons requires that one be as close as possible to the intended prey. In doing so, an ethical hunter shows respect and thanksgiving to the animal for providing nourishment and many sustainable resources.
Observers and photographers of wild animals would do well to practice stalking and tracking. Many phantoms of the forest you’ve only dreamed of capturing in your lens will appear when practicing these techniques. No telephoto lens required.
Anyone wishing to challenge their physical prowess should add stalking to their workout regimen. The level of functional fitness needed to stalk wild animals is different from any sport or recreational activity I’ve ever experienced. Mark told us that martial artists found the most success of anyone attending his stalking class. Even more so than professional athletes.
The main benefit I personally received under Mark’s instruction was the complete immersion in nature. Slowing down to a snail’s pace uncovered small, “invisible” wilderness details unnoticed when trekking full speed with human locomotion.
I approached this otter family to within 15 feet as they fed on crawdads in the creek.
An analogy Mark used was that of a rock tossed into a pond. The impact ripples to every shoreline. A stalker’s task is to minimize the wake in the animal’s living space. One’s goal is to become part of the “wild” world and not merely a visitor.
“Stalking and tracking are symbiotic. Tracking teaches where to stalk. Stalking teaches how to interpret a nuance in a track.” ~ Mark Warren
Mark describing details to a young student during our tracking class.
Educators will find lessons, exercises, and games throughout this volume. In our age of electronics, parents have the challenge of disconnecting kids from devices and coax them into trading virtual screens for forest streams. Mark offers hundreds of ways to make this transition fun, educational, and experiential.
If you are searching to find a unique gift for someone special this Christmas, I would recommend checking the book link at Medicine Bow. I’ve not found a more comprehensive book detailing the lost art of tracking and stalking.
P.P.S – If you find value in our blog, Dirt Road Girl and I would appreciate your vote on Top Prepper Sites! You can vote daily by clicking hereor on the image below. Check out all the other value-adding sites while you’re there…
I think I now understand why so many pioneer log cabins had packed dirt floors.
Ease of construction may have been the #1 reason. Lacking dimensional lumber, time, and labor, a dirt floor was an easy solution. You weren’t necessarily poor, but the term, “dirt poor”, stuck. Believe it or not, there’s a growing number of wealthy folk returning to earthen floors.
With my self-reliance on trial, I wanted a wooden floor for my little log cabin in the woods… complete with a front porch overlooking the creek. As promised in our last article, here’s what I came up with for my budget floor support system.
Round Log Floor Joists
A big box hardware store is a 10 minute drive from the cabin site. They sell dimensional lumber of all sizes to speed up the build. However, this whole “self-reliance on trial” thing had me going another direction.
The living area with five log joists set in place.
When I first started this project in February, the cabin dimensions were going to be a cozy 8’x10′. The first tree I felled was bucked into 10 foot sections for the 8 foot walls. Since expanding the cabin size to 10’x12′, the 10 footers wouldn’t work for wall logs. Bingo! These would become my floor joists.
Hew One Side Flat
Ax-cut logs need to be sawn flat on both ends to start the hewing process. Secure the log to cribbing with log dogs. Last year I made two from half-inch rebar which work fine. Hammer one point into the log and the other into the cribbing log. Repeat on the other end of the log.
I choose the side with the fewest knots to hew. Pine knots are a curse from the devil for hewers. The chosen side is turned and secured to the cribbing perpendicular to the ground. Dog the log before marking plumb lines.
Measure the center of the log end horizontally and place a mark at the halfway point. Place a level on the mark vertically and draw a plumb line. Do the same operation to draw a level horizontal line through the center mark. You should now have two lines intersecting to form a cross hair on the end of the log. Repeat this step on the other log end.
One more plumb line to draw before we’re done. Determine how much wood you want to remove from the side of the log. Place the level at that point and draw a vertical plumb line. I took off about an inch of wood which created ample flat surface on the joists.
Plumb and level lines drawn
Where this second plumb line meets the top of the round log, use a knife or ax to score a slit through the line. Drive a nail shallow in the cross hair. Hook the string of a chalk line box to the nail. Slip the string into the slit at the top of the log and run the chalk line to the other end of the log. Secure it in the other slit you made. While holding the line in the slit, reach down the line with your other hand and pull the chalk line up vertically, not horizontally. Release and the sting to “snap” or “pop” the chalk line.
The chalkline secured in the ax slit at the top of the line to be hewed.
By the way, all my logs have been debarked. If hewing with bark on the log, strip off a section of bark where the chalk line will be snapped. Read more about hewing with the bark on in this article.
Scoring
Scoring is the process of making relief cuts down the side of the log to remove the bulk of wood before hewing to the line. With so little wood to remove from the floor joist, I thought slash cuts would be best. Slashing is a series of overlapping 45 degree cuts about 4 inches apart down the length of the log. However, the logs had seasoned enough to make it difficult to remove wood after slashing.
Slash scoring with the log turned 30 degrees added too much extra work.
I ended up cutting “V” notches about a 8 inches apart down the log side. The raised wood between the notches are called jogs or joggles. The joggles were removed close to the chalkline with my ax. The log floor joists were all in the 6-8 inch diameter range. Not large enough to stand on to cut notches with my long-handled felling ax. I stood on the opposite side of the log and cut notches using a 26 inch boy’s ax. Make sure that the notches go all the way to the line and are plumb through to the bottom of the log.
Joggling or Juggling
Now is the time to remove the joggles. On these small logs, I used the grub bit of my double bit felling ax mostly. The 36 inch handle allowed me to swing almost upright, saving my back. Removing this excess wood can be the most dangerous part of the whole hewing process. A forceful swing is needed to knock off the protruding joggles. Be aware of where your legs and feet are before swinging.
I hewed several logs with my double bit only.
My most comfortable stance was to straddle the log with my right foot well to the right of the log. A slight bend at the waist and knees adds insurance that the ax will strike the ground and not my boot. The grub bit will strike the ground as it passes through the wood from time to time. Wood chips create a barrier between the bit and ground as the process continues.
A safer way to remove joggles is to rotate the log on the cribbing about 30 degrees (captured two photos above). A lateral swing (out of the frontal zone) is used with the log between you and the moving ax. You’ll need to re-plumb the log before hewing to the line.
Hewing
With a thin layer of wood (1/2 inch or less) proud of the chalkline, hewing begins. I used my broad ax on some, and the double bit felling ax on others. I’ve become fond of using the longer double bit even for hewing. It dealt with lighter’d knot better. I found that once the joists were rough-hewn with the double bit, I could set them in the sill log notches and comfortable hew high spots by swing horizontally with my broad ax. And it could be done while I sat on the adjacent joist.
Hewing to the line with the double bit ax. This log was almost too short to use. Notice the ax-cut end almost makes a nice tenon.
The angle in which the double bit struck the wood had to be adjusted. It’s not a vertical swing like the broad ax. Once the angle is dialed in, the wood begins to slice off. I actually obtained smoother finishes using the double bit over the broad ax. I got closer to the chalkline as well. Keep in mind, this is rough-hewn lumber.
Mortise and Tenon
Before joists could be set, a level line was needed on the inside of the sill logs. Using a water level, I penciled in marks on all four corners. A chalkline was snapped to give me a level line on the two sill logs where the top of the joists would rest.
I marked the sill logs at 2 foot intervals for joist positions along the 12 foot walls. Mortise joints (pockets) were cut into the sill log with a 2 inch chisel and dogwood maul. The mortise pockets measured about 2″x4″. Each joist measurement, from pocket to pocket, was different. Working with round logs of differing diameter is entirely different from building with dimensional lumber.
The faint blue chalkline is still visible. This joist needed to be lowered. I switched to red chalk as it seemed to last longer.
Tenons were cut on the ends of each joist to match the mortise pockets. Joists were set and raised or lowered to meet the level line on the sill logs. A simple wedge of wood underneath or trim of the tenon did the trick.
Mortises chiseled to 2″x4″ dimensions.
Leveling Joists
The four-foot level on top of the aluminum bar extended my reach to four joists at once.
Though each joist tenon met the level line on the sill logs, rough-hewn logs will have high spots… at least from a hewer like me. I used a long piece of rectangular aluminum as a straightedge coupled with a 4′ level to ride atop four of the five joists. I moved the level from sill to sill checking for high spots and dips in the joists.
Close enough!
Taking a comfortable sitting position on an adjacent joist, I planed the high spots down with the broad ax. This was a great change of pace on how I typically swing this heavy hewing ax. Recheck level, plane, recheck, plane… until my OCD subsided. It’s close enough for an off-grid log cabin in the woods!
After shimming and shaving to level joists, I carved and drove wooden wedges into the mortise pockets to take away any wiggle that might be present in the joints. I’m following the same process for the front porch log joists. I’m running 3 long joists perpendicular to the living area joists with a girder underneath at the halfway point. The 6’x12′ front porch will provide hours of relaxing ambiance as creek water tumbles over rocks.
P.P.S – If you find value in our blog, Dirt Road Girl and I would appreciate your vote on Top Prepper Sites! You can vote daily by clicking hereor on the image below. Check out all the other value-adding sites while you’re there…
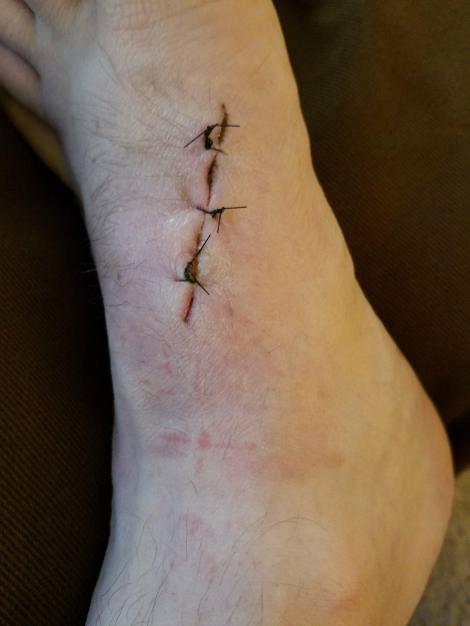
On the heels of my ax-work classes at the Georgia Bushcraft Spring Gathering, I wanted to cover some of the risks of swinging a tree clever. It’s our job to mitigate some of the risk. Even then, accidents happen.
At the Gathering, my buddy, Karl, shared a recent ax injure he incurred when his ax glanced from the wood he was splitting. He graciously, or not so gracious if you have a weak stomach, allowed me to share his injure here for educational purposes.
********* WARNING: GRAPHIC PHOTOS OF BLOOD AND A OPENED FOOT **********
The ax glanced and struck Karl on the top of his left foot severing one bone completely and halfway through the second bone.
The two bones circled took the brunt of the blow.
A nasty ax gash.
Shoes, even leather boots, aren’t much of a deterrent to a sharp ax.
Stitched and cleaned up.
The photos above make it crystal clear how dangerous a moving ax can be. However, not all injuries to wood choppers come from the business end of the ax meeting flesh, or from negligence. Trees don’t always cooperate. They’re known to drop dead limbs on unsuspecting victims below. Trees and axes are not to blame. They do what they do without malice or remorse.
Taking an ax to the woods with the intent of chopping is serious business. 99% of my ax work is done alone in the woods. Even though I try to employ best-practices, the risk of becoming a victim is always in the forefront of my mind. I’m no expert and my ax-related advice should not be trusted but verified through experience.
5 Deadly Sins of Ax-Work
Vernon Law is credited with saying, “Experience is a hard teacher because she gives the test first, the lesson afterward.”
We can never eliminate all the dangers of swinging an ax. We can only lessen the gravity of missing the mark through commonsense risk management. The good news is… true repentance will change your actions, and, hopefully, save you from the pain of these painful mistakes.
1.) Arrogance
“Only the penitent man shall pass.” ~ Indiana Jones and the Last Crusade
The toughest woodsman is no match for tonnes of wood crashing to the forest floor. Even a wrist-size limb falling from 50 feet above can crush a shoulder or skull. While toughness is a fine virtue, be humble. The moment an axman approaches his work with superiority and a been-there-done-that attitude is the moment he gets blindsided.
There’s a fine line between confidence and arrogance. Confident ax skills inspire. Arrogance will get you hurt or killed. This holds true more so for seasoned axmen than beginners, and, in my experience, men over women.
2.) Entanglements and Hang Ups
Any obstruction in the ax swing arc must be cleared before work begins. Check overhead for nearby limbs and vines which may snag and deflect an ax in mid swing. I’m obsessive about removing the smallest twig when standing on top of logs to buck. I figure if I’m swinging inside my frontal zone (described below) inches from my feet, I can’t afford a stroke to veer.
A screen shot from a recent video of an overhead limb which snagged my ax.
Fell enough trees and you’ll have one hang up mid-fall. My first strategy, if the tree butt didn’t release from the hinge, is to try to free it from the stump. Some times the impact on the ground will jar the hang up loose. If not, I’ve had some success moving the butt of the tree backward using a long lever pole. Place the lever under the butt end and lift repeatedly to slide the tree butt backwards until it releases.
A safer and less strenuous way is to use a come-along attached to an anchor behind the tree stump. Without a modern come-along, a powerful winch can be made from two logs and a rope/cable. Ratchet the tree butt until it releases. You may be tempted to cut the offending tree which caused the hang up. This is a high-risk endeavor. Be sure to have all your medical/life insurance up to date. You and/or your surviving family will likely need it.
One hazard I hope to never encounter again was the yellow jacket sting between my eyes on my downward stroke in the video below. You’re only defense is to run like you stole something!
3.) No Exit Strategy
When felling trees with an ax or saw, preparing two or three escape routes is wise. When the tree begins its decent, get out of Dodge on a pre-determined path. The safest exit is at 30 degree angles from the back notch of the tree. Put your back against the tree and extend your arms like you’re about to give your mama a hug. Your arms are pointing to your best escape paths. Next safest is in a line opposite of the direction of fall. If this path is chosen, or the only option, put great distance between you and the stump to prevent a kickback from nailing your body to the ground.
Escaping perpendicular to the line of fall increases the risk of being struck by falling limbs from adjacent trees. I’ve witnessed trees “jump” and roll several feet to the side of the stump hinge by contacting adjacent tree limbs during the fall. Another overlooked danger is a dead spot halfway up the tree which breaks and falls back toward the woodsman as the bottom half falls in the direction of its lay. Be vigilant, drop your ax, and sprint for your life.
Fortunately this log snapped halfway up and fell sideways from where I was standing.
4.) Violating the Frontal Zone
There are two basic ax swings: lateral and vertical. Certain guidelines should be followed for each swing. Take a look at the diagram below to better understand your frontal zone.
Adapted from The Ax Book
In The Ax Book, which I recommend you devour until the pages are dog-eared, Dudley Cook describes the frontal zone as two parallel lines running along side the outside edges of your feet when chopping. All lateral swings should be outside the parallel lines, always. The inertia of an ax in full, extended-arm swing only stops when acted upon by an external force. The ax head has a stopping point, and that point could be your body if you disregard the frontal zone guidelines.
There are two relatively “safe” strokes one can make within the frontal zone: a.) backed up, and b.) bucking. The backed up stroke is what beginning choppers are most familiar – splitting wood on a chopping block. The solid chopping block offers a backstop for the moving ax. Of course, as in Karl’s case above, there remains inherit dangers. Watch our video below to gain some safety tips for splitting firewood, the most common ax-work of campers and homesteaders.
Bucking is simply separating a log into lengths. The diameter of the log to be bucked determines my technique. Larger diameter logs (12+ inch range) allow me to stand on top to cut two V notches. Swings are always below my feet. If I miss my intended target below my feet, my body is out of harms way.
I stand on the ground to buck smaller diameter logs. The log itself is my back up. Accuracy is essential at the top of the bucked notch when your feet are on the ground. Even though the log is between you and your legs, miss the top of the notch and you now have a non-backed up swing in the frontal zone… and a very bad ending.
Another video of ours demonstrates the importance of accuracy on the top of notch cuts when bucking on the ground…
A third stroke in the frontal zone, which I’ll mention, but do not recommend, is the most dangerous and best performed with a saw. Situations arise where a high limb needs to be removed. My risk management strategy is to choke up on my ax handle with one hand and strike the limb at a 45 degree angle without completely severing the limb. A few lighter followup blows usually separates the limb. My forward hand gives me more breaking power as the ax follows through.
5.) Washed in the Blood
“All bleeding eventually stops. The challenge is stopping blood loss before the supply runs out.”
Injuries related to axes and trees can be deadly. A first aid kit should be in close proximity to your work area. One item which you should consider carrying on your person is a tourniquet. If a catastrophic ax wound occurs where sever bleeding will result in death, this is your only option to see your family again. Practice applying this device on your own body before you actually need it.
A personalized first aid kit will treat the most common injuries such as scrapes, bumps, blisters, and bruises. I carry large sterile bandages, gauze rolls, and Band-Aids. My tourniquet fits in my cargo pocket of my kilt or pants. A few other items I include in my ziplock first aid bag are:
Acetaminophen for pain
Wound dressing
Tweezers and needle – mostly for tick removal, ugh
Aspirin, proven to assist in heart attack treatment
Diphenhydramine (Benadryl) for stinging/biting insects – plantain isn’t always available in the woods and I don’t react well to stings
A sharp hunk of steel flying freely through space is a scary sight… if you happen to spot it. It’s like shooting an arrow straight overhead and wondering where it will stick. Ax heads give an ample warning to observant axmen. A slight gap appears where the ax eye was seated on the handle. Continuing work with this slight slippage is full of hazards. Stop, re-seat the head, and pound a metal step wedge into the top of the handle. My working axes aren’t pretty, but they are tightly fit cutting tools.
Step wedges added in the field on my favorite double bit. Looks gnarly but hold this working ax head on securely.
Don’t lose your head! Take great care to keep your ax sharp and securely attached to the handle.
If you’re even slightly tempted by any of these deadly sins, put your ax down before you meet your Maker.
P.P.S – If you find value in our blog, Dirt Road Girl and I would appreciate your vote on Top Prepper Sites! You can vote daily by clicking hereor on the image below. Check out all the other value-adding sites while you’re there…
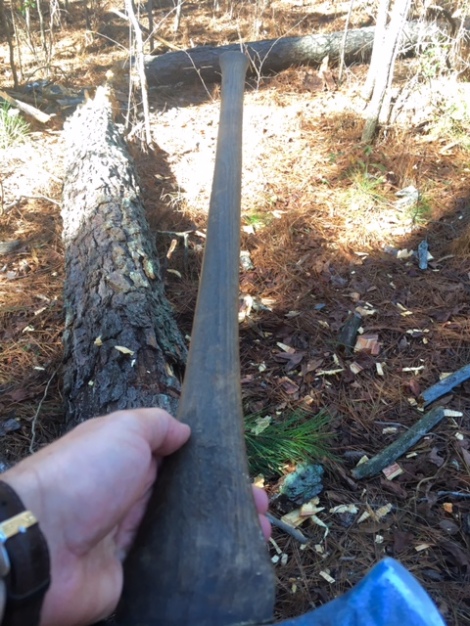
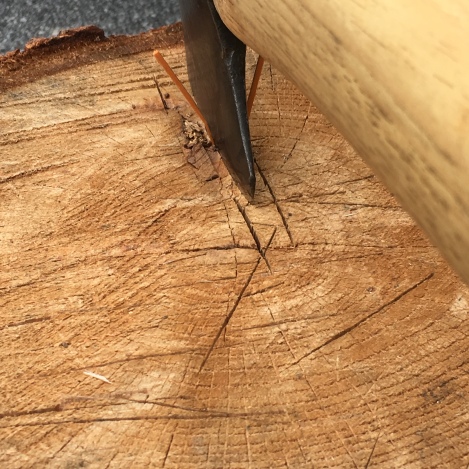
Less than a century ago, woodsmen skilled with an ax could chop wood all day and return to do it again, day after day. They were held in high esteem and highly sought after. Power saws and combustion engines sent yesteryear’s axes to hang on old barn walls. Today the usefulness of axes seems to be limited to splitting firewood… or, for the lumber sexual, as boutique wall-hangers.
How you choose to acquire wood is up to you. However, the steps of cutting timber hasn’t changed. A tree must be felled, limbed, bucked, and hauled. Like other aficionados of working axes, I enjoy experimenting with the potential of our most under-appreciated tool in the woods.
It doesn’t take long for the ax handle to transmit to an inexperienced axman’s brain, and his muscular system, that brute force only dulls the functionality of this tool. Fatigue and frustration are the result. And injury is not far behind. There are no secrets to becoming a proficient axman. However, there are a few techniques and strategies I’ve learned over the years which may shorten the learning curve.
Giving unsolicited advice is not my thing. But if you’d like to continue, here’s my take on thick ax handles, brute force, and working axes.
Heavy, Stupid, and Unreasoning
Watching a beginner axman swing is painful. I cringe when I think back on some of my early ax work. But ax-manship can only be improved through swinging sharp steel on the end of a stick. Like any other skill, practice makes permanent; whether good or bad.
When asked to coach someone new to the art of ax work, I try to convey the two types of force used – finesse and brute force. The origin of the word brute comes from the Latin word brutus, meaning “heavy, stupid, unreasoning.” Set the macho aside in ax work and you get a beautiful, rhythmic relationship between the wood and axman.
Muscling through wood is a white-knuckle affair. I broke my favorite double bit handle last year, not by over-strike or mishit, but by stupidly applying my full force throughout initial contact. The handle was thin, flexible, and a joy to use. Brute force ended its usefulness. It is now taped together and serves as a pattern when thinning down fat factory double bit handles.
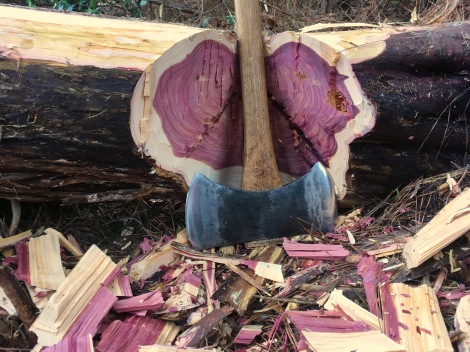
Bucking eastern red cedar with the tuned handle on my best double bit.
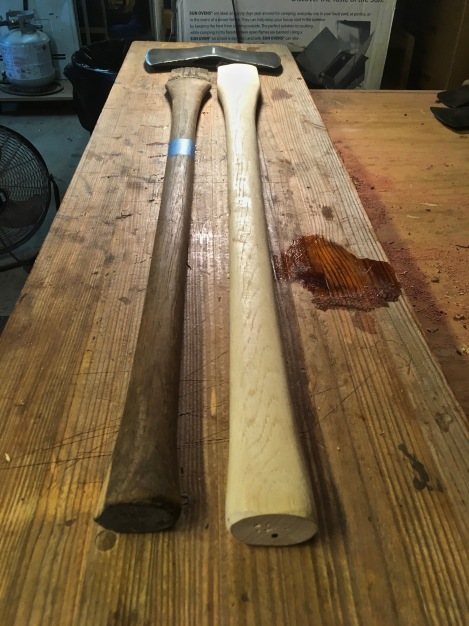
Simply reducing my forward force just before the moment of impact would have allowed the inertia of the axhead to do the work. Giving that extra “push” through the strike does more harm than good. You’ll not only save ax handles, you’ll reduce some shock sent up the handle. A thinner handle flexes to help absorb and reduce the beating on your body. At least that has been my experience. Wielding an ax with brute force is not how the old timers lasted all day, day after day. This type of finesse is seldom mentioned or passed down to inexperienced axmen.
The resurgence of interest in axes is encouraging to see in outdoorsy groups. Axes are chic, sexy, and scary – all reasons we like them. The novice buys a high dollar ax and proceeds to break the fat factory handle, even after adding a bulky leather over-strike collar. Handle manufactures compensate for low Ax I.Q. with fatter handles. And then again, the age of working axes was so long ago that even commercial handle makers have no reference point as to what a handle should look like and feel like in the hands.
Thicker, modern handles are not the cure. Wrapping your hands around these clubs makes the uninitiated think they’ll never break. Stephen Edholm makes a logical argument (from actual experience with working axes) for thinner handles in the video below. Anyone who chopped all day with an ax will echo the same.
No replacement handle I’ve ever bought in recent memory was ready to hang and go to work. To be fair, there may be some turnkey handles out there. I’ve never found them. I either make my own or customize the club-like handles from hardware stores. Then there’s the rare occasion of finding that forgotten ax at an antique store or yard sale grandpa used before the chainsaw came along.
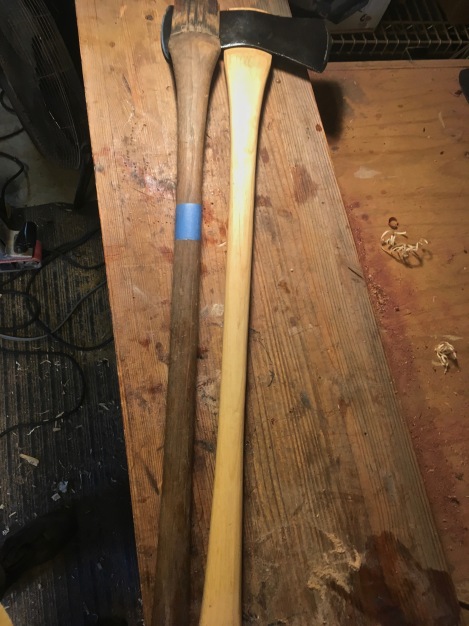
You can see the noticeable difference between the modern and old working ax handle below.
Power vs Finesse
On occasion, I have split toothpicks (Stim-U-Dent – matchstick size toothpicks) with my ax. I don’t say this to brag. It is, however, a lesson in muscle memory, striking where I look, and relaxing at the end of my swing. Knowing I’m not chopping heavy wood, I began to notice that I was unconsciously easing up about halfway into the downward arc of my natural swing. As a result, I’d hit my mark more times than not.
Striking where you look.
The human brain is a beautimus, complicated computer. Since few people actually use axes, baseball may help illustrate the point. A pitcher doesn’t aim the baseball as it leaves his outstretched arm. The ball is thrown, not aimed. There’s a significant difference in the two. The same goes for batting. I coached my players to throw their hands at the ball. This is oversimplified. But the brain tells a player when to grip the bat tightly and when to relax the grip. A death grip at the beginning of the swing tightens the muscles in the arms, shoulders, and upper torso causing the swing to be herky jerky. As a result, accuracy plummets since the “flow” is lost. Through years of drills, coordination, practice, and timing, batters learn that aiming won’t hit the target.
I don’t aim my ax. I look at the exact spot I want my blow to land. I then throw my hands through an imaginary plane from my nose to the small target. My only swing thought is “strike where I look.” My natural, controlled swing gets the job done more efficiently. Once you can strike where you look, power will follow accuracy.
Accuracy and Precision
Wasted ax strikes are frustrating and exhausting. Making every blow count takes a combination of accuracy and precision. At first glance, the two words seem the same. But in my world of teaching math and science, they have different meanings. Let’s apply them to working axes.
Accuracy is how close you come to the desired result. Precision is how consistently you get the same result using the same method. Translated to ax-manship, does my swing hit the target and is it consistent enough to repeatedly hit the target?
When bucking, I try to overlap each cut in a three to four swing pattern (depending on log diameter) down the face of the log. This overlapping pattern opens wood fibers to help prevent the ax bit from get stuck in the wood. Repeat this cutting pattern one double bit length wide from the first line of cuts. If accuracy and precision is dialed in, chips the size of the notch will go flying.
Developing accuracy and precision with working axes is like hauling logs, you gotta really want to do it. There’s not a lot of finesse in log hauling.
P.P.S – If you find value in our blog, Dirt Road Girl and I would appreciate your vote on Top Prepper Sites! You can vote daily by clicking hereor on the image below. Check out all the other value-adding sites while you’re there…
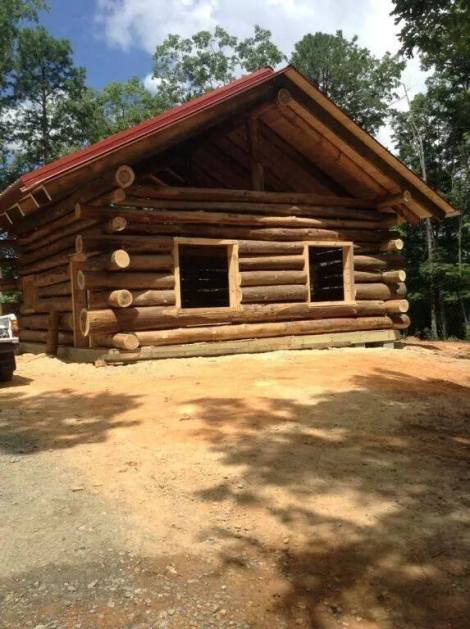
Image used with permission from the builder, Wiley Log Homes.
We built crude log forts in the woods growing up. They weren’t water tight or warm. The wind would cut through the muddle of sticks and threaten to take your hat off. Those were fun times. A bona fide log cabin was what I dreamed of then… and that dream remains.
At nearly my age (55), Dick Proenneke set out to live in a remote area of Alaska. For 30 years, he lived in a log cabin he built with his own hands. You can learn more of his remarkable legacy of self-reliance and conservation by watching the documentary, Alone in the Wilderness.
For those following my cabin project on my YouTube channel, I’m in the early stage of cutting and debarking logs. I don’t have the luxury of waiting a year or more for peeled logs to season. I could wait but patience isn’t one of my strong suits. I’ll build my little “practice” cabin with green logs. I’ve already been asked in video comments how long I’ll let my logs season before building.
Here’s the thing, I’m not going to use traditional saddle notches to connect corners. I may try my hand at saddle notches on cured/seasoned logs at some point. Until then, my research turned up a little-known (to me at least) construction method which uses green, unseasoned logs in construction. If you’re not familiar with this style, let me introduce you…
Butt and Pass Style Log Cabin
The advantages of using the butt and pass construction technique is it requires little in the way of tools and construction experience for a DiY log cabin builder. I’ve got plenty of construction experience and tools. My dilemma is that I have green logs and want to finish the cabin before the end of the school year. This no-scribe, no-notch method will speed up the construction process.
The top photo of this article is a butt and pass log home built by Wiley Log Homes. Ronnie, the owner, gave me permission to share a few of his beautiful handcrafted log homes here. I hope to have a few shots of my own cabin corners soon. Until then, take a look at the corners of these Wiley Log Homes.
This cabin has a stone basement.
Five foot eves help keep water off the logs.
A good shot of the butt and pass corner style.
No matter what method is used green logs will shrink. However, with tight-pinned butt and pass construction, settling will only happen if the foundation/piers are not properly formed. With each course of logs, holes are drilled through the top log through the bottom log. A length of 1/2″ rebar is driven through the logs (tight-pinned) about every two feet. As the green logs cure and shrink, the logs shrink around their center line. The gaps between the logs increase but the wall height remains the same. Touching up the chinking over the first few years will have to happen as the logs cure, so I’ve read.
Self-Reliance on Trial
I plan to build my cabin with hand tools only. That’s a tall order especially when I have power tools at my disposal. The pioneer method doesn’t trump someone who chooses to use power tools. I have a comfortable home and don’t “need” this cabin. But somewhere, back in my deeper, primal self, I want this cabin, if for nothing more than to put my self-reliance on trial. Who knows, I may not make it through the project using just hand tools. Either way, this project has been brewing in my gut for years and feels good to take the first step.
My cousin said this to me after he saw the first logs de-barked. “Hardest step is the first one. I’ve been told this but usually by someone who ain’t doing the stepping.” ~ Tim Hester. This is a photo of Dick Proenneke peering out of his cabin door (Image credit: National Park Service)
I’ve only bucked and de-barked one pine tree so far. My first attempt at skinning logs was with a draw knife. The tool peeled bark really well but would not be a sustainable method for this old man. I needed a method where I’m not bent over scraping with pine sap flying in my face. Enter the tile scraper. I ground the edge on this old long-handled tool and it’s a far cry better than my draw knife on my back. I’ve been using it like a draw knife, scraping long strips of bark off the length of the logs, but will try peeling whole sections off logs by prying around the round part of the log. Not sure how well this will work since the sap is not rising like in spring time.
Another hand-tool concerns that comes to mind is boring holes to accept the rebar pins. Twisting a half-inch auger through logs can’t be easy. Yet another challenge will be transporting 12 and 14 foot logs to the build site in the woods. I won’t be able to split them in half or into rails the way I did in last year’s Axe Cordwood Challenge. I need draught horses, or oxen. Seriously!
Progress Report
To keep up with the log cabin journey, I’ve created a playlist on my channel titled, Log Cabin Build. Most are mine but a few are of Dick Proenneke’s cabin. I’ll also be updating here on the blog.
This is the last video in the log cabin series. I traded my draw knife for a DiY bark spud…
With only one day per week to work on the cabin, progress is slow. Winter break should offer a few extra work days. Below are some photos of my progress.
A storm blow-over bucked and ready for de-barking.
Two debarked logs.
After the first two logs, I mentioned in my video about the fun you can have debarking logs. In honor of Tom Sawyer’s fence white washing pitch, I had a buddy and his son show up to my first Barking Party. Evan Newsom, first picture below, was the first to party on!
Tom Sawyer would be so proud!
I even have my school students convinced…
Introduced students at RISE to the draw knife. They have acquired a liking for this tool.
Sure appreciate having the physical health to be able to attack this pioneer project. It will take longer to construct using hand tools. Patience may become a strong suit of mine after all is said and done.
P.P.S – If you find value in our blog, Dirt Road Girl and I would appreciate your vote on Top Prepper Sites! You can vote daily by clicking hereor on the image below. Check out all the other value-adding sites while you’re there…
Arguably, the most underrated and overlooked primitive technology is rope and string. That is until you run out of modern cordage. A whole new appreciation for stuff that binds will quickly become apparent.
Ropes and knots predate the ax, the wheel, and possibly the controlled use of fire by our ancestors. Think of stone tools. These had to be tied to the end of sticks. Shelters stood with joints bound by fibrous lashing material. Animal sinew, catgut, and hide were used as well. But, as my friend, Mark Warren, says, it’s easier to get your hands on plants since they don’t run away from you.
Fibers that Bind
In my area of Georgia, tree bark, roots, leaves, stems, and stalks can be used for bindings. For our cordage class at school, we used Tulip Poplar (Liriodendron tulipifera) and cattail (Typha) for fiber material. Cattail from our second-hand beaver pond, and tulip poplar from my stash I collected over the years.
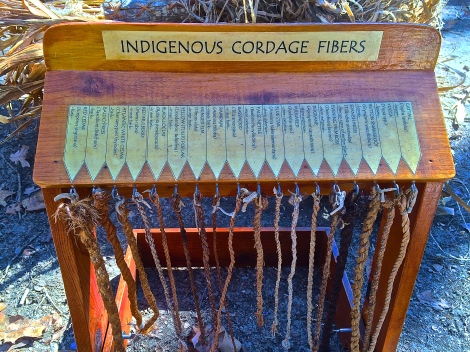
You’re not limited to a few choices in nature. Below are 18 cordage fibers made and displayed by Scott Jones at one of his workshops I attended. If you’re into primitive skills and technology, I highly recommend you pick up his books, Postcards to the Past, and A View to the Past. Both are essential for any primitive practitioner on your Christmas list!
18 indigenous cordage fibers Scott Jones has on display for demonstrations
Besides the 18 listed below on the display, we also used okra stalk, that’s right, the garden variety, to make cordage in his class.
From L to R:
Red Cedar
Bald Cypress
Atlantic White Cedar
Red Mulberry
Black Locust
Yellow (Tulip) Poplar
Winged Elm
Paw Paw
Basswood
False Nettle
Blue Star
Milkweed
Dogbane
Evening Primrose
Spanish Moss
Button Snakeroot
Yucca
Cattail
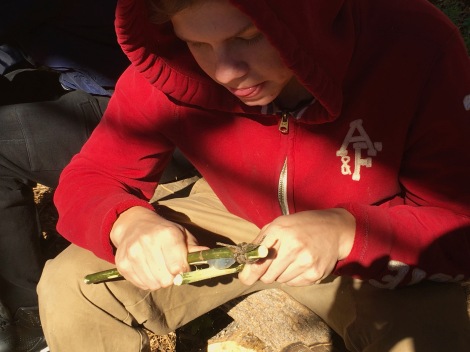
Different materials require different methods of extracting fibers. For our purposes, and to keep this article manageable, we’ll stick with the two materials we used in class – tulip poplar and cattail.
Preparing Fibers
As mentioned earlier, I collect tulip polar bark every chance I get. This tree has many uses – (see here and here). It’s best to harvest in late spring and summer as the bark will “slip” off the trunk with ease. The inner bark is what you’re after. I like to use inner bark from fallen limbs or dead standing saplings. Simply soak the dried bark, a process called, retting, in water for a few days to a few week. At my fixed camp, I toss large sections of bark into the creek and weigh them down with rocks. The soaking helps break down the stuff that holds the outer and inner bark together. After the bark is retted, the inner bark should peel in long, useful strips.
Hang the strips to dry. Pre-dried fibers are less prone to shrinkage even after wetting them during the cordage making process. Separate the strips into finer fiber bundles (hair-like fibers) for stronger cordage. Or you can start twisting wider strips for expedient cordage.
We have a nice stand of cattails next to our outdoor classroom. At this point in the season, the leaves are dead and brown. For green leaves, cut and dry until they turn brown. You’ll notice these leaves twist better when damp. Even a morning dew enhances their flexibility.
Cattail leaves can be striped into smaller widths for stronger cordage but wasn’t worth the effort for our class. For expediency, we used whole leaves. Here’s how…
Reverse Twist Two-Ply Method
For our beginner cordage-makers, we used whole cattail leaves and wide strips (1/2 inch) of tulip poplar inner bark. Larger material allows the student to see how the twisting works and is easier to handle than fine fiber bundles.
Also, keep the fiber material damp during the whole process.
Start in the middle of a strip of fiber material about arm’s length long. Pinch the ply with the index finger and thumb of both hands with 2-3 inches between your pinch points. Begin to twist the ply away from your body with your right hand in a clockwise rotation and left hand counterclockwise. This will cause the ply to twist until it naturally bends into a kink/loop.
Forming the loop.
Pinch the loop with your left hand (index finger and thumb). You now have two plies extending in a “Y” formation. Pinch the strand furthest from your body with your right hand close to your left hand (about 1/4 to 1/2 inches). Twist your right hand away from your body in a quarter turn or 90 degree rotation.
Starting the outside ply twist.
A full 90 degree rotation of the outside ply.
While holding the twisted ply between your thumb and index finger, reach your middle finger on your right hand around to grab the strand closest to your body. Grip this ply with your middle finger against your index finger. Now twist back a quarter turn to the original starting position. This motion brings the outside ply over the inside ply. The two plies have now switched places. Release the ply you were pinching and repeat the process on the “new” outside ply.
Rotating back 90 degrees with the opposite ply pinched with the middle finger.
Once you get the mechanics down you’ll be able to hand-twist tightly woven cordage like a champ. One student picked this motion up quickly and made a few feet of cattail cordage in less than 30 minutes.
RISE student twisting cattail cordage. He began teaching other students the technique.
Splicing Technique
If both plies are even when you begin twisting, you’ll end up backtracking (unwinding twists) to make a splice. With experience you’ll find that starting the kink/loop with one ply longer than the other will take care of this problem.
When you get to the end of your rope (about an inch left on the outside ply with a longer inside ply), and need to make longer cordage, a splice is needed. Take another length of fiber material of similar diameter and lay it in the “Y” with an inch of material overlapping. Pinch the overlapping new fiber on the existing two-ply cord you’ve already made. With the new ply running parallel with the short outside ply, pinch these together with your right hand and continue the two-ply twisting technique described above. This splicing technique will continue until you twist a length of cord long enough for your needs.
New fibers added in the crook of the “Y” to be spliced.
Trim the overlapping spliced end when your cordage is complete.
Note: For any left-handed folks, reverse the instructions.
Trim the overhanging spliced material on the finished cord. Now you can terminate the end of your cord with a couple of half hitches.
Start using your new cordage for primitive binding projects like a Hoko knife.
Tying it all together with natural cordage.
Below is a video we did during class on making cordage for those interested…
The reverse twist method is useful when smaller lengths of tightly woven cordage are needed. We’ll do a future post on a method called the “Thigh-Roll”. This technique is a speedy way to make large quantities of natural two-ply cordage… and easier on your hand muscles.
P.P.S – If you find value in our blog, Dirt Road Girl and I would appreciate your vote on Top Prepper Sites! You can vote daily by clicking hereor on the image below. Check out all the other value-adding sites while you’re there…
The blood of our ancestors flows in our own veins. Our aboriginal legacy is written in the very make-up of our bodies. The ancient caves and campfires of our pasts call to us from within. Primitive Technology is our inheritance as well. It is a world heritage which knows no race, creed, or color. It is foreign to no one. It is the shared thread which links us to our prehistory and binds us together as human beings.
Steve Watts ~ “Primitive Technology, A Book of Earth Skills”
It seems with every generation, the disconnect between the earth and her resources widens. But deep inside us all, our primal roots desire to reconnect with the raw resources that have sustained our species for millennia. Touching our Stone Age past offers this tangible connection.
A simple way to introduce primitive technology to students is by making a Hoko knife. This stone cutting tool was discovered on the Hoko River archeological site in Washington State. A landslide destroyed the native fishing village about 2,700 years ago preserving artifacts of their material culture.
Steps to Making a Hoko Knife
Materials needed:
Sharp stone flake
Wooden handle
Cordage
A.) Stone Flakes
You don’t have to possess mad flintknapping skills to construct this simple cutting tool. The original Hoko knife was made of a thumbnail size flake hafted with spruce root to a cedar handle. Archeologist believe this delicate tool was used to butcher fish for eating and longterm preserving.
Discarded flakes from Justin Cook.
Our stone flakes were gifted to our class by a good friend and master flintknapper, Justin Cook of Wayback Wilderness. He had a pile of flakes left over from his flintknapping class at our Georgia Bushcraft Fall Campout and offered them to me. I gladly accepted.
You can also make your own flakes. Find a stone which breaks like glass. As you know, broken glass creates sharp edges. My friend and primitive skills mentor, Scott Jones, introduced me to bipolar flaking. Use a hammerstone and stone anvil to strike smaller stones which fracture into sharp, straight, useable flakes. Flat, long flakes work best for this application.
B.) Wood Selection
Next to our outdoor classroom, a willow (Salix) tree grows in our secondhand beaver pond. I cut a finger-size branch for handle material. I also had a section of box elder (Acer negundo) left over from friction fire kits. We used both for our project since they’re split easily and evenly. Experiment with woods in your locale to find what works for you.
Willow on top, Box Elder on bottom.
C.) Cordage
Since we haven’t taught natural cordage yet, students used manmade cordage to haft the flakes in place. A partial spool of tarred bank line is what we had left over from our bamboo shelter construction project. Natural cordage options in our woods include inner bark of several trees, dogbane, yucca, cattail, and many more. Artificial sinew, real sinew, or leather would also serve as good bindings.
D.) Assembly
Split one end of your handle with either a stone flake or metal knife. If the split starts to run off to one side, bend the thicker half more than the thinner half to even up the sides. The split should be long enough to accept the flake with room for binding the split end.
With the flake inserted in the split stick, lash the split ends together. With modern line, we used a jam knot to start the lashing (clove hitch also works). After 4 or 5 tight wraps, we tied two half hitches (down-n-dirty clove hitch) to secure the line. This provides enough friction to hold the flake securely. The problem point with this method is the chance that the handle will continue to split on the un-lashed side. To help prevent this, give the backside of the flake one wrap to reach the other side of the handle. Terminate the lashing just above the flake with two half hitches.
Wrapping both sides of the stone flake.
A finished Hoko knife bound with jute twine.
Without fish to butcher, we used our new stone tools to scrape bark off handles. I need to bring a mess of fish to class soon for some experimental archeology. One student asked, “Would this thing cut the head off a fish?” We shall find out.
P.P.S – If you find value in our blog, Dirt Road Girl and I would appreciate your vote on Top Prepper Sites! You can vote daily by clicking hereor on the image below. Check out all the other value-adding sites while you’re there…