Posts Tagged With: bushcraft ax skills

2 Ax Techniques for Fast Firewood Splitting

by Todd Walker

2 Ax Techniques for Fast Firewood Splitting ~ TheSurvivalSherpa.com

The permanent scars on my parent’s car port floor are a reminder of that grand idea Craig and I came up with while splitting firewood in 1977. The winter wind felt like we were tied to a whipping post.

“Let’s get out of the wind.”

“How ’bout the car port? The wood’s gotta be stacked in there anyway.”

Not our best idea ever, but we set up shop on the two-year old concrete floor. Driving the metal wedge with 8-pound sledge hammers, a few, quite a few actually, shot like bullets through the wooden rounds followed by a distinctive twang of metal meeting concrete.

“Ya think he’ll notice?”

“Nah. It’s just a few dimples. And we’ll stack wood on top anyway.” Upon further inspection, they were chunks, not dimples.

Had we known of these two splitting techniques, we could have saved Daddy’s new floor… and a lot trouble when he got home from work.

The Twist Technique

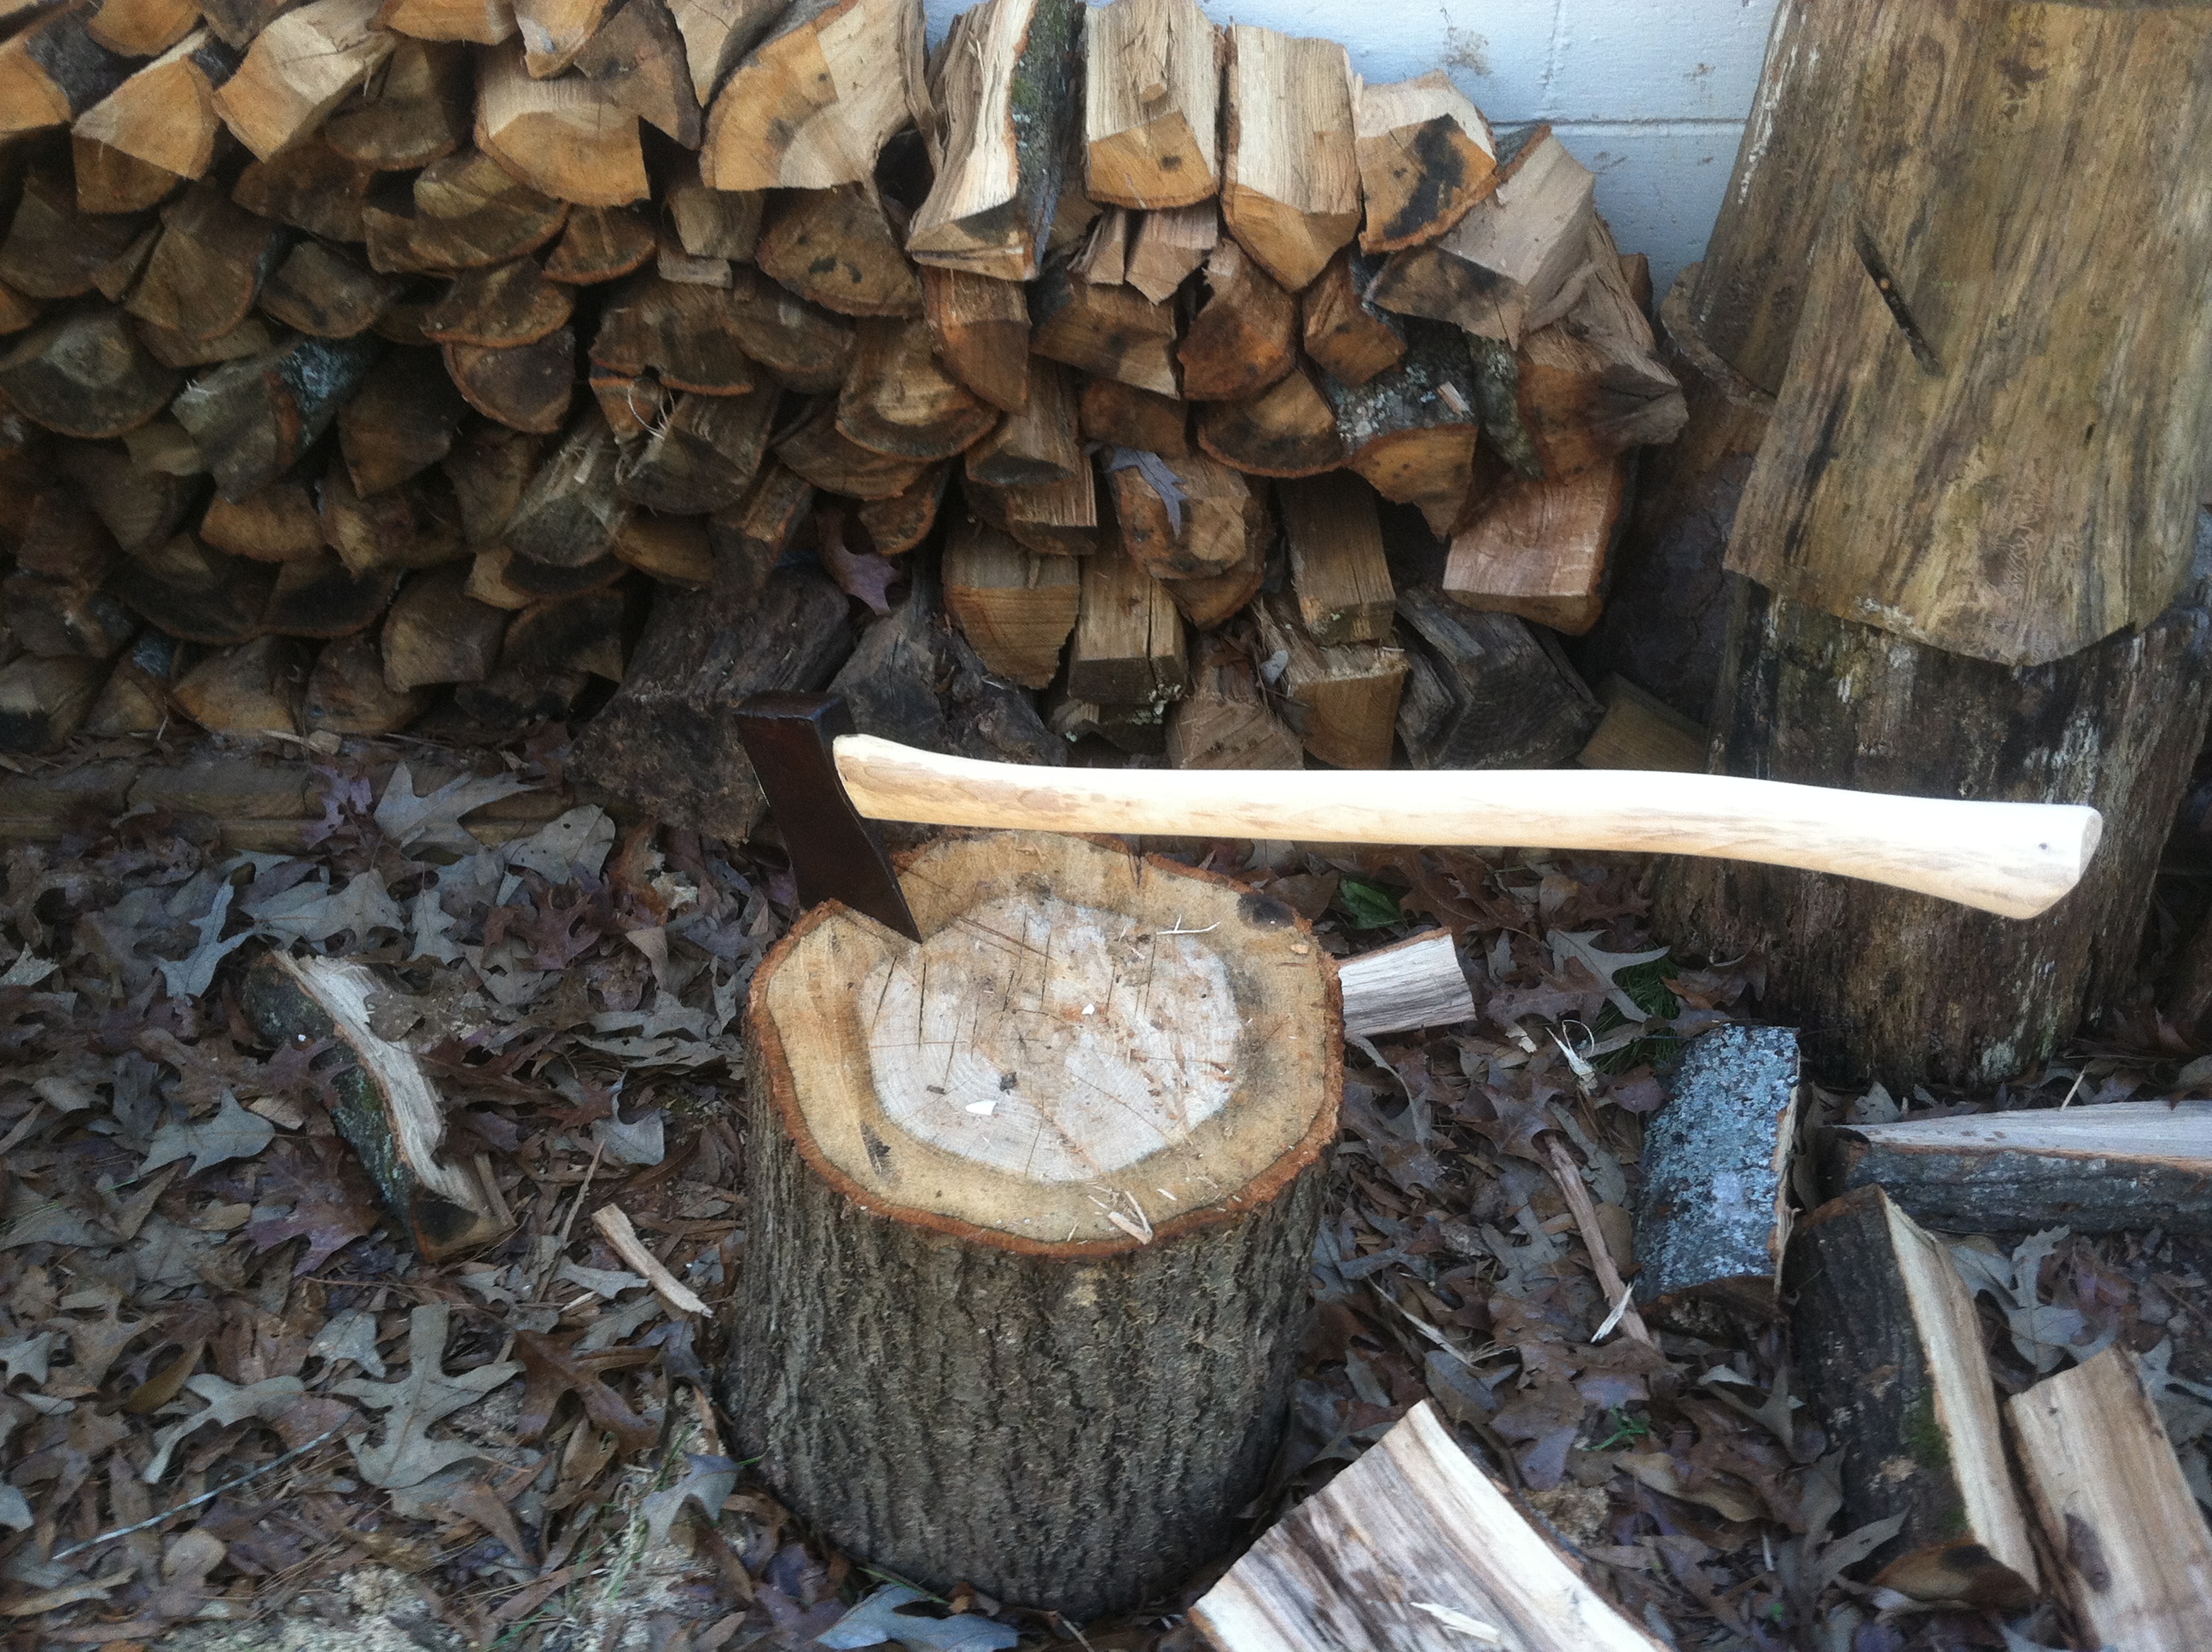
The normal way to turn big rounds of wood into little stuff is to use a splitting maul or hammer and steel wedge. These tools are heavier than an ax and doesn’t mind eating grit, even an occasional rock under ground. But they’re heavy fellows and not convenient to tote to base camp. A proper ax is easier to carry and does a noble job of separating wood rounds.

There are many frustrating ways to split wood. Typically, one balances a round atop a chopping block, takes aim, swings, and one becomes two pieces. And neither piece stays on the platform for further splitting. The cycle of bending over, balancing a half-round atop the chopping block, and splitting again is about as fun as a pulling teeth. Even using an old tire to hold the stick together while splitting requires lifting and placing the wood inside the tire.

If you want to speed up the splitting process, put a twist on your swing.

Stance, Swing, and Safety

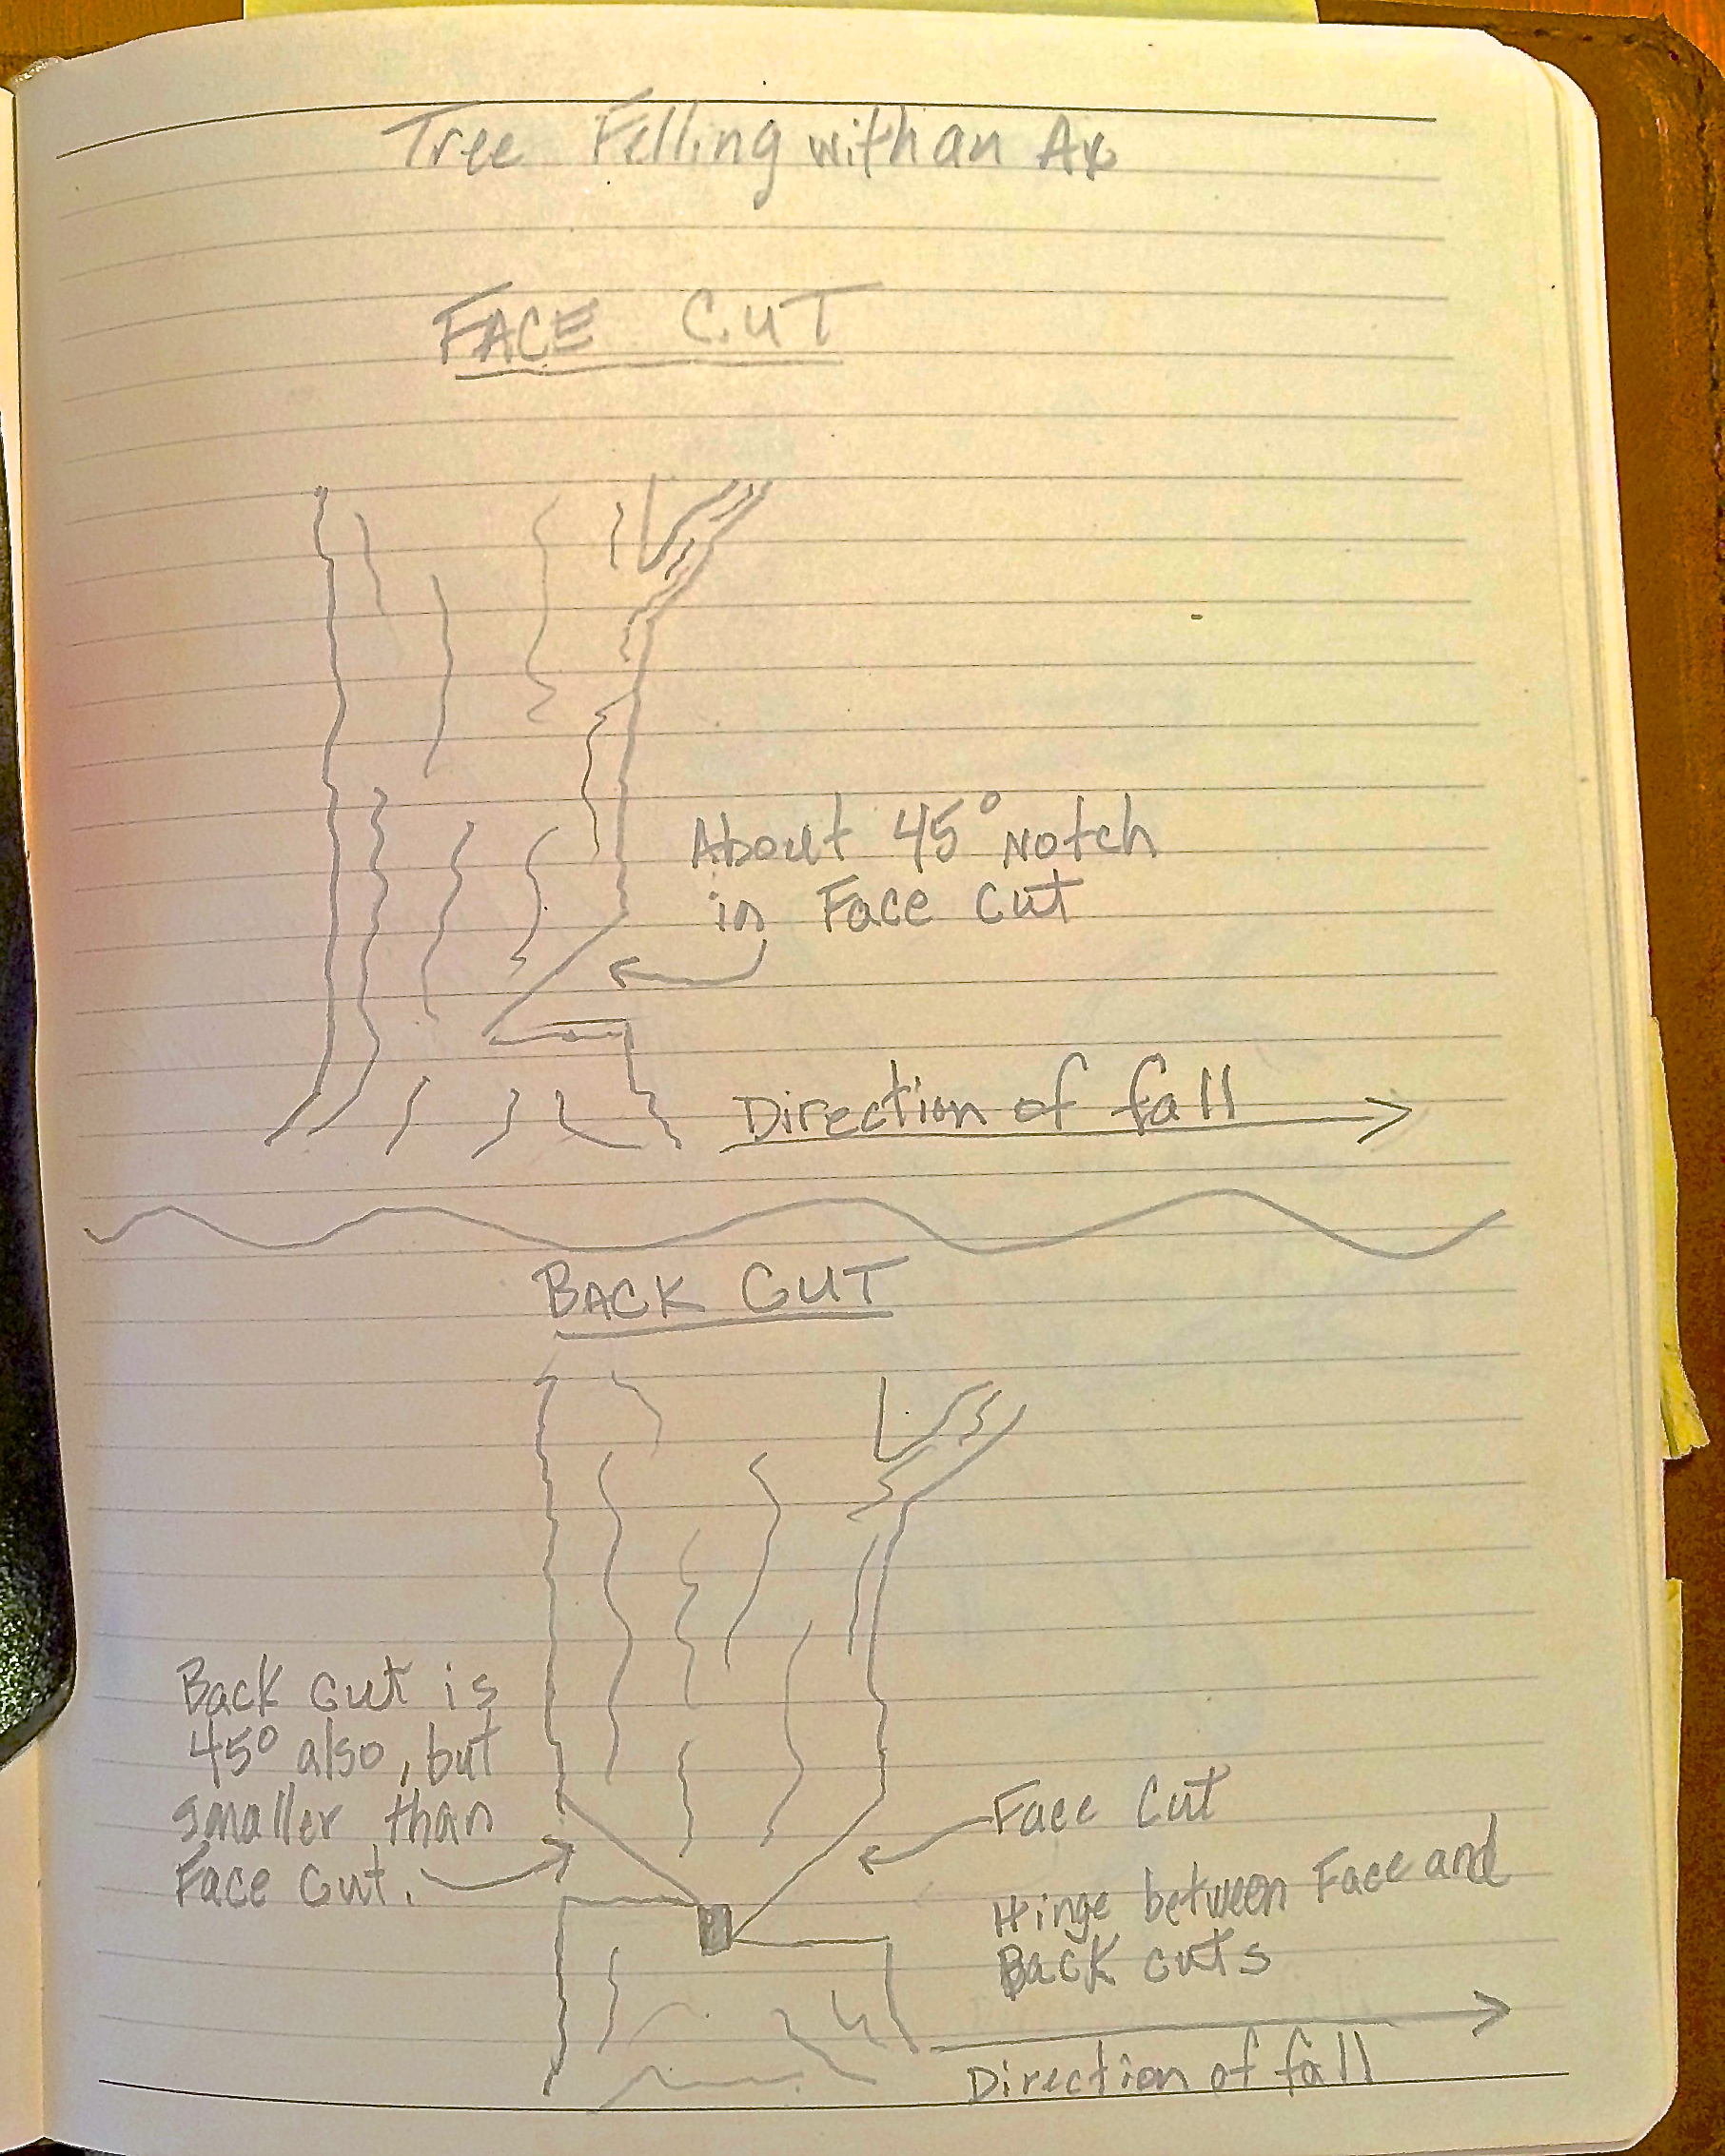
Trees, like people, are different yet have similarities. No matter the wood species, when possible to determine, split rounds from top to bottom. That is, position the wood vertically as it grew in the forest, top end up, bottom (butt) down.

Longer axes are safer than short-handled ones. When splitting, even on a chopping block (backed-up vertical stroke), with a boys ax (24 to 28 inch length), if you miss the target and chopping block all together, your follow through will likely turn your foot into a clove hoof. A 36 inch or longer handled ax extends the swing arc and would stop in the ground on miss hits.

With that in mind, and the fact that we’re not using a chopping block, we’re actually splitting what would traditionally be used as a chopping block – a big, round chunk resting on the ground. A slight twist or flick of the handle at the moment the ax meets the wood will prevent the ax from traveling through the length of wood.

To start, target the outside edge of the round. For my swing, I aim about 3 inches in on the outside edge of the chunk. My right hand grips the bottom of the handle and flicks or twists to the right on impact. You’ll be moving around the chuck steadily removing wood so make sure your area is clear of all tripping hazards and swing obstructions.

Clear, straight-grained wood like the Red Oak in the video makes for fine splitting… until you hit a knot. At that point, the twist technique is not effective. Other tree species can be difficult to split even with a splitting maul. Sweet Gum, for instance, reveals a mangled, interlocking grain which frustrates the most seasoned wood splitter. The best strategy to get through knots with an ax is to strike dead center on the knot. Or, just designate the piece a long-burner.

The Tiger Technique

Steven Edholm, who issued his crazy Axe Cordwood Challenge, along with my fellow participants have tried to come up with a name for this splitting method. Nothing official has stuck. What I’m calling this golf-like-swing is the Tiger. You may have figured out by now I’m referring to Tiger Woods, professional golfer.

Whatever you choose to call it, the Tiger is my favorite and fastest method for turning a pile of large rounds into small, burnable chunks. Before the Safety Sally brigade shuts me down for even suggesting you use what appears to be a dangerous ax swing, allow me to explain the method behind what seems to be pure madness.

Safety Concerns 

I covered the basics of swinging an ax inside and outside your frontal zone in a previous article. There are inherit dangers anytime you swing 3 and a half pounds of scary-sharp steel. I get it. No matter how many times I grip my ax, my mind pictures a few online ax injuries, which can’t be unseen, as I soberly begin swinging. Even then I must follow, without exception, the protocol of safe ax use.

A few concerns always pop up from Safety Sally folks who have never attempted the Tiger. It just looks awfully dangerous. Here’s the gist of their advice/concern…

  • A glancing blow and the ax hits your leg. Don’t split that way.
  • The log should be propped up against another back rest.
  • Looks like an accident waiting to happen – especially with a double bit ax.
  • That’s a hazardous way of splitting wood. I’ve chopped and split wood growing up. Never chopped that way.

What’s interesting is that other seasoned axmen comment on the effectiveness of this method. This is a lateral swing and is preformed outside the frontal zone. The important part is to keep your feet ahead of the point of ax impact. Clear-grained wood separates with alarming speed… and will fly many feet in the wood lot.

When clearing and area for ax work, I use this same swing to remove small saplings close to the ground. As the ax arc begins its upward motion, the bit separates the sapling cleanly. Again, follow the Frontal Zone rules for safe swinging.

Just like any other ax technique, Doing the Stuff is the key to improvement. You can’t watch the video or read about it to become proficient. Study proper technique and go split some wood.

Here’s a few photos of my firewood stack at base camp. The Axe Cordwood Challenge is coming along nicely and teaching me some valuable lessons on the journey.

2 Ax Techniques for Fast Firewood Splitting ~ TheSurvivalSherpa.com

The front stack is all ax cut: felling, bucking, splitting, and cutting to length. The Red Oak in the rear was sawn and doesn’t count in my Cordwood Challenge.

2 Ax Techniques for Fast Firewood Splitting ~ TheSurvivalSherpa.com

Red Oak and Tulip Poplar stacked. You can see the difference between the sawn firewood and ax-cut wood.

Keep Doing the Stuff of Self-Reliance,

Todd

P.S. – You can also keep up with the Stuff we’re Doing on TwitterPinterestGoogle +, YouTube, Instagram, and Facebook… and over at our Doing the Stuff Network.

P.P.S – If you find value in our blog, Dirt Road Girl and I would appreciate your vote on Top Prepper Sites! You can vote daily by clicking here or on the image below. Check out all the other value-adding sites while you’re there…

Thanks for Sharing the Stuff!

Copyright © by Survival Sherpa: In light of the recent theft of all my content by a pirate site, my sharing policy has changed. I do not permit the re-posting of entire articles from my site without express written consent by me. My content on this site may be shared in digital form (200 words or less) for non-commercial use with a link back (without no-follow attribute) to the original article crediting the author. All photos, drawings, and articles are copyrighted by and the property of Survival Sherpa. You are more than welcome to share our photos and articles on social media for educational purposes as long as you link back to the original article/photo with credit to the author.

Categories: Bushcraft, Camping, Functional Fitness, Homesteading, Lost Skills, Self-reliance | Tags: , , , , | 4 Comments

Camp Craft Challenge: The One Billet Boil Up

by Todd Walker

Camping is a time to renew friendships and experience the fellowship of kindred spirits. There is no other place quite like the glowing sticks of a campfire to rejuvenate my soul.

Camp Craft Challenge- The One Billet Boil Up - TheSurvivalSherpa.com

Fun times at Georgia Bushcraft campouts are often around a fire. Fire challenges, to be more specific. Most competitions consist of bringing a container of water to a rolling boil. There are other ways to gauge the woodsman’s or woods-woman’s firecraft skills, but none are more important (or fun), in my mind, than boiling water in the woods. With hot water, a camper can disinfect creek water and cook squirrel stew while sipping hot coffee, tea, and cocoa.

To prepare for these fire challenges, I’m known for collecting a trash bag full of “smalls” (pencil lead and pencil size twigs). Gathering enough twigs to boil water in under three minutes can take 30 minutes to an hour depending on how sidetracked I become in the woods. Squirrel! 

Collecting resources on woods treks is wise. However, you won’t find me walking through the woodland with a 55 gallon bag of sticks unless I know there’s an upcoming water-boil competition. With that being said, I’d like to introduce, and challenge, our readers to a time-honored way to boil water which incorporates ax, knife, and fire skills…

One Billet Boil Up

One-stick-fires are not new to me. However, I discovered the interesting history behind this challenge on Chris Noble’s site, Master Woodsman. Chris is always willing to share his wealth of woodsy knowledge at our campouts and his website. Find more on the history of this challenge here and here.

Challenge Guidelines

Here’s what you’ll need. Keep in mind that these are challenge guidelines not competition rules. You’re only competition is you for the sake of testing your skills.

  • One dry wood billet (species of your choice) around 6 inches in diameter and about one foot long – I used a standing dead red cedar billet for my challenge
  • Sharp ax or hatchet
  • Sharp knife
  • Bush pot or tin can large enough to hold one quart of water (32 ounces)
  • Kitchen matches (strike anywhere type)
  • Timer and camera (optional) if you’d like to share with us

I filmed the challenge on our channel if you’d like watch. The previously mentioned Master Woodsman links have useful video examples. Those guys and gals are fast!

Disclaimer: I’m well aware of the competitive spirit among my camping buddies. Should you take the challenge, know that you are using sharp cutting tools which do not discriminate about what they cut… fingers, shins, and hands included. If you are new to ax and knife work, spend time learning to properly handle these cutting tools. You are responsible for keeping appendages if you take this challenge, not us. No prizes are involved, so keep it safe.

Challenge Strategies

With my normal twig fire for water-boiling, surface area is guaranteed. Not so with a solid log. You must create surface area from the log as quickly and safely as possible. Split off a few one inch shingles from the round with your ax. Cut one of the shingles into smaller pieces. Immediately create shavings or fuzz sticks with your knife or ax from one of the smaller pieces. Light these shavings/fuzz sticks with a match as soon as possible. If you’re match goes out without achieving ignition, you’re allowed another match.

Split down more wood to begin building a log cabin fire lay around the fire. Use the smallest split wood to lay over the fire inside the base of the fire lay. The object is to build a couple of layers of burning kindling inside the log cabin.

Place the water container on top of flames supported by two of the cross pieces of the log cabin. Blow the base of the fire as needed to fan the flames.

Build the log cabin up to the top of the container with more split wood. Use what’s left of the original billet to split off four shingles. Lay the shingles against the fire lay in teepee fashion to trap and funnel the heat around the water container.

Just as a blacksmith billows air into his forge to increase the temperature, lay on the ground near the base of your fire and blow. This should only be done if your container is positioned on a steady log cabin structure. You wouldn’t want hot water falling and hitting any part of your body… another inherent risk.

Camp Craft Challenge- The One Billet Boil Up - TheSurvivalSherpa.com

My tin can is somewhere in there.

Once you’re satisfied the fire lay is sustainable, stand back and get your timer ready. Stop your timer once you have a rolling boil in your pot. Side bubbles around the edges of the container does not count as boiling. The entire surface of the water should be dancing and rolling with bubbles.

If you take the challenge, be sure to let us know your results. On social media, use the hashtag #OneBillitBoilUp so we can find you. Remember, the only prize you’ll receive is enhanced camp craft skills. Have fun and be safe!

Additional Resources

Keep Doing the Stuff of Self-Reliance,

~ Todd

P.S. – You can also keep up with the Stuff we’re Doing on TwitterPinterestGoogle +, YouTube, Instagram, and Facebook… and over at the Doing the Stuff Network.

P.P.S – If you find value in our blog, Dirt Road Girl and I would appreciate your vote on Top Prepper Sites! You can vote daily by clicking here or on the image below. Check out all the other value-adding sites while you’re there…

Thanks for Sharing the Stuff!

Copyright: Content on this site (unless the work of a third-party) may be shared freely in digital form, in part or whole, for non-commercial use with a link back to this site crediting the author. All links in articles must remain intact as originally posted in order to be republished. If you are interested a third-party article, please contact the author directly for republishing information.


Categories: Bushcraft, Camping, Doing the Stuff, Preparedness, Self-reliance, Survival Skills | Tags: , , , , , , , | 2 Comments

Ax-Manship: Tips for Splitting Long Logs for Firewood

by Todd Walker

It’s cold and you need firewood back at base camp. That standing dead oak tree 200 yards from your shelter will provide you with enough BTU’s for heat and cooking on this frigid weekend.

What’s the best strategy to get the fuel back to camp?

Ax-Manship: Smart Tips for Processing Long Logs into Firewood | www.TheSurvivalSherpa.com

You can only carry x amount of stove-length firewood in your arms before your back shuts down. The efficient method is to cut longer lengths at the harvest site and haul it back to base camp. How long? The answer depends on your functional fitness level and the diameter/density of the log to be hauled.

You need to conserve calories since the only means of conveyance is your body. Firewood provides heat. Heat cooks food. Food provides calories.

Hauling Long Logs

I first witnessed the technique as a young boy when my daddy hired Mr. Colbert to cut timber on our land. Get this, his name was King… King Colbert!

Mr. Colbert was strong as Paul Bunyan’s ox, Babe the Blue Ox! He hauled pulp wood logs to his old log truck on his shoulder. Paul Bunyan was folklore, but King was the real deal!

Now, you don’t have to be as strong as Mr. Colbert to transport firewood, a few simple tips, and upping your functional fitness, will have you toting logs like toothpicks.

Here’s my rule of thumb for hauling logs…

  • A foot or so taller than me
  • Choose trees I can reach around with one arm and touch my nose
  • Walk the path of least resistance (tripping hazards)… even it’s a longer walk
  • Good form equals less injuries

Let’s haul some wood!

Ax-Manship: Tips for Splitting Long Logs for Firewood | www.TheSurvivalSherpa.com

Doing squats here but it’s the same technique only you walk with the log on your shoulder.


Stand the log on end. Position your shoulder just past the midway point of the log. With your legs and hips bent like your about to do a squat in the weight room, keep your back straight and tilt the log backwards (opposite the way you’re facing) as you lift the log.

The longer end of the log will naturally counter balance to your backside. A bandana or extra shirt on your neck will prevent scratches. Now haul it back to camp!

Splitting Long Logs

Grab your ax, two hardwood wedges, and a maul. Simple machines are force multipliers. Carve two pieces of hardwood about 8 inches long into wedges with your ax. The beauty of woodcraft/bushcraft skills is that you craft simple machines on site. This lightens your load considerably.

Don’t overlook the importance of a simple maul for camp craft projects. Uses include but are not limited to…

  • Pounding stuff like stakes and wedges
  • Baton for splitting wood
  • Hammer for mortise and tenon joints on shelters
  • All sorts of camp craft tasks at camp

Here’s a down and dirty tutorial on how to make your own maul:

Back to splitting.

Lay the log to be split on top of another log to elevate it off the ground. If you want to get fancy, cut a “Y” branch to cradle the log. This short “Y” holds the long log steady for splitting and prevents grounding of your sharp ax. Your ax bit won’t take kindly to dirt and rocks.

Once secure, straddle the log and strike the end of the log with your ax to start a split. Remember to keep the ax handle horizontal at impact. It may take a couple of strikes. Once a split opens in the log, drive a wedge into the split above your ax with a maul. Remove your ax and pound another wedge in the crack going down the log. Use the maul, not your ax. The steel ax tends to “mushroom” the top of wooden wedges. And please, never hammering metal wedges with an ax.

Repeat this process until the log splits lengthwise. Take care not to pound the wooden wedge into your “Y” cradle or other hard stuff or you’ll blunt the wedges.

Use your ax to cut any stubborn wood fibers clinging to both halves of the log. Follow safety procedures as if you were limbing. Keep your anatomy clear of ax swings!

Repeat the process to split halves into quarters or even eighths. I prefer quartered if I have my bucksaw at camp. With a shorter folding saw, eighths speed the processing considerably.

Bucking the Split Logs

I’ve found this method of processing firewood saves my ax. Sawing logs into firewood lengths first, then splitting them with an ax, consumes cutting tool resources (sharp ax bit) quicker than splitting long logs first then bucking.

With your logs quartered, you’re ready to process firewood lengths for your tent stove or campfire. Obviously, if you’re burning a long fire, all this processing is unnecessary.

To save calories and frustration, lay the split rails in a notched stump vise you’ve crafted. A simple “V” notch or “7” notch will help hold the rails in place while you cut to your desired length. On the homestead, build yourself a sawbuck.

If you don’t have a takedown bucksaw, order a 21 inch Bacho Dry Cut saw blade and build one from scrap lumber for under 12 dollars. This saw eats through wood like a beaver on steroids! I just ordered a 36 inch blade for larger logs.

DRG and I would really appreciate you subscribing to our YouTube channel. It’s just another avenue for us to Share the Stuff of Self-Reliance! We’ve got a subscriber giveaway planned when we reach 500 subscribers. We’re at 226 now. Thanks for all your support!

And as always…

Keep Doing the Stuff of Self-Reliance,

Todd

P.S. – You can also keep up with the Stuff we’re Doing on TwitterPinterestGoogle +, YouTube and Facebook page… and over at the Doing the Stuff Network on PinterestGoogle +, and Facebook.

P.P.S – If you find value in our blog, Dirt Road Girl and I would appreciate your vote on Top Prepper Sites! You can vote daily by clicking here or on the image below. Check out all the other value-adding sites while you’re there…

Thanks for Sharing the Stuff!

Copyright: Content on this site (unless the work of a third-party) may be shared freely in digital form, in part or whole, for non-commercial use with a link back to this site crediting the author. All links in articles must remain intact as originally posted in order to be republished. If you are interested a third-party article, please contact the author directly for republishing information.

Categories: Bushcraft, Camping, Doing the Stuff, Homesteading, Self-reliance, Survival Skills | Tags: , , , | 4 Comments

4 Essential Ax Skills for Self-Reliance

by Todd Walker

Not many a young boy, in our present chainsaw generation, has ever witnessed his mother fell a tree with her ax. My brain cells blur as to the exact date, kindergarten maybe, but the image of Mama swinging sharp steel rhythmically against that tree is permanently etched in my childhood memory bank. Over 45 years later, my ax addiction continues!

4 Essential Ax Skills for Self-Reliance | www.TheSurvivalSherpa.com

A question you must ax…

How long will chainsaws hum along? Long enough… maybe. Either way, self-reliance requires that one never put all their hopes in one tool.

I’m not anti-chainsaw. I love my Stihl… for certain jobs. She allows me to work without much sweat. Ah, but nothing beats a hunk of steel on the end of a stick. When wielded skillfully by fit individuals, it is a thing of beauty and a joy forever!

The ax is the oldest, most under-appreciated, yet invaluable tool which serves not only as a wilderness lifeline, but a simple machine that connects your hands to a forgotten craft… Ax-Manship.

The ax of our past may be the key to our future. You see, the more complicated a machine (i.e. – a chainsaw) the more likely you’ll need a small engine repair shop in your basement to keep it productive. In the field, at a minimum, you’ll need to carry two types of oil, gasoline, gas can, files, and a bar wrench to harvest wood with this machine. You’ll likely need another machine for conveyance just to reach your woodlots with all the stuff accompanying your chainsaw.

A sharp ax (sheathed, of course) can be slung over your shoulder with a sharpening stone in your pocket. That is all. No doubt, a chainsaw can rip through cords of firewood and fell huge timber. But again, the question remains, how long will they hum? If your answer is “forever”, you may view the ax as an archeological artifact with little use for modern man.

Even if combustion engines continue to run “forever”, you’ll never regret owning ax-manship skills. Indigenous peoples, soldiers, farmers, homesteaders, woodsmen, frontiersmen, and craftsmen of old knew the value of this tool and how to use it.

Every self-reliant man should learn these 4 basic ax skills… safely, without shortening your toes.

Warning: Axes are daylight tools. Safe and efficient ax skills only come from using your ax(es) properly. Like other tools, choose the right one for the job. Felling and bucking wood is not the only job axes do well. Job specific axes include: hewing, ship building, butchering, carpentry, fire fighting, wood carving, and many more.

For the purpose of this non-comprehensive ax article, we’ll focus on felling, limbing, bucking, and just a touch of splitting with and ax…

1) Felling

4 Essential Ax Skills for Self-Reliance | www.TheSurvivalSherpa.com

Journal Notes ~ A: Face Cut and Back Cut

Without experience felling trees, you should never lay an ax to a trunk you can’t reach around with one arm. Practice accuracy and technique on smaller trees.

Determine the lean of the tree to be felled by viewing it from a distance two directions: front and 90º to the side. Hold/hang the end of your ax handle between your thumb and forefingers and use it as a plumb line to sight the tree’s lean. This will help you determine the lay or path the tree will fall.

With proper tools (wedges, jacks, ropes), a skilled axman can make most any tree fall in his/her desired direction. However, it’s much easier to fell a tree towards its natural lean if that path is clear of other obstacles.

Before Your First Swing

  1. Visually check the tree for any widow makers (dead limbs) that might dislodge and crash onto your body. Dead standing trees are excellent for firewood but also pose a higher risk of dropping limbs when being hacked on. Even small twigs falling can damage your eye the moment you look up to check. Eye protection is advisable.
  2. Clear your swing radius of all debris that might snag your ax mid swing. Miss hits and glances mean potential injury.
  3. Watch the wind. Predominant wind direction and gusts can be your friend or foe when felling trees.
  4. Have multiple escape routes. Things can go very wrong if a tree kicks back or gets snagged in an adjacent tree on its decent. Take time to plan and clear paths. Be ready to drop everything and retreat if need be.

Swing Stance

Position your body so that your feet are behind the chopping strokes and to the outside of your feet. Chopping stokes should be outside the “train tracks” (two parallel lines running to the outer edges of your boots) with your feet inside the tracks on flat ground where possible.

Face Cut

Aim to make a 45º face cut near the base of the tree. This notch should go about halfway through the tree and be perpendicular with the imaginary line of fall. Make progressive cuts in a pattern to remove wood chips. Accuracy is more important here than strength and power.

Never swing in an upward manner to remove wood chips in the notch. Upward ax swings are likely glance and end in your face. Continue making 45 degree cuts from top to bottom of the face cut. Decreasing your swing angle slightly to about 10º will help remove chips… just never swing upward! Also, keep the ax handle as horizontal as possible while swinging. Do this by flexing your knees and waist with the ax head at 45º.

Now you have a 45 degree face cut with an even shelf about halfway through the tree. Time for the next notch.

Back Cut

The back cut is a smaller version of the face cut. Again, this cut needs to be a 45º notch with its shelf an inch or two higher than the face cut shelf. This hight difference creates a “hinge” between the two notches.

The hinge serves as a safety device to prevent kickback when the tree begins to fall. Even with smaller diameter trees, the weight of the tree falling causes the base of the tree to push backwards. It’s physics.

You may find it helpful to score the area of the back cut with your ax to give you an accurate target. Use the same cutting strokes as you did with the front cut. As you close in on the front cut from the rear, pay attention to the trees movement. Once it starts to lean, you may get one more swing in. After that, it’s time to get out of the way and let gravity take over. Do not stand directly behind the falling tree. Move to a safe distance to either side… and get ready to drop your ax and run if need be.

2) Limbing

4 Essential Ax Skills for Self-Reliance | www.TheSurvivalSherpa.com

Journal Notes ~ B: Limbing

Limbing can be dangerous since there is no backup to stop the ax once it severs the branch. Here’s some tips for limbing safely:

  1. Swing in a direction from the base (trunk) to the top of the downed tree. This removes the limb even at the trunk leaving little to no snags.
  2. Start by removing limbs from the topside of the downed tree to prevent them from interfering while limbing side branches. Remember to keep your feet inside the “railroad tracks” and the limb outside the tracks on all horizontal swings. Once severed, remove to keep your work area clear for side limbing.
  3. Keep the tree trunk between you and the limb you are removing when at all possible. Keep your body slightly forward of the target limb as you swing.

3) Bucking

Once your tree is down and limbed, you need to move it to camp or your woodshed. If the chainsaws are no longer humming, vehicles probably aren’t either. Or, you may be too deep in the backwoods to be reached with a truck or tractor.

4 Essential Ax Skills for Self-Reliance | www.TheSurvivalSherpa.com

Journal Notes ~ C: Bucking


Buck it! Bucking is the process of chopping logs into manageable lengths for conveyance. If you know the length of your ax, use it as a measuring tool to lay out the log sections to be bucked.

Bucking tips:

  1. Scotch the log with wooden wedges or smaller branches on both sides of the log to be bucked.
  2. Stand on top of the log with feet straddling your cut mark. (This is an advanced technique. Bucking with feet on the ground in the video below should be practiced before standing on a log for bucking) Spread feet about shoulder’s width apart with knees and hips slightly flexed. This stance is adjusted up or down depending on the length of your ax.
  3. Maintaining your balance, swing accurately and begin making “V” notches from the center of your mark to a width equal to the diameter of the log. For instance, a log 10 inches in diameter will have a V notch about 10 inches wide.
  4. Once you’ve notched one side of the log, turn and repeat the notching on the log’s opposite side. The two V notches will meet in the middle of the log and break apart.

4) Splitting

The-Woodsman's-Secret-to-a-Well-Hung-Ax

Splitting both short and long bucked logs will be covered more thoroughly in our next post in this series. But for now, here is a video that will give you a few tips on how to safely split firewood at camp.

Keep Doing the Stuff of Self-Reliance,

Todd

P.S. – You can also keep up with the Stuff we’re Doing on TwitterPinterestGoogle +, YouTube and our Facebook page… and over at the Doing the Stuff Network on PinterestGoogle +, and Facebook.

P.P.S – If you find value in our blog, Dirt Road Girl and I would appreciate your vote on Top Prepper Sites! You can vote daily by clicking here or on the image below. Check out all the other value-adding sites while you’re there…

Thanks for Sharing the Stuff!

Copyright: Content on this site (unless the work of a third-party) may be shared freely in digital form, in part or whole, for non-commercial use with a link back to this site crediting the author. All links in articles must remain intact as originally posted in order to be republished. If you are interested a third-party article, please contact the author directly for republishing information.

Categories: Bushcraft, Camping, Doing the Stuff, Homesteading, Preparedness, Self-reliance, Survival Skills | Tags: , , , | 22 Comments

Blog at WordPress.com.