Medical

Off Grid Medic: Surviving Wilderness Emergencies When Definitive Care is Miles Away

by Todd Walker

Off Grid Medic: Surviving Wilderness Emergencies When Definitive Care is Miles Away ~ TheSurvivalSherpa.com

More and more people are getting back to nature to enjoy its beauty and benefits. The list of outdoor activities seems endless. With these pursuits comes risk of injury. Common injuries like scrapes, sprains, burns, bites, and blisters can turn serious in remote locations. I’ve had my share of bumps, bruises, stings, and close calls. Thankfully, none were life threatening… but could have turned sideways quickly.

Note: All injuries depicted look real but are not. If you’re queasy about blood and guts, you may want to reconsider reading the rest of this article.

A skill set I’ve neglected for years is wilderness first aid. Teaching students outdoor self-reliance skills at RISE spurred me on to train with one of the best Wilderness Emergency Care instructors available, Mark DeJong, owner of Off Grid Medic. We were also fortunate to have Michelle Pugh, an accomplished long distance hiker, author of two books of her adventures, and Off Grid Medic staff instructor teaching our class. Their style of teaching fits perfectly in my “Doing the Stuff” wheelhouse. You won’t sit and watch boring power points in a sterile environment. Courses are held where outdoor enthusiasts roam – the woods. Our class was hosted by Georgia Bushcraft, LLC.

Besides imparting real-world knowledge, Mark works his magical moulage abilities by transforming last night’s rib eye bone into a patient’s open fracture. These realistic injuries aren’t for shock value but to help students “train like you fight.” Discovering a bone protruding from the skin or an impalement in a training exercise will give you a clue as to how you’d respond in a real wilderness emergency.

Off Grid Medic: Surviving Wilderness Emergencies When Definitive Care is Miles Away ~ TheSurvivalSherpa.com

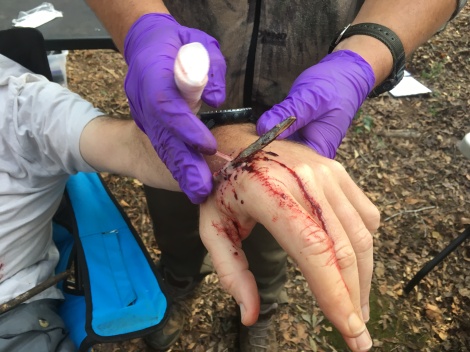
See what I mean? Some of Mark’s handiwork on “Dutch Oven” Bill.

Wilderness First Aid

Urban first responders are equipped with tools and reinforcements to get patients to definitive care within minutes typically. For wilderness rescuers, hospitals and doctors might be hours or days away. Environmental stressors, evacuation over rugged terrain, limited medical resources, and other unknown variables present unique challenges for patient care and treatment.

If you interested in professional training in wilderness emergencies, contact Off Grid Medic. Below are a few things to consider if you’re ever in the role of wilderness rescuer.

You’re Number One

You can’t rescue a victim if you step into a dangerous situation and become one yourself. Before rushing in, assess the situation, location of patient, and possible hazards; dead tree limbs overhead, steep/loose ground, freezing water, etc., etc. Take care of yourself and team before providing care.

As an example, use the Reach, Throw, Row, Go steps to protect yourself in an open water rescue.

  • Reach: Use when victim is close to shore line and can be reached with by hand, pole, paddle, etc. without having to enter the water.
  • Throw: Victim is too far away to be reached, throw a line, rope, PFD attached to rope, if the victim is conscious and able to grab the rope.
  • Row: Rescuers will use a boat/canoe/kayak if Reach and Throw isn’t an option. Get close enough to use Reach, Throw, or lift the victim into the craft.
  • Go: This is the last and least safe option for rescuers. It may be necessary due to the victim being unconscious or unable to grab a rope.

McGyver Mentality

Even if you are a medical professional, the wilderness changes the game. After your initial patient assessment, a typical first aid kit may not contain every item you’ll need in remote emergencies. Be prepared to improvise… a lot.

Off Grid Medic: Surviving Wilderness Emergencies When Definitive Care is Miles Away ~ TheSurvivalSherpa.com

Space blankets come in many styles. Buy good quality, sturdy blankets.

For a few more ideas on outside-the-box first aid items, this article of ours may help.

Besides a first aid kit, I’ll wager that you probably have the following items in your supplies. If not, consider adding them.

  • Emergency Shelter: Start with proper clothing for the rescuer, space blanket (not the cheap mylar sheets), control body temperature, body wrap for victim, shield from elements, signaling device (orange), etc.
  • Duct Tape: Wound closure (butterfly stitches), splints/wraps, slings, neck/head immobilization, fire starter, and uses too long to list here.
  • Ziplock Baggies: Exam gloves, wound irrigation, occlusive dressing for large burns, sucking chest wound taped on three sides, and more.
  • Rope/String: Splinting, litter bed, lashing a litter together, emergency shelter, etc.
  • Bandana/Cotton Material: Bandages, sling, splint padding, dressing, wet dressing, etc.
  • Metal Container: Disinfect water for hydration via boiling, cooking, warm liquids, hot/cold pack, etc.
  • Fire Kit: Emergency tinder, lighter, road flare (not joking), signaling, warm patient and rescuers, comfort, cooking (unexpected stay), water disinfection, etc.
  • Knife/Saw/Ax:  Tools to make other items for rescue (litter, fire, etc.), remove insect stinger, collecting firewood, etc.
  • Head Lamp: You’ll need your hands free to attend to a patient in dark conditions.
  • Compass: Preferable one with a mirror and magnifying lens – all kinds of uses beside navigation.

To Splint or Not to Splint

Sprains, strains, and closed fractures are not always distinguishable. Open fractures are easier to diagnose since the bone protrudes from the skin. A closed fracture may not show deformity in a limb. The rule of thumb is to splint if a limb is painful, swollen, or deformed – this applies to sprains and strains. Immobilize the limb(s) before the patient is evacuated.

Off Grid Medic: Surviving Wilderness Emergencies When Definitive Care is Miles Away ~ TheSurvivalSherpa.com

Makeshift splint by Mike and Jessica. Interesting note: I taught Mike middle school P.E. in 1985. Man, I’m old!

We learned to splint limbs with resources on hand and materials from the wilderness. Without a modern SAM Splint, you’ll have to get creative. Two sticks, cordage, and a shirt stuffed with leaves will pad and immobilize an arm or leg.

Off Grid Medic: Surviving Wilderness Emergencies When Definitive Care is Miles Away ~ TheSurvivalSherpa.com

SAM Splints are great to have in your pack.

Off Grid Medic: Surviving Wilderness Emergencies When Definitive Care is Miles Away ~ TheSurvivalSherpa.com

Mark demonstrating the B.U.F.F. splint – Big, Ugly, Fat, Fluffy – on Michelle.

Slings for an arm/shoulder/collar-bone injure have to offer support and keep the limb secured to the body. Through hands-on experimentation, my partner and I found that zipping her arm inside her light jacket created a snug fitting sling which was comfortable and warm. There’s more than one way to sling a limb.

Off Grid Medic: Surviving Wilderness Emergencies When Definitive Care is Miles Away ~ TheSurvivalSherpa.com

Another diy sling.

Transporting the Victim

Depending on location and terrain, rescue reinforcements may be far way or unable to respond in remote areas. You’re injured friend will have to be carried out. A makeshift litter can be made from poles and string.

Off Grid Medic: Surviving Wilderness Emergencies When Definitive Care is Miles Away ~ TheSurvivalSherpa.com

Happy people carrying a litter full of Casey.

Two Litter Options: 

  1. Large group of 6-8 people
  2. Small group with as few as 3 people with backpacks

Large Group: Cut two saplings about 8 feet long and sturdy enough to carry weight. Cut 5-6 sturdy cross pieces about 5 feet long. Position the two long poles parallel next to the victim. Place the cross poles under the long poles at intervals which support the head, mid back, hips, knees, and feet. Lash the poles together using square lashing or any knots to secure them in place. If time is an issue, or cordage is sparse, use a jam knot with two short pieces of bank line or paracord.

Off Grid Medic: Surviving Wilderness Emergencies When Definitive Care is Miles Away ~ TheSurvivalSherpa.com

Demonstrating square lashing and jam knot techniques.

Transfer the patient to the litter. Team members lift at the extended cross poles and walk.

Small Group: Use two saplings as above. If sturdy rope is available, wrap the rope around the poles to create a bed. The pole ends are tucked into the lower part of the shoulder straps of two backpacks. This allows two people, with proper fitted backpacks, to transport a victim.

Off Grid Medic: Surviving Wilderness Emergencies When Definitive Care is Miles Away ~ TheSurvivalSherpa.com

Two poles inserted in the backpacks straps to carry our patient on a rope litter. Obviously, they wouldn’t be facing each other if not in the class.

The culmination of our three-day, 20 hour training was a nighttime rescue. I mentioned that Off Grid Medic likes to keep it real for “train like you fight” scenarios. Mark and Michelle didn’t let up and provided excellent, realistic, hands-on training the entire weekend!

If you’re a camper, hiker, woodsman, or Scout leader, consider learning wilderness first aid. This is an entry-level course into the world of wilderness emergency care. Contact Mark for next-level courses and continuing education. I offer my highest recommendation to the Off Grid Medic team for their professionalism, knowledge, and real-world training.

Keep Doing the Stuff of Self-Reliance,

Todd

P.S. – You can also keep up with the Stuff we’re Doing on TwitterPinterestGoogle +YouTubeInstagram, and Facebook… and over at our Doing the Stuff Network.

P.P.S – If you find value in our blog, Dirt Road Girl and I would appreciate your vote on Top Prepper Sites! You can vote daily by clicking here or on the image below. Check out all the other value-adding sites while you’re there…

Thanks for Sharing the Stuff!

Copyright © by Survival Sherpa: In light of the recent theft of all my content by a pirate site, my sharing policy has changed. I do not permit the re-posting of entire articles from my site without express written consent by me. My content on this site may be shared in digital form (200 words or less) for non-commercial use with a link back (without no-follow attribute) to the original article crediting the author. All photos, drawings, and articles are copyrighted by and the property of Survival Sherpa. You are more than welcome to share our photos and articles on social media for educational purposes as long as you link back to the original article/photo with credit to the author.

Categories: Bushcraft, Camping, Doing the Stuff, First Aid, Medical, Preparedness, Self-reliance, Survival Skills | Tags: , , , | 1 Comment

How Cherokees Used Trees of Southern Appalachia for Food, Medicine, and Craft

by Todd Walker

How Cherokees Used Trees of Southern Appalachia for Food, Medicine, and Craft - TheSurvivalSherpa.com

Foraging wild food requires practice, knowledge, and experience on your landscape. Notice I used the word your land. What you’ve read in books and watched on YouTube may not apply to your locale. While survival principles may never change, self-reliance is local.

Many of us are self-taught in skills of wilderness living. However, one way to shorten your learning curve is to find an experienced skills practitioner in your area who is actually Doing the Stuff. After receiving instruction, you gain knowledge. Knowledge weighs nothing but is not enough. You make knowledge applicable through time and experience and context. There is no substitute for time in your woods.

I had the recent pleasure of attending my third class at Medicine Bow, A Primitive School of Earthlore in the North Georgia Mountains. If you look up Renaissance Man in the dictionary, Mark Warren’s bio should appear, but won’t. He’s not only a walking encyclopedia of woods-lore, he won the U.S.National Champion in Slalom/Downriver combined and the World Championship Longbow Tournament in 1999. On top of his wealth of outdoor knowledge, he is also a musical composer and published author.

Mark’s knowledge of the Cherokee uses of plants and trees is the foundation for anyone interested in wilderness living and self-reliance. I wrote him an email after the class asking assistance on a question for this article. I wanted to know the degree to which Cherokees depended on domesticated crops verses wild foods.

Mark’s response:

“Everyone knows about Cherokee farming and the 3 sisters (corn, squash, and beans), but the wild growth of forest and field was actually “farmed” too, by pruning or clearing for light. For example, swamp dogwoods were pruned to encourage survival shoots for basketry and arrow shafts. Large areas along flood plains were burned to help create a monopoly of river cane (for the same two crafts). A lot of those “brakes” can still be seen. The same is true of foods. I have a sense of why Amicalola was sacred to the Cherokee. I suspect it was for the prolific sochani that grows there. It’s also called green-headed coneflower. Cherokee women in NC still harvest it in spring and freeze for the year.”

Click here for more information on Sochani (Green-Headed Coneflower).

Think about this astounding bit of research…
“The Cherokees of the 19th century are listed as having around 800 plants in their repertoire (Mooney, 1992). This from a pool of about 2,400 species of plants to work from or about a third!” ~ Source

Every year I add more plants and trees to my food-medicine-craft list. But 800! I’ve got a lot to learn and experience.

“In the school of the woods, there is no graduation day.” 

~ Horace Kephart

Trees of Southern Appalachia

Wild plant foragers get excited this time of the year. Green shoots make their way through the soil for another growing season. Autumn turns to winter and the smorgasbord disappears. But trees, they stand ready to share their resources year-round.

Winter tree identification would not be challenging if trees would stop dropping their leaves. Mark taught winter botany lessons which I had never been exposed to. Sharing all I learned would take several articles. For our purposes today, we will explore 3 of my favorite trees in my woods and how the Cherokee and settlers used them for food, medicine, and craft resources.

Tulip Tree

Tulip Poplar (Liriodendron tulipifera) it is not a poplar at all. It is actually in the Magnolia ((Magnoliaceae)) family of flowering trees. There are many common names for Liriodendron tulipifera besides Tulip Poplar… Yellow Poplar, Canoe Wood, Yellow Wood, and Tulip Tree. That is one reason it is important to use scientific names of plants and trees… if you can manage to pronounce them. This will remove any confusion over common names.

Related Resource: Trees for Self-Reliance

Food

The Tulip Tree, while not a nutritional powerhouse, is a favorite of mine mainly for craft and outdoor self-reliance. Tulip Tree blooms are a main source of nectar for honey bees which produces a dark, amber honey loaded with antioxidants.

  • The only part of a Tulip Tree that I know is edible is the nectar in the flowering blooms.
  • Edit: Darryl Patton, The Southern Herbalist, sent me a message saying he collects, dries, and pounds the inner bark into flour for baking in his spring classes. Thank you, Darryl.

Medicine

Tulip Tree’s inner bark and leaves were used medicinally by the Cherokee and settlers in Appalachia for treating…

  • Poultice from leaves for inflammation and sores.
  • Inner bark tea for periodic fevers, diarrhea, pinworms, as a digestive aid and for rheumatic pain.
  • Supposedly, inner bark was chewed as an aphrodisiac.
  • The bark could also serve as a substitute for quinine in treating malaria.
  • Tooth aches.
  • Used as a tonic to induce perspiration to treat fevers.
  • Root bark and seeds useful as a wormer for the body.
  • Cough syrup from bark.

Craft

  • Fire Craft ~ Wood for friction fire, inner bark for tinder, hot, quick burning firewood which does not produce long-lasting coals like other hardwoods.
  • Cordage ~ Inner bark fibers can be processed into cordage and rope.
When Primitive Skills and Prepping Have Sex | www.TheSurvivalSherpa.com

Indigenous cordage: Clockwise from 12:00 ~ Dogbane; Tulip Tree; Okra, and Yucca.

  • Containers ~ Outer bark crafted into berry baskets, arrow quivers, and larger pack baskets.
  • Carving ~ The soft hardwood lends itself to easy carving of spoons, bowls, pottery paddles, canoe paddles, and even the canoe itself. One common name of this tree is Canoe Wood.
This design will be carved into the Tulip Tree and used to imprint designs on primitive process pottery.

This design will be carved into the Tulip Tree paddle and used to imprint designs on primitive process pottery.

  • Insulation ~ Shredded inner bark can be stuffed between layers of clothing to create dead air space to retain body heat in a survival situation.
  • Roofing/Siding ~ Outer bark slabs used for shingles and siding on shelters.

Hickory

Hickories make excellent wildlife resource as squirrels and feral pigs love to eat their nut meat. Pignut (Carya glabra), Mockernut (Carya tomentosa), and Shagbark (Carya ovata) are the three hickories I’m most familiar with in Georgia, Mockernut being the most common.

Food

  • Sap ~ Sap water from hickories can be consumed without treatment.
  • Nuts ~ Contains fats (18g/serving), protein (3.6g/serving), and carbohydrates (5 g/serving) – Serving size = 1 oz.
  • Hickory syrup from crushed and processed nuts.
  • Cooking oil from nuts.
  • Kunuche (ku-nu-che) ~ A traditional Cherokee hickory nut soup.
  • Nuts with exterior husks are useful as charcoal for cooking food.
Scott Jones using hickory nuts as charcoal

Scott Jones (Media Prehistoria) using hickory nuts as charcoal.

  • Hickory Milk ~ “They pound them to pieces, and then cast them into boiling water, which, after passing through fine strainers, preserves the most oily part of the liquid; this they call by a name which signifies hiccory milk; it is as sweet and rich as fresh cream, and is an ingredient in most of their cookery, especially homony and corn cakes.” – Source

Medicine

  • Infusion of boiled bark for arthritis pain.
  • Inhaling fumes of young shoots on hot rocks as a treatment for convulsions.
  • Cold remedy
  • Liver aid
  • Gynecological aid
  • Dermatological issues

Craft

How to Handcraft a Custom Ax Handle from a Tree - TheSurvivalSherpa.com

This ax handle started out as the hickory tree pictured in the background

Hickory was used by the Cherokee’s for…

  • Stickball sticks
  • Crafting bows
  • Handles – (Here’s my tutorial on carving an ax handle from hickory)
  • Firewood
  • Smoking meats
  • Furniture
  • Inner bark of Mockernut and Shellbark Hickory used to finish baskets
  • Ashes from hickory were used by settlers to make quality lye for soap.
  • Inner bark used for cordage. Mark described a method of slicing down a hickory limb to remove the bark and twisting it to make a strong rope. I’ll explore that method in a later post.
  • Green nut husks used as dye – (My bed sheet tarp was dyed with hickory and black walnut dye)
  • Nut oil mixed with bear fat as an insect repellent.

Pine

There are 36 pines in North America to choose from. These evergreens are easy to spot for anyone. To narrow down the species, count the needles. The Eastern White Pine (Pinus strobus) is the only species in Eastern North America with 5 needles in the fascicle sheath (the paper-like sheath surrounding the base of the needles).

How Cherokees Used Trees of Southern Appalachia for Food, Medicine, and Craft - TheSurvivalSherpa.com

Hemlock is a part of the pine family and grows in southern Appalachia. Like other pines in our region, the inner bark is edible.

Food

  • Pine nuts are edible and tasty.
  • Inner bark was eaten when other foods were scarce. Should be boiled/cooked since it is high in turpenes. Can also be dried and ground into a flour.
  • Pine pollen can be collected and is edible and used like flour.
  • Long strips of inner bark can be boiled to make pine noodles.

Medicine

  • Pine needle tea has the following medicinal properties: antiseptic, astringent, inflammatory, antioxidant, expectoranthigh in Vitamin C for colds – flu – coughs, congestion, and even scurvy.
  • Shikimic acid, the main ingredient in Tamiflu, is harvested from pine needles in Asia.
  • Pine resin applied to skin conditions.
  • Arthur Haines describes on his YouTube channel how pine pollen provides multiple avenues of protection against radioactive cesium.
  • Warm poultice of pine resin will draw splinters and foreign matter from skin.
  • The inner bark can be fashioned as an antiseptic Band Aid for cuts and scraps
  • Chew softer sap straight off the tree like a gum for sore throats and colds. You could pre-make “gum” with these ingredients: bees-wax, pine sap, and honey.

Craft

See more useful fire craft articles on our Bombproof Fire Craft page.

  • Wood for shelters and bows for bedding.
  • Rescue Signals ~ A pre-made signal fire built with green pine boughs on top will generate enough white smoke to be seen for miles.
  • Pine needles were used to make baskets and resin was used as a sealer.
  • Logs were used in home building.
  • White pine and hemlock are both good wood for friction fire.
  • Dried and ground hemlock inner bark used as flour.
  • Dried pine “flour” is useful when rubbed on the body to cover human scent while hunting.

Mark says that Cherokees called trees “The Standing People.” Trees do not walk to new locations like animals in search of food. They are always in the same spot. Learning to identify trees and their resources will put you in a better position of appreciation and stewardship of your natural environment.

To mention all the trees used by the Cherokee would be better addressed in book form. In this article, we’ve highlighted three of my favorite trees in our woodlands. I’ll write future blogs covering more. Here’s a teaser on future posts… Dogwood, Sourwood, Basswood, Black Walnut, Persimmon, Beech, Black Cherry, and the list continues.

Keep Doing the Stuff of Self-Reliance,

Todd

P.S. – You can also keep up with the Stuff we’re Doing on TwitterPinterestGoogle +, YouTube, Instagram, and Facebook… and over at our Doing the Stuff Network.

P.P.S – If you find value in our blog, Dirt Road Girl and I would appreciate your vote on Top Prepper Sites! You can vote daily by clicking here or on the image below. Check out all the other value-adding sites while you’re there…

Thanks for Sharing the Stuff!

Copyright © by Survival Sherpa: In light of the recent theft of all my content by a pirate site, my sharing policy has changed. I do not permit the re-posting of entire articles from my site without express written consent by me. My content on this site may be shared in digital form (200 words or less) for non-commercial use with a link back (without no-follow attribute) to the original article crediting the author. All photos, drawings, and articles are copyrighted by and the property of Survival Sherpa. You are more than welcome to share our photos and articles on social media for educational purposes as long as you link back to the original article/photo with credit to the author.


Categories: Bushcraft, Camping, DIY Preparedness Projects, Doing the Stuff, Herbal Remedies, Lost Skills, Medical, Natural Health, Preparedness, Real Food, Self-reliance, Survival Skills, Wildcrafting | Tags: , , , , , , , , | 46 Comments

DON’T PANIC! A Layperson’s Guide to Surviving Common Wilderness First Aid Emergencies

guide-to-surviving-common-wilderness-emergencies

By Kathleen Starmer, OYOInfo.net

As a rule, I don’t take life guidance from a work of science fiction. But when it comes to The Hitchhiker’s Guide to the Galaxy, I make an exception. Whether you’re dealing with the sudden onset of a blizzard or an alien invasion, you won’t be of use to anyone if you allow yourself to be seized by the sinister tentacles of panic. Take a breath. Get all zen. Channel your inner monk. NOW you’re in the proper mindset to handle an emergency situation. Let’s proceed!

DISCLAIMER: Before we get into the meat of this article, let me say this loud and clear: I am not a medical professional. In fact, let’s all say that together, shall we? “Kathleen is not a medical professional.” The author accepts no liability for anything that happens to anyone who follows the advice in this article. The information supplied herein is strictly for informational purposes, and will hopefully serve to incite you to sign up for a Wilderness First Aid course so that you can enjoy The Great Outdoors in the safest manner possible. Glad we got that squared away.

Presenting (drum roll, please) three—count ‘em: THREE!—of the most common emergencies you’re likely to confront in a wilderness situation, as well as some suggestions on how best to handle said emergencies with only a basic level of training.

Oh, My Aching Back…or Foot…or…: Muscle Strains and Sprains

guide-to-surviving-common-wilderness-emergencies

“Hold still! I’m trying to help!”

Ah, the disappointment of a twisted ankle one day into your week-long backpacking trip! Not surprisingly, the treatment for strains and sprains in exactly the same on the trail as it is on the soccer field: Rest, Ice, Compression, and Elevation (RICE).

The “rest” part is fairly easy. If your schedule allows, take a day or two to chill out and give the injured muscle, tendon, or ligament a break. Ice can be a bit trickier. I, for one, have never hauled frozen blocks of water into the woods, but you can improvise by immersing the sore area in a cold stream for short intervals, filling a plastic bag with cold water and securing it to the injury, or even by wrapping a wet bandana around the injury and letting the breeze perform some evaporative cooling. That wet bandana can also do double-duty as a compression bandage, or you could break open the first aid kit and use an elastic wrap. Lastly, if the injury is to one of the person’s limbs, prop the offending limb on a backpack, a fallen log, or whatever handy item you can find to decrease swelling and speed recovery.

You can also offer anti-inflammatories to the patient if they wish to self-administer, and there are some fancy-schmancy taping techniques you can learn about in a Wilderness First Aid Course. Taping is especially useful if the patient needs to keep moving before they’ve fully recovered. Plus, it looks bad-ass.

“It’s Just a Flesh Wound”: Abrasions and Lacerations

guide-to-surviving-common-wilderness-emergencies

Boo boos aren’t only for the wee ones when you’re on the trail

Boo-boos just seem to be a way of life in the outdoors. In fact, lots of folks don’t consider it a successful outing if they don’t come home with at least one “war wound.” But just because skin injuries are common doesn’t mean you should get all devil-may-care about them. You can minimize the risk of complications down the line by following these simple tips.

First of all, if there is significant blood loss, staunch the flow. Just a little bit of blood is fine—in fact, it can even be good, as it will clean out the wound. Otherwise, apply pressure to the wound with a clean bandage. You can learn proper technique in any basic first aid class. Major blood loss, it goes without saying, is beyond the scope of this article.

The second thing you want to do is prevent infection. Since we’re addressing injuries in the boonies, chances are, an open wound is contaminated with nasties. You can use the alcohol wipes found in your first aid kit to clean around the wound, but it’s best not to use those wipes on broken skin because their harsh nature might actually further damage tissue. Your best bet is to irrigate the wound with clean water. Either use copious amounts of flowing, potable water, or if you’re super-prepared, use a special irrigation syringe. In the unfortunate incident of embedded debris, you can use sterilized (read: toasted in your campfire) tweezers to carefully remove it. Now, if we’re talking outright impalement, that’s a whole other issue…again, best addressed by taking a Wilderness First Aid course. Gee, you knew I was gonna say that, didn’t you?

Lastly, you want to promote wound healing. This is simply a matter of applying a proper dressing. Bonus points for elevating the injured area to decrease swelling.

You’re Giving Me a Heart Attack: Cardiac Issues

guide-to-surviving-common-wilderness-emergencies

Could be a heart attack; could be a bad cheeseburger. Play it safe and treat as a cardiac event.

You might be surprised to learn that heart attacks are among the top three causes of wilderness fatalities. It’s certainly not as “sexy” as a dramatic fall from a canyon wall, but a cardiac event has the potential to be just as deadly. So do yourself a favor: get in shape before you head out for that three-day backpacking adventure. Step away from the deep fried, gravy drenched chocolate cheesecake. Have a doctor give you the all-clear before you embark on that 14,000 ft summit hike. Do everything you can to stack the deck in your favor.

However, even the best-laid preparations can go awry, so it behooves you to know the signs of a cardiac emergency. While it’s true that less-serious conditions can cause some of these symptoms, when you’re in the wilderness, treat any patient with the following signs as though they are experiencing a heart attack until proven otherwise by a medical professional. Better safe than sorry. According to the American Heart Association (AHA), the most common symptoms of heart attack include:

  • Chest discomfort, typically in the center of the chest and lasting for several minutes. It may feel like painful pressure, squeezing, or a sense of “fullness.”
  • Discomfort in other areas of the upper body, including one or both arms, the back, neck, jaw, or even the stomach.
  • Shortness of breath that is not due to exertion, with or without chest discomfort.
  • Other signs could include breaking out in a cold sweat, nausea, vomiting, light-headedness/dizziness, or an impending sense of doom.

(Although the most common symptom of a heart attack for women is the classic chest pain shown in the movies, females are also more likely to experience the symptoms I’ve indicated in italics above.)

If you have any reason to suspect someone is your wilderness party is experiencing a cardiac emergency, sit them down, give them 325 mg of uncoated aspirin to chew for about 30 seconds and swallow, and make them comfortable. Ask if they are carrying nitroglycerin tablets. If they are, give the tablet container to them so that they can self-administer one dose. Keep them calm and quiet. If you have cell reception, call for emergency rescue by qualified professionals. If you are out of communication range, pick the fittest person in your party to hoof it back to civilization and bring help ASAP. A heart attack is serious business, and there are all sorts of special situations and qualifiers for this dilemma; your best bet is to get your Wilderness First Aid certification before your next outing so that you’ll know the proper course of action for your particular scenario.

So there you have it! A quick-n-dirty layperson’s guide for dealing with common wilderness emergencies. And I know I’ve said it 127 times already, but once again, with feeling: sign up for a Wilderness First Aid course today! Your life—or at least your comfort—may depend on it!

Author Bio:

guide-to-surviving-common-wilderness-emergencies

After over a decade of working as an academic ecologist and another 13 years at NASA, Kathleen Starmer created http://OYOinfo.net with the intent of bringing practical emergency preparedness to The Every(wo)man. She is particularly concerned with helping people who live in urban areas deal with the fallout from climate change-related disasters. You can follow Kathleen on Facebook (http://www.facebook.com/oyoinfo), Twitter (http://twitter.com/oyoinfo), Instagram (http://instagram.com/oyoinfo), and Pinterest (http://www.pinterest.com/oyoinfo). You can also amuse yourselves with her amateur video production skills on YouTube (http://www.youtube.com/channel/UCmamAXUReXQyKZOX-jf6wrQ); encouraging emails may be sent to inquiry@oyoinfo.net (mailto:inquiry@oyoinfo.net). 

—————————–

P.S. Don’t forget to register to win a $75 gift certificate from Trayer Wilderness. The giveaway ends November 3rd! Click here to enter.

Categories: Camping, First Aid, Medical, Preparedness | Tags: , , | 7 Comments

47 Creative Uses for Self-Aid in Your 10 Piece Kit

by Todd Walker

Fall is a season where many of us head out to enjoy the outdoors. Crisp air, colorful leaves, deer in rut, and clear mountain streams lure us to nature. Unfortunately, there are times when things go sideways on day hikes and canoe trips. When they do, you’ll need knowledge, skills, and resources to get home safely.

self-aid-10-piece-kit

The goal of wilderness survival is simple… to effect self-rescue or be found alive. Even “minor” injures in a 72 hour scenario can decrease your chances of meeting that goal.

Self-aid should become a top priority on your skills list. Why?

You’re likely to come in contact with sharp stuff, hot stuff, slippery stuff, and/or stinging stuff on outings. I rarely leave the woods without one of these most common wilderness injuries:

  • Cuts/Abrasions
  • Burns
  • Breaks/Strains/Sprains
  • Bites/Stings
  • Blisters

You may choose to carry a first-aid kit to treat these injuries. That is a smart option. Let me state upfront, if you require daily medication for health issues, by all means, be sure to pack enough of your meds.

Can your 10 piece kit double as a self-aid/first-aid kit? Indeed it can!

First, here are the 10 essential items that should go with you on every trip to the woods…

The 10 C’s of Survivability (10 Piece Kit)

  1. Cutting tool
  2. Combustion device
  3. Container
  4. Cover
  5. Cordage
  6. Cotton bandana
  7. Cargo tape
  8. Cloth sail needle
  9. Candling device
  10. Compass

Look beyond the obvious uses for these 10 items – shelter, fire, navigation, water, etc., etc. With a little creativity, your 10 C’s can effectively treat each of the most common injuries in a 72 hour wilderness survival scenario.

Here’s how…

(Adapted from Brian Manning’s hand-out and Jason Hunt’s class on wilderness self-aid at The Pathfinder School)

Cuts and Abrasions

  1. Cutting tool – use knife to remove debris from wounds
  2. Combustion device – sterilize tools
  3. Container – irrigate and wash wound with water
  4. Cover – (drum liner, plastic tarp) bandage and cover wounds
  5. Cordage – tourniquet as a last resort
  6. Cotton bandana – wipe/clean wound, bandages, dressings, tourniquet
  7. Cargo (duct) tape – all-purpose Band Aid, DIY butterfly Band Aid
  8. Cloth sail needle – remove debris from wound and stitch/suture in extreme cases
  9. Compass – good compasses have a magnifying lens that can be used to inspect wounds closely
self-aid-10-piece-kit

Using your knife to cut a duct tape butterfly bandage. Keep your knife outside the Triangle of Death. You don’t need another wound.

self-aid-10-piece-kit

Pull the wound together after securing one side of the bandage to the skin. The cut should be pinched together slightly. This is a temporary fix.

self-aid-10-piece-kit

Shemaghs make great slings. Get one that is 100% cotton.

Breaks, Sprains, and Strains

  1. Container – water bottle used as a hot or cold pack
  2. Cordage – splint wraps, slings (add padding)
  3. Cargo tape – immobilize limbs by taping makeshift splints in place
  4. Cotton bandana or shemagh – slings, splint wraps, padding under splints (tie smaller bandanas together for longer slings)
  5. Cover (drum liner) – water collection (cold/hot pack), splint wraps, slings
self-aid-10-piece-kit

If using a folding saw or machete as a makeshift splint, tape the cutting edge before taping it to your limb.

self-aid-10-piece-kit

Immobilizing a limb. Add padding under your splint before taping.

Burns

  1. Cutting tool – remove debris and clean burns
  2. Container – use to pour water for irrigation, stop the burning process, and cold pack
  3. Cotton bandana – cover burn loosely, retain moisture on burn
  4. Cloth sail needle – clean burns
  5. Cover (drum liner) – cover and protect burns
  6. Compass – mirror and magnifying lens used to inspect burns and hard-to-reach areas on the body

self-aid-10-piece-kit

Bites and Stings

  1. Cutting tool – knife to scrape/remove stingers and splinters
  2. Container (water bottle) – cold compress to reduce swelling, irrigation – in the case of venomous snake bites, keep location cool, immobilize, and get medical help ASAP.
  3. Cargo tape – DIY Band Aids, bandage tape, remove stinger
  4. Cloth sail needle – remove stinger or splinter
  5. Compass – mirror and magnifying lens used to locate and inspect hard to reach areas on the body (i.e. – tick removal and bites)
  6. Cotton bandana – Band Aid/bandage material, pressure dressing
self-aid-10-piece-kit

Sighting mirror on compass used to inspect embedded tick on the back of the calf in the dark. A headlamp frees both hands for the task.

self-aid-10-piece-kit

Cold water in a water bottle

Blisters

  1. Cargo tape – cover/shield developing hot spots
  2. Cloth sail needle – pop blister at base to drain
  3. Container (water bottle) – irrigate and clean area

Additional self-aid uses for the 10 piece kit

  • Your candling device (head lamp/flashlight) can be used for inspection and treatment at night with all the common injuries.
  • Metal water bottle and cup is useful for preparing infusions, decoctions, and sterilization of your knife or needle before cleaning wounds.
  • Besides using a tarp/emergency space blanket for core temperature control (CTC), these items can also serve as a stretcher, water collection device, and sling material.
  • Use your pack for immobilization and elevating injured limbs and or dealing with shock.
  • And of course, a proper fire kit affords you the ability to maintain CTC, heat natural medicinals, and heat compresses.

Your 10 piece kit should always accompany you on wilderness adventures. As you can see, these multi-purpose tools have many redundant uses. Heck, the 10 C’s of Survivability should go with you no matter where you’re headed.

Keep Doing the Stuff of Self-Reliance,

Todd

P.S. – You can also keep up with the Stuff we’re Doing on TwitterPinterestGoogle +, YouTube, Instagram, and Facebook… and over at the Doing the Stuff Network.

P.P.S – If you find value in our blog, Dirt Road Girl and I would appreciate your vote on Top Prepper Sites! You can vote daily by clicking here or on the image below. Check out all the other value-adding sites while you’re there… 

Thanks for Sharing the Stuff!

Copyright: Content on this site (unless the work of a third-party) may be shared freely in digital form, in part or whole, for non-commercial use with a link back to this site crediting the author. All links in articles must remain intact as originally posted in order to be republished. If you are interested a third-party article, please contact the author directly for republishing information.

Categories: Bushcraft, Camping, Doing the Stuff, First Aid, Medical, Self-reliance, Survival, Survival Skills | Tags: , , | 40 Comments

Herbal Medicine Kit: Bleeding

Part 5 in our Go-to Herbal Medicine Kit series.

herbal-medicine-kit-bleeding

by Kat Yorba

Today we continue on with our series with looking at “Bleeding.”  We will discuss the herb Agrimony and Yarrow.  Make an Herbal Compress to stop Bleeding and a Tincture of Yarrow.

BLEEDING

Some people can handle the sight of blood, some can’t.  I am one of those who can’t.  But I find that being prepared…knowing ahead of time what to do and having my supplies on hand enables me to feel better about the whole issue.

 Let’s better understand what bleeding does.  Bleeding has it’s advantages.  It’s the bodies way of cleaning dire and foreign particles from a wound, and when exposed to air it forms a fibrous substance called fibrin.  This fiber creates a netting that entangles other blood cells so that they clot into a scab…your bodies natural band-aid!

So, you’re in a serious situation and bleeding needs to be stopped right away.  Certain herbs can be applied directly to the wounded area.  If this does not stop the bleeding, apply an herbal compress with pressure.  While administering herbal remedies, you should also try to slow the flow of blood by raising the injured area higher than the heart.

Agrimony, plantain and yarrow are versatile herbs that can arrest bleeding and encourage scabbing.

Keep in mind that treatments made with these herbs in the form of powders or poultices are an emergency tactic only.  Although herbs quickly arrest bleeding, they are not antiseptic enough so proper cleaning and disinfecting will also need to be done.  Use your discretion but seek medical attention when necessary!

Herbal Compress to Stop Bleeding

Click HERE to print recipe! 

 Herbal Medicine Kit   Bleeding 

Agrimony

 Herbal Medicine Kit   Bleeding

Defined

Agrimonia gryposepala: species native to North America commonly known as tall hairy agrimony was used by the Among the Iroquois people, Cherokee, The Ojibwe and other ingenious peoples for much the same purposes of the common agrimony Agrimonia eupatoria which was naturalized from europe. Hemp Agrimony, Eupatorium Cannabinum (Linn.)and the Water Agrimony Eupatorium Aquaticum mas, have somewhat similar properties but are not botanically related.

Therapeutic Uses

Agrimony’s astringency is effective against diarrhea, especially in small children, and because of its low toxicity, the herb is particularly suitable for children’s illnesses. Agrimony stops irritation of the urinary tract that may increase a child’s urge to urinate and, therefore, may be useful in the treatment of bladder leakage (cannot hold urine), bed-wetting and adult incontinence.

Agrimony is perhaps best known as a wound herb used on medieval battlefields to staunch bleeding. This same property helps to staunch heavy menstrual bleeding as well. Agrimony is most used in modern herbal practice as a mild astringent and a tonic, the tannins it contains tone the mucus membranes making it is useful for alleviating the symptoms of coughs and sore throats. The combination of being a bitter tonic as well as an astringent herb make agrimony a valuable tonic for the digestive system and a useful remedy for healing peptic ulcers. The bitter principles in the plant support the function of the liver and gallbladder. The herbal tea can be used as a skin wash; it is thought to improve minor injuries and chronic skin conditions.

Recipe

Skin Wash/Tea/Infused Liquid for Creams or Gargle :

Standard brew using 1 teaspoon of dried herb to each cup hot water. The longer you let it steep, the more tannins are extracted. Make a stronger decoction for external use in baths and skin washes Drink 2 to 3 cups per day. Used in ointment form for skin rashes, and as a gargle for sore throat.

Yarrow

 Herbal Medicine Kit   Bleeding

Description:

Yarrow was once known as “nosebleed”, it’s feathery leaves making an ideal astringent swab to encourage clotting. Yarrow skin washes and leaf poultices can staunch bleeding and help to disinfect cuts and scrapes; taken as a tea it can help slow heavy menstrual bleeding as well. Yarrow is a good herb to have on hand to treat winter colds and flu; a hot cup of yarrow tea makes you sweat and helps the body expel toxins while reducing fever. The chemical makeup of yarrow is complex, and it contains many active medicinal compounds in addition to the tannins and volatile oil azulene. These compounds are anti-inflammatory, antibacterial, and help relax blood vessels. Yarrow should be on everyone’s list of remedies since the herb makes itself useful for everything from brewing beer to a hair rinse to preventing baldness. In China, yarrow is used fresh as a poultice for healing wounds. A decoction of the whole plant is prescribed for stomach ulcers, amenorrhoea, and abscesses.

Side Effects: 

Avoid in pregnancy, can cause allergic skin reactions in sensitive people who suffer from allergies related to the Asteraceae family. Moderation is the key to safe use, the thujone content can be toxic over an extended period of time

Recipe:

Yarrow Spritzer

For a tonic that soothes the nerves and uplifts at the same time, this is a good combination for an aroma lamp or mister. Also use as a facial steam for the benefits of yarrow that is skin healing and for spruce that helps the respiratory system.

Variations: Use lime instead of orange.

3 drops-Orange

4 drops-Spruce

2 drops -Ylang-Ylang

6 drops -Yarrow

How to Use:

Lamps/Diffusers:

15 to 20 drops of a blend can be used at a time in most standard sized aroma lamps.

 Mist Spray:

As a general rule use 15-30 drops per cup (8 oz.) of liquid for mist sprays, depending on your preference and the strength of the essential oils.

Yarrow Tincture

Click HERE to print!

  Herbal Medicine Kit   Bleeding


Recap:  That concludes our look at “Bleeding”.  Today we learned a little more about the herbs; Agrimony & Yarrow.  We made a Herbal Compress to stop Bleeding and also Yarrow Tincture.

Looking ahead:  Next post we will be learning all about “Bruises”.  We will first talk about Arnica, Witch Hazel and Chamomile.  Then move on to several recipes; Bruise Compress, Tincture of Arnica & a Herbal Ice.

Reminder:  Have on hand St. John’s wort flower tops, Witch Hazel Bark, Chamomile Flowers, Lavender Flowers, Lavender Essential Oil, Distilled Water, Washcloth for Compress.

————————————–

About Kat Yorba: Hi, I’m Kat. I’m a wife, mother, friend, massage therapist, writer, gardener, and child of God. I LOVE coffee, chocolate, essential oils, good books, cats, motorcycles, guns, drag racing and living in the USA! Learning to be more self-reliant & self-sufficient in a semi-homemade, homesteading way! Connect with Kat on her blog, Simply Living SimplyFacebookTwitterPinterest, and Google+.

Categories: Doing the Stuff, Herbal Remedies, Medical, Preparedness, Self-reliance, Wildcrafting | Tags: , , , | 7 Comments

Why Being a “Tree Hugger” Builds Self-Reliance

by Todd Walker

tree-hugger-self-reliance-uses-american-sycamore

I’ve never considered myself a “tree hugger” as defined in the Merriam-Webster dictionary:

noun: someone who is regarded as foolish or annoying because of being too concerned about protecting trees, animals, and other parts of the natural world from pollution and other threats [Emphasis mine]

Yesterday I annoyed a few motorists crossing a narrow country bridge on a tree hugger outing. Not intentionally, mind you. It’s just that I needed to photograph a beautiful American Sycamore stretching its molten limbs over a muddy Georgia river. One trucker let me know how foolish I looked by blaring his air horn as I perched on the bridge railing snapping my shutter. Unaffected, I continued my craziness.

The thought of being a tree hugger, as previously defined, may not describe you, but every person on the journey to self-reliance and preparedness would benefit from hugging a tree or two.

You’re conflicted, right? Well, don’t be.

It’s our responsibility to protect, use, and conserve our natural resources. We’re stewards of this land. Our Appalachian ancestors understood the properties of trees and how to use the wood, bark, leaves, and roots to build a sustainable life. There were no box stores with stacks of dimensional lumber to build a house. If a handle shattered, they knew the best wood to use for re-hafting an ax. Tulip Poplar was abundant and used to build houses and hand-hewn log cabins. The Appalachian pioneers knew their wood!

tree-hugger-self-reliance-uses-american-sycamore

A young sycamore growing near the roadside

There are boat-loads of info on edible weeds and medicinal plants. I’ve found a lack of printed material on the medicinal/edible uses of trees. I have many of the Foxfire book series and always look to add more to my self-reliance library. Clue me in if you have more tree resource books, please. So, like any good Doer of the Stuff, I’m embarking (pun intended) on a tree education journey as part of my Doing the Stuff Skills list. Who knows, maybe you’ll be convinced to embrace your inner tree hugger.

Ready, set, hug!

The first tree to wrap your arms around is the American Sycamore (Platanus occidentalis). It can reach heights over 130 tall, over 10 feet in diameter, and grow to be 600 years old. George Washington documented in his journal in 1770 a sycamore with a diameter of 14 feet (45 feet in circumference). Trees this large usually have hollow trunks that house animals of all sorts. It’s been reported that settlers even used hollowed Sycamore trees to shelter livestock.

The rapid growth rate of this deciduous tree causes the bark to shed in molten fashion like a birch tree. Its camouflage pattern of light green and brownish gray with creamy white background splotches causes the trunk to stand out in late fall and winter when forest leaves lay on the ground. The exfoliating bark and coloration makes the sycamore one of the easiest deciduous trees in the eastern woodlands to identify in the winter.

tree-hugger-self-reliance-uses-american-sycamore

The Sycamore and Self-Reliance

The fast growing American Sycamore likes wet bottom land near streams, rivers and ponds in full sun. Their leaves are similar to maple but not as spectacular since they turn a boring brown in the fall. Beavers find the bark appetizing.

In Bushcraft 

Bushcraft refers to the art of crafting in the bush (woods) with minimal tools and lots of skill.

  • Sycamore’s fibers intertwine making it an excellent wood for spoon and bowl carving. The wood tends to warp in the drying process, so use dried, seasoned wood.
  • Not rot resistant and shouldn’t be used for longterm structures exposed to the moisture.
  • The sap offers a year-round source of hydration in warm climates.
  • The sycamore can also be tapped like a maple tree for syrup or sugar. However, it takes a lot of sap to make small batches of sycamore syrup.
  • Shade-casting crown of large trees offer shelter from the sun.
  • Large leaves (up to 10 inches across) can be used as a wrap for slow cooked food over coals for an added sweet flavor.
tree-hugger-self-reliance-uses-american-sycamore

This green leaf measured almost 9 inches across

In Woodwork 

  • Sycamore is grown commercially for pulp and rough lumber.
  • Interlocking grain makes nice accent pieces for woodworking.
  • Turns easily on a lathe for bowls.
  • Beautiful specking on gun stocks.
  • Music boxes; guitars and violins.
  • Hard to split which makes sycamore an excellent butcher’s block.
  • Quarter sawn makes this wood more stable for projects. Flat sawn tends to warp.
  • It gets one of its nicknames “Buttonwood” from it ability to create durable wooden buttons.
  • The wood is food safe and was used for food crates and barrels in the past.

In Medicine

Inner bark tee was used for a wide variety of treatments by Native Americans.

  • Colds, coughs, and lung ailments
  • Measles
  • Emetic – cause vomiting
  • Laxative
  • Astringent properties to treat skin issues and eye wash
  • Sweet sap on the inner bark used for wound dressing
  • Sap can also be used to make wine

The American Sycamore is a pioneer species. About forty years ago, we stopped cultivating a small field on wet bottom land on our family farm. Today we have a large stand of native sycamores growing wild.

tree-hugger-self-reliance-uses-american-sycamore

What was once several acres of corn we pulled by hand

Being a “tree hugger” should not carry a negative stereotype or denote a political affiliation for those of us building self-reliance skills and pursuing a more sustainable lifestyle. Embrace your love of trees and learn to be stewards of these towers of the forest!

Have you hugged a tree today?

Keep Doing the Stuff of Self-Reliance,

Todd

P.S. – You can also keep up with the Stuff we’re Doing on TwitterPinterestGoogle +, and our Facebook page… and over at the Doing the Stuff Network on PinterestGoogle +, and Facebook.

P.P.S – If you find value in our blog, Dirt Road Girl and I would appreciate your vote on Top Prepper Sites! You can vote daily by clicking here or on the image below. Check out all the other value-adding sites while you’re there…

Thanks for Sharing the Stuff!

Copyright: Content on this site (unless the work of a third-party) may be shared freely in digital form, in part or whole, for non-commercial use with a link back to this site crediting the author. All links in articles must remain intact as originally posted in order to be republished. If you are interested a third-party article, please contact the author directly for republishing information.


Categories: Bushcraft, Camping, Doing the Stuff, Homesteading, Lost Skills, Medical, Natural Health, Preparedness, Self-reliance, Wildcrafting | Tags: , , , | 21 Comments

27 Survival Uses for Common Mullein Besides Cowboy Toilet Paper

by Todd Walker

Part of our Self-Reliant Summer series

Ever been caught in the woods with nature calling you to a squatty position? If you forgot the Charmin, you’d still be a happy camper with Cowboy Toilet Paper (AKA – Common Mullein). It’s velvety soft leaves have wrangled many a woodsman and camper from certain disaster over a cat hole.

27 Survival Uses for Common Man Mullein Besides Cowboy Toilet Paper

The fuzzy leaf of this botanical wonder may cause skin irritation (contact dermatitis). That’s not a bad thing if you happen to be a Quaker in the new world. Since Quaker women weren’t allowed to wear make up, these resourceful ladies rubbed the hairy leaves on their cheeks for a homemade blush to attract suitors. Hence the name Quaker’s Rouge.

If employed as Cowboy TP or camper’s wash cloth, wipe with the flow of the hairs not against. Use caution with sensitive behinds. If a rash occurs, plantain is usually close by.

Common Mullein (Verbascum thapsus) is easy to identify making it a safe gateway herb to wildcrafting and medicinal plants. The leafs, stalk, and root are safe for medicinal purposes.

First year plants grow as a rosette with large, wooly, hairy, velvety leaves. The silver-green foliage gives the plant an artificial waxed appearance. They grow in well-drained disturbed soil by roadways, abandoned fields, waste places, and even gravel, rocky soil in full sun.

10 Survival Uses for Mullein Besides Cowboy Toilet Paper

First year growth

Second year growth can reach heights over ten feet.

10 Survival Uses for Mullein Besides Cowboy Toilet Paper

Forgot my tripod. This is my first EVER selfie! I’m 5’10” tall for comparison.

10 Survival Uses for Mullein Besides Cowboy Toilet Paper

Mullein flowers showing off their five yellow flowers

You may know this European weed transplant by other common names such as flannel flower, Quaker’s rouge, bunny’s ear, candle wick, great mullein, torchwort, miner’s candle, poor man’s blanket, hag’s taper, ice leaf, or Cowboy Toilet Paper. Whatever name you use, mullein has been a valuable mulituse tool for self-reliance for thousands of years.

Here’s why…

Properties of Mullein

Understanding the properties of herbs allows you to get the most out of  your herbal medicine chest. Here’s the plant’s medicinal profile:

  • Analgesic – pain relief
  • Anticatarrhal – reduces inflammation of the mucous membranes (lungs, sinus, etc.)
  • Antispasmodic – suppresses involuntary muscle spasms
  • Antitussive – relieve or prevent coughs
  • Astringent – contraction of body tissue, typically on skin
  • Demulcent – forms a soothing film over mucous membranes
  • Diuretic – increases urine production
  • Expectorant – aid in the clearance of mucus from the airways, lungs, bronchi, and trachea
  • Mucilant – coat and protect mucous membranes
  • Vulnerary – promotes healing of wounds, cuts, and abrasions

For more information on medicinal properties of herbs, check out Bk2natuR’s Herbal Dictionary and other natural goodness!

An additional awesome herbal/wildcrafting resource can be found at Common Sense Homesteading. Laurie, a blogging friend of mine, has a great series called Weekly Weeder with 48 posts on using your weeds for culinary and medicinal purposes. I highly recommend her stuff!

As you can see, Common Mullein has many more uses than emergency roadside TP. Take a look…

Medicine

  • Mullein tea (expectorant) helps facilitate lung function and removes congestion and mucus from the respiratory tract. Dried leaves may also be used as a smoke inhalation.

A dehydrator speeds up the drying process. Set your dehydrator on its lowest heat and process until dry. I set this batch on 95º for about 18 hours for crispy leaves.

[Side note: Even though out Excalibur uses little electricity, I want to build a solar dehydrator. If you have successfully built your own, please contact me. Thanks!]

10 Survival Uses for Mullein Besides Cowboy Toilet Paper

One of five trays of 1st year mullein leaves

10 Survival Uses for Mullein Besides Cowboy Toilet Paper

‘Toby’ the pig helping me make some mullein tea with a backyard bushcraft setup

  • Oil infusion of the yellow flowers for ear aches

How to make Mullein-Flower Oil Infusion

A.) Locate a group of blooming mullein plants (June-September) and harvest the yellow flowers. You’ll need enough to fill a small jam or jelly jar half to three-quarters full. I ended up with about half a jar of flowers. This is tedious and time-consuming. Allow the blooms to dry for an hour or so to remove some of the water content.

10 Survival Uses for Mullein Besides Cowboy Toilet Paper

Flowers harvested from 6 or 7 mullein stalks

B.) Fill the jar with olive oil or any oil you like and screw the lid tightly. Steep the infusion in a warm, sunny spot for about 2 to 4 weeks. Shake the infusion once a day – if you remember.

10 Survival Uses for Mullein Besides Cowboy Toilet Paper

Sunny spot for steeping

C.) Pour the infused oil through a strainer (cheese cloth or bandana) into another container for storage. Label, date, and store in a cool dark cabinet. For ear aches or wax build up, place a few (2-3) drops into the ear a couple of times daily until the problem clears up.

 Garden/Permaculture

  • Improves soil as a nitrogen fixer and heals the worst soil conditions
  • Feeds bees and other pollinators
  • Compost material
  • Some birds enjoy the seeds
  • Rotenone, found in mullein, is synthesized for insecticide
  • Goats won’t eat it so mullein is a good way to add some green to goat-ravaged land

Bushcraft and Self-Reliance

  • Mullein leaves can be used inside shoes as a cushion and warmth
  • Blanket mullein is one alias outdoor enthusiasts should keep in mind for emergency blanket
  • Saponins in the seeds are said to be useful for stunning fish for easy collection – use only in a true survival scenario
  • Dried leaves and seed pods make an excellent tinder for fire starting
  • Dip a dried seed head stalk in tallow, bees-wax, or pine sap for a long-burning torch (torchwort, miner’s torch)
  • The stalk can be used to create a friction fire – bow or hand drill style

Creek Stewart at Willow Haven Outdoor has a great video demonstrating the friction fire technique using mullein below:

Common Mullein is the common man/woman multi-tool of herbal self-reliance. Ah, a new alias… Common Man Mullein!

DISCLAIMER: This information is offered for educational purposes only. Do your own due diligence before foraging wild edibles and medicinal plants of any kind.

Keep Doing the Stuff of Self-Reliance,

Todd

P.S. – You can also keep up with the Stuff we’re Doing on TwitterPinterestGoogle +, and our Facebook page… and over at the Doing the Stuff Network on PinterestGoogle +, and Facebook.

P.P.S – If you find value in our blog, Dirt Road Girl and I would appreciate your vote on Top Prepper Sites! You can vote daily by clicking here or on the image below. Check out all the other value-adding sites while you’re there…

Thanks for Sharing the Stuff!

Copyright: Content on this site (unless the work of a third-party) may be shared freely in digital form, in part or whole, for non-commercial use with a link back to this site crediting the author. All links in articles must remain intact as originally posted in order to be republished. If you are interested a third-party article, please contact the author directly for republishing information.

Categories: Bushcraft, Doing the Stuff, Herbal Remedies, Medical, Natural Health, Self-reliance, Survival, Wildcrafting | Tags: , , , , | 57 Comments

Sick of Ticks? Take Brad Paisley’s Advice

by Todd Walker Part of our Self-Reliant Summer series I first heard the song Ticks by Bard Paisley at a bank drive-thru window. Clever lyrics. Why share such a trivial event? Because I like Brad Paisley’s music and hate ticks… passionately!! Sick of Ticks? Take Brad Paisley's Advice These blood suckers are anything but petty parasites for anyone venturing outdoors. Their genetics seem to steer them to the most delicate and hardest-to-get-at places on the human body. Like zombies looking for a blood meal, they sink their barbed jaws in your skin and gorge. For me, I’d rather roll naked in poison ivy than have a tick bite. Once removed, they leave itchy, nagging bite marks for months. However, applying my plantain spit poultice immediately and repeatedly for a few days causes the bite symptoms disappear.

The War on Ticks

We’re in the middle of peak tick season (May – June – July). That’s why I love dirt time in the winter – little to no ticks! My personal war on ticks involves prevention and early treatment. Is your skin crawling yet? No need to panic over these blood-bloated pests.

Take a Deep Breath

Just don’t exhale. Breathing sets off the tick honing device. You see, ticks are attracted to you and me, all mammals in fact, because we spew carbon dioxide with each breath. Check out this creepy field experiment at North American Hunter. Calvin and Grant placed a one pound container of dry ice in a deer bedding area. In less than 8 hours, they harvested over 600 of these blood suckers! One more than the mark of the beast. There’s a the correlation here I think!!

An Ounce of Tick Prevention

If only there were a way to experience bug-free dirt time. There isn’t. Biting insects are part of the outdoor experience. But you can decrease their damage by following these tips. As Ben Franklin once said, “An ounce of prevention is worth a pound of cure.” Proactive parasite prevention will help you get out there without constantly worrying about tick-borne illnesses like Lyme disease or Rocky Mountain spotted fever. There are hundreds of species of ticks in the world but only a few are of concern to you. Blacklegged tick, Wood (Dog) tick, and Lone Star tick are the 3 arachnids on top of the tick-born disease list.

Image courtesy of Centers of Disease Control and Prevention

Image courtesy of Centers of Disease Control and Prevention

I hate them all but here’s the top woodland offender in my neck of the woods…

Blacklegged Tick (Deer tick)

This is the only tick in the Eastern woodlands with 8 black or dark chocolate-colored legs. Beware of this little devil. Not all deer ticks are carriers of Lyme disease but some are. That’s reason enough to make you cringe, right? Baby deer ticks (nymphs) become infected with Lyme disease by feeding on certain rodents. Early spring and summer are the times they are likely to be found feeding on you and passing on bacterium called Borrelia burgdorferi which causes Lyme disease. The good news is that Lyme disease isn’t transferred until about 24-36  hours of an infected tick having a blood meal on you. Early detection and removal is the key. Be a real friend and do what Brad Paisley suggests, “I’d like to check you for ticks”… every 2-3 hours while in tick country. Common Sense Tick Deterrents

  • Light colored clothing makes spotting these critters easier
  • Long pants tucked into boots or socks
  • Walk in the center of wooded paths when possible to avoid brushing against undergrowth where ticks hitchhike for a ride – and no, ticks don’t fly or pole vault from overhead trees limbs
  • Tuck long sleeve shirts into pants
  • Cover your head with a hat, bandana, or buff
  • Apply insect repellant to all clothing and exposed skin

It is recommended by the CDC and other government health organizations to apply repellent containing 10-30% DEET. That alone is the reason I do NOT apply DEET to my skin. Call me skeptical or even a tin foil hatter but I’ve seen the damage done in the name of public health in more areas than pest control.

Natural Tick Repellents

One of the tenants of our Doing the Stuff Network is to trade theory for action. Will natural (non-DEET) insect repellents really prevent you from becoming a tick’s next blood meal? I haven’t tried all these recipes. If you’ve found/created an effective natural concoction, please share in the comments. The war on ticks needs you! Here are a few DiY recipes to consider.

  1. Healthy Household: Bug Away Spray – Doing the Stuff Trusted Resource
  2. Natural Tick Repellents That Worked!
  3. 20+ Natural Insect Repellent Recipes for a Bug-Free Summer – Doing the Stuff Trusted Resource
  4. Easy, Natural Tick Repellent That Really Works (Rose Geranium Oil works on dogs too)

These recipes all contain some form of essential oil. Cat nip has been studied and found to be as effective as DEET. Warning – do NOT use essential oils during pregnancy – animal or human. Other effective essential oils for ticks are:

  • Tea tree
  • Lemon
  • Pennyroyal – do your own research before using this one
  • Eucalyptus
  • Clove
  • Rose
  • Sweet myrrh

Tick Check and Removal

I’ve done my fair share of this unpleasant practice. As the lyrics say, “You never know where one might be.” Ticks seem to migrate to tender, gentler areas of my body. Check for ticks thoroughly while showering. Bathing removes crawlers. Once attached, no amount of soap and water will wash them off. For those hard to reach places, have a really close friend or partner look you over. Of course, they’ll need to rub that freckle and occasional mole to confirm their tick suspicions. 😉 See, another argument against being a lone wolf! If it’s too late and a blood meal is in progress, break up the dinner party. There’s a right and wrong way to remove ticks. No disrespect meant to any folklore methods passed down from grand pappy but these may cause more harm than good. Your goal is to remove the tick without causing it to vomit supper back on its dinner plate – your skin! Pardon the disgusting description. Grabbing the tiny tick with your club-like finger is likely to hurl its bodily fluids back into you. Confession time. I’ve removed ticks with my fingers when that’s the only tools I’ve had available. Just be as gentle as possible. Other Wrong Methods

  • Hot match applied to an embedded tick
  • Paint with nail polish
  • Smother with petroleum jelly

The Correct Way Flip the attached tick in a handstand position. Use tweezers or forceps to grab the little menace close to your skin. Pull straight up and out with steady pressure. Twisting or jerking will likely leave barbed mouthparts in your skin. Companies sell tick tools specifically designed to remove ticks safely. I’ve never used one but would be happy to hear your experience. Now you can go all destroyer mode. In a wilderness setting, drop the tick in your camp fire to return it to its rightful place – HELL! Crush it between two rocks and burn the rocks to destroy any potential gooey pathogens. At home, simply flush the tick down the toilet. It’s also a good idea to sterilize the tweezers via heat or alcohol. Wash the bitten area and your hands with soap and water or antiseptic ASAP. Check the tick to see if it lost its head in tug-o-war battle. If so, apply a plantain poultice to help draw the nasty stuff out of the bite indention. Bushcraft Tick Tools Carry these tools to add redundancy to you kit…

  • Swiss Army Knife – the tweezers are for more than plucking your unibrow
  • Compass – use the sighting mirror to inspect your nether region
  • Magnifying Glass – make fire on sunny days and get a visual on the smaller embedded ticks

Symptoms of Lyme Disease

Within 3 to 30 days after being bitten, the first sign of Lyme disease is a reddish bull’s-eye about 2 inches in diameter at the bite location. If detected in the early stage, Lyme disease can be treated with antibiotics for a quick recovery. Later stages respond to antibiotics but may take months or years to cure. Any itchy rashes or reactions after being bitten is a sign to seek medical attention. An extra precaution would be to preserve the tick in a small vial of alcohol or taped to a white piece of paper for identification purposes if complications arise. I’ve never been a tick saver. I burn ’em! My hatred for ticks can not be overstated! At the same time, I love being outdoors. So my war on these blood suckers continues with the lyrics of Ticks swirling in my head. What’s your best tick tips on prevention and treatment?

Keep Doing the Stuff of Self-Reliance,

Todd

P.S. – You can also keep up with the Stuff we’re Doing on TwitterPinterestGoogle +, YouTube and our Facebook page… and over at the Doing the Stuff Network on PinterestGoogle +, and Facebook.

P.P.S – If you find value in our blog, Dirt Road Girl and I would appreciate your vote on Top Prepper Sites! You can vote daily by clicking here or on the image below. Check out all the other value-adding sites while you’re there…

Thanks for Sharing the Stuff!

Copyright: Content on this site (unless the work of a third-party) may be shared freely in digital form, in part or whole, for non-commercial use with a link back to this site crediting the author. All links in articles must remain intact as originally posted in order to be republished. If you are interested a third-party article, please contact the author directly for republishing information.

Categories: Bushcraft, Camping, Medical, Natural Health | Tags: , , , | 14 Comments

Pondering Poison Ivy Remedies and Itch Relief

by Todd Walker

Pondering Poison Ivy Natural Remedies and Itch Relief

pon·der – to think about or consider (something) carefully

Spend any amount of time in the outdoors or in your yard, it’s very likely you’ll come in contact with this evil plant. It has successfully reduced men, women, and children to miserable, scratching beasts.

Time in nature has a calming, rejuvenating effect on people… until they feel Nature’s revenge.

Over the years I’ve sought out home remedies to stop the painful, blistering rash caused by poison ivy. In my experience, some work, some don’t. In extreme cases, I’ve gotten steroid shots. Like the time I transferred the oil to my nether region while relieving myself in the woods – the week before getting married! An injection of steroids was my top priority. LOL!

It’s ironic that this poisonous vine is in the family of my favorite nut, the cashew. I eat a hand full daily with no reaction. What makes the ivy, oak, or sumac poisonous to humans is the dreaded oil… urushiol (you-ROO-shee-ol). All parts of the plant contain the oil which can stay active for up to five years. Once the oil makes contact with your skin – via touching the plant directly or indirect contact from clothing, shoes, or your pet – the clock starts ticking for a red, itchy, bubbly rash to occur within 12 to 72 hours.

Some people swear they are immune to this stuff. I’ve personally witness a buddy of mine hug a pine tree covered in poison ivy with no ill effects. The theory of some people being immune is suspect in my mind. WARNING: If you are one of those fortunate individuals who have rolled in this stuff and never experienced a reaction, you may be a candidate for hospitalization in the future. Stories exist of people who thought they were immune but found out the hard way they were not. The more times you come in contact with the oil, the more likely your are to come down with a rash.

Attempting to build immunity to poison ivy is not a new idea. Tales of Native Americans eating leaves in early spring to build resistance , true or not, is not something I’ve tried or recommend.

Stuff to Avoid

The best remedy for poison ivy is AVOIDANCE. That’s not always easy. The oil is potent and stable. Taking off shoes after hiking or petting your dog who stares at you wagging and waiting for affection can transfer urushiol. Doing exposed laundry or handling outdoor tools – same effect. Imagine unknowingly spreading the oil in a sleeping bag – and re-infecting yourself two more times by sleeping in the bag a year later!! You can read more stories of creatively contracting the rash here. Horrific photos of poison ivy victims can be viewed in the Skin Rash Hall of Fame. This stuff is nothing to play with!

Avoid anything that would make the oil go airborne like burning wood contaminated with poison ivy. Lawn mowers and weed trimmers have a way of spreading the wealth.

Leaves of Three

Leaves of three, let it be! Poison ivy and oak have three-leaf clusters. Poison ivy and oak are very similar and not worth making a distinction between the two. They’re both bad news!

Pondering Poison Ivy Natural Remedies and Itch Relief

Leaves of three!

Pondering Poison Ivy Natural Remedies and Itch Relief

Avoid ‘hairy’ vines climbing on trees

Pondering Poison Ivy Natural Remedies and Itch Relief

Poison ivy about to bloom

Poison sumac, on the other hand, is a shrub that has 7 to 13 leaves on a branch and is found mostly in wet, swampy areas.

I Need a Remedy!

If you know you’ve come in contact with urushiol, wash the area of skin with cold water and non-oil based soap. Hot water opens skin pores to allow more poison oil in. An industrial soap like Fels Naptha is good to keep on hand or in your bushcraft/camping kit. No soap? Water is better than nothing. Once the oil bonds to the skin, no amount of washing will help.

While I haven’t tried all the folk remedies listed below, they may work for you. If so, please let other readers know. Also, you may have a cure that we haven’t listed. By all means, please share!

Herbal Remedies

  • Jewelweed – Apply the juice to affected area. The natural soaps in this weed are thought to be responsible for healing blisters in 2 to 3 days. How to identify and use jewelweed for skin rashes can be found here.
  • Tea Tree Oil – Apply every two hours to stop itching and dry the blisters and rash.
  • Honey suckle leaves – Blend leaves 3:1 with water. Strain and apply to affected area liberally.
  • Plantain – The drawing properties of this weed helps with bites and poisonous plants. Apply a poultice twice daily.
  • Aloe vera plant is known for burn relief but can be used for poison ivy as well

Kitchen/Bath Remedies

  • Fels Naptha soap is excellent stuff for removing urushiol
  • Baking soda paste and bath
  • Oatmeal paste and bath
  • White vinegar
  • Salt rubbed into the rash and used in baths
  • Banana peel (inside) rubbed on rash – from Foxfire books
  • Tomato juice bath with salt
  • Immediately after contact, wash with cold water and dishwashing soap which cuts grease… and urushiol
  • Some like it HOT! Hot water treatment – run hot water (hot as you can stand without scalding) on affected area for itch relief
  • Hair blow dryer – same idea as hot water treatment above.
  • Vicks VapoRub – temporary relief from itching
  • Rubbing alcohol misted on areas
  • Bleach – I don’t recommend this but people use it on their skin
  • Ban roll on anti-perspirant – the plain, non-scented stuff

Medicine Cabinet Conventional Remedies

  • Witch Hazel
  • Over the counter poison ivy meds
  • Goldbond medicated cream
  • Epsom salt bath soak
  • Milk of Magnesia – add layers to affected area for itch and drying
  • Preparation H

Clean Your Stuff

Now that you know you have the rash, it’s vital that you clean clothing, bedding, tools, shoes, and pets that can further spread the toxic oil. You don’t want to share the love with others or re-infect after you’re cured. Urushiol the size of a pin head can infect 500 people. It’s potent stuff!

First, the oil is what causes the rash. It’s not spread by draining blisters to other body parts or people. It is systemic in highly allergic people and can spread to other body parts. The culprit is usually oil on or under finger nails that causes the rash to spread. Avoid touching sensitive areas if you knowingly touched the plant oil.

Wash clothes and bedding several times. The first few days after exposure, shower in cold water several times a day with a non-oil based soap. Oily soap helps spread the urushiol. You want to completely rid the oil from your body. This may sound like overkill but better safe than itchy.

Wipe down tools and gear with alcohol or using rubber gloves. Anything you may have touched before may hold the oil – steering wheel, light switch, door knobs, tool handle, etc. I carry a flask of Everclear in my bushcraft kit for medicinal reason and disinfection.

Trade Theory for Action

Not every remedy works for everybody. We’re individuals and our body chemistries are different. What works for me may not for you. Besides avoidance, what conventional or folk remedy have you found effective to rid the rash?

Keep Doing the Stuff,

Todd

P.S. – You can also keep up with the Stuff we’re Doing on TwitterPinterestGoogle +, and our Facebook page… and over on the Doing the Stuff Network on PinterestGoogle +, and Facebook.

P.P.S – If you find value in our blog, Dirt Road Girl and I would appreciate your vote on the Top Prepper Sites! You can vote daily by clicking here or on the image below. Check out all the other value-adding Prepper sites while you’re there…

Thanks for sharing the stuff!

Copyright Information: Content on this site (unless the work of a third-party) may be shared freely in digital form, in part or whole, for non-commercial use with a link back to this site crediting the author. All links in articles must remain intact as originally posted in order to be republished. If you are interested a rare third-party article, please contact the author directly for republishing information.


Categories: Bushcraft, Camping, Doing the Stuff, Medical | Tags: , , | 29 Comments

Foraging Feral Food: Trout Lily

by Todd Walker Foraging Feral Food: The Trout Lily Craving feral food? Now’s the time to hit the woods. The Trout Lily is blooming!

Before going wild on this gem of the woodland, you should have an introduction to this short-lived blooming beauty. In the creek bottom near the shelter I’m building, the forest floor is covered with a yellow carpet of trout lilies. They are known to grow in huge colonies that can be hundreds of years old. The bulbed plant takes about seven years to produce a one-leafed plant. A two-leafed plant with a yellow flower on top of its red stem is a mature plant.

Its scientific name is Eryhronium americanum. You may know them by other common names: Fawn lily, Deer tongue, Adder’s tongue, or Dog’s-tooth violet. Someone along the way said the grayish green leaves with purplish brown spots resembled a brook trout.

The Dog’s-tooth handle was a mystery to me though. Nothing about the plant above ground shouted ‘dog’ or ‘tooth’. Upon digging a lily from the ground, the bulb (corm) resembles a dog’s canine tooth. The corm is edible and tastes sweet in early spring. By May the bulb has turned starchy. The entire plant is edible and has medicinal uses.

Be aware that the plant is considered an emetic – too much will cause vomiting. And they take seven years to mature, so only harvest sparingly from large colonies. A mature plant produces two mottled leaves and one flower. At this rate of growth, you can see why it takes hundreds of years to grow a huge colony.

Medicinal Uses

  • Native American women ate raw leaves to prevent conception
  • Root tea to reduce fever
  • Poultice from the crom is used to draw splinters and reduce swelling
  • Leave poultice is used on hard to heal ulcers and skin conditions
  • Fresh or dried leaves soften skin – always test for allergic reaction on a small area of your skin
  • From the early to mid Nineteenth century the plant was used to treat gout

 Edible Uses

  • The flower, leaves, and bulb are edible
  • Mass quantities will cause you to throw up – take it easy on them, unless you need to vomit
  • Crom/bulb can be roasted – raw they have a cucumber taste
  • Flowers are slightly sweet due to their nectar
  • Leaf tea
  • Ground croms can be used as a thickening agent for cooking

Other Uses

  • Native Americans chewed the bulb and spit the juice water to attract fish
Foraging Feral Food: The Trout Lily

The view across the creek at my shelter

Identification

Flower: The yellow Trout lily produces a single, nodding flower with six pedals. The flower closes at night and opens in the day light. The flower has both male and female sex organs.

Leaves: This perennial produces one to two lance-shaped leaves. A one leaf plant has not yet matured. Give it a year or seven. The stem of the plant is brownish-red.

Crom/bulb: The mature bulb resembles a dog’s canine tooth and is covered with a brown paper-like skin. Peel the skin before eating raw.

Habitat: In North America, Trout lilies grow in moist, rich soils in the eastern deciduous woodlands from Georgia to Canada. Get out and enjoy this lily while you can. The blooms only last through spring. Hope this was useful as you get some dirt time in this year.

Keep Doing the Stuff of Self-Reliance,

Todd

P.S. – You can also keep up with the Stuff we’re Doing on TwitterPinterestGoogle +, YouTube and our Facebook page… and over at the Doing the Stuff Network on PinterestGoogle +, and Facebook. P.P.S – If you find value in our blog, Dirt Road Girl and I would appreciate your vote on Top Prepper Sites! You can vote daily by clicking here or on the image below. Check out all the other value-adding sites while you’re there…

Thanks for Sharing the Stuff!

Copyright: Content on this site (unless the work of a third-party) may be shared freely in digital form, in part or whole, for non-commercial use with a link back to this site crediting the author. All links in articles must remain intact as originally posted in order to be republished. If you are interested a third-party article, please contact the author directly for republishing information.

Categories: Bushcraft, Doing the Stuff, Medical, Natural Health, Wildcrafting | Tags: , , | 4 Comments

Blog at WordPress.com.