
by Todd Walker
I’ve had different compost bins over the years. I usually make them out of four shipping pallets sitting directly on the ground. We’d have to manually stir the pile with a pitchfork. I wanted to “up” grade.
“Up” being the key word here. The goal is to give Dirt Road Girl the ability to roll her wheelbarrow or garden wagon to the compost station, dump in black garden gold, and distribute to our garden and potted plants.

The Dirt Road Girl Compost Tumbler
Over the last year of fighting cancer, her body has weakened – not her desire to get beneficial bacteria under her nails. She’s never shrunk from any outdoor tasks like clearing land or hauling firewood. This is my attempt to make garden life a little more efficient and less labor intensive. Work smart, ya know.
There’s an ol’ timer who sells barrels ten minutes from our house on the main highway. I’ve traded with him in the past for plastic and metal containers. I bought two plastic 55 gallon food grade barrels from him. One for the DRG tumbler and one to be used for rainwater – or some other resilience project.
Tip: When buying containers for gardening, water storage, or food storage, make sure they are food grade.
My barrels contained apple cider vinegar.
Now onto the project.
Step 1: Mark and cut the axle holes.
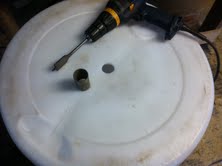
Measure half the diameter of your barrel and place a center mark on both ends of the barrel. I used a sharpie but a pencil will work if you have good eyesight. I then cut a short piece off my axle pipe to be used to trace a circle for the cut. I had an old piece of chain link fencing pole out back. It measured 1 1/4 inches in diameter by about 6 feet in length. Center the short piece of pipe on the center mark on the end of the barrel and trace around the outside of the pipe. Repeat on the opposite end of the barrel.
I then used a 1 1/4 inch paddle bit to bore the holes in the barrel ends.
Step 2: Mark and cut the door opening.
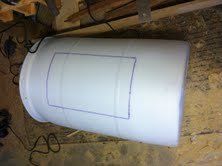
My door measures 18″ x 12″. You want to get your door centered with the 18″ side running the length of the barrel. Use a framing square to make sure the door corners are 90 degree angles. I used a flexible 18″ metal ruler for tracing on the curved barrel.
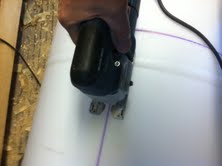
Once you love the door outline, it’s time to cut. Since you’ll be using the cut out to make the door, don’t drill large holes at each corner to get your saw blade into the plastic to make the cut. I drilled a couple of 1/8″ holes in one corner to get my jigsaw blade started. This worked on the first corner. On the remaining corners, I held my jigsaw at an angle, braced against the barrel, and started the cut until I penetrated the plastic barrel. This technique is not for finishing work, but it’ll get the job done.
Step 3: Door installation. Install the hinges on the door first. I placed mine about three inches in from each corner on the door. I quickly realized that my door would need a stop along both the hinge side and the latch side. I screwed two pieces of wood molding to the inside of the barrel along both 18 inch door frames. That turned out to be good fix for a floppy door. 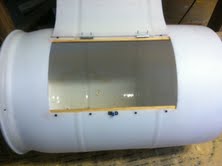
I installed a barrel lock on the other side of the door. Not impressed with its ability to keep the door shut. I plan to replace it with a better latch.
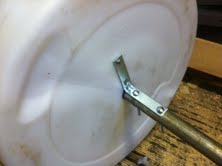
Step 4: I then inserted the axle through the barrel leaving enough pipe to rest on the brackets. To keep the weight of the barrel off the plastic holes, I attached an “L” bracket to the pipe and barrel on both ends.
The barrel is now ready to take a spin. All I need is a frame.
Step 5: Build the frame. I’ve seen many different types of stands for tumblers: Posts in the ground, X posts, and drums that spin lengthwise. I wanted a stand that was more mobile.
Here’s my material list for my frame:
- Two pressure treated 4x4x8’s (purchased at box store) – used for vertical posts and base
- One 5’ length of pressure treated 2×4 (scrap from my wood pile) – used for cross support on base
- 5’ length of 1×6 pressure treated fence panel (scrap from my wood pile) – screwed to top of post to maintain plumb on vertical posts
- Two 5/16×5” carriage bolts (poached from an old swing set a few years back) – secure vertical posts to base accompanied by decking screws
- Hand full of exterior decking screws (I keep plenty of these and other assorted hardware on hand)
- Bracket for axle – I was going to drill a hole through the vertical posts to accept the axles but didn’t have the proper size hole saw bit. The paddle bit would have worked, but I wanted a slightly larger hole diameter to allow the axle to spin without binding. I improvised and screwed two metal caster brackets to the posts.
- Two hinges for the door
- One barrel lock
Tools needed:
- Circular saw or any saw to crosscut the stock
- Jigsaw to cut the barrel door
- Drill/impact driver and 1 ¼ inch paddle bit. The bit size will differ if you use a pole with a different diameter.
- Palm-sander to take off rough edges on door and door opening left by the jigsaw.
- Measuring device and writing utensil
- Framing square
First, cut two 5’ lengths of 4×4. You’ll have two 3’ sections leftover for the base of the frame if you use 8 foot stock. To join the vertical post to the base, cut a 3 ½ inch x 1 ¾ deep notches in both ends of the vertical posts. Cut the same size notches in the center of each base piece. Newbie tip: Set your circular saw to the desired depth (1 3/4″) and make several passes over the area to be notched. Strike these “feathers” with a hammer and clean up the bottom of the notch with a chisel.
Mate the vertical posts with the notch in the middle of each base. Now, drill a suitable diameter hole for the carriage bolt in the center of each notched area. Carriage bolts aren’t necessary but recommended. Go ahead and press the bolts through holes and tighten with a nut and washer. No need to worry too much about the bases being square now. You’ll make sure they’re perpendicular when you screw in a few decking screws in the joint.
My barrel measured 35 inches from rim to rim. I decided to use 46 inches as the inside measurement between my vertical posts. I cut my 2×4 53 inches long and attached it to the back-end of the two base supports. Square it and screw it. The frame should stand on its own now.
Next, I cut my 1×6 the same length (53 inches) and attached it to the tops of both vertical posts. I then attached the brackets 13 inches from the top of each vertical post. Skip this step if you bore holes into your posts for your pipe axle.
The last step is to mount the tumbler on the frame. Since I used metal brackets, I simply slid one end of my axle into a bracket and repeated on the other side with the opposite bracket. I slid two more poached carriage bolts in the end of the brackets to keep the axle in place.

Note: If using drilled holes in the vertical posts to mount the tumbler, you’d probably want to insert the axle through the holes before attaching the bottom and top cross rails to the frame.
This was a weekend project. I worked off-and-on for about 3 hours. DRG now has an elevated tumbler for easy access to compost.
Future modifications:
- Add a couple of agitator bars running through the length of the barrel to help stir the contents as barrel spins.
- Replace the barrel lock with a more secure lock to keep the door from flopping open while spinning.
- Add an improvised crank handle on the end of the axle for easy spinning.
- Add some 20 inch rims and low profile tires for added mobility – just checking to see if you’re paying attention 🙂
Any suggestions on making a better “mouse trap”? Don’t be shy. Please let me know.
Keep Doing the Stuff,
Todd
P.S. – You can also keep up with the Stuff we’re Doing on Twitter, Pinterest, Google +, and our Facebook page… and over at the Doing the Stuff Network on Pinterest, Google +, and Facebook.
P.P.S – If you find value in our blog, Dirt Road Girl and I would appreciate your vote on Top Prepper Sites! You can vote daily by clicking here or on the image below. Check out all the other value-adding sites while you’re there…

Thanks for Sharing the Stuff!
Copyright: Content on this site (unless the work of a third-party) may be shared freely in digital form, in part or whole, for non-commercial use with a link back to this site crediting the author. All links in articles must remain intact as originally posted in order to be republished. If you are interested a third-party article, please contact the author directly for republishing information.


