Posts Tagged With: DIY Preparedness

DiY Goldenrod Tincture Benefits

by Todd Walker

I welcome the sight of goldenrod blooming in Georgia. These tiny, golden flowers signal the end of the dog days of summer and usher in cooler weather.

Goldenrod gets a bad rap when it comes to seasonal fall allergies. The average person sees the blooming yellow stalks on roadsides and fields and automatically blame these showy goldenrod heads for their itchy eyes, runny nose, and sneezing. The most likely allergy suspect is goldenrod’s cousin – ragweed.

Goldenrod and ragweed both belong to the Asteraceae family. The good news is that goldenrod, the good cousin, can be used to treat seasonal allergies caused by the bad cousin, ragweed. Instead of blaming goldenrod, use it. Here’s a simple tincture recipe.

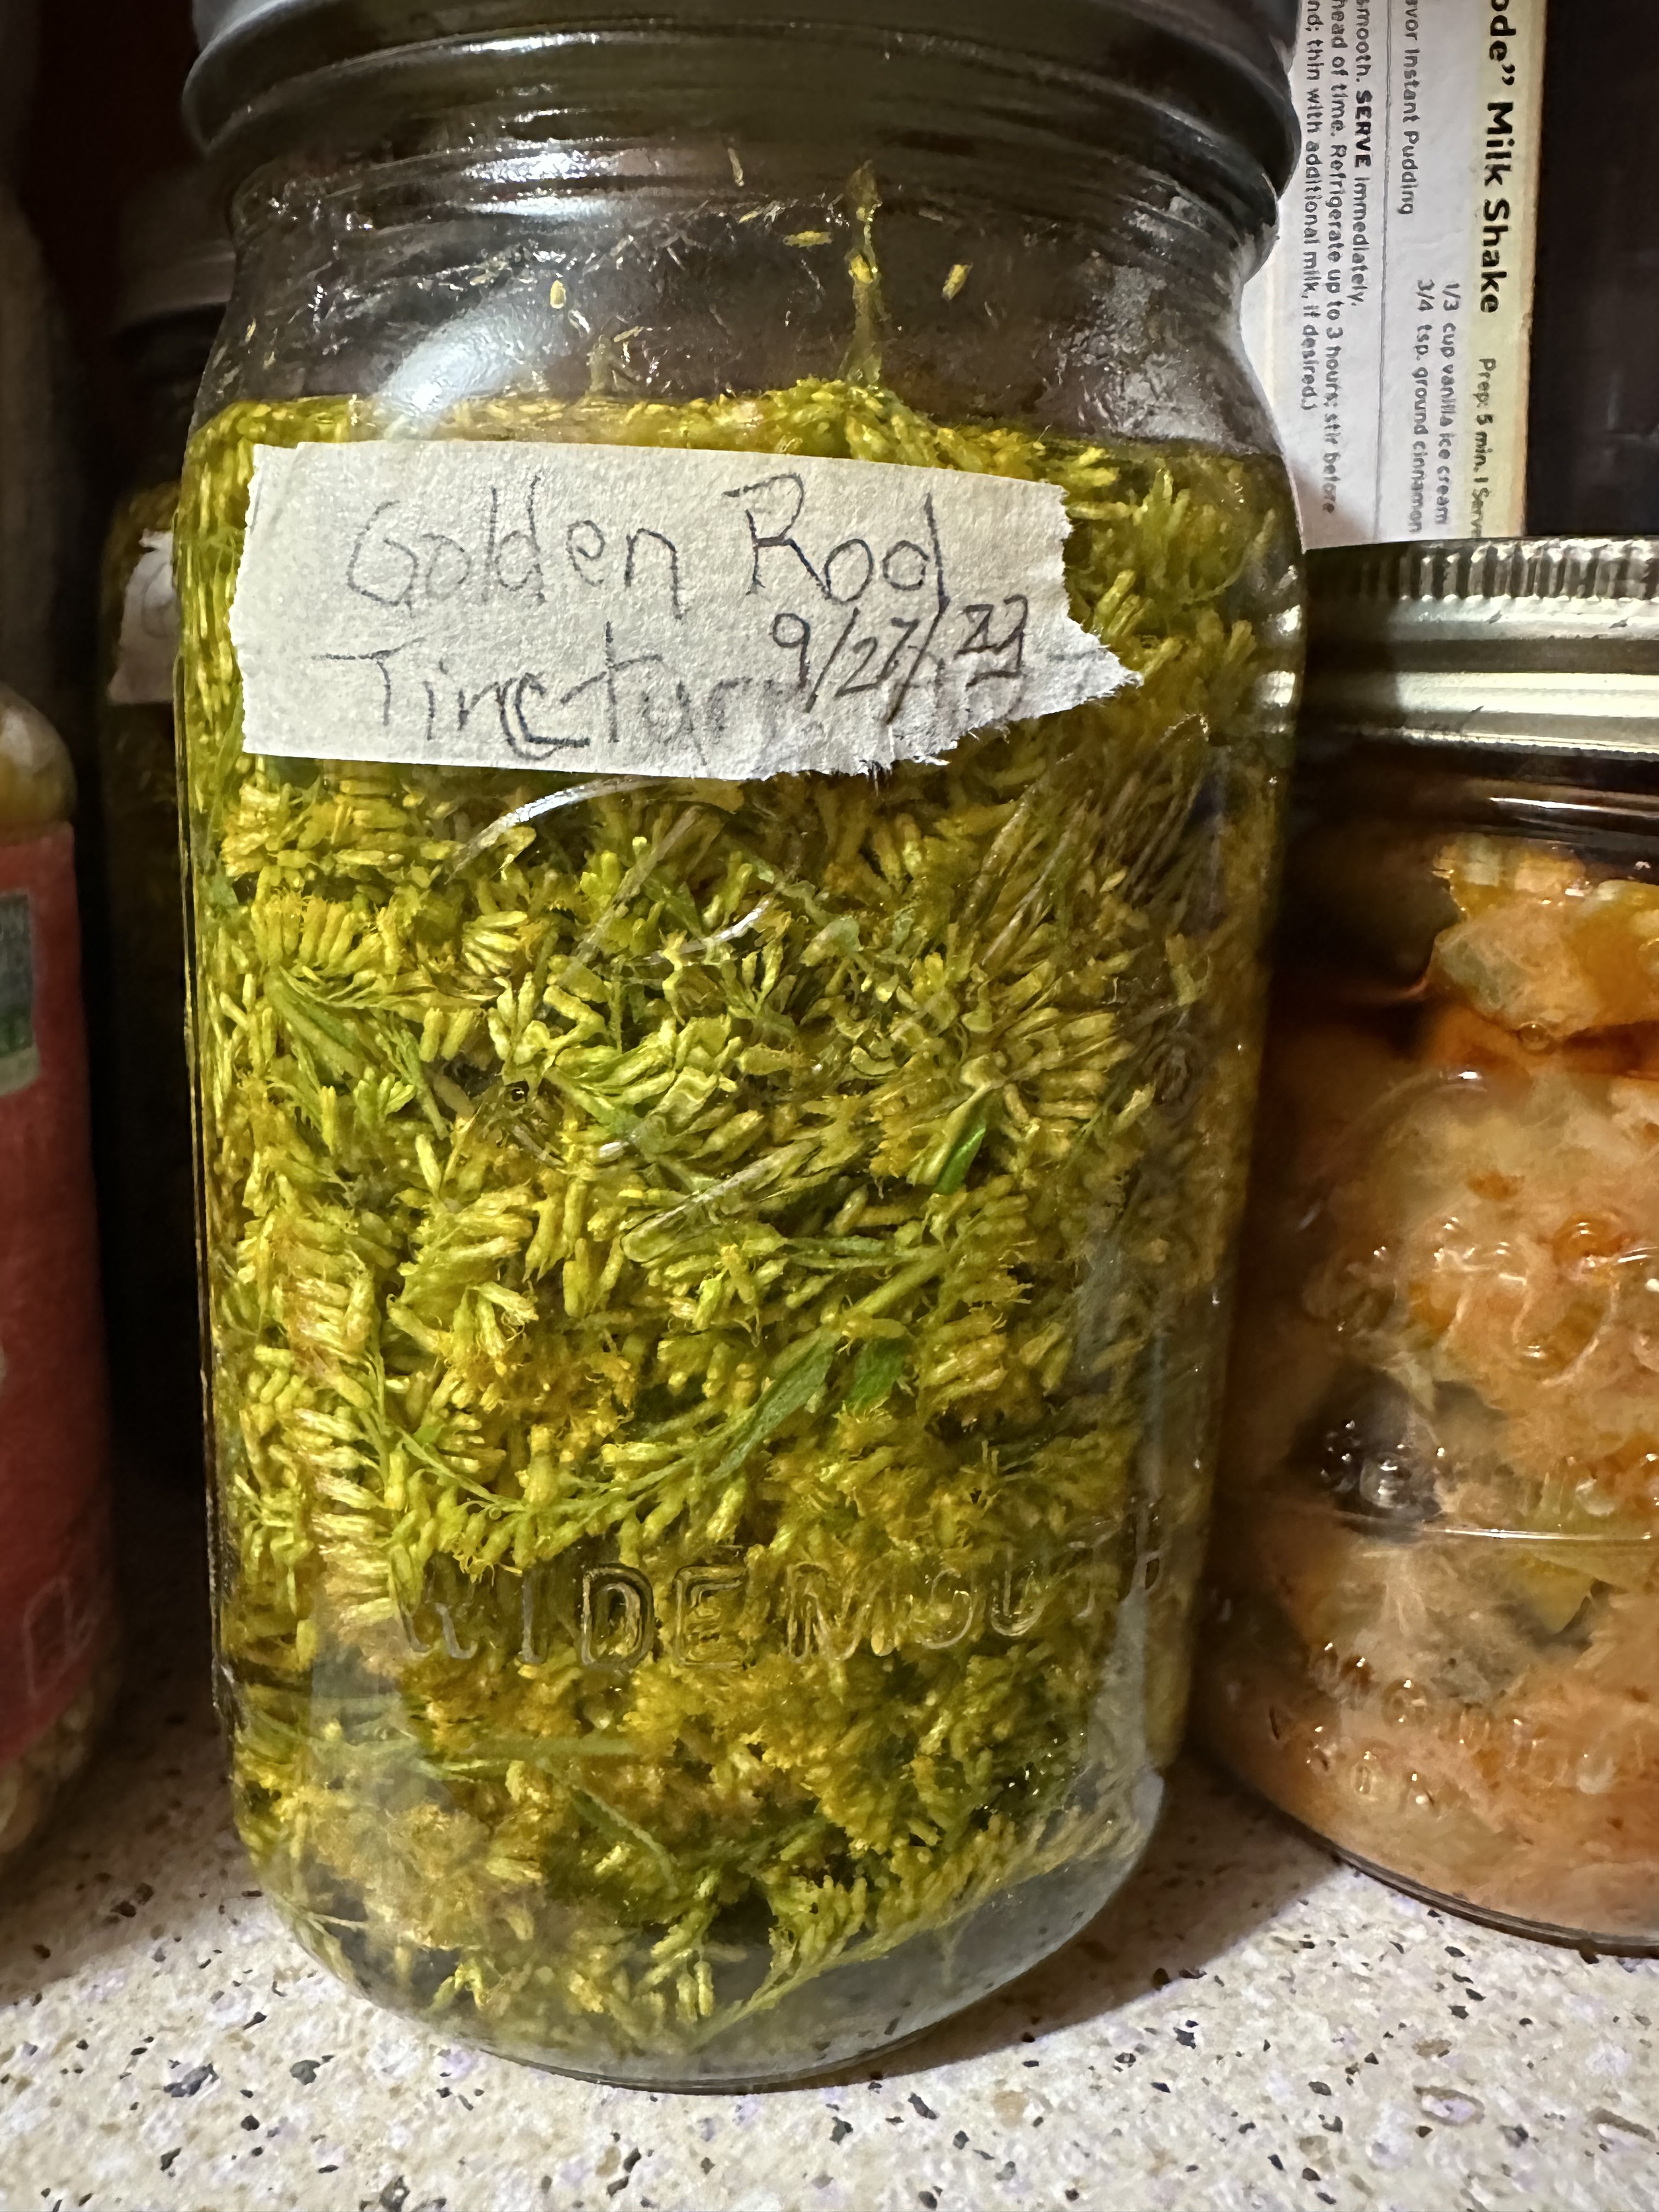
Harvest goldenrod in full bloom by cutting a few inches below the yellow flower head. I don’t recommend harvesting from highways/roadsides that are likely sprayed with chemicals for weed control.

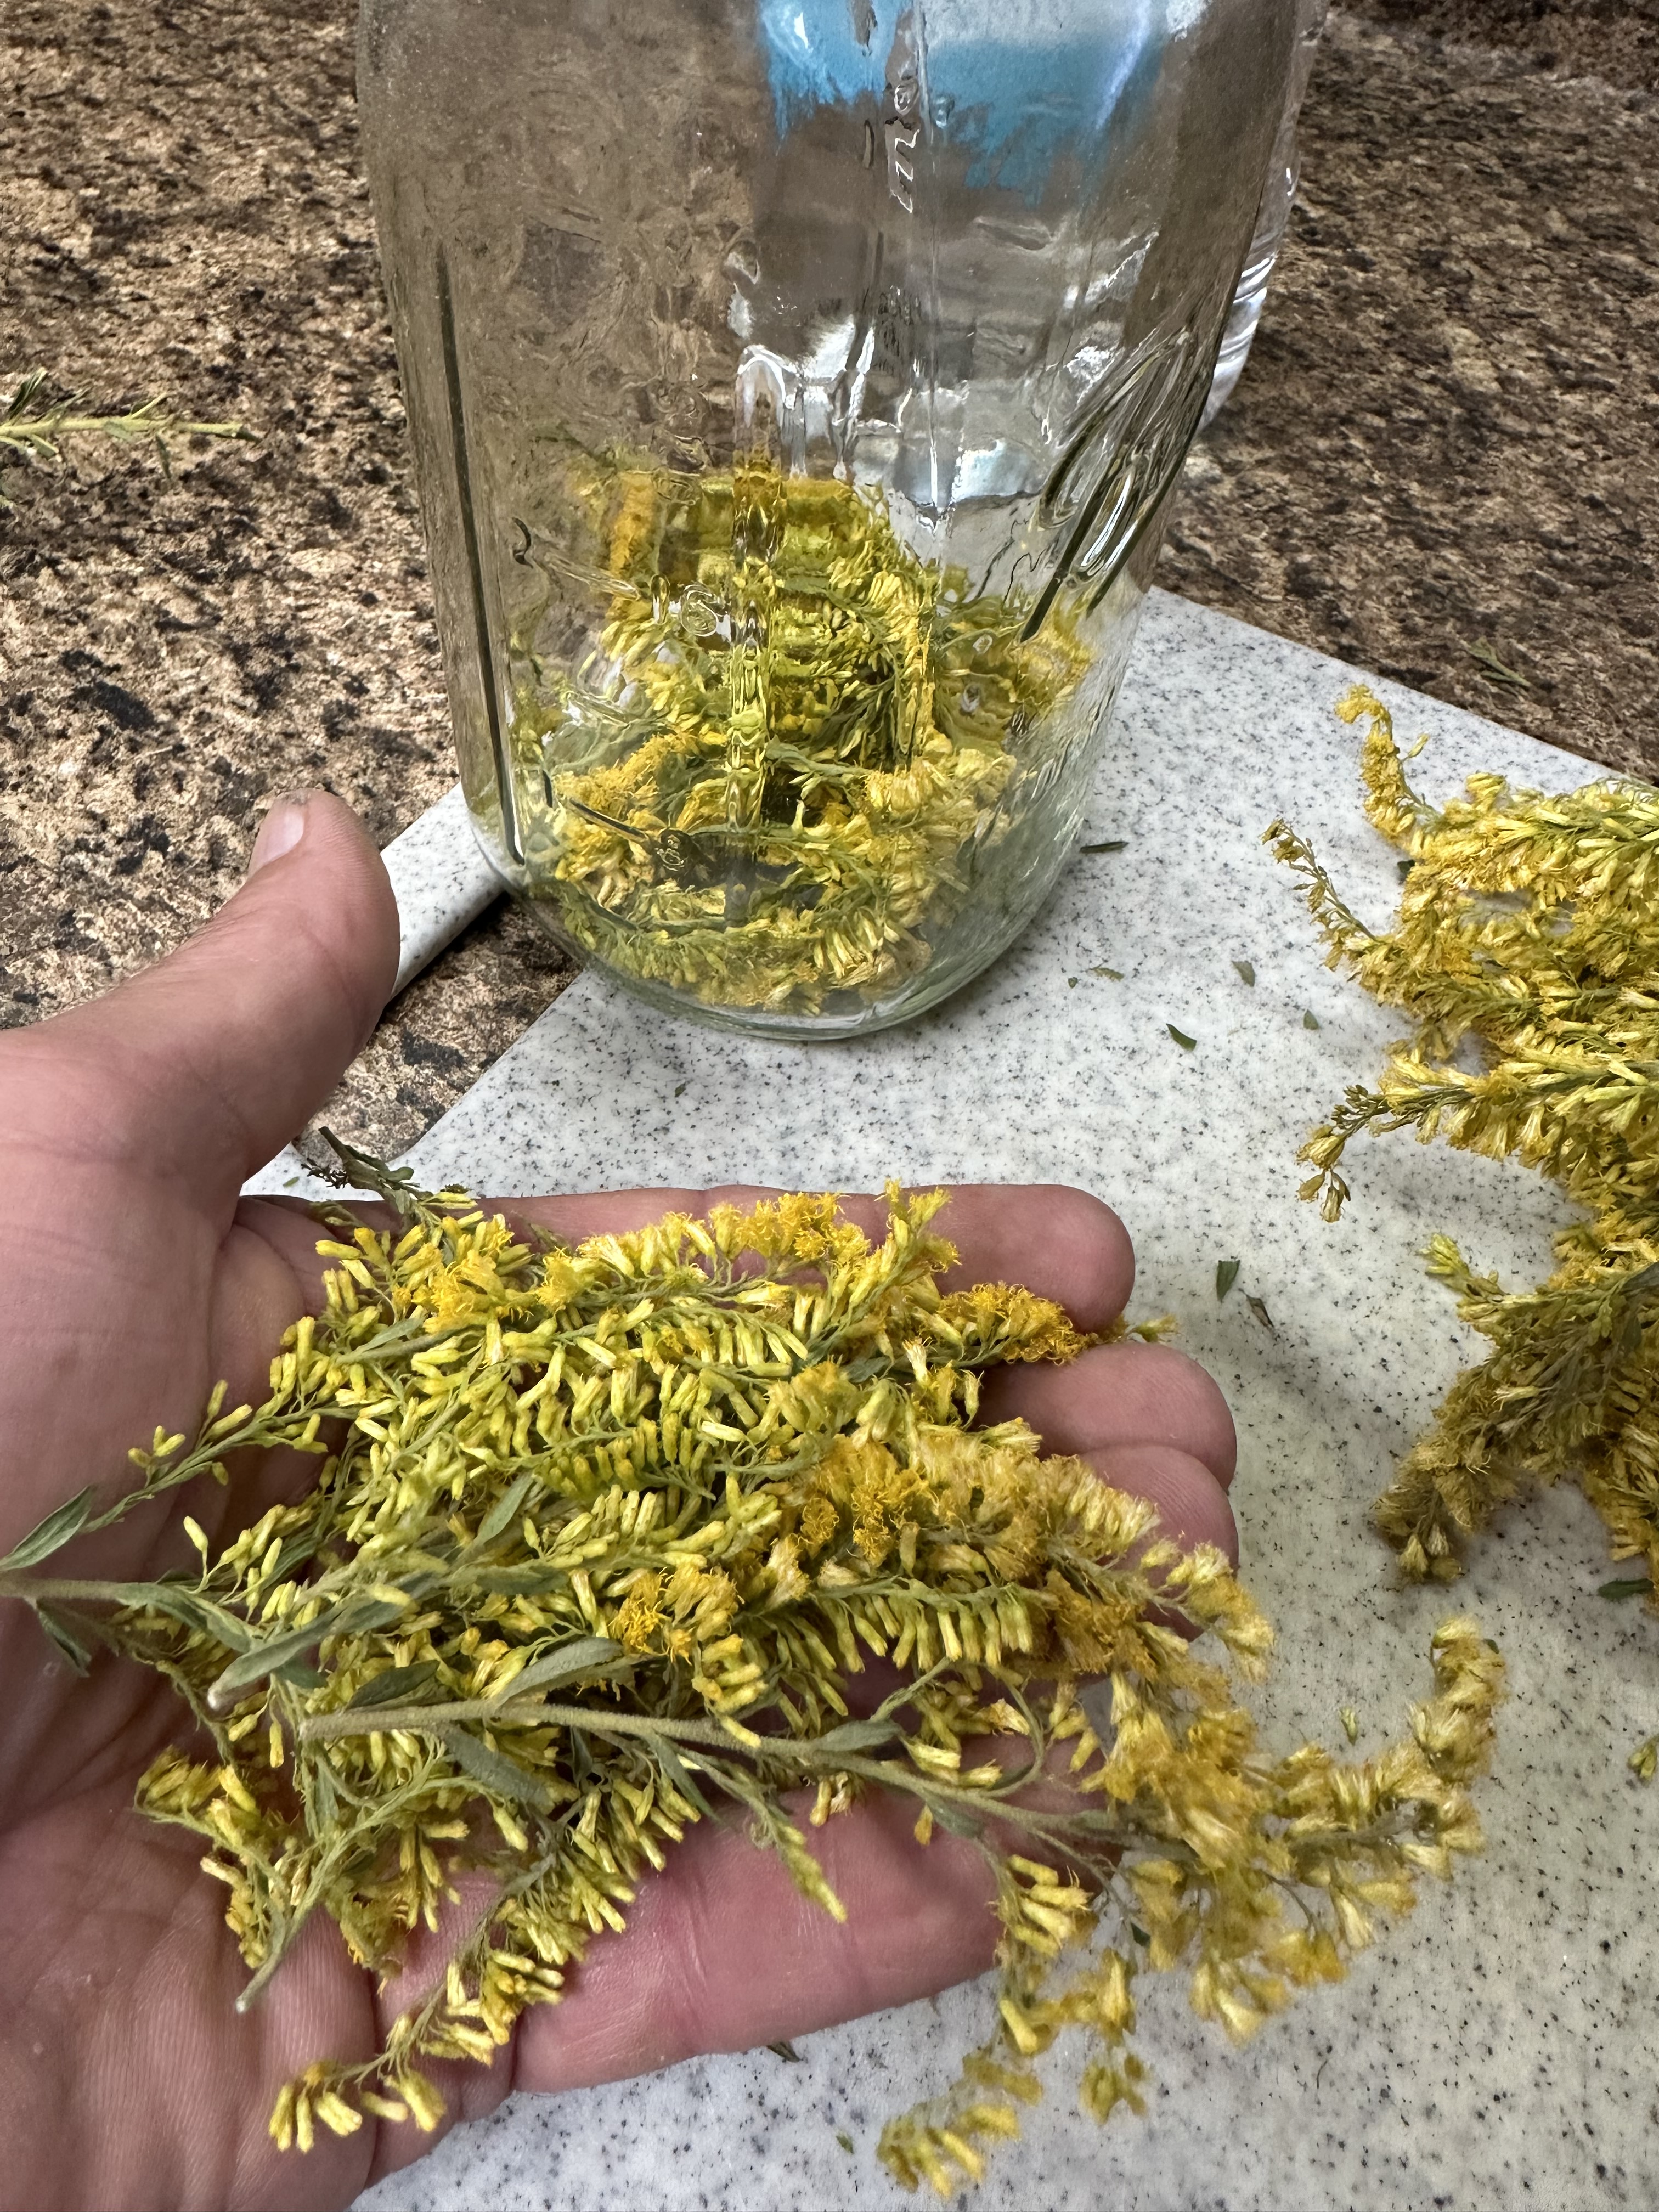
I was in a hurry so I didn’t finely chop the flowers, stems, leaves for this batch. Chopping creates more surface area for contact with the alcohol used in the tincture process. We’ll see how this goes. I’m betting it’ll turn out fine.

Add the chopped goldenrod to a clean glass jar. Pack it down as you fill the container about 3/4’s full of plant material.

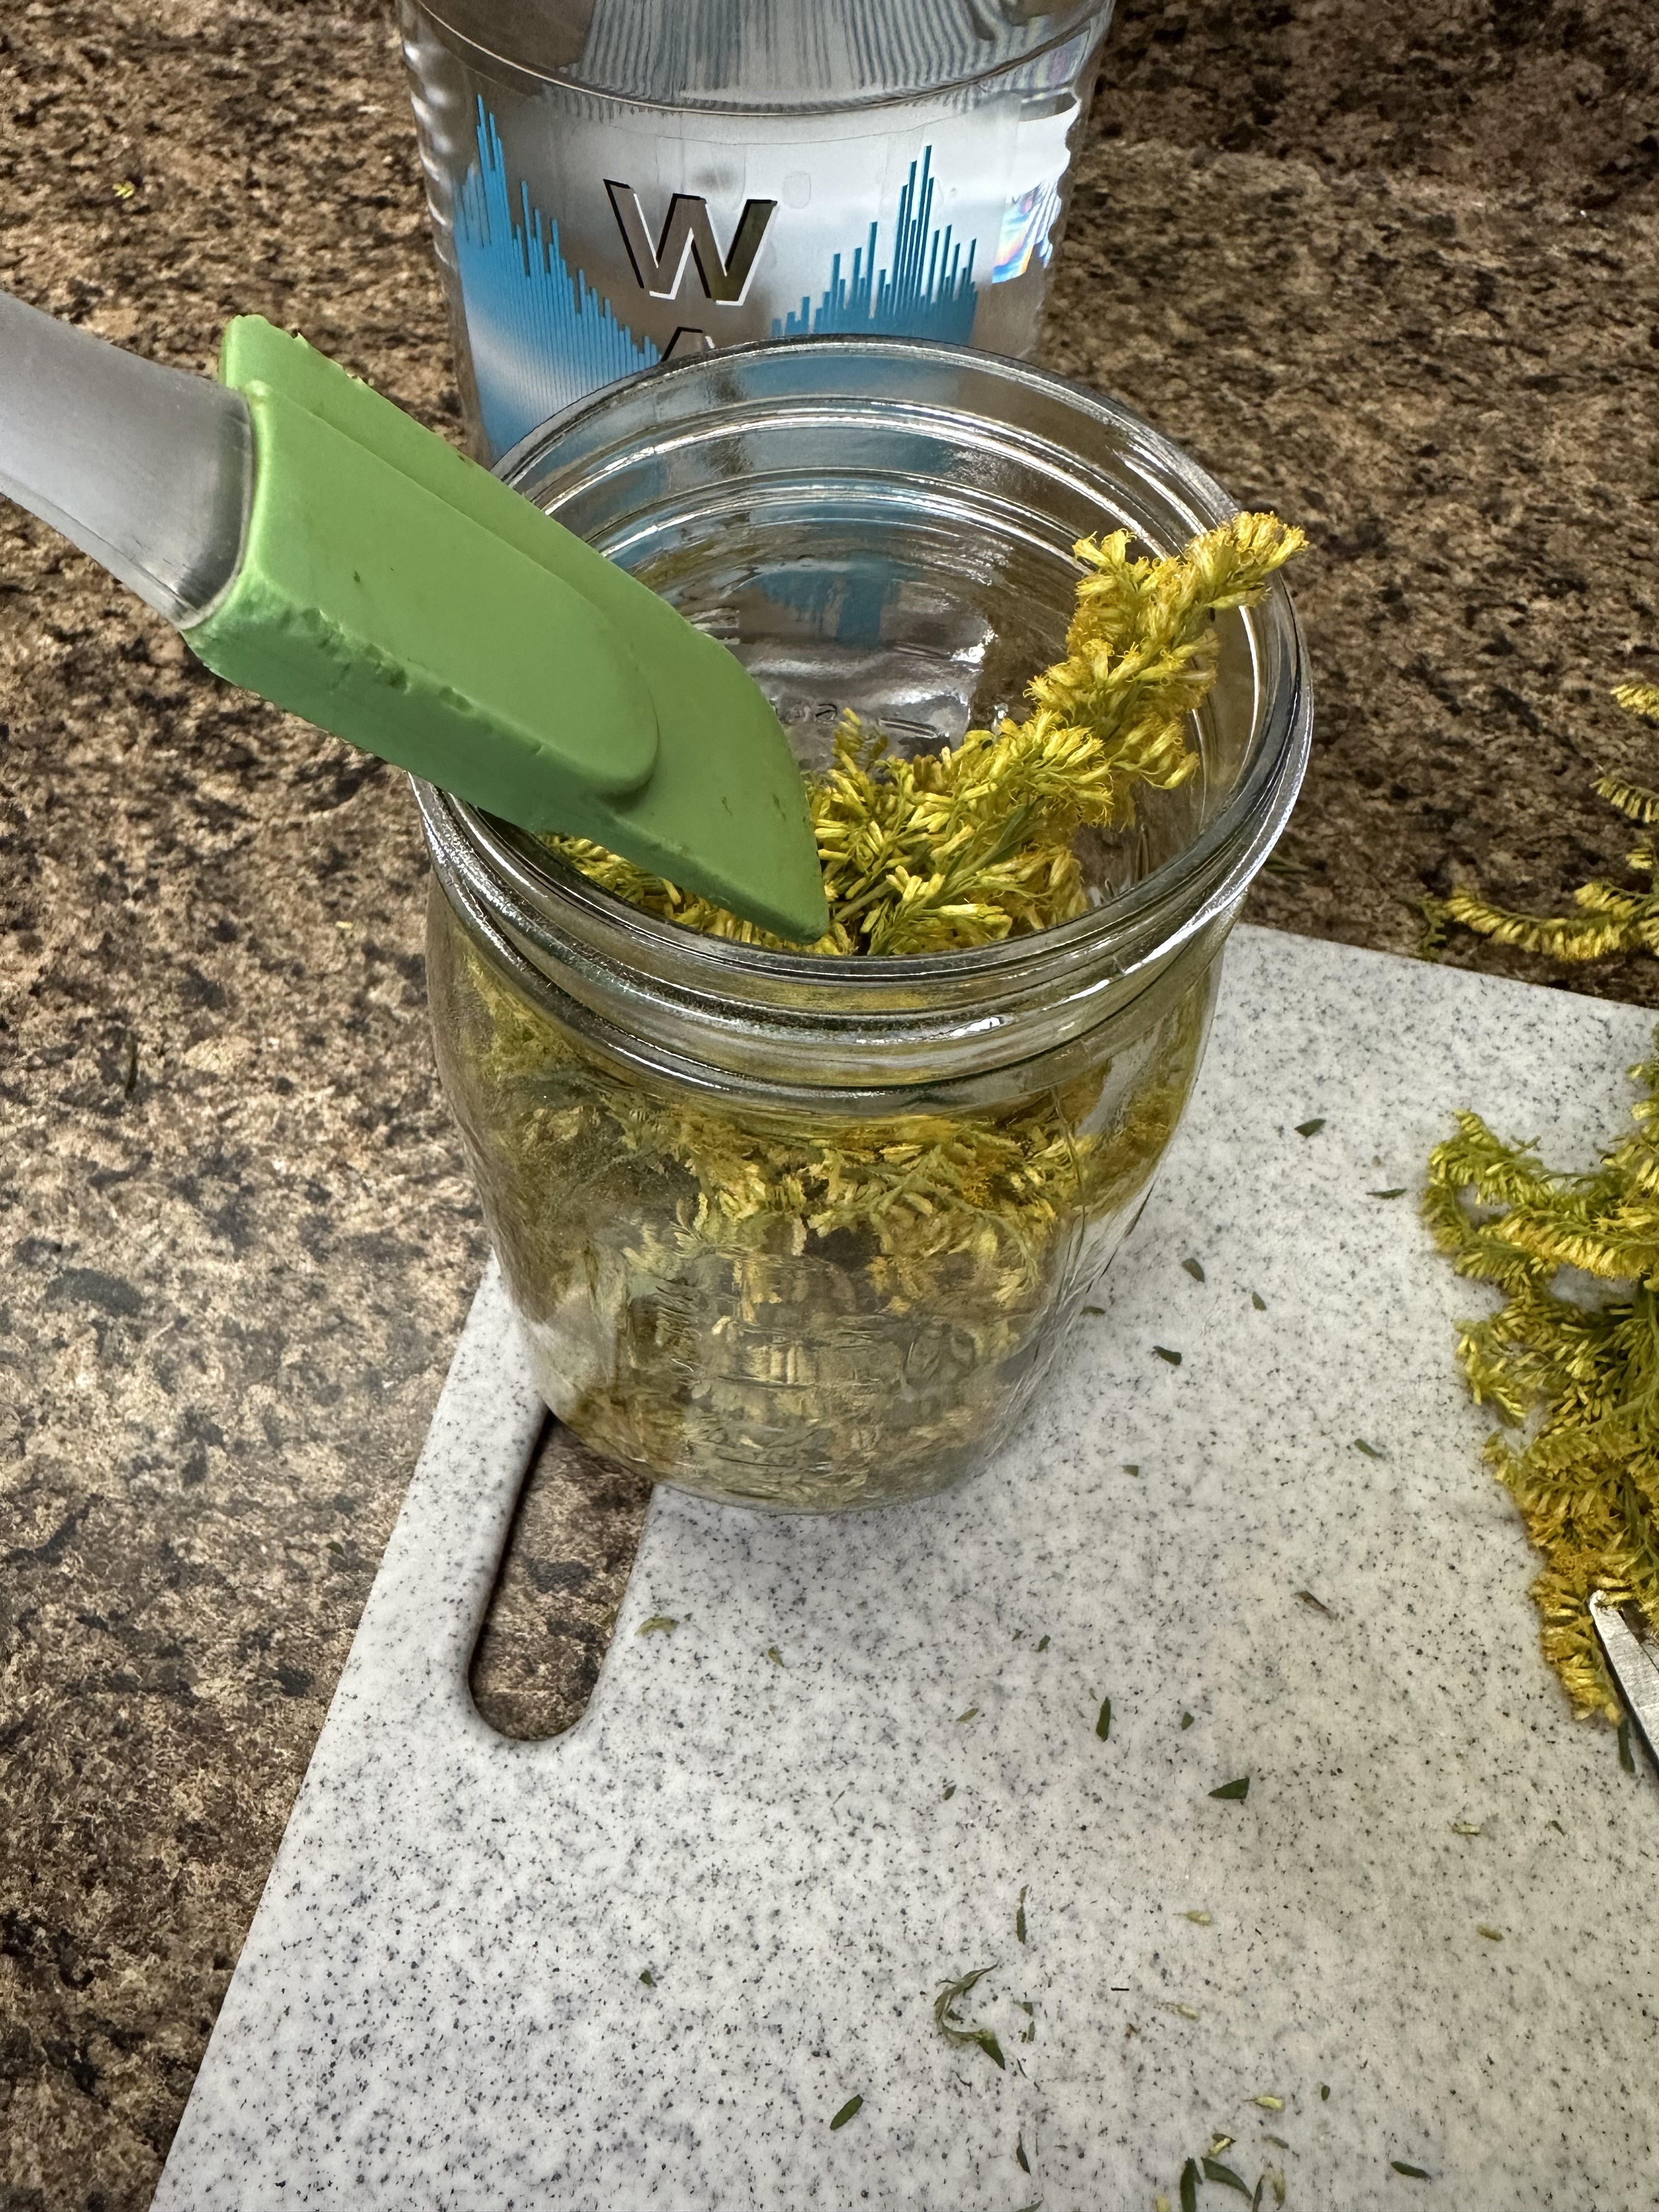
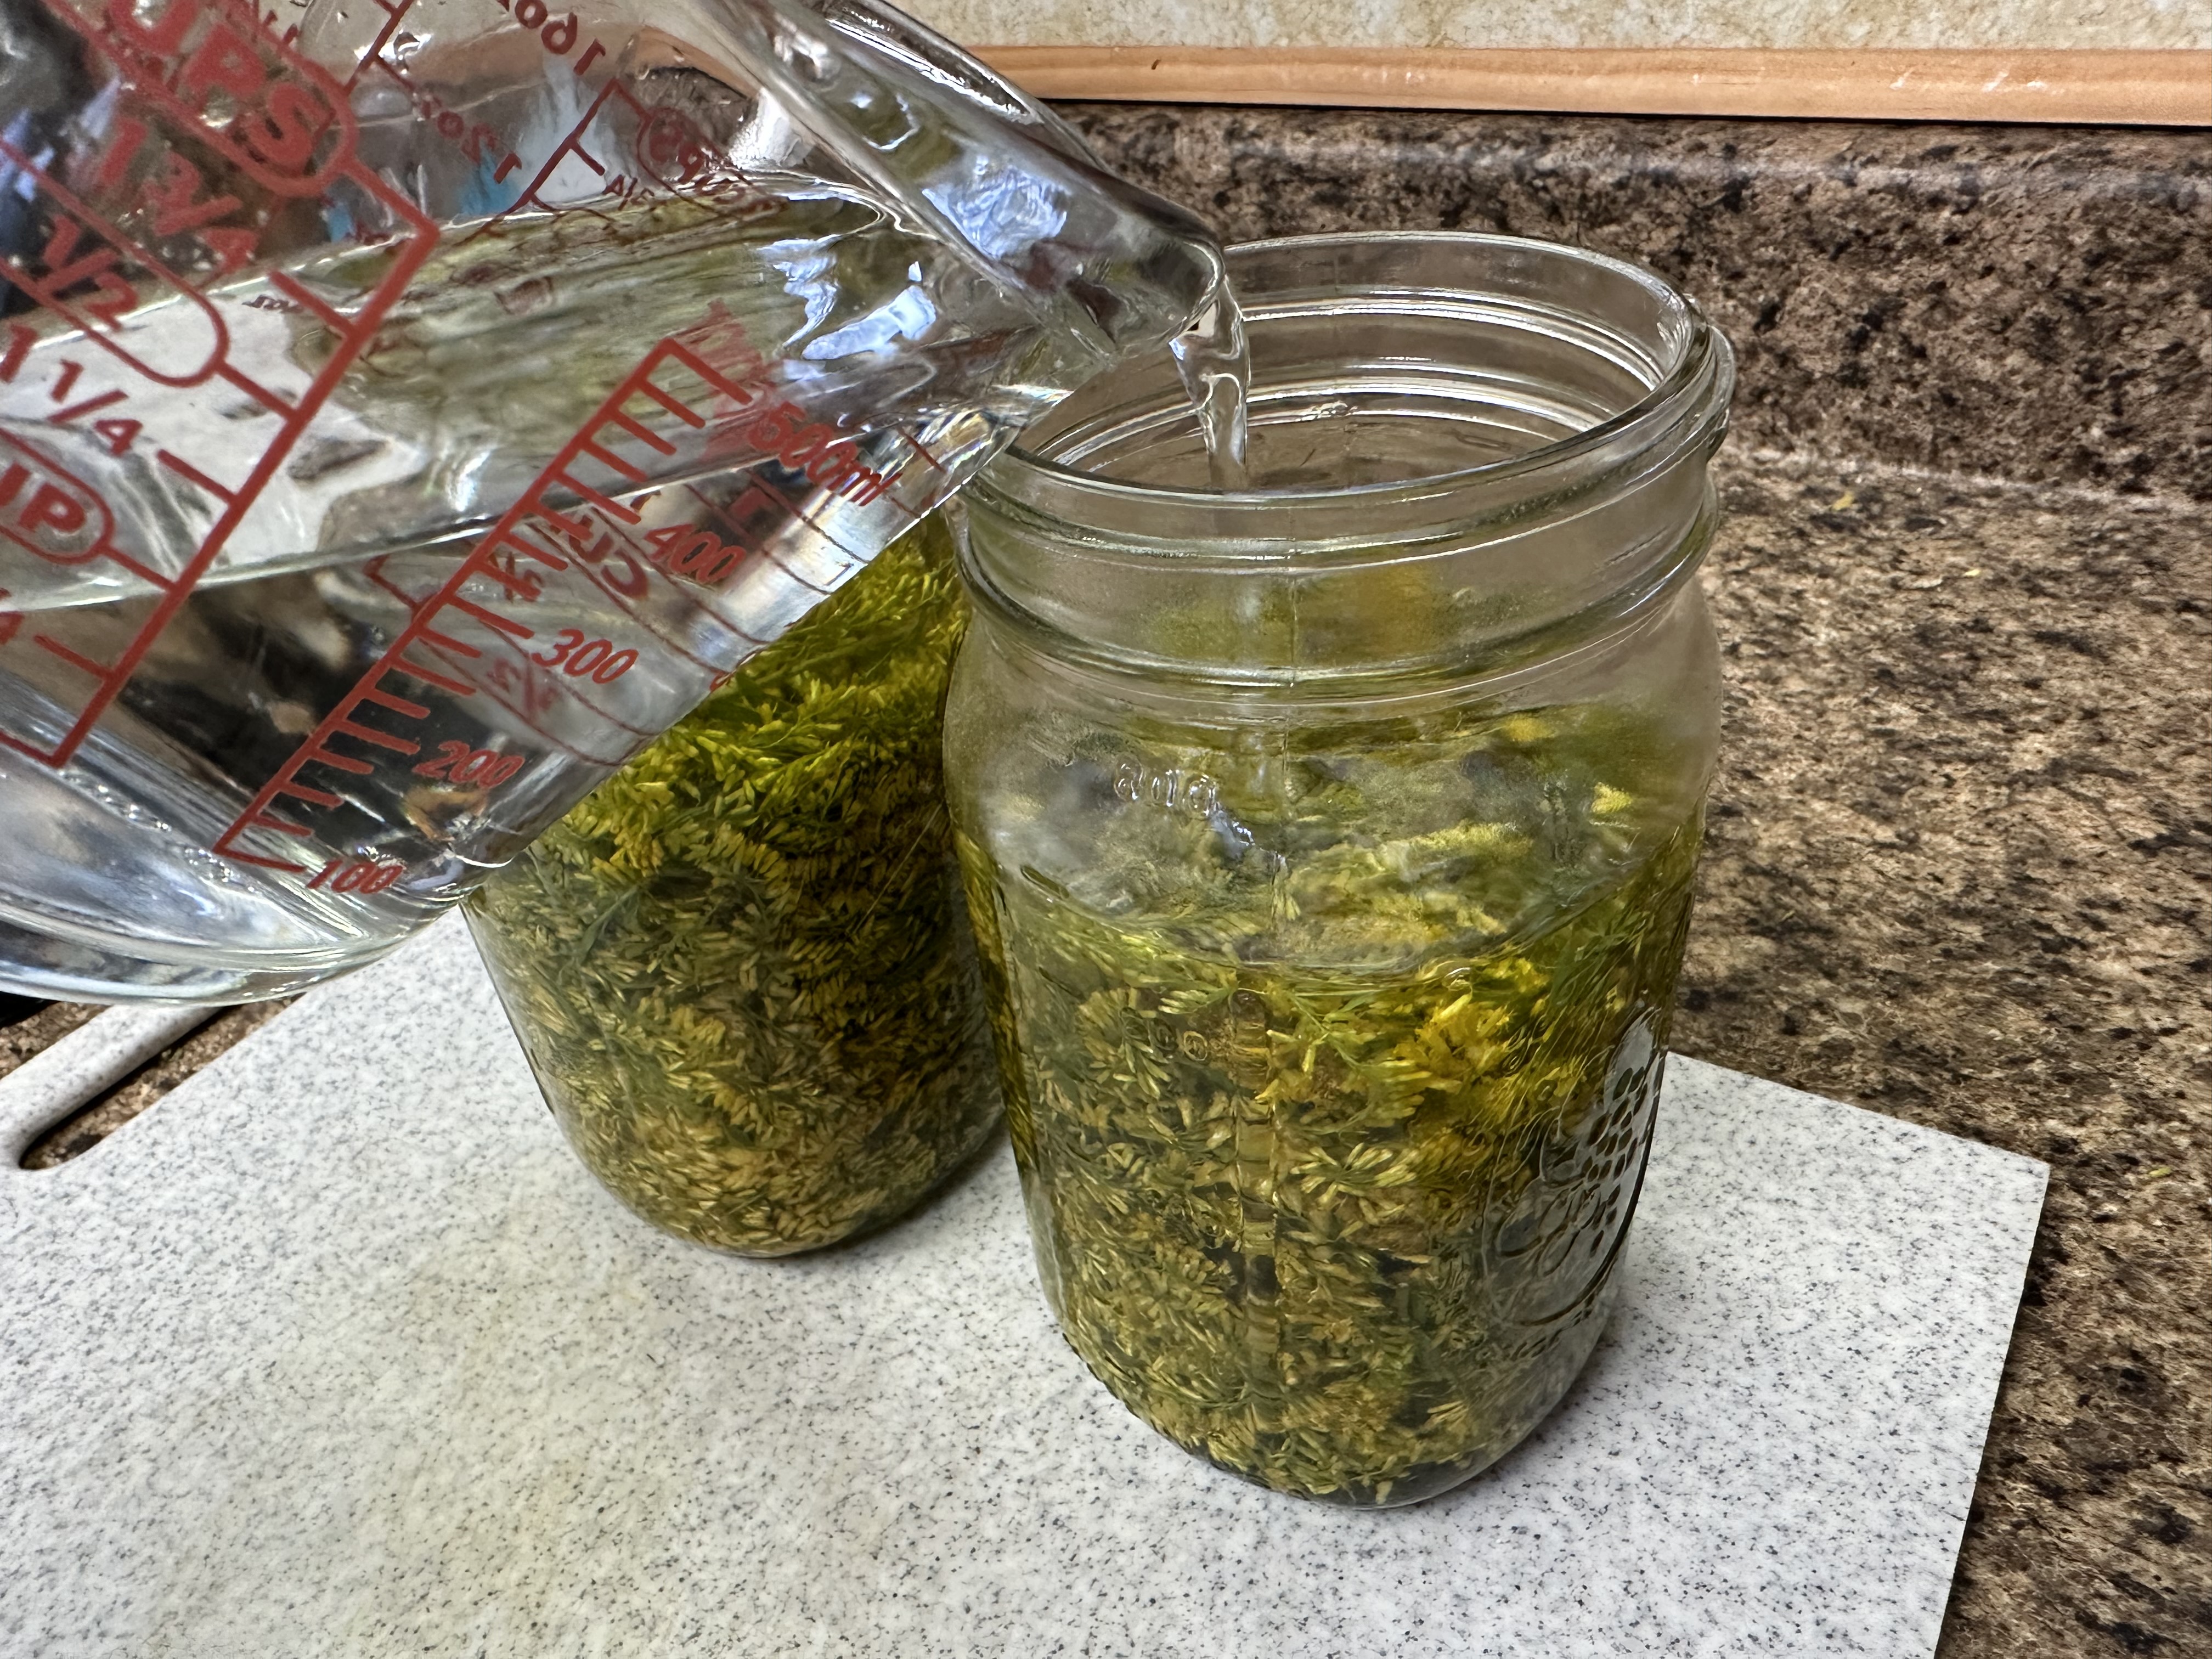
Pour enough alcohol into the jar to cover the chopped goldenrod. I used cheap vodka… because I’m cheap, and retired.

I remembered seeing someone top off the alcohol with water to fill the jar. They said some of the medicinal properties in goldenrod could only be extracted using water. I’m no expert herbalist, but I thought I’d give it a shot. I used filtered water from my Berkey water filter even though I have well water.

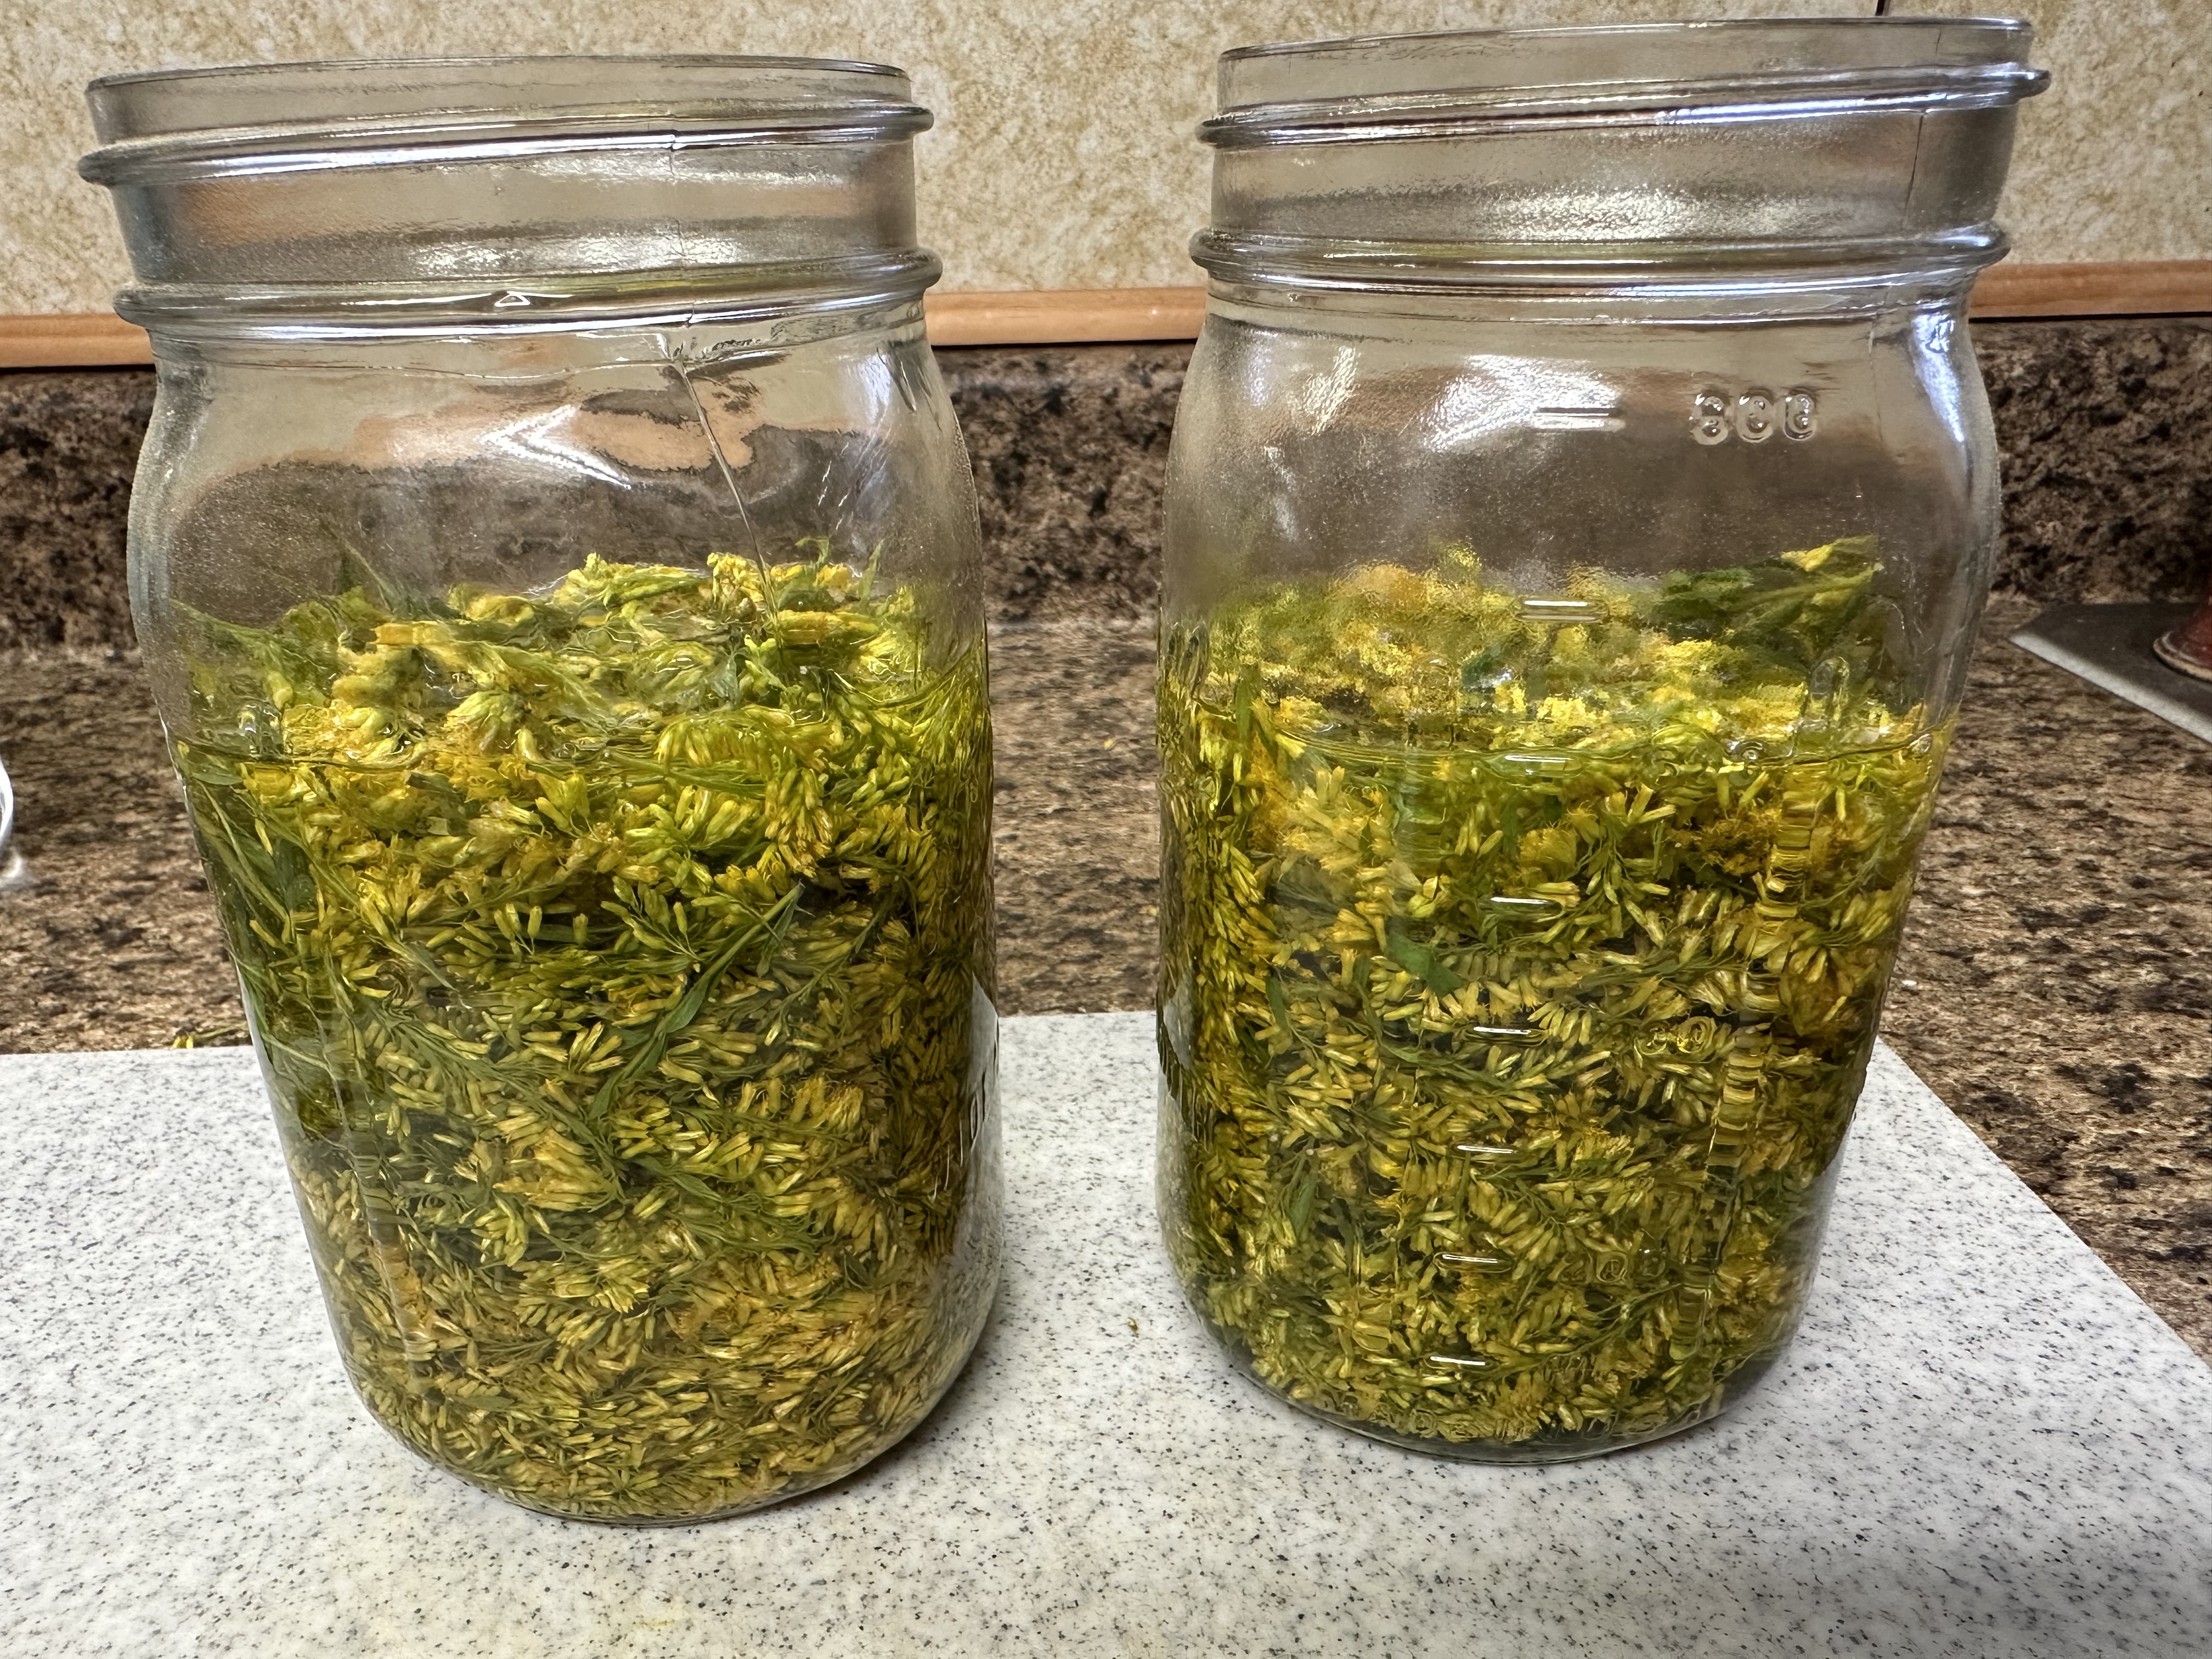
Seal the jar with a lid and label it with the date of production. Store it in a cool, dark cupboard. Shake the jar and contents every day or so if you remember… which I forget to do at times.

In about six weeks, the tincture can be strained and ready to use.

I mention that I’m far from a professional herbalist. I do have two friends who are highly accomplished in this field. If you’re interested in learning more from them, follow them at the links below:

Philip Winter – Twisted Vine Herbs and Anne-Marie Bilella- Forager Chick

Medicinal Use of Goldenrod

The usual disclaimer: I never give medical advice here. I’m not a doctor. Consult your physician for your health care needs. I have personally overcome health challenges using plant-based medicine. Your mileage may vary.

Goldenrod has been used for many years to help with allergy symptoms, sore throat, runny nose, itchy eyes, and colds and flu. It may also relieve toothache, sore muscles, inflammation and pain. Some claim antioxidants in the plant have anti-cancer properties.

Researching the benefits of goldenrod, I also discovered it shows promise for fighting kidney stones. This possibility alone makes me smile big! If you’ve never had a kidney stone, you won’t understand.

If you’ve personally found goldenrod to be helpful, drop us a line in the comments, please.

Keep Doing the Stuff of Self-Reliance,

~ Todd

P.S. – You can also keep up with the Stuff we’re Doing on TwitterPinterestYouTubeInstagram, and Facebook… and over at our Doing the Stuff Network.

P.P.S – If you haven’t done so already, be sure to check out the new Survival Sherpa School and smash that subscribe button at the top of the page!

Thanks for Sharing the Stuff!

Copyright © by Survival Sherpa: Content on this site (unless the work of a third-party) may be shared freely in digital form, in part or whole, for non-commercial use with a link back to this site crediting the author. All links in articles must remain intact as originally posted in order to be republished.

Categories: DIY Preparedness, First Aid, Herbal Remedies, Homeopathy | Tags: , , | Leave a comment

Attention Men: Pinterest is a Prepping Goldmine

by Todd Walker

I catch hell and get crazy looks when I tell my male friends that I’m on Pinterest.

Here’s a recent snide remark…

“You’re kiddin’, right!? That’s where girls post about manicures and weddings!”

Yep, there’s lots of estrogen induced pinning going on. But, guys, I’ve found Pinterest to be a great tool for preparedness and self-reliance.

Man is a tool-using animal. Nowhere do you find him without tools; without tools he is nothing, with tools he is all.

~ Thomas Carlysle

assorted wedges

There are lots of manly Pins that will stoke the fire of preparedness and self-reliance for anyone interested. In fact, it’s quite likely that your favorite prepared blogger has an active board full of value-adding pins. Whatever you’re into – prepping, survival, self-sufficiency, homesteading, DiY, bushcrafting, pioneer skills, guns, hunting/fishing, tools, permaculture, fitness – you’ll find it on Pinterest.

One cool thing about this social media tool is that your pins don’t disappear into the ether like Facebook or Twitter. What you pin on your board(s) stays there for future reference. My Pinterest boards serve as my Doing the Stuff refrigerator where I pin “fridge worthy” stuff I’m working on.

One preparedness project I found and finished yesterday is the self-feeding battery storage unit below. I was dressed for a hunting trip and my truck wouldn’t start. So I salvaged the day by heading to my shop to build preparedness stuff!

Power at your finger tips

Power at your finger tips

From left to right are the most common batteries: AAA, AA, C, D, and 9V batteries are ready for use and in one place. You can find the plans on my DIY Preparedness Project Board. I modified my battery storage unit by making it 21 inches tall instead of the original 8 inches to accommodate a Prepper load of batteries.

It beats my old scattered drawer storage method. There are 23 AA batteries in the slot with room for at least a dozen more.

When DRG or I need a battery, we can easily pull one from the self-feeding rack.

Who’s on Pinterest?

Alright manly men, before dismissing Pinterest as a girly hangout, you need to head over to Pinterest and Pin some preps!

While you’re there, you can follow your’s truly and some of my recommended preparedness pinners:

These are just a few of the folks I’ve got pinned to my Doing the Stuff internet fridge. Add your favorites in the comments.

Keep Doing the Stuff,

Todd

P.S. – You can also connect with us on TwitterPinterestGoogle +, and our Facebook page.

Thanks for sharing the stuff!

Copyright Information: Content on this site (unless the work of a third-party) may be shared freely in digital form, in part or whole, for non-commercial use with a link back to this site crediting the author. If you are interested a third-party article, please contact the author directly for republishing information.

Categories: 180 Mind Set Training, Preparedness | Tags: , , | 33 Comments

Jim’s DiY Fuel Transfer Pump: Don’t Spit or Swallow

[Todd’s note: I love Texas! My maternal grandfather came from the Lone Star State. A lot of great patriots and preppers call it home.

One of our readers, Jim, from somewhere in Texas, read my post about the Shaker Siphon hose and sent me a note on his fuel transfer system. I like it! I thought you might too.]

Thanks Jim for adding value with your Doing the Stuff Tutorial!

How to transfer fuel without ‘swallowing’

by jim w, somewhere in TX

Here is my electric fuel transfer board.

DiY Fuel Transfer Pump: Don't Spit or Swallow

Jim’s compact DiY Fuel Transfer Pump wrapped up and pulled from storage

The board is plain pine that is 18″ long and 11.5″ wide.  It has a 3″ long by 1″ wide hand hold cut in the top of it to grasp it easier.

Jim's DiY Fuel Transfer Pump: Don't Spit or Swallow

Fuel board set up and unwrapped

I painted the board OD GREEN to go with my military equipment I collect.

It has a MR. GASKET diesel micro electric fuel pump #12D mounted to it, via two holes drilled and one bolt, two washers and one nut per hole that holds it in place.  I also used the inline fuel filter supplied by Mr Gasket, though you could choose another type if you wanted to as there are lots of them available.

Here is the description from Advance Auto Parts website – http://shop.advanceautoparts.com/webapp/wcs/stores/servlet/product_electric-diesel-fuel-transfer-pump-mr-gasket_6340003-p   (I have NO AFFILIATION WITH THEM – I just surfed the web until I found a description I liked). On this website, they list the price as $59.99 – including the inline fuel filter:

Jim’s DiY Fuel Transfer Pump: Don’t Spit or Swallow

12-volt electric diesel fuel transfer pump is safe for diesel fuel use. Simple 2 wire design, self priming, includes 100 micron in line filter. 4-7psi 35GPH, small universal design allows easy set and installation anywhere. Solid state worry free electronics, 12 volt negative ground systems only.

Once the electric fuel pump was wired with an additional 6′ of wire, I added two alligator clips.  I then attached the inline fuel filter to the fuel pump. Next I added two lengths of 1/4″ fuel hose.  On the outgoing side, I put a 7.5′ piece of fuel hose.  On the incoming side, I put a 6.5′ piece of fuel hose.  That gives me a total of 14′ of fuel hose from source to destination.

Auto Zone sells fuel hose by the foot for $1.29 in my area: http://www.autozone.com/autozone/accessories/Armor-Mark-5-16-in-SAE-J30R7-fuel-and-emission-hose-Sold-by-the-foot/_/N-257j?itemIdentifier=4955_0_0_

It works great.  I either use a battery in the vehicle I’m transferring fuel to OR carry a spare battery along when I’m out in the middle of nowhere to run this pump.

While 35 GPH (gallons per minute) sounds fairly slow (and it is), MOST fuel tanks these days are 20 gallons or less.  So you could fill a 20 gallon tank in about thirty to forty minutes.

Please be aware that these days, new vehicles have some form of ‘anti-siphoning’ device built into the fuel filler tube before it reaches the tank.   If, on the other hand, you drive military vehicles like I do, that is never an issue.  Plus if you are just transferring fuel from one of your own fuel canisters, this is an easy, clean way to do so.

If you do not have ANY of these items on hand, as I did, your overall cost would be around $110.   That does not include the battery to run it.

  • Pump $65
  • Fuel hose $20
  • Board  $5
  • Two nuts/bolts & four washers $5
  • 6′ wire and 2 alligator clips $10

With the exception of the fuel pump and hose, I’m guessing on the cost of the other pieces.  I ACTUALLY HAD everything but a new pump on hand and splurged the $50 for it.  I made this several years go and it works every time I hook it to power.  I also have these installed in my military vehicles, one of which I’ve owned more than four years.  They all work every time you turn the key.

If power is an issue, for fuel stored in barrels, I recommend a rotary hand pump.  http://www.northerntool.com/shop/tools/product_200129224_200129224    – that link is for a ‘Fill Rite’ from Northern Tool company $200  (again, NO AFFLIATION, I just got mine there). Not cheap but will last for your lifetime.

I hope that helps give insight into OTHER choices other than the fuel pump [Shaker Siphon] displayed here earlier.  It’s a good alternative, but if you are serious about your preps, a great fuel transfer pump is the way to go.  Whether you are transferring 5 gallons or 500, not having to do it by ‘sucking’ is a good thing.

This Doing the Stuff Tutorial contributed by WALLEW (aka – jim w – from somewhere in TX)

————————-

If you have a Doing the Stuff project you’d like to share, drop me a line via email ~ survivalsherpa (at) gmail (dot) com

Keep Doing the Stuff!

Todd

P.S. – You can also keep up with the Stuff we’re Doing on TwitterPinterestGoogle +, and our Facebook page… and over at the Doing the Stuff Network on PinterestGoogle +, and Facebook.

P.P.S – If you find value in our blog, Dirt Road Girl and I would appreciate your vote on Top Prepper Sites! You can vote daily by clicking here or on the image below. Check out all the other value-adding sites while you’re there…

Thanks for Sharing the Stuff!

Copyright: Content on this site (unless the work of a third-party) may be shared freely in digital form, in part or whole, for non-commercial use with a link back to this site crediting the author. All links in articles must remain intact as originally posted in order to be republished. If you are interested a third-party article, please contact the author directly for republishing information.

Categories: DIY Preparedness Projects, Doing the Stuff, equipment, Preparedness | Tags: , , , , , | 6 Comments

A DiY Farmhouse Table, DRG’s Grocery Bag, and Chair Planter

by Todd Walker

Part of building resilience and self-reliance is taking ACTION! “Doing the stuff” as I call it.

After rearranging our house a few weeks back, Dirt Road Girl found a plan for a farmhouse table at Ana White’s site. She prints it and I’ve got my weekend project.

Ana’s plan was easy to follow and used basic DiY skills. Nothing advanced in this build. Here’s what I used.

Plan: Farmhouse Table on Ana’s site

Estimated Cost: $150 – I bought new lumber and lots of screws.

Estimated Time Investment: 10-20 hours. I spent about 5 hours each day (Sat. & Sun.) so far.

Skill Level: Beginner if you’ve ever used a circular saw. Intermediate if you just asked what a circular saw looks like.

Wood Used: Pine framing lumber from a box store. It’s rough but we like rough. You won’t get a splinter at Walker’s Diner, but you’ll see all the “character” of the wood.

Finish Used: We bought a weathered wood stain and will seal it with linseed oil (part II in a later post).

My pics don’t offer a start to finish tutorial with every detail. For that, go to Ana’s site. She offers great details for cut dimensions with 3D diagrams. This is more of an encouragement for reluctant DiYers to start doing the stuff and practice self-reliance skills.

Basic Tools Needed: Measuring tape, square, hammer, eye and ear protection, drill, circular saw, paint brush or rag for stain, sander, screws – lots of screws.

Supplemental tools… if you have them. I have never found anything resembling a straight 2×2 in a lumber yard. I bought 2×4’s and ripped them on my table saw. You could do the entire project with the basic tools list if you had to. I used two pipe vises to squeeze the table boards together. My miter saw was used to cut the 2×2’s, 2×4’s, and 2×6’s. The 2×8 was cut with the basic circular saw. I used a wood chisel to do the notches. Use an impact driver for sinking screws if you have one. If not, a regular drill will do the job.

Step 1: Cut the boards to size from the cut list on Ana’s site. I was supposed to shorten the table to 84 inches in length but got side tracked and made it the original length of 96 inches. Oh well, we have extra space for Thanksgiving dinner now.

Some of the long cuts.

Some of the long cuts.

Step 2: Follow the plans to begin assembly on each part of the table.

Inside and outside legs with notches ready for assembly

Inside and outside legs with notches ready for assembly

Glue and screw all the pieces together. I used 2 1/2 inch screws for the whole project except for attaching the bread boards to the legs. I used 3 1/2 inch screws there.

Legs, stretcher, end boards, and apron

Legs, stretcher, end boards, and apron

You’ll want to do your sanding on the frame before you attach the 2×2 supports. It makes things easier. Flipping the table once it is assembled is difficult. The beast weighs a ton.

2x2 supports installed on a square frame

2×2 supports installed on a square frame

Attaching breadboard ends

Attaching bread board ends

Ana tells you to attach both bread boards before the 2×6’s go in place. I secured one bread board then centered one table top board. I’m glad I did. Even pre-cutting the table top boards carefully, there was small gaps at the other end between the bread board and table top boards. I remedied that by cutting an 1/8 off the 7 table top boards with a circular saw once they were screwed to the table frame. This made a tight fit for the bread board end.

Pipe clamps putting the squeeze on the 2x6's

Pipe clamps putting the squeeze on the 2×6’s

There are three exposed screws in the end of each table top board. I flipped the table on its side and screwed the boards from underneath through the 2×2 supports. Two screws per board. If you want to hide all screws, you’ll need to work from the underbelly of the table. The exposed screws fits our personality and Hillbilly Industrial decor just fine.

Finished table with breadboards attached. Next step is to stain and seal the whole thing.

Finished table with bread boards attached. Next step is to stain and seal the whole thing…and get some help to move this heavy puppy.

Part II will show the finished product, hopefully next weekend. Stay tuned.

Grocery Bag and Chair Planter

Not to be outdone, DRG was in the front yard starting plants in containers. We’re probably known as those weirdo’s in our neighborhood. We call it Hillbilly Industrial.

You’ve probably got some extra cloth or plastic shopping bags collecting E. coli bacteria, right? Why not repurpose them into planters. Here’s a few pics from DRG’s creative pursuits yesterday. I love her!

The bag's caption reads, "Boss Lady". How appropriate :)

The bag’s caption reads, “Boss Lady”. How appropriate 🙂

The start of our front yard garden with more to come

The start of our front yard garden with more to come. Also, notice the galvanized bucket to the left.

DRG's clever chair planter

DRG’s clever chair planter

DRG is a very clever girl. She attached chicken wire under the missing seat, lined it with coconut fiber, and planted flowers for our front porch. Hillbilly Industrial indeed!

Keep Doing the Stuff,

Todd

P.S. – You can also keep up with the Stuff we’re Doing on TwitterPinterestGoogle +, and our Facebook page… and over at the Doing the Stuff Network on PinterestGoogle +, and Facebook.

P.P.S – If you find value in our blog, Dirt Road Girl and I would appreciate your vote on Top Prepper Sites! You can vote daily by clicking here or on the image below. Check out all the other value-adding sites while you’re there…

Thanks for Sharing the Stuff!

Copyright: Content on this site (unless the work of a third-party) may be shared freely in digital form, in part or whole, for non-commercial use with a link back to this site crediting the author. All links in articles must remain intact as originally posted in order to be republished. If you are interested a third-party article, please contact the author directly for republishing information.

Categories: DIY Preparedness Projects, Gardening, Resilience | Tags: , , | 15 Comments

DiY Cigar Survival Fishing Kit

by Todd Walker

Every year I get older and my backpack gets heavier. To trim some weight, I began downsizing items in my bag. Here’s a great stove that weighs less than 6 ounces and runs on twigs.

I humped my backpack the other day through the woods with DRG. I immediately noticed the extra strain on my hips. Not overbearing, but noticeable. As I age, I look for ways to lighten my load on stuff I carry – body weight included 🙂 Here’s a great way to shave a few ounces off any fishing kits you pack for your bug out bag, walk-about bag, or hunting bag. It fits in a glove box in your vehicle nicely too.

The idea for my last fishing kit for my bug out bag came from Dave Canterbury. It was made of PVC, which was very sturdy, but weighed more than I liked. This summer I wanted to trim the weight on my BOB. It’s not going to be ultralight, but every pound I trim only makes humping that thing easier. The first piece I tackle is my…well…my fishing tackle.

First, assemble materials. I looked for a lightweight tube for a couple of weeks. I didn’t want glass. Plastic would work. Aluminum would be even better. I found a plastic tube that held a watch on a shopping trip with my wife. I bought it for $5.oo and ditched the cheap watch. The problem with the plastic tube is that I would not be able to use it for boiling water in a survival situation.

Then we stopped by the adult beverage store for some wine. This place also has a nice humidor with a great selection of cigars.

*Aha Moment*

We spent the next five minutes rummaging through stogies looking for the perfect candidate. I needed it to be long enough and with sufficient diameter to hold the necessary fish-catching supplies. I found a cigar, which I enjoy from time to time, with a great tube. It measures 1 inch in diameter by 6 1/4 inches long tube. Being aluminum, I can use it to boil water in a pinch. The picture below shows the difference in sizes of the old PVC kit (bottom) and the new one completed.

Here’s what I used to assemble my kit: Cigar sleeve, duct tape, bank line, electrical tape, 10# fishing line, strike anywhere matches, fire starter, dry flies, artificial lizard, non-lead weights, 3 types of fishing hooks, metal leader, swivels, 2 floats/bobbers, and a snack size zip-lock baggie.

Assembly Process

Step A: Wrap the screw end (or non-rounded end) with about 3 or 4 feet of duct tape. Do I even have to tell you about all the uses for this miracle survival material?  I keep strips of it in my cars, wallet, desk, almost every where I go. Duct tape may not help you catch fish, but I’m sure it’s possible with a little creativity. It’s a utility player that should be on and in every preppers gear and bags.

Step B: Tie a slip knot on the end of your bank line (don’t forget to burn the nylon end to prevent unraveling) and tighten it around the tube next to the duct tape. Wind about 50 to 100 feet of line onto the tube. I used closer to 50 feet to keep the profile of the tube even. Bank line can be used for limb hooks and trot lines in a true survival situation. This allows for passive fishing while you attend to other tasks. [NOTE: Check your local fishing and game laws during rule of law times before using these methods.]

The bank line can also be used for a makeshift fly rod (and other cordage needs). Simply cut a sapling about 8 feet, attach 10 feet of bank line to the end, add a piece of mono filament line to the bank line with one of the dry flies in the kit and you have a hillbilly fly rod rig. When no bait is available for your hooks, use this rig to catch smaller pan fish to use for bait on limb hooks. This is very enticing for larger fish and turtles.

Bank line being wrapped

Step C: Secure the bank line to the tube with a couple of wraps of electrical tape. Again, more tape to use as needed.

Electrical tape wrapped around bank line

Step D: Now you’re ready to add the mono filament fishing line. I used 10# line. I wouldn’t recommend anything below 6# line. (Update: I used 50 lb spider wire for our son’s Christmas stocking). In a survival situation, the last thing you want to see is a decent sized fish run with 4# line and snap it off.

An old technique I’ve used for years is to lay the line inside a book and feed the line onto the tackle. I did this for the cigar tube as well. Tie a slip knot on the end of the fishing line and secure it to the tube where you taped off the bank line. Start rotating the tube to add line. I guess you could wind the line on the tube with you free hand. I prefer to roll the line on by rotating the tube with my finger tips from both ends of the tube. I’m a little OCD. I think the line might accumulate more kinks if you wind it with you free hand.

Add line until you get within one inch of the rounded end of the tube, then double back over the existing line. I added about 50 feet of line to my rig. Next, add a layer of electrical tape to secure the line to the kit. A wide rubber band might work, but I like the tape.

Below is the finished exterior of the kit. By the way, if you haven’t purchased and read “Boston’s Gun Bible“, do so now. I read it yearly.

Step E: Place the strike-anywhere matches, fire starter (more details about this item later), dry flies, artificial lizard, non-lead weights, 3 types of fishing hooks, and swivels in a snack size zip-lock baggie. Squeeze the air out by rolling it toward the top of the bag. Seal the bag and slide into the tube.

Step F: Screw end-cap onto tube and wrap with electrical tape for a water-tight seal.

Fire Starter Note: I made the fire starter a few years ago. It’s jute twin that was saturated with paraffin wax. It literally only takes a spark to get a flame going. Just cut a one inch piece, unravel, and “fluff” to create more surface area for your spark. Another added bonus is that it even lights in wet conditions. I have bundles in all my bags. You never know when you’ll need to cook up those fish you just caught with your new Cigar Survival Fishing Kit!

The only modification I’d add is to make a paracord loop extending from the end of the cap. I’ll add pics when that happens.

Your turn. Got any suggestions to make this better? Please add them in the comment section.

Keep Doing the Stuff of Self-Reliance,

Todd

P.S. – You can also keep up with the Stuff we’re Doing on TwitterPinterestGoogle +, YouTube and our Facebook page… and over at the Doing the Stuff Network on PinterestGoogle +, and Facebook.

P.P.S – If you find value in our blog, Dirt Road Girl and I would appreciate your vote on Top Prepper Sites! You can vote daily by clicking here or on the image below. Check out all the other value-adding sites while you’re there…

Thanks for Sharing the Stuff!

Copyright: Content on this site (unless the work of a third-party) may be shared freely in digital form, in part or whole, for non-commercial use with a link back to this site crediting the author. All links in articles must remain intact as originally posted in order to be republished. If you are interested a third-party article, please contact the author directly for republishing information.

Categories: Bushcraft, Camping, DIY Preparedness Projects, Preparedness, Self-reliance, SHTF, Survival | Tags: , , , , , | 6 Comments

I’m Digging on Rules of Three for Hiding a Gun

For any “when it’s time to bury my guns, its past time to use them” patriots, I would recommend reading Claire’s practical guide on why, how, what, and where to hide guns. Plus some cool bonus material at the end. If you’re digging on this article, check out more of her work over at Backwoods Home Living Freedom blog

by Claire Wolfe

Source: Backwoods Home Magazine 

My friend Jack pulled the car into a grassy clearing. We donned rubber boots, fetched a metal detector and digging tools from the trunk, and headed off along a game trail. Our mission: To dig up and test fire a pistol Jack had buried years ago.

The trail disappeared into a wetland, which Jack crossed with confidence. The muddy water was only about six inches deep where he walked, but I couldn’t see the bottom so I waded gingerly after him. It was at this point I discovered that my borrowed waterproof boots — weren’t. I squished along after Jack. By the time I emerged onto dry land, he was standing well ahead of me, next to the stump of an old cedar that had been logged a hundred years ago.

“It’s buried right here,” Jack told me confidently. “Between this stump and that sapling.”

I was dubious. The “sapling” wasn’t exactly a sapling anymore. It had grown into a mid-sized alder tree. Besides, Jack had history with not being able to relocate a buried firearm. Back in 2004, I had mocked him in one of my Backwoods Home Hardyville columns for that very thing, an SKS he couldn’t relocate.

Nevertheless, he set to breaking up roots. I followed with a shovel.

“I didn’t bury it very deep,” he said. “We shouldn’t have too much trouble.”

They’re at it again. The politicians in Washington, DC, and their media mouthpieces everywhere are in full cry, threatening more restrictions on our right to own guns.

In response, Americans are rushing to buy firearms, particularly those that might be targets of the next ban. Without a doubt, many guns are going underground or into other hiding places. When Draconian restrictions take effect, millions more firearms will get tucked into walls, haylofts, hollow trees, and waterproof containers buried in the woods.

There are people who say, “When it’s time to bury the guns, it’s actually time to dig them up and use them.” They have a point. But in fact, there are plenty of good reasons to hide guns, now or at any other time. And we’re not talking about simply concealing a gun to have it handy in home, office, or hotel room. We’re talking about hardcore, long-term hiding — stashing guns against some urgent future need.

My friend Jack, carrying a metal detector and digging implements, heads toward a game trail that leads to the site where he buried a pistol many years ago. The game trail is right in front of him but strangers would be unlikely to spot it because of the quick-growing blackberry bramble that’s obscured it.

Three reasons to hide a gun

You might want to hide a firearm just to have a spare if your others get stolen or damaged in a disaster.

You might want to hide a firearm if you are a peaceable person who is nevertheless forbidden to own a gun because of some misdeed in your past or some arbitrary state law.

And of course, you might want to hide a firearm if you fear nationwide bans and confiscations but realize that you can’t stand alone against the gun banners.

Read the rest here


Categories: Uncategorized | Tags: , , , , , , , | 2 Comments

Making Yogurt: Experiments 1-4

I’ve written before on the health benefits of probiotics in fermented foods like my Down and Dirty Sauerkraut. Daisy Luther offers her trials and tribulations on her way to success in her DiY yogurt process.

by Daisy Luther

Yogurt making gear

I was absolutely determined to make yogurt.  Real, yummy delicious yogurt, the nice thick kind that can stand on its own in a dish, supporting a big spoon full of fruit.

Yogurt has so many good things going for it!  I eat it almost daily and contribute my resistance to stomach viruses and my greatly improved acid-reflux to the habit.  You can read more about the benefits and some tasty ways to use it in my “Ode to Yogurt”.

Attempts #1 and #2

Attempts 1 and 2 were made simultaneously.  The only difference between the two was that #1 was made from pasteurized milk from the dairy and #2 was made from reconstituted powdered milk.

Live yogurt for starter

I used the “thermos” method, found in detail HERE.

Basically, the thermos method is as follows.

  1. Heat 1 cup of milk to 165-185 degrees F (use a candy thermometer – or, wait until you are starting to see some bubbles rising but the milk is not yet boiling).
  2. Remove the milk from the heat and allow it to drop to 105-110 degrees F.
  3. Gently stir in the starter (1 tablespoon of yogurt with live cultures).  You want it to be well-combined but don’t use anything crazy like an immersion blender.  Just a whisk will do.
  4. Immediately place the mixture into a thermos that has been warmed with hot water and put the lid on.
  5. Keep the thermos cozily wrapped in towels overnight (8-24 hours).

You should get up to delicious, rich, thick yogurt.

I, however, did NOT get up to delicious, rich, thick yogurt.  I got up to runny, drink-it-through-a-straw yogurt.  I was seriously bummed.

Regular milk, thermos method

Powdered milk, thermos method

I noticed, however, that the powdered milk yogurt was thicker than the refrigerated milk yogurt.  That got my wheels turning a little.

Attempts #3 and #4

In the face of my early morning disappointment, I decided to try a few different things with the next batches.

I searched up “Why is my thermos yogurt runny?” and found this awesome site, Not Quite Nigella, had some interesting suggestions.

My next two batches were made from a cup and a half of milk from the fridge with 1/3 of powdered milk stirred into it. I was hoping that if the milk was thicker to start with, so too would be my yogurt.

I made another attempt at the thermos method, described above, with half of the mixture.

With the other half, I tried the blog’s “oven method.”

While my milk mixture was heating on the stove top, I turned the oven on to 300 degrees F.

I washed a pint Mason jar and filled it with scalding hot water to keep it warm.

When the milk had been inoculated with the culture, I poured the half that didn’t go into the thermos into the empty, warm jar and placed it on a pan, popped it in the oven, and turned off the heat.  I left it in the warm oven for 5 hours.

Alas, it resulted in runny yogurt.

Oven method, powdered milk mixed with regular milk

I had, at this point, reached my yogurt frustration threshold.  I spoke rather impolitely to the yogurt in the thermos, wrapped snugly in its towel.  I left the thermos on the stove while I baked a batch of cookies.  I turned on the oven a couple of times to keep things warm in the kitchen.  I strongly suspect my other failures are because my house is so chilly, a fact that is really only bothersome when making yogurt or waiting for bread to rise..

I left the thermos of yogurt for 11 hours.  I opened it…and ……SUCCESS!!!!! Happy dance in the kitchen!!!!

Thermos method, powdered milk mixed into regular milk


So, the keys to the successful batch of yogurt were…

  • The thermos method
  • Adding 1/3 cup of powdered milk to each 1-1/2 cup of regular milk
  • Warming up the kitchen a few times throughout the day.
Tomorrow I am planning to make a full batch of yogurt. I will let it sit for a solid 12 hours, and  I might try putting the thermos on a heating pad and turning it on intermittently throughout the day. I really want to keep it low-tech because yogurt making is a skill I’d like to be able to accomplish without the grid.
Author bio: Daisy Luther is a freelance writer and editor.  Her website, The Organic Prepper, offers information on healthy prepping, including premium nutritional choices, general wellness and non-tech solutions. You can follow Daisy on Facebook and Twitter, and you can email her at daisy@theorganicprepper.ca
Categories: Fermentation, Frugal Preps, Homesteading, Natural Health, Self-reliance | Tags: , , , , , | 1 Comment

DiY Fire Starter in a Drinking Straw

Hank over at Sensible Survival is at it again. Check out his DiY fire straw and make this your next project.


This is one of the best and most convenient fire starters that I’ve come across in a long time.  Many of us know that cotton balls rubbed with petroleum jelly make great fire starters, but they are messy and not real convenient to carry.  This method makes it easy to carry these little fire balls and they won’t leak and get on your clothing or other gear.  All you need to make these is some cotton balls, petroleum jelly, a plastic drinking straw, a pair of scissors, and a small stick.

Start off by taking a cotton ball or two and rubbing them thoroughly with petroleum jells.  While you’re at it go ahead and pull apart the cotton into thin shreds.  Pictured below: top, Rubbing petroleum jelly into cotton balls: bottom, shredded up cotton.
 
Now take the drinking straw and cut it into two 3 inch tubes, and four ½ inch tubes.  Pictured below: Cut up drinking straw
 
The next part is a little hard to describe, but the pictures should make it easier to understand.
1. Use your thumbnail to crimp across the straw about ¼ inch from one end, then fold that end down.
 
2. Now use your thumbnail to make a length-wise crease in the part that you folded down. Then pinch the end together.
 
3. Now take one of the ½ inch pieces of straw and slip it down over the end to hold it closed.
 
4. Turn up the open end of the straw and start stuffing it with the soaked cotton.  I find that it is easier if I kind of roll the cotton between thumb and fingers to make a string out of it.
 
5.  Use the stick to tamp the cotton down tight in the straw.
6. Fill the straw to about ½ inch from the top, then fold the top end down the same way you did the bottom.  Crimp it, put a ½” collar on it, and you’re finished.
 
Wipe off any petroleum jelly that you got on the outside, and you now have a leak proof, waterproof, convenient fire starter that you can add to a survival kit, put in your glove box, or drop in your pocket.  To use the fire starter just cut it open, fluff up the cotton and light it up.  This stuff will ignite easily using a metal match type fire striker.
Categories: Bushcraft, Camping, DIY Preparedness Projects, Frugal Preps | Tags: , , , , , | 20 Comments

Arm Pit Probiotics and DiY Deodorant

by Todd Walker

The importance of probiotics to intestinal health has been common knowledge for some time. I’ve written about the helpful bacteria we ingest via fermented foods here. But there is less known about the health benefits of probiotics for our largest bodily organ – our skin.

Just as our gut is infested with billions of microorganisms busily doing their thing to boost our immune system, researchers are now looking into how these friendlies actually help our skin.

Our skin is literally bathed with trillions of bacteria. For all you ultra clean freaks, you can’t just wash them off. Why would you want to anyway? Just as a healthy gut flora benefits overall immune function, studies are showing the colonies of skin microorganisms play a major role in your overall health as well. Though you can’t see these little critters, we live together with them in a symbiotic relationship, much like a bird lives in symbiosis with the hippopotamus. You scratch my back, I’ll scratch yours.

In other words, the bacteria living on your skin are involved in a symbiotic relationship with you.. The bacteria on your inner elbow, for instance, process the raw fats it produces and in turn moisturize your skin. – Source

Let’s talk arm pits shall we. I stopped using commercial deodorant a while back. Aluminum chlorohdrate or aluminum zirconium found in commercial brands was not something I wanted absorbed through my skin. I’ve always used natural brands. They’re expensive though. I’ve used a coconut oil and corn starch mix before – and other homemade recipes – but was never really satisfied.

Then Andrea over at Frugally Sustainable comes out with a probiotic deodorant recipe. Right on! Two of my favorite things: probiotics and another DiY project!

So, Dirt Road Girl and I go shopping for ingredients. What a hoot. I broke one metal – yes metal – scoop digging out bulk cocoa butter. It’s cheaper to buy in bulk and I was determined to do just that. The store had everything we needed that we were missing at home. And they were probably glad to see us leave before breaking more equipment.

I used Andrea’s recipe over at Frugally Sustainable. Click here to for details.  If you haven’t visited her site, stop by. It’s loaded with great tips on frugal preparedness and health tips.

Instead of rehashing her recipe, I’ve added it below with a few of my own [italicized] comments in brackets. Also, photos are mine. To see original pics from Andrea’s site, click the link above.

Homemade Probiotic Deodorant

DiY Deodorant1 - Copy

Ingredients

-1 tbsp. cocoa butter
-1 tbsp. coconut oil
-1 tbsp. shea butter
-1 tbsp. beeswax
-2 1/2 tbsp. arrowroot powder
-1 tbsp. baking soda
-1/4 tsp. vitamin E oil
-15 drops essential oil of your choice
-2 capsules powdered probiotics

Method

1. Melt cocoa butter, coconut oil, shea butter, and beeswax over low heat. [I used a grater to shave of the beeswax. The cocoa butter is rock hard. I dug out enough with a spoon – without breaking it – to get the tbsp. need. We almost passed on the shea butter due to its smell. I talked DRG into buying it since we’d be adding peppermint essential oil to the mixture.]

Let it cool before adding probiotics

Let it cool before adding probiotics

2. Remove pot from heat, then add arrowroot powder and baking soda. Whisk with chopsticks until all powders are dissolved and combined. [Since I don’t own chopsticks to stir with, I used an old-fashioned fork and a whisk. Even if I had chopsticks, I prefer the whisk and fork. It seems like they’d accomplish the desired effect (stirring) better. I’ve never been skilled with those little sticks.]

Add vitamin E oil and essential oils at this time. [I added 12 drops of peppermint essential oil at this point. I’m calling my concoction “Candy Cane B.O. Killer”.] Allow mixture to cool in pan. Once it is cooled and the consistency of pudding, open capsules of probiotics and add powder to mixture. Stir with spatula quickly to combine. [Let it cool. I dumped two capsules of probiotics into the pan before it cooled. Realizing that the heat cooked my probotics, I followed directions and added two more after the right temp was reached.]

3. Add mixture to a clean, used deodorant container. Place in refrigerator to cool and harden. After this, product may be stored on counter (Note: Using a shelf stable probiotic such as Bio-Kult will prevent the need for refrigeration). This recipe will fill container and last for 3-4 months. Remember…a little goes a long way!

The stick on the left is only partially full.

The stick on the left is only partially full.

Notes

-When choosing a probiotic supplement for this deodorant it is important to find one that is shelf stable. It should also contain highly resistant beneficial bacteria such as lactobacillus and bifidobacteria. These “good bacteria” have the ability to survive the pH of our stomach acid during digestion and are the one’s that should be included in this recipe.

-If you have sensitive skin, substitute baking soda and use arrowroot powder solely. You may also consider omitting the essential oils.

-Use good smelling essential oils, any scent or combination of scents will do. So pick your favorite and have fun with it!

My Results

I used my Candy Cane B.O. Killer for the first time yesterday. It was a typical work day for me. Standing all day teaching. I also did my usual 3 sets of 30 push ups between classes and on breaks. In the past, the natural store-bought deodorant starts to wane by 4 or 5 o’clock. Not big a problem since I’m getting home by then where I can reapply as needed.

But here’s the real test.

DRG has a highly sensitive sniffer. When I walked in after work, I kissed my lovely wife, dropped my lunch pail, and raised my arms in surrender and said, “Smell.” Drum roll…..

It really works! I pasted the DRG sniff test – and with only two light swipes under each arm. My old deodorant took several swipes and left my pits soaked.

My pits, my students, and DRG would like to give a sniffing shout out to Candy Cane B.O. Killer!!!

Keep Doing the Stuff,

Todd

P.S. – You can also keep up with the Stuff we’re Doing on TwitterPinterestGoogle +, and our Facebook page… and over at the Doing the Stuff Network on PinterestGoogle +, and Facebook.

P.P.S – If you find value in our blog, Dirt Road Girl and I would appreciate your vote on Top Prepper Sites! You can vote daily by clicking here or on the image below. Check out all the other value-adding sites while you’re there…

Thanks for Sharing the Stuff!

Copyright: Content on this site (unless the work of a third-party) may be shared freely in digital form, in part or whole, for non-commercial use with a link back to this site crediting the author. All links in articles must remain intact as originally posted in order to be republished. If you are interested a third-party article, please contact the author directly for republishing information.

Categories: DIY Preparedness, DIY Preparedness Projects, Frugal Preps, Natural Health, Self-reliance | Tags: , , , , , | 36 Comments

The Virtue of Industry

Originally published at The Organic Prepper and reprinted here with the author’s permission. 

by Daisy Luther

Times are stressful.  In many homes, there are unopened bills in the basket by the door.  Bank accounts are in overdraft.  Every week the charges at the grocery store are a little bit higher than the week before, and for less food.  Kids want new clothes and that latest video game, the car needs to be fixed and people’s jobs are draining the very life from them.

It is vital to take time out of the day to relax.  It rejuvenates you, improves your health, and calms your mind so that you can think more clearly.

When you have a million and one things to do, though, sometimes it’s difficult to force yourself to stop.  This is because stress releases two hormones into your body: adrenaline and cortisol. Excesses of these hormones can cause blood pressure spikes, food cravings that lead to weight gain, and heart disease, to name just a few of the pitfalls.

Many folks decide they need a hobby, and that hobby ends up either costing them money with nothing to show for it, or it kills off a few brain cells as the person sits there, passively entertained in an altered state in front of the television or a video game.

Studies have shown that watching television induces low alpha waves in the human brain. Alpha waves are brainwaves between 8 to 12 HZ. and are commonly associated with … brain states associated with suggestibility…Too much time spent in the low Alpha wave state caused by TV can cause unfocused daydreaming and inability to concentrate….Advertisers have known about this for a long time and they know how to take advantage of this passive, suggestible, brain state of the TV viewer. There is no need for an advertiser to use subliminal messages. The brain is already in a receptive state, ready to absorb suggestions, within just a few seconds of the television being turned on. All advertisers have to do is flash a brand across the screen, and then attempt to make the viewer associate the product with something positive. (source)

Passivity actually opens up the door to your brain and allows you to be programmed – mass media uses this as a tool, by promoting ideas (like gun control, acceptance of the “big brother” philosophy, or the politically correct flavor of the month).  It inhibits your critical thinking skills and leaves your brain craving even more time in this low Alpha state.  This is the reason that some people sit blankly in front of the TV for hours every night, until they fall asleep on the couch and then get up to do it all again.

File:BenFranklinDuplessis.jpgBecause of this, it’s important to choose your spare time activities in a manner that enhances your brain function, instead of reducing it.  In a world where entertainment means playing on your Iphone or sharing photos on Facebook, opting for industry for your downtime can be an unusual choice.  But, stepping outside the path of the herd and choosing productive hobbies is a great way to relax.  What’s more, if your brain is engaged in an activity while you view a television program or movie, then you are not as susceptible to messages, either subliminal or blatant.  This means that you don’t actually have to keep the TV turned off at night – you just need to refrain from zoning out in front of it.

In 1726, 20 year old Benjamin Franklin sought to cultivate his character.  He listed off the thirteen virtues that he  believed were important to living a good life, one of which was industry.  Franklin wrote of this characteristic, ” Industry: Lose no time; be always employed in something useful; cut off all unnecessary actions.”  He believed that the pursuit of productivity would build character and help the practitioner to lead a more successful and moral life.  In his autobiography Franklin wrote, “I hope, therefore, that some of my descendants may follow the example and reap the benefit.”

We can absolutely apply Franklin’s philosophy of industriousness and productivity to our lives today.  When choosing leisure activities, consider opting for a productive hobby.

It should either…

  • Teach something
  • Create something
  • Repair something
  • Improve something

That leaves the door wide open to a broad range of choices!  If you tend to be an overachiever, then you can relax without the guilt of worrying about all the things that you “should” be doing instead of chilling out.


Think back to the days before television.  People worked hard all day long, producing food, cutting wood, cooking, hunting, building…it was a full time job to survive and thrive.  In the evenings, by candlelight, they could stop and put their feet up for a while.  Books were not widely available like they are now, so families passed the time by performing stitchery, carving, making furniture, mending things and creating items that made their lives more pleasant and beautiful. Sometimes a family member would read aloud, play an instrument or sing.  Time was of value and not to be wasted, and there was rarely money to spare on an “evening out”.

Productive hobbies not only improve your brain – they can save you money and better your chances for thriving in a post-SHTF world.  The ability to create or repair something will improve your standard of living and provide you with valuable skills for barter should an economic collapse occur.  Time spent teaching your children these skills will, in turn, pass down arts that would otherwise be lost to generations of the future, while helping your child become a more critical thinker and problem solver.

Following are some examples of productive hobbies.

  • Reading
  • Sewing clothing, curtains and soft furnishings
  • Knitting and crocheting
  • Carving
  • Repairing broken items
  • Mending
  • Darning socks
  • Building furniture
  • Making pottery
  • Cooking and baking
  • Writing
  • Drawing and creating art
  • Playing an Instrument
  • Singing
  • Archery
  • Making cards
  • Making jewelry
  • Fletching
  • Gunsmithing
  • Making ammo
  • Welding and soldering
  • Learning a language
  • Doing a puzzle
  • Playing a word, math or strategy game
  • Marksmanship
  • Exercise
  • Gardening
  • Preserving food
  • Practicing outdoor skills like hiking, camping and foraging

The list is endless but those are a few suggestions.  How do you unwind?  What do you like to do in your spare time?

Author bio: Daisy Luther is a freelance writer and editor.  Her website, The Organic Prepper, offers information on healthy prepping, including premium nutritional choices, general wellness and non-tech solutions. You can follow Daisy on Facebook and Twitter, and you can email her at daisy@theorganicprepper.ca

Categories: Life-Liberty-Happiness, Lost Skills, Preparedness, Self-reliance | Tags: , , , , | Leave a comment

Blog at WordPress.com.