Posts Tagged With: homesteading

Deja vu: Building an Off-Grid Log Cabin… Again

by Todd Walker

Deja vu: Building an Off-Grid Log Cabin... Again

Three 21 foot logs, the crowning roof logs, lay on the ground debarked with pine sap oozing like beads of sweat. They would serve as my ridge pole and two top plate logs. Then it happened…

The landowner’s son, my good friend, walked to the cabin site and told me that the family was putting the land up for sale. I was shocked, not so much about the fate of my “practice” log cabin, but because he was raised on this beautiful land his entire life. He apologized about all the work that I had put into the cabin.

“It’s a practice cabin, buddy,” I said.

A year and a half of felling, bucking, skinning, stacking and pinning logs together. My options were limited. Let it sit unfinished and eventually rot to the ground. Or move it. DRG and I moved to the property across the road just a few months ago. Yep, that would be its new location.

Weeks before the news, I had arranged a work day with a group of our friends to finish up the walls. The building party turned into a demolition day. Each log was labeled and numbered to make reassembling the log puzzle less confusing. Stick by stick, the team worked all day to tear down 1.5 years of work, some of which they helped build.

Deja vu: Building an Off-Grid Log Cabin... Again

Many thanks to these fine friends on demolition day!

Deja vu

After the dust settled, the job of rebuilding began. I figured reassembly would take less time. I was right.

Foundation

I decided to go back with dry-stack stone piers for the foundation. This would save money since the land had plenty of stones for stacking. Boulders I couldn’t physically lift, there were several, I used my rope come-a-long to inch them onto a trailer. My friend’s tractor would have made this task a breeze, but it was in the shop for repairs.

One lesson learned from the first stone foundation was I didn’t need to be exact on stacking each pier. I got them close to level using a water level and tweaked them as needed once the sill logs were on top. Dimensional lumber would require each pier to be exactly the same height. If you enjoy putting puzzles together, this job is for you.

Deja vu: Building an Off-Grid Log Cabin... Again

Dry-stack piers

Sill Logs

I needed to start stacking logs. The challenge was to transport the two 1,000 pound, 18 foot sill logs from the previous site to their new home. My log hauling operation consisted of Donkey Kong (4-wheeler) and Junior (LogRite Arch). This duo had successfully hauled all the other cabin logs across the creek, up a 75 yard incline which makes young men huff and puff, and across the road to my place.

I crossed my fingers and headed toward the creek with a sill log in-tow. Donkey Kong crossed the creek and stalled with its front tires off the ground. The opposite end of the long log was stuck on the other side of the creek. I knew then that I was in for a long afternoon of winching up a steep hill. After five winching episodes, we made it to the top! And in 90+ degree Georgia heat with high humidity. I was soaked.

I rebuilt my lifting tripod at the new site, hung the chain fall, and started setting sill logs. The first row is important and takes the longest to get set. To square the corners, the Pythagorean Theorem was used to form a 3-4-5 triangle at each corner.

Log Cabin Update: Sill Logs and Hand-Hewn Floor Joists ~ TheSurvivalSherpa.com

From the first build: The corner nail is near the head of the hammer where the two chalk lines intersect. The tape measure forms the hypotenuse of the right triangle.

Deja vu: Building an Off-Grid Log Cabin... Again

Five sill logs set and squared at the new site.

Log Courses Going Up

Before disassembling the cabin, each log was labeled to make putting it back together a no-brainer. It’s like paint by numbers.

Deja vu: Building an Off-Grid Log Cabin... Again

Logs staged in order for assembly.

Deja vu: Building an Off-Grid Log Cabin... Again

Deja vu: Building an Off-Grid Log Cabin... Again

A fine sight!

Deja vu: Building an Off-Grid Log Cabin... Again

Four rows complete!

Every log you see was felled and bucked with an ax, with a few back cuts using a one-man hand saw. Logs were debarked with a barking sud or draw knife. Most of the assembly on the original site was done with a brace and bit and sledge hammer. I chose this pioneer method the first time around. On the rebuild, I’m running power tools with a generator. The use of modern tools has sped up the process considerably. I even have a shop fan to move hot air around the new site.

Floor Joists

Those who have followed this log cabin build may remember the hand-hewn log floor joists on the first build. I made the decision to abandon this floor system. Why? Two reasons…

  • During disassembly, we discovered that one sill log notched to accept the floor joists had significant decay. This log came from a dead-standing pine tree which seemed to be solid. I opted to replace it with another log.
  • Even if the sill log had remained solid, I quickly realized that the alignment of the two notched sill logs had to be perfect to accept the hewn log joists.

Pressure treated lumber was used as joists. It was cheaper on some boards than non-treated. Plus, I’m not sure how long it’ll take to get a roof over the cabin. The old plywood subfloor was salvaged and tacked on the new joists as temporary flooring.

Deja vu: Building an Off-Grid Log Cabin... Again

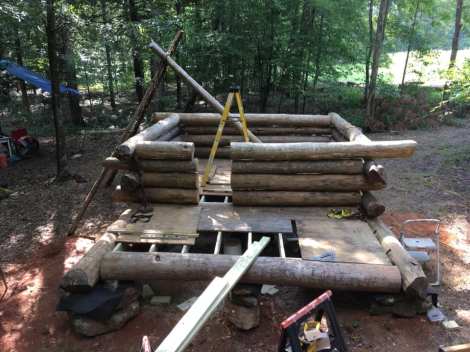
Shimmed and screwed rim joists.

Installing flat boards on round logs had a few challenges. There are gaps between the two, some almost 1.5 inches. I used shims to keep the 2×8’s rim joists plumb. Six inch screws secured the joists where large gaps appeared. Joist hangers were set on 16 inch centers for the 10 foot run on the floor.

Deja vu: Building an Off-Grid Log Cabin... Again

Temporary flooring with lifting tripod .

Deja vu: Building an Off-Grid Log Cabin... Again

The front porch joists are 2×6’s to cover a span of less than 6 feet.

We’ll keep practicing until we finish this log cabin. We’ve been here before.

Keep Doing the Stuff of Self-Reliance,

~ Todd

P.S. – You can also keep up with the Stuff we’re Doing on TwitterPinterestYouTubeInstagram, and Facebook… and over at our Doing the Stuff Network.

P.P.S – If you find value in our blog, Dirt Road Girl and I would appreciate your vote on Top Prepper Sites! You can vote daily by clicking here or on the image below. Check out all the other value-adding sites while you’re there…

Thanks for Sharing the Stuff!

Copyright © by Survival Sherpa: Content on this site (unless the work of a third-party) may be shared freely in digital form, in part or whole, for non-commercial use with a link back to this site crediting the author. All links in articles must remain intact as originally posted in order to be republished. If you are interested a third-party article, please contact the author directly for republishing information.

Categories: Doing the Stuff, Homesteading, Log Cabin, Self-reliance, Uncategorized | Tags: , , | 6 Comments

Where There Is No Kitchen: Cooking When The Grid Goes Down

Editor’s note: P. Henry offers some very practical tips to cooking in a SHTF scenario. He even added a tip for washing dishes from a 1880’s homesteading manual – I’ve never heard of or tried this one. Check out the other practical advice over at their site – The Prepper Journal

by P. Henry

Source: The Prepper Journal

Many of you are familiar with the nearly famous books “Where There Is No Doctor” and “Where There Is No Dentist” that are the most widely used health education books in tropical and sub-tropical developing countries. These are great references that you can download from our Resources page that cover basic medicine and dental care from a perspective of a people who aren’t able to drive to the doctor or see the dentist whenever they have a tooth ache.

The concept of “Where there is no” popped into my mind as I was preparing to write this post. In a grid-down scenario we may not have the easy access to our kitchen tools that we have relied on in the past. Most kitchen appliances are powered by electricity or gas and if those both go out due to an emergency you could find yourself living “where there is no kitchen”.

Not having access to your microwave shouldn’t cause you any panic though, because people have been living pretty well without these conveniences for a very long time. Even if you have stored 30 days worth of dehydrated food and water, chances are you will want to eat something warm before it is all over. Even in the military we only ate MRE’s once a day when we were out in the field. MRE’s will keep you alive but eventually you get tired of that and want something hot and delicious. I know that MRE’s can be heated up too, but the contents of a regular bag of MRE’s can’t hold a candle to a nice venison stew that has been cooking slowly over a fire all day.

With some simple planning and preparation you can cook just about anything you need to keep you alive and healthy through any disruption. There are a few considerations and lots of options for cooking that we will discuss below.

Cooking Options

We are going to assume that any cooking that you will be doing is outside in this grid-down scenario. No cooking with open flame should be done indoors and that includes using your big stainless steel propane grill. Fumes are toxic and can hurt you so keep it outside for safety.

stassj-cooking-stirring-woodstove-1024x768Wood stoves – These are about the closest you can come to the power and convenience of a range or oven inside your house or retreat location. Yes I know that I just said to cook outside, but your stove is vented outside already. This is a winter solution though because you won’t likely want to fire up the big wood-stove in the living room in the middle of August.  In much older homes, the kitchen was in a different part of the house because the heat would stifle everyone else. During the winter a wood stove is a perfect solution for cooking and you can easily fit a couple of pans on the top and regulate the heat easily. You can cook on a wood-stove with your regular pans without any problem.

Backyard Grill – This is my personal first line of defense if the power goes out. It is simple to use and already set up outside. The main drawback is the need for propane but I keep an extra 50lb. canister of propane at all times so that if my main source runs out I still have a spare. This spare propane would be on my list of basic household items that you need to stock up on also. Some people use charcoal so an extra bag or two would be wise. It won’t last as long as a can of propane but having the ability to cook for a few days is always a smart idea. Optionally, if your house is heated with propane, you can purchase an adapter to run your grill but you probably are already using your oven in the house. It’s nice to have options.

TripodCampfire – Since the dawn of time people have been cooking over an open fire on the ground. This would be my fallback option after the propane was gone or if I had something that was larger and needed to cook for a long time. Campfires don’t need to be fancy but having a pit surrounded with rocks to contain the fire is preferred. To cook on a campfire, you will want to invest in at least one piece of cast iron cookware. Two would be the best giving you the option to fry or cook a big stew. You will also want to have a method to suspend your cookware over the flames. This is where agreat tripod like the one on the left here or a grate you can set on the ground over the coals. I prefer the tripod, but the grate is much simpler when you are using a skillet.

Camping stoves – These are a great solution too and use the same type of Coleman propane cylinders your lanterns take. They do have the drawback that the grill does though, and once your fuel is gone, they are worthless. You can use the grill grating itself over a regular campfire so don’t throw that away. We will talk about that more later. Backpacker stoves also come in handy in a pinch, but that would not be ideal for cooking larger meals. It will heat up single portions nicely though, and there are a lot of fuel options for the short-term emergency.

Rocket Stove – Rocket stoves are simple to build using materials you may have lying around or in the shed. These can be fueled with sticks and twigs and make a great surface that produces a lot of heat without a big footprint. There is an article about how to make a rocket stove out of a few cans that you should check out also.

Lanterns – Anything that produces heat can warm your food and some lanterns give you the ability to use the heat escaping from the top to boil water or heat soup. This is yet another good option that may work for some people. Candles can also be used but this would be my last resort. They take forever but you are already using your candle so this is a way to get two uses out of your preparations.Lantern

Solar – I saved this one for last but solar cooking shouldn’t be discounted at all. If you have sun and dry weather this is a great way to heat up and cook meals if you have time to wait. You will want to build your own solar oven which is fairly simple or there are several you can buy online. If you just need to warm up a can of soup you can sit that in the sun on the driveway for 30 minutes and voila!

Solar ovens can be made in numerous ways with lots of material. Here is a video for a funnel solar oven by LDSPrepper that cost only $5.


Cooking Necessities

The first place we look is to our cooking containers, or what we are going to hold over our source of heat to contain this wonderful food you are getting ready to cook. Cast iron is my personal favorite but that isn’t practical if you are on the move. You can also cook with #10 cans if needed, just be sure that the plastic coating on the interior melts out first.

Aluminum foil is not only useful for creating a solar oven, but you can form bowls out of this to cook with or boil water in a pinch. Aluminum foil is a second cousin to Duct tape I believe, because it has so many uses and should be on your list of supplies for your household. Can and bottle openers are nice. They aren’t necessary because if you are hungry enough, you will get that can open, but they are very convenient and do not cost anything at all. You will also want to have plenty of capacity for making fire in the first place. Lighters are simple and cheap, but flint and strikers should be in your survival kits also.

Other tools you could use are oven mitt or pot holders to handle the pots on these cooking surfaces. Wooden spoons and spatulas won’t melt like plastic and you can even make these yourself if you have plenty of time on your hands and a sharp knife.

Cleanup

Now that the group has been fed how do you clean up? Sanitation is something that becomes more important with the severity and duration of the emergency. Germs are easily passed so cleaning your food utensils is an important consideration for the health of your survival group.  Assuming you have some water on hand for cooking, we can look back at how the pioneers cleaned their dishes.

The rare 1881 Iowa settlers manual has a tip for washing dishes when you’ve run out of soap. It’s in the cleaning chapter of the book and was written for some of the first people moving into Iowa to homestead in the 1880′s.

To wash dishes without soap, have your dishwater hot and add a very little milk, as this softens the water, gives the dishes a nice gloss and preserves the hands. It removes the grease, even that from beef, and yet no grease is ever found floating on the water as when soap is used.

For the most part, hot water and a sponge with abrasive on one side will do the trick. Boiling dishwater before doing dishes would be the safest way to make sure you’re not scrubbing your pots with Giardia. But as for me, 99% of the time, I’m content with just getting it hot enough to cut the grease. Your call. After scrubbing, strain your dishwater through a fine mesh strainer (or a bandana) and broadcast the waste-water. In other words, fling it far and wide. You can use the rest of whats left for compost.


Categories: Camping, Homesteading, Preparedness, Self-reliance, Survival | Tags: , , , , , , , | 12 Comments

Making Yogurt: Experiments 1-4

I’ve written before on the health benefits of probiotics in fermented foods like my Down and Dirty Sauerkraut. Daisy Luther offers her trials and tribulations on her way to success in her DiY yogurt process.

by Daisy Luther

Yogurt making gear

I was absolutely determined to make yogurt.  Real, yummy delicious yogurt, the nice thick kind that can stand on its own in a dish, supporting a big spoon full of fruit.

Yogurt has so many good things going for it!  I eat it almost daily and contribute my resistance to stomach viruses and my greatly improved acid-reflux to the habit.  You can read more about the benefits and some tasty ways to use it in my “Ode to Yogurt”.

Attempts #1 and #2

Attempts 1 and 2 were made simultaneously.  The only difference between the two was that #1 was made from pasteurized milk from the dairy and #2 was made from reconstituted powdered milk.

Live yogurt for starter

I used the “thermos” method, found in detail HERE.

Basically, the thermos method is as follows.

  1. Heat 1 cup of milk to 165-185 degrees F (use a candy thermometer – or, wait until you are starting to see some bubbles rising but the milk is not yet boiling).
  2. Remove the milk from the heat and allow it to drop to 105-110 degrees F.
  3. Gently stir in the starter (1 tablespoon of yogurt with live cultures).  You want it to be well-combined but don’t use anything crazy like an immersion blender.  Just a whisk will do.
  4. Immediately place the mixture into a thermos that has been warmed with hot water and put the lid on.
  5. Keep the thermos cozily wrapped in towels overnight (8-24 hours).

You should get up to delicious, rich, thick yogurt.

I, however, did NOT get up to delicious, rich, thick yogurt.  I got up to runny, drink-it-through-a-straw yogurt.  I was seriously bummed.

Regular milk, thermos method

Powdered milk, thermos method

I noticed, however, that the powdered milk yogurt was thicker than the refrigerated milk yogurt.  That got my wheels turning a little.

Attempts #3 and #4

In the face of my early morning disappointment, I decided to try a few different things with the next batches.

I searched up “Why is my thermos yogurt runny?” and found this awesome site, Not Quite Nigella, had some interesting suggestions.

My next two batches were made from a cup and a half of milk from the fridge with 1/3 of powdered milk stirred into it. I was hoping that if the milk was thicker to start with, so too would be my yogurt.

I made another attempt at the thermos method, described above, with half of the mixture.

With the other half, I tried the blog’s “oven method.”

While my milk mixture was heating on the stove top, I turned the oven on to 300 degrees F.

I washed a pint Mason jar and filled it with scalding hot water to keep it warm.

When the milk had been inoculated with the culture, I poured the half that didn’t go into the thermos into the empty, warm jar and placed it on a pan, popped it in the oven, and turned off the heat.  I left it in the warm oven for 5 hours.

Alas, it resulted in runny yogurt.

Oven method, powdered milk mixed with regular milk

I had, at this point, reached my yogurt frustration threshold.  I spoke rather impolitely to the yogurt in the thermos, wrapped snugly in its towel.  I left the thermos on the stove while I baked a batch of cookies.  I turned on the oven a couple of times to keep things warm in the kitchen.  I strongly suspect my other failures are because my house is so chilly, a fact that is really only bothersome when making yogurt or waiting for bread to rise..

I left the thermos of yogurt for 11 hours.  I opened it…and ……SUCCESS!!!!! Happy dance in the kitchen!!!!

Thermos method, powdered milk mixed into regular milk


So, the keys to the successful batch of yogurt were…

  • The thermos method
  • Adding 1/3 cup of powdered milk to each 1-1/2 cup of regular milk
  • Warming up the kitchen a few times throughout the day.
Tomorrow I am planning to make a full batch of yogurt. I will let it sit for a solid 12 hours, and  I might try putting the thermos on a heating pad and turning it on intermittently throughout the day. I really want to keep it low-tech because yogurt making is a skill I’d like to be able to accomplish without the grid.
Author bio: Daisy Luther is a freelance writer and editor.  Her website, The Organic Prepper, offers information on healthy prepping, including premium nutritional choices, general wellness and non-tech solutions. You can follow Daisy on Facebook and Twitter, and you can email her at daisy@theorganicprepper.ca
Categories: Fermentation, Frugal Preps, Homesteading, Natural Health, Self-reliance | Tags: , , , , , | 1 Comment

Sustainable System: Rocket Stoves

When I asked for a few guest posts while DRG and I take a mini vacation, Caroline Cooper showed her generous spirit and sent me this piece on rocket stoves. Thank you Caroline!
Posted on June 26, 2012 by 

rocket stove erika Sustainable System: Rocket Stoves

A rocket stove is very easy for anyone to use. Erika is making pastured paleo burgers for dinner with homemade mustard, ketchup, cheese sauce and lettuce for the wrap.

For years I have used an assortment of stoves for camping and numerous different types of fuels. I have also cooked meals over an open fire on camping trips. That’s definitely a smoky experience. Recently, I have found a new kind of stove that has converted me over to wood based fuels.

A rocket stove uses a very small amount of wood and produces a very hot, smokeless fire. These stoves are great for cooking meals in the backyard, camping or emergency preparedness. Just about anything can be used as fuel. I have used: small branches, twigs, yard waste, scrap wood, bark, cardboard, office paper and junk mail. Burning this waste helps reduce my household waste stream and pressure on local landfills. I bought a Grover Rocket Stove but for comparison, here is a USH2 Rocket Stove.

The surprising thing about a rocket stove is how the fire burns so hot and clean. After the fire gets going there is very little smoke. The space under the fuel compartment allows air to feed the fire, producing a very powerful draft, which focuses a very hot flame on the cooking surface.

I like using a cast iron frying pan for cooking meals. A cast iron pan avoids the toxicity of Teflon and spreads the heat well and avoids burning. The rocket stove could be used with a stainless steel pot for boiling water.

rocket stove wood Sustainable System: Rocket Stoves

Any fuel can be used in a rocket stove. I have used scrap wood, small branches, bark, office paper and junk mail. What is surprising is how little fuel is needed for cooking a meal.

rocket stove firebox Sustainable System: Rocket Stoves

Here is the firebox. After the fire is started very little smoke is produced. If you have ever cooked over an open fire you will know why smokeless cooking is a wonder of the modern world.

The rocket stove can have the ash easily emptied anywhere in my garden that potash or lime is needed to increase soil alkalinity. It’s great to have a stove that doesn’t need any petroleum products. I am always searching for more appropriate technology. Rocket stoves can also be simply made out of fire bricks. Here is a video on this simple technology for building a rocket stove out of fire bricks and cooking food outside. The second video is about the dangers of cooking with an open fire in houses. They have developed a modified rocket stove for inside use.

stone rocket stove Sustainable System: Rocket Stoves

Rocket stoves can be made anywhere and with natural materials. This rocket stove was made with granite beach rocks in the Broken Group Islands after our MSR gas stove stopped functioning.

Updated January 31, 2013: What would happen if a clean burning rocket stove could be brought into your house? Friends, it looks like the technology for mass rocket stoves have been worked out. Mass rocket stoves don’t have a chimney, use 1/8 to 1/4 the amount of wood, and exhaust CO2 and water vapor. No wood smoke smog! Sounds crazy, but a friend of mine has just build one, and it works as advertised. For more information about mass rocket stoves for heating your home please see this article on permies.com.

Categories: Uncategorized | Tags: , , , | 2 Comments

Building A Dirt Road Girl Compost Tumbler

by Todd Walker

I’ve had different compost bins over the years. I usually make them out of four shipping pallets sitting directly on the ground. We’d have to manually stir the pile with a pitchfork. I wanted to “up” grade.

“Up” being the key word here. The goal is to give Dirt Road Girl the ability to roll her wheelbarrow or garden wagon to the compost station, dump in black garden gold, and distribute to our garden and potted plants.

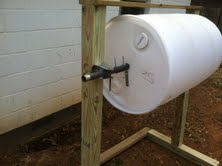
The Dirt Road Girl Compost Tumbler

The Dirt Road Girl Compost Tumbler

Over the last year of fighting cancer, her body has weakened – not her desire to get beneficial bacteria under her nails. She’s never shrunk from any outdoor tasks like clearing land or hauling firewood. This is my attempt to make garden life a little more efficient and less labor intensive. Work smart, ya know.

There’s an ol’ timer who sells barrels ten minutes from our house on the main highway. I’ve traded with him in the past for plastic and metal containers. I bought two plastic 55 gallon food grade barrels from him. One for the DRG tumbler and one to be used for rainwater – or some other resilience project.

Tip: When buying containers for gardening, water storage, or food storage, make sure they are food grade.

My barrels contained apple cider vinegar.

Now onto the project.

Step 1: Mark and cut the axle holes.

DRGcompost1 - Copy

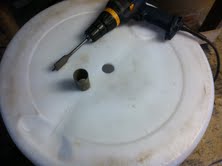
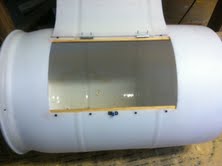
Measure half the diameter of your barrel and place a center mark on both ends of the barrel. I used a sharpie but a pencil will work if you have good eyesight. I then cut a short piece off my axle pipe to be used to trace a circle for the cut. I had an old piece of chain link fencing pole out back. It measured 1 1/4 inches in diameter by about 6 feet in length. Center the short piece of pipe on the center mark on the end of the barrel and trace around the outside of the pipe. Repeat on the opposite end of the barrel.

I then used a 1 1/4 inch paddle bit to bore the holes in the barrel ends.

Step 2: Mark and cut the door opening.

DRGcompost2 - Copy

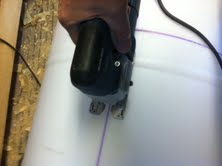
My door measures 18″ x 12″. You want to get your door centered with the 18″ side running the length of the barrel. Use a framing square to make sure the door corners are 90 degree angles. I used a flexible 18″ metal ruler for tracing on the curved barrel.

Once you love the door outline, it’s time to cut. Since you’ll be using the cut out to make the door, don’t drill large holes at each corner to get your saw blade into the plastic to make the cut. I drilled a couple of 1/8″ holes in one corner to get my jigsaw blade started. This worked on the first corner. On the remaining corners, I held my jigsaw at an angle, braced against the barrel, and started the cut until I penetrated the plastic barrel. This technique is not for finishing work, but it’ll get the job done.

DRGcompost3 - Copy

Step 3: Door installation. Install the hinges on the door first. I placed mine about three inches in from each corner on the door. I quickly realized that my door would need a stop along both the hinge side and the latch side. I screwed two pieces of wood molding to the inside of the barrel along both 18 inch door frames. That turned out to be good fix for a floppy door. DRGcompost4 - Copy

I installed a barrel lock on the other side of the door. Not impressed with its ability to keep the door shut. I plan to replace it with a better latch.

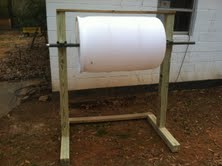
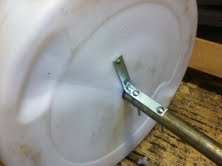
Step 4: I then inserted the axle through the barrel leaving enough pipe to rest on the brackets. To keep the weight of the barrel off the plastic holes, I attached an “L” bracket to the pipe and barrel on both ends.

DRGcompost5 - Copy

The barrel is now ready to take a spin. All I need is a frame.

Step 5: Build the frame. I’ve seen many different types of stands for tumblers: Posts in the ground, X posts, and drums that spin lengthwise. I wanted a stand that was more mobile.

Here’s my material list for my frame:

  • Two pressure treated 4x4x8’s (purchased at box store) – used for vertical posts and base
  • One 5’ length of pressure treated 2×4 (scrap from my wood pile) – used for cross support on base
  • 5’ length of 1×6 pressure treated fence panel (scrap from my wood pile) – screwed to top of post to maintain plumb on vertical posts
  • Two 5/16×5” carriage bolts (poached from an old swing set a few years back) – secure vertical posts to base accompanied by decking screws
  • Hand full of exterior decking screws (I keep plenty of these and other assorted hardware on hand)
  • Bracket for axle – I was going to drill a hole through the vertical posts to accept the axles but didn’t have the proper size hole saw bit. The paddle bit would have worked, but I wanted a slightly larger hole diameter to allow the axle to spin without binding. I improvised and screwed two metal caster brackets to the posts.
  • Two hinges for the door
  • One barrel lock

Tools needed:

  • Circular saw or any saw to crosscut the stock
  • Jigsaw to cut the barrel door
  • Drill/impact driver and 1 ¼ inch paddle bit. The bit size will differ if you use a pole with a different diameter.
  • Palm-sander to take off rough edges on door and door opening left by the jigsaw.
  • Measuring device and writing utensil
  • Framing square

First, cut two 5’ lengths of 4×4. You’ll have two 3’ sections leftover for the base of the frame if you use 8 foot stock. To join the vertical post to the base, cut a 3 ½ inch x 1 ¾ deep notches in both ends of the vertical posts. Cut the same size notches in the center of each base piece. Newbie tip: Set your circular saw to the desired depth (1 3/4″) and make several passes over the area to be notched. Strike these “feathers” with a hammer and clean up the bottom of the notch with a chisel.

Mate the vertical posts with the notch in the middle of each base. Now, drill a suitable diameter hole for the carriage bolt in the center of each notched area. Carriage bolts aren’t necessary but recommended. Go ahead and press the bolts through holes and tighten with a nut and washer. No need to worry too much about the bases being square now. You’ll make sure they’re perpendicular when you screw in a few decking screws in the joint.

My barrel measured 35 inches from rim to rim. I decided to use 46 inches as the inside measurement between my vertical posts. I cut my 2×4 53 inches long and attached it to the back-end of the two base supports. Square it and screw it. The frame should stand on its own now.

Next, I cut my 1×6 the same length (53 inches) and attached it to the tops of both vertical posts. I then attached the brackets 13 inches from the top of each vertical post. Skip this step if you bore holes into your posts for your pipe axle.

The last step is to mount the tumbler on the frame. Since I used metal brackets, I simply slid one end of my axle into a bracket and repeated on the other side with the opposite bracket. I slid two more poached carriage bolts in the end of the brackets to keep the axle in place.

DRGcompost7 - Copy

Note: If using drilled holes in the vertical posts to mount the tumbler, you’d probably want to insert the axle through the holes before attaching the bottom and top cross rails to the frame.

This was a weekend project. I worked off-and-on for about 3 hours. DRG now has an elevated tumbler for easy access to compost.

Future modifications:

  • Add a couple of agitator bars running through the length of the barrel to help stir the contents as barrel spins.
  • Replace the barrel lock with a more secure lock to keep the door from flopping open while spinning.
  • Add an improvised crank handle on the end of the axle for easy spinning.
  • Add some 20 inch rims and low profile tires for added mobility – just checking to see if you’re paying attention 🙂

Any suggestions on making a better “mouse trap”? Don’t be shy. Please let me know.

Keep Doing the Stuff,

Todd

P.S. – You can also keep up with the Stuff we’re Doing on TwitterPinterestGoogle +, and our Facebook page… and over at the Doing the Stuff Network on PinterestGoogle +, and Facebook.

P.P.S – If you find value in our blog, Dirt Road Girl and I would appreciate your vote on Top Prepper Sites! You can vote daily by clicking here or on the image below. Check out all the other value-adding sites while you’re there…

Thanks for Sharing the Stuff!

Copyright: Content on this site (unless the work of a third-party) may be shared freely in digital form, in part or whole, for non-commercial use with a link back to this site crediting the author. All links in articles must remain intact as originally posted in order to be republished. If you are interested a third-party article, please contact the author directly for republishing information.


Categories: DIY Preparedness, DIY Preparedness Projects, Frugal Preps, Gardening, Homesteading, Self-reliance | Tags: , , , , , | 24 Comments

Top 10 Egg Laying Chickens

H/T to Resilient News. Backyard chicken farming has become popular and is growing one chick at a time. Here’s a quick run down of the top ten chickens for egg production over at The Weekend Prepper. Yum!

Chicken Breeds for Egg Laying

Top 10 Egg Laying Chickens

If you are looking to build a more self sufficient lifestyle, having several egg laying chickens is a great way to get a reliable supply of eggs – a great source of protein and nutrients.

Chickens lay eggs all year long – with really productive hens laying more than 200 eggs a year. So if you choose your breeds carefully, you will be well supplied with eggs with only a few chickens in your flock.

Let’s take a look at 10 popular and prolific egg layers.

  • Black Sexlink – This chicken is a cross between a Barred Rock hen and a Rhode Island Red cock. It is a pretty gentle chicken and a prolific egg layer. It lays large brown eggs and typical production is approximately 240 eggs per year per bird.
  • Red Sexlink – Created by breeding a Rhode Island Red male and a Rhode Island White female, this chicken is very common in commercial breeding operations. It lays large brown eggs and its typical production is about 240 eggs per year.
  • White Leghorn – This chicken is a great egg layer but a bit of a nervous breed. It lays approximately 250 white eggs per year.
  • California White – This chicken is an excellent producer of large white eggs. They are known to lay a whopping 300 eggs per year.
  • California Gray – Like the white, this chicken will deliver a massive 300 large white eggs per year.

Read the rest here


Categories: Frugal Preps, Homesteading, Preparedness, Self-reliance | Tags: , , , , | 7 Comments

6 Cleaning Necessities for Your Stockpile

Originally published at The Organic Prepper by Daisy Luther

December 31, 2012

If you have these 6 items, there’s nothing you can’t clean:

Baking soda

Bleach

Borax

Dawn dish soap 

Table salt

White vinegar

Many of us have spent our valuable dollars buying the latest in cleaning supplies.  What we’re really paying for is harsh chemicals (some of them carcinogenic) and artificial fragrances (many of which are also unhealthy).  Instead, consider stocking up on these basic items, which will allow you to make any household cleaner you might need.  Most of the time you can purchase these items on sale or in bulk quantities.  As well, they all serve other purposes besides basic cleaning, which maximizes your storage space.

Baking soda

  • Remove coffee and tea stains from mugs by soaking them in baking soda and hot water.
  • Deodorize garbage cans by sprinkling baking soda in the bottom.
  • Remove burnt-on food from the bottom of pots by covering the bottom with a layer of baking soda, topping with about 2 inches of water and bringing to a boil.  Immediately remove the pot from the heat and leave overnight, covered.
  • Clear clogged drains by pour 1/2  cup of baking soda down them, followed by boiling water.
  • Removed stains from the tub with a scrub made from a thick paste of baking soda and water.
  • Use a rinse of baking soda and water to remove pesticides from food.
  • Add 1/2 a cup of baking soda to laundry when using bleach – this intensifies the effects of the bleach.
  • Sprinkle baking soda in a stainless steel sink, then scrub with a damp cloth or sponge for a clean shiny basin.

Bleach

Bleach is the only item on the list that is highly toxic – consider bleach the “big guns” when it comes to cleaning.

  • Mix bleach and water in a spray bottle. Spray liberally on bathroom tile to remove mildew in grout.
  • Use bleach and water to clean wooden or butcher block cutting boards, especially after cutting up meat.
  • Sanitize secondhand kitchen items by soaking them in bleach and water.
  • Disinfect garbage cans by soaking them in bleach (outdoors) and then rinsing them well.

Borax

Borax is a natural mineral compound.  It can be used as a mold inhibitor, a deodorizer and an insecticide.

  • Sprinkle it in your toilet bowl over night for quick easy cleaning in the morning.
  • Make a thick paste of borax and water and apply it on mold. Leave overnight, then rinse well to remove.
  • Make all-purpose cleaner by mixing 1/2 cup of borax with 1 gallon of hot water in a spray bottle.  Shake well.
  • Sprinkle borax in vegetable drawers and leave over night.  Rinse well – this will remove any smells from the drawers.
  • Sprinkle pets bedding with borax – leave overnight and vacuum the next morning.  This will kill flea eggs.
  • Neutralize urine odors by sprinkling the stain with borax, leaving for a few hours, then vacuuming or washing the item.

Dawn dish soap

The classic blue Dawn dish soap is a slightly different formula than the other varieties.

  • Use Dawn to remove oil or petroleum jelly from hair.
  • A drop of Dawn dissolved in water can be used in a spray bottle to rid your garden of mites and aphids – simply spray the leaves with the soapy water.
  • 3 drops of Dawn in one gallon of water can be used to clean windows.
  • When used as a pet shampoo, it kills fleas on contact.
  • Remove grease from tools by washing them in Dawn.
  • Pretreat oily stains on laundry with Dawn dish soap.

Table salt

  • Sprinkle on spills in the oven – allow the oven to cool then wipe out.
  • Scrub cast iron cookware with a paste made from salt and cooking oil.
  • Wash enamel cookware with salt and vinegar.
  • Clean wicker by scrubbing it with salt, then allowing it to sit in the sun for the afternoon.
  • Repair mars to wood with a paste made from salt and cooking oil.

White vinegar

  • Mix 1 cup of vinegar with a bucket of warm water to clean kitchen floors – this will cut through the grease.
  • Add vinegar to the rinse water for dishes to get glasses crystal clear.
  • Make glass cleaner by mixing 1/4 cup of vinegar with 2 cups of water and a squirt of dish soap.
  • Get rid of fruit flies by putting out a small dish of white vinegar.
  • To kill germs, spray vinegar full strength on  door knobs, remotes, etc.
  • Remove stickers and price tags by soaking them in white vinegar.
  • Dampen a cloth with vinegar to get sink taps and faucets shiny.
  • Soak citrus peels in white vinegar to make a pleasantly scented spray cleaner.

The best thing about these cleaners is that they are real multi-taskers.  I live in a small house, so my storage space is limited. It helps me make the most of my space when I can use an item for many different purposes.

As well, my daughter is very sensitive to chemicals.  I use the bleach very sparingly (and mostly outside).  The rest of the items are non-toxic and cause no issues whatsoever.  It is a far healthier way to clean than filling your house with petroleum based chemicals.

You can find some recipes for excellent home-made cleaning products HERE – the recipes use many of these 6 ingredients!

Do you make any old-fashioned cleaning products to keep your house sparkling?  Please share your secrets below!

Author bio: Daisy Luther is a freelance writer and editor.  Her website, The Organic Prepper, offers information on healthy prepping, including premium nutritional choices, general wellness and non-tech solutions. You can follow Daisy on Facebook and Twitter, and you can email her at daisy@theorganicprepper.ca

Categories: Frugal Preps, Homesteading, Preparedness, Self-reliance | Tags: , , , , , , | Leave a comment

Pastured Poultry Butchering

Kids say the darndest things. The topic of where our food comes from was raised in my new Science classroom a few year back. I’m still in shock at Tony’s ‘enlightened’ response on the origin of meat. “From the ground,” he said. I probed. I never pass up these entertainment opportunities.

“So, it’s kinda like planting corn,” I asked.

“Yep. You plant some meat in the ground and it grows,” he said with confidence. That, my friend, is called job security.

Tony, if you’re reading this, you can stop wondering where pastured chickens come from. Matronofhusbandry over at Throwback at Trapper Creek gave me permission to share this with you and the Sherpa crowd. I love their site. It chronicles the similarities and differences of homesteading on a 1881 farm and in present day.  Located in the Pacific Northwest, their goal is to be as self-sufficient as possible. Our kind of folk. Take some time to read their musings and practical articles.

Now for the featured article. HEED the WARNING for the squeamish, vegans, and/or vegetarians.

Not for the squeamish…

June 28, 2008

WARNING – LOTS OF BLOOD AND BODY PARTS WILL BE SHOWN AFTER THE SERENE VIDEO and the first 5 pictures.

Last supper – really it is last lunch.

[Click here to view their short Pastured Poultry video]

Here is what those adorable chicks I showed you 8 weeks ago, turned into.  Grass and grain eating and pooping fertilizing fools.   I’ve just moved them to fresh grass, and am watering them, you can see them grazing and doing the contented chicken leg and wing stretch.  They have had an enjoyable eight weeks.  I always think if I was a dog, I would want to be one of my dogs, and if I was a chicken, I would want to be one of my chickens… .

We withhold the feed the afternoon before processing the chickens.  They receive water and fresh grass, but no grain.  This allows the crop  and the rest of the digestive system to clear out.  This step is important,  a clean crop and a flushed out intestinal tract make life a little more pleasant during this task.

We loaded them into our crates during the dark, they stay calm and settle right down in their crates.  They were going to get to travel and see other chickens in the nearby state of Washington at our friends farm, who let us come over and butcher when they do.  On the slate for the day:  4 adults and an assortment of kids from age 9 – 16 were going to  butcher 500 chickens and be cleaned up by lunchtime. This is in addition to doing chores as usual, on three farms They had 365, their friend from church had 70, and we were bringing 71.  We were home by noon.

As an aside to people who might be bothered by this post – I worked today alongside a nine year girl teaching her how to butcher a chicken.  Her biggest concern?  Her apron was a little too big, and the straps kept slipping off of her arms.  She was a trooper.  She stuck with it and like a good trail horse, she was bombproof, even getting playful and making a dead chicken fart, by bouncing it on the table.  I don’t think she wonders where her food comes from.

This post will be long on pictures, but I will try to explain each so you can see how we spent our day.  I’m still number crunching – I’m scared to see how much they cost me, but the accountant in me has to know to the penny.

Crossing the Columbia River, looking east towards home.

Yep, this is the place.
//i28.tinypic.com/4jnae9.jpg

Jerseys and broiler pens.
//i31.tinypic.com/atwtq9.jpg

Missy, our greeter.

New baby chicks.

*****WARNING***** the party is over!


Read the rest here and stop wondering where our food comes from


Categories: Food Storage, Homesteading, Lost Skills, Self-reliance | Tags: , , , , , | Leave a comment

Turn Wood Into Gas: A Simple Wood Gasifier

Source: Windmeadow Labs

Wood gasification is the process of turning wood into carbon monoxide and hydrogen by reacting the raw material (wood) at high temperatures with a controlled amount of oxygen. Without oxygen, the wood can’t burn so it transforms into gas. This gas can be used as fuel in an internal combustion engine.

[Watch the short video here]


During World War II wood gas generators where used to fuel automobiles in Europe. I’ve been thinking about building one and seeing if I could run a small lawn mower engine off of wood gas.

For an experiment I built this small wood gasifier. My setup is not a full scale gasifier. It justs pyrolysizes the wood. A few more steps are needed for full gasification. The gas coming out of the can, has a high tar content. If used in an engine, it would eventually coat the cylinder with tar and cause it to seize up.

All I used was a quart paint can, propane stove and some plumbing fittings. I used the propane stove just to make things easy. In a regular gasifier, charcoal is used as the heat source. The plumbing fittings where used to carry the gas away from the can. They are not really needed, but I wanted to make sure I showed that the gas can be piped away. First I drilled a hole in the lid of the paint can. Then put a connector in the hole and J.B. welded the connector to make sure it had an air tight seal. I then added a few more pipe fittings just to show that the gas could be piped away. Last I made a burner out of a small tomato paste can.

Dry wood


I filled the paint can with dry wood and made sure the lid was on tight. A minute or two after I put the paint can on the stove, wood gas/smoke started to come out of the plumbing pipe. The wood gas easily ignited. It took a few more minutes before enough gas was being produced to sustain a flame.

The gas contains carbon monoxide which is both flammable and poisonous, so you need to make sure to do this outside and not breath in the gas. Because you have a paint can full of flammable gas, there is always the chance the can could blow up. Hopefully just the top would pop off with a loud boom, but I wouldn’t put my head to near the can.


Here you can see the wood gas coming up through the plumbing.

Charcoal

All that is left of the wood is charcoal.

My next plans are to scale this up and use charcoal as the heat source. There are a ton of plans on the net. One of the best documents I found, was made by FEMA back in the 1980’s. It describes how wood gasification works and how to build a would gasifier for use on a tractor.

Categories: DIY Preparedness Projects, Homesteading, Preparedness, Self-reliance | Tags: , , , | 5 Comments

Who’s Your Farmer? Healing The Land One Bite At A Time

Joel Salatin on Knowing Your Farmer: “Link up with the tribe.”

By Karen De Coster

Tuesday, August 7, 2012

This is a fantastic interview on the part of Dr. Mercola, with anarcho-farmer Joel Salatin. There are many great interviews with Joel ’round the web, but this interview is very different than the norm. In fact, one focus is around the spontaneous order of farm-to-food.

Joel brings up some great points about the problem of farmer’s markets: limited hours, bureaucracy and politics, space confinement, heavy costs (labor, time, equipment) for farmers to come to the market, etc. He, as a libertarian, is a huge advocate of small, local farmers and consumers using technology to gain independence from government and the omnipotent food oligarchy. Salatin discusses the use of virtual, electronic farmer’s markets, where electronic informational interfaces create economies of scale and efficiencies that the industrial machine currently employs.

I especially like the part where Joel talks about American culture being such that folks have been wanting to be liberated from the kitchen, and thus farmers have essentially met consumer demand and produced the junk in grocery stores today: ”Give me TV dinners, give me Velveeta cheese, and squirtable stuff … and breakfast cereals, Cheerios, Pop Tarts, and Cocoa Puffs.” Humans, he properly notes, have been “separated from taste and texture, and the old, historical nuances of food” which has given us a monstrous commodification of agriculture. The other side of that equation, which Joel doesn’t mention, is the government-subsidized industrial food oligarchy creating much of this consumer “demand” through subsidies, political pandering, growing the corporatocracy, and all of the other assorted schemes that further popularize and entrench the empowered establishment.

Joel, when talking about the importance of farm animals and their natural habitat, always likes to talk about the “pigness of the pig,” or the “chickenness of the chicken,” but what about the Joelness of Joel? This is some of his best work, right here in this interview, in a great setting with another valued libertarian, Dr. Joseph Mercola.

Joel correctly notes that, as a non-farmer and consumer, you need to network and “get linked up with the tribe that thinks differently.” I love that comment because I have my own informal tribes that I  influence, one conversation (or one food purchase) at a time. More on that topic later.

Categories: 180 Mind Set Training, Homesteading, Preparedness, Real Food, Self-reliance | Tags: , , , , , , | 2 Comments

Blog at WordPress.com.