Posts Tagged With: DIY

Building A Dirt Road Girl Compost Tumbler

by Todd Walker

I’ve had different compost bins over the years. I usually make them out of four shipping pallets sitting directly on the ground. We’d have to manually stir the pile with a pitchfork. I wanted to “up” grade.

“Up” being the key word here. The goal is to give Dirt Road Girl the ability to roll her wheelbarrow or garden wagon to the compost station, dump in black garden gold, and distribute to our garden and potted plants.

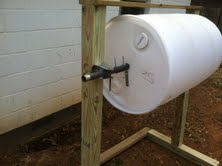
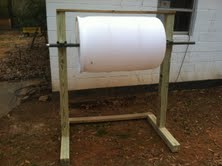
The Dirt Road Girl Compost Tumbler

The Dirt Road Girl Compost Tumbler

Over the last year of fighting cancer, her body has weakened – not her desire to get beneficial bacteria under her nails. She’s never shrunk from any outdoor tasks like clearing land or hauling firewood. This is my attempt to make garden life a little more efficient and less labor intensive. Work smart, ya know.

There’s an ol’ timer who sells barrels ten minutes from our house on the main highway. I’ve traded with him in the past for plastic and metal containers. I bought two plastic 55 gallon food grade barrels from him. One for the DRG tumbler and one to be used for rainwater – or some other resilience project.

Tip: When buying containers for gardening, water storage, or food storage, make sure they are food grade.

My barrels contained apple cider vinegar.

Now onto the project.

Step 1: Mark and cut the axle holes.

DRGcompost1 - Copy

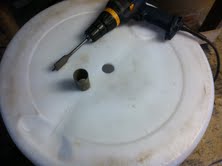
Measure half the diameter of your barrel and place a center mark on both ends of the barrel. I used a sharpie but a pencil will work if you have good eyesight. I then cut a short piece off my axle pipe to be used to trace a circle for the cut. I had an old piece of chain link fencing pole out back. It measured 1 1/4 inches in diameter by about 6 feet in length. Center the short piece of pipe on the center mark on the end of the barrel and trace around the outside of the pipe. Repeat on the opposite end of the barrel.

I then used a 1 1/4 inch paddle bit to bore the holes in the barrel ends.

Step 2: Mark and cut the door opening.

DRGcompost2 - Copy

My door measures 18″ x 12″. You want to get your door centered with the 18″ side running the length of the barrel. Use a framing square to make sure the door corners are 90 degree angles. I used a flexible 18″ metal ruler for tracing on the curved barrel.

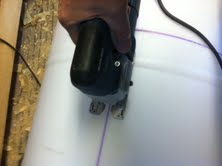
Once you love the door outline, it’s time to cut. Since you’ll be using the cut out to make the door, don’t drill large holes at each corner to get your saw blade into the plastic to make the cut. I drilled a couple of 1/8″ holes in one corner to get my jigsaw blade started. This worked on the first corner. On the remaining corners, I held my jigsaw at an angle, braced against the barrel, and started the cut until I penetrated the plastic barrel. This technique is not for finishing work, but it’ll get the job done.

DRGcompost3 - Copy

Step 3: Door installation. Install the hinges on the door first. I placed mine about three inches in from each corner on the door. I quickly realized that my door would need a stop along both the hinge side and the latch side. I screwed two pieces of wood molding to the inside of the barrel along both 18 inch door frames. That turned out to be good fix for a floppy door. DRGcompost4 - Copy
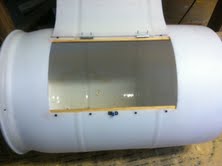
I installed a barrel lock on the other side of the door. Not impressed with its ability to keep the door shut. I plan to replace it with a better latch.

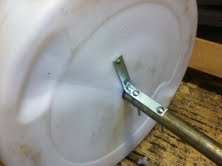
Step 4: I then inserted the axle through the barrel leaving enough pipe to rest on the brackets. To keep the weight of the barrel off the plastic holes, I attached an “L” bracket to the pipe and barrel on both ends.

DRGcompost5 - Copy

The barrel is now ready to take a spin. All I need is a frame.

Step 5: Build the frame. I’ve seen many different types of stands for tumblers: Posts in the ground, X posts, and drums that spin lengthwise. I wanted a stand that was more mobile.

Here’s my material list for my frame:

  • Two pressure treated 4x4x8’s (purchased at box store) – used for vertical posts and base
  • One 5’ length of pressure treated 2×4 (scrap from my wood pile) – used for cross support on base
  • 5’ length of 1×6 pressure treated fence panel (scrap from my wood pile) – screwed to top of post to maintain plumb on vertical posts
  • Two 5/16×5” carriage bolts (poached from an old swing set a few years back) – secure vertical posts to base accompanied by decking screws
  • Hand full of exterior decking screws (I keep plenty of these and other assorted hardware on hand)
  • Bracket for axle – I was going to drill a hole through the vertical posts to accept the axles but didn’t have the proper size hole saw bit. The paddle bit would have worked, but I wanted a slightly larger hole diameter to allow the axle to spin without binding. I improvised and screwed two metal caster brackets to the posts.
  • Two hinges for the door
  • One barrel lock

Tools needed:

  • Circular saw or any saw to crosscut the stock
  • Jigsaw to cut the barrel door
  • Drill/impact driver and 1 ¼ inch paddle bit. The bit size will differ if you use a pole with a different diameter.
  • Palm-sander to take off rough edges on door and door opening left by the jigsaw.
  • Measuring device and writing utensil
  • Framing square

First, cut two 5’ lengths of 4×4. You’ll have two 3’ sections leftover for the base of the frame if you use 8 foot stock. To join the vertical post to the base, cut a 3 ½ inch x 1 ¾ deep notches in both ends of the vertical posts. Cut the same size notches in the center of each base piece. Newbie tip: Set your circular saw to the desired depth (1 3/4″) and make several passes over the area to be notched. Strike these “feathers” with a hammer and clean up the bottom of the notch with a chisel.

Mate the vertical posts with the notch in the middle of each base. Now, drill a suitable diameter hole for the carriage bolt in the center of each notched area. Carriage bolts aren’t necessary but recommended. Go ahead and press the bolts through holes and tighten with a nut and washer. No need to worry too much about the bases being square now. You’ll make sure they’re perpendicular when you screw in a few decking screws in the joint.

My barrel measured 35 inches from rim to rim. I decided to use 46 inches as the inside measurement between my vertical posts. I cut my 2×4 53 inches long and attached it to the back-end of the two base supports. Square it and screw it. The frame should stand on its own now.

Next, I cut my 1×6 the same length (53 inches) and attached it to the tops of both vertical posts. I then attached the brackets 13 inches from the top of each vertical post. Skip this step if you bore holes into your posts for your pipe axle.

The last step is to mount the tumbler on the frame. Since I used metal brackets, I simply slid one end of my axle into a bracket and repeated on the other side with the opposite bracket. I slid two more poached carriage bolts in the end of the brackets to keep the axle in place.

DRGcompost7 - Copy

Note: If using drilled holes in the vertical posts to mount the tumbler, you’d probably want to insert the axle through the holes before attaching the bottom and top cross rails to the frame.

This was a weekend project. I worked off-and-on for about 3 hours. DRG now has an elevated tumbler for easy access to compost.

Future modifications:

  • Add a couple of agitator bars running through the length of the barrel to help stir the contents as barrel spins.
  • Replace the barrel lock with a more secure lock to keep the door from flopping open while spinning.
  • Add an improvised crank handle on the end of the axle for easy spinning.
  • Add some 20 inch rims and low profile tires for added mobility – just checking to see if you’re paying attention 🙂

Any suggestions on making a better “mouse trap”? Don’t be shy. Please let me know.

Keep Doing the Stuff,

Todd

P.S. – You can also keep up with the Stuff we’re Doing on TwitterPinterestGoogle +, and our Facebook page… and over at the Doing the Stuff Network on PinterestGoogle +, and Facebook.

P.P.S – If you find value in our blog, Dirt Road Girl and I would appreciate your vote on Top Prepper Sites! You can vote daily by clicking here or on the image below. Check out all the other value-adding sites while you’re there…

Thanks for Sharing the Stuff!

Copyright: Content on this site (unless the work of a third-party) may be shared freely in digital form, in part or whole, for non-commercial use with a link back to this site crediting the author. All links in articles must remain intact as originally posted in order to be republished. If you are interested a third-party article, please contact the author directly for republishing information.

 

Categories: DIY Preparedness, DIY Preparedness Projects, Frugal Preps, Gardening, Homesteading, Self-reliance | Tags: , , , , , | 24 Comments

Deconstructing My Adjustable Paracord Rifle Sling…Just for You

by Todd Walker

One of our readers, winonageek, commented recently on my 550 Paracord Rifle Slings“I love the idea for an adjustable paracord sling. Would you elaborate on how you made the adjustable sling? How did you connect the paracord and webbing?”

So, I thought I’d deconstruct it for him and anyone else interested.

After making my first paracord rifle sling, I attached it to a Ruger 10-22. Hum, nice fit, look, and functionality for redundant cordage. But what if I wanted to adjust the length for, say, a shotgun, or a longer rifle for a barrel-chested friend? My wheels were spinning. Off to Wally World to find a cheap clasp.

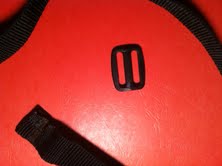
I dug into my box of webbing and found a piece of 1 inch material about two feet in length. More digging produced a buckle thingy (Triglide) used to connect the two loose ends of webbing.

I used about 80 feet of black paracord because, well, it’s the only color I had in a 100 foot hank that day.

Stuff you’ll need

  • Paracord – about 80 feet – I use 100 feet ’cause I hate being too short at the climax of a project 🙂
  • 1 inch x 28 inch webbing – more length depending on how many Twinkies you’ve packed away on your waistline
  • Buckle thingy (Triglide)
  • 2 sling swivels
  • 1 buckle clasp – I used a 1 inch clasp to fit my webbing

Connecting the stuff

A.) Start one end of the paracord on one sling swivel and the other end through the female part of the clasp. I loop the cord through four times on both connectors. That’s unnecessary for strength, but just looks better than two loops on the connectors.

Do a basic cobra weave down the entire length starting at the clasp end. Once you reach the sling swivel, begin a king cobra weave (video link) on top of the previous cobra weave. I ran the king cobra weave about 20 inches and terminated the weave. The entire length of the paracord portion, from swivel to clasp, is about 24 inches. This measurement does not include the clasp and sling swivel.

Once you have the sling secured to the female clasp and sling swivel, it’s time to attach the webbing to the remaining hardware: sling swivel #2, buckle thingy (Triglide), and the male end of the clasp. To save you the trial-and-error method and a load of frustration, follow these procedures closely.

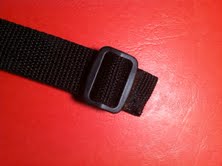
B.) I bent about 1/2 inch of webbing and melted it to itself to create a “stop” for the triglide. That step is probably not required. Then take the buckle thingy and feed the webbing through as shown.

Buckle thingy and webbing

Triglide and webbing

Webbing fed through buckle to melted "stop"

Webbing fed through buckle to melted “stop”

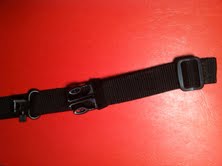
C.) Now you can feed the clasp (male end) and sling swivel #2 on the webbing. Make sure they both are facing out like the buckle pictured below.

Progression: buckle, male clasp, sling swivel

Progression: buckle, male clasp, sling swivel

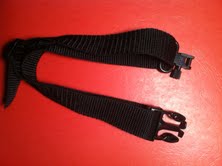
D.) Take the loose end of the webbing and feed it back through the buckle – on top of the end already in the buckle. Your done. Adjusting the length is done by sliding the loose end to fit. My sling is comfortable at around 38-39 inches end to end. Remember to use longer webbing for a longer sling.

Assembly complete

Assembly complete

That’s it. I’m sure there are better, more functional methods, but this is what I had on hand except for the clasp. I used Uncle Mike’s sling swivels that I already had in my gun cleaning box. I never throw away webbing. The buckle was poached from my paracord supply bag. My total cost was under $10.00. I know. If I had to buy all the supplies upfront, it would cost more. It pays to stock up and be a scavenger.

As always, if you have a better idea for making an adjustable paracord sling, don’t be shy. Please let me know how to improve this puppy.

Keep Doing the Stuff,

Todd

P.S. – You can also keep up with the Stuff we’re Doing on TwitterPinterestGoogle +, and our Facebook page… and over at the Doing the Stuff Network on PinterestGoogle +, and Facebook.

P.P.S – If you find value in our blog, Dirt Road Girl and I would appreciate your vote on Top Prepper Sites! You can vote daily by clicking here or on the image below. Check out all the other value-adding sites while you’re there…

Thanks for Sharing the Stuff!

Copyright: Content on this site (unless the work of a third-party) may be shared freely in digital form, in part or whole, for non-commercial use with a link back to this site crediting the author. All links in articles must remain intact as originally posted in order to be republished. If you are interested a third-party article, please contact the author directly for republishing information.
Categories: DIY Preparedness Projects, Doing the Stuff, Equipment, Firearms, Gear, Paracord | Tags: , , , , | 4 Comments

DIY Lamp From Trash

First posted over at Survival Punk, this is a creative way to re-purpose trash.

I’m back with another quick, easy and cheap DIY project. When cleaning up the other day I saw a oil lamp I had made a few years ago. I had completely forgot about it.  After having sat for a few years I gave it a try and it worked just as good as ever. For this tutorial, short as it will be, I wanted to make a new one. That way I could show you step by step and now I have two and two is one after all. Let me show you how to turn trash into a great little oil burning lamp.

Light it up

Light it up


Re-purposing owns Recycling

If recycling makes you feel better about yourself, because your keeping something from a garbage pile, without actullay having to do anything but put something in a different bin. Then you really need to think bigger. I always prefer to keep things from entering the waste stream, or recycle stream, at all. I keep can’s, jars, junk mail and other odds and ends. Don’t worry I’m not a crazy hoarder I keep things orginized and use them do to things. When I get too much I get rid of them. Today I’ll show you how to use an empty glass jar and some scrap cotton to make a oil lamp. A much better use than sorting into a different bin.


Salsa Jar

Salsa Jar

To start with we’re going to need an empty jar with a metal lid. For this one I’m using an empty salsa jar, before I’ve used an olive jar. You could use mason jars but to me that seems like a waste of a canning jar. These empty jars could also be got for free from friends and family.Clean out the jar good and remove the label from it.

Cutting a hole

Cutting a hole

Next up we need to cut a slot in the top of the lid for our wick to go into. You want to cut the slot so that the wick will be snug into it. Too tight and adjusting the wick will be too hard. Too loose and the wick could fall into the jar and cause some serious issues.

Cotton cloth

Cotton cloth

For the wick you will need a length of cotton cloth. Make sure you use 100% cotton for this. The first time I made one of these I used old shoe laces. Turns out they were not cotton but a synthetic material and wont wick and burn but will melt. For this I just cut up an old t shirt. You will need to cut it a little longer than the height of the jar. I like mine to stick up about an half inch and have about an inch extra in the bottom. This will allow you to have many burns out of the lamp.

Filling up

Read the rest here

Categories: DIY Preparedness Projects, Preparedness, Self-reliance | Tags: , , , , | 1 Comment

DIY Preparedness: The 5 Minute Tin Olive Oil Lamp

by Todd Walker

Got a minute or 5? Last night I made an emergency lamp out of a breath mint tin, wick, and olive oil… in 4:41 minutes. It will probably take you less time but I’m slow.

I love to re-think and re-purpose common items we usually throw in the landfill. I build my signature “outhouse” birdhouse out of old barn wood and used pallets. I’ll have to post a DIY article on that soon. Back to today’s quick DIY adventure.

An easy project is this oil lamp. You can use any container you like. I chose a breath mint tin since I have a large collection of them from each school year. I always hated teachers bending down at my desk and breathing horrid, putrid breath on me. So I eat lots of mints teaching. I also like the tins with lids so I can throw one in my bag for wilderness trips. Just render some animal fat for fuel and you’ve got a long-lasting source of light. It creates great ambiance after the meat has been cooked over the open fire and the lies around the campfire begin to fly. Whatever!

Here’s how I made mine. You’ll probably make one that beats mine like a drum. Please share if you do.

Materials

Breath mint tin (color to match wife’s decor – I gave her three color choices. I’m nice like that)

Wick – Use only material with natural fibers. Man-made polyester wicks will melt. If you want to get all primitive, you could use cordage you made from natural fibers. I used what I had on hand.

Fuel – I used the last of a bottle of olive oil in the pantry that had gone rancid. As Rachel Ray says, EVO. The benefit of this oil is that its odorless and burns without smoking. Also, if it’s spilled while lit, it won’t cause a flash fire like other lantern fuels.

Tools

Sharp object (I used a utility knife and Swiss Army Knife)

Nail punch (Just because I had mine handy and my wick was about a 1/4 inch in diameter. I guess I could have used the SAK for the whole project.)

Assembly

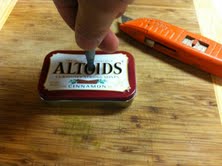
Step 1: Gently make a hole in the lid of the tin with your sharp object. Be careful not to gash a huge hole in the lid or you hand. Don’t press the knife straight into the lid. Use a gentle twisting motion with the point of the knife to start the hole. This allows you to control the size you create. The hole size is determined by the diameter of your wick material. The larger the wick, the larger the flame. I tweaked the hole until the wick fits snugly. In the first photo, I included two other possible wick choices.

Create starter hole…carefully

Step 2: I used a nail punch that is cone-shaped to slowly tweak the starter hole to match my wick’s diameter.

Tweaking the hole for the diameter of my wick

Step 3: Make a small hole to the side of the main hole. This allows for air circulation and venting.

Vent hole

Step 4: Now, insert the wick into the hole with a small amount exposed on the outside of the lid. The remaining wick is curled into the bottom of the tin.

Wick inserted

Step 5: Add your olive oil. Don’t fill the tin to the top. You’ll discover a leak where the lid is connected to the side of the tin.

Fuel up!

Step 6: After adding the fuel, allow the wick a couple of minutes to saturate. Then light your lamp and impress the misses.

Burn baby, burn!

Keep Doing the Stuff,

Todd

P.S. – You can also keep up with the Stuff we’re Doing on TwitterPinterestGoogle +, and our Facebook page… and over at the Doing the Stuff Network on PinterestGoogle +, and Facebook.

P.P.S – If you find value in our blog, Dirt Road Girl and I would appreciate your vote on Top Prepper Sites! You can vote daily by clicking here or on the image below. Check out all the other value-adding sites while you’re there…

Thanks for Sharing the Stuff!

Copyright: Content on this site (unless the work of a third-party) may be shared freely in digital form, in part or whole, for non-commercial use with a link back to this site crediting the author. All links in articles must remain intact as originally posted in order to be republished. If you are interested a third-party article, please contact the author directly for republishing information.

Categories: DIY Preparedness Projects, Frugal Preps, Preparedness | Tags: , , , , | 46 Comments

Blog at WordPress.com.