Retirement (June 2022) has me reflecting on my lifework. The dust-covered rocking chair overlooking the pond tells me that it ain’t over. In between working on my new log cabin, I’ve been building my next adventure, the Survival Sherpa School!
Often when you think you’re at the end of something, you’re at the beginning of something else.
~ Fred Rogers
December 2022 marks the 11th birthday of this blog. While writing over 600 articles here, I’ve never made a dime from the blog. I’m not more virtuous than others by offer all this free information over the years. I don’t hate money, it’s just the model I chose from the beginning.
However, the Survival Sherpa School is a separate site with a mission to offer hands-on classes to help you learn, prepare, and survive. With the help of my good friend, Melonie of Mel of the Mountains, we now offer a variety of classes on many primitive and traditional skills from bark baskets to hide tanning. I’ll be adding more class content in the near future.
Do me a favor and go check out the site to see what may interest you or someone you know.
While you’re visiting the Survival Sherpa School, hit that Subscribe button to join our community. You’ll be the first to be notified of upcoming classes, events, and exclusive content you won’t see on this blog, YouTube channel, or social media.
Some of our followers have been here from the very start and I can’t thank you enough for all your faithful support! We’ve learned a lot together through the magic of the internet. I’ll continue to post value-added content here, don’t worry.
After our Appalachian Bark Basket class at Little Rose Nature Adventures, we’ve taught three more classes in two states (GA and NC)! Below are some highlights of the experiential learning going on.
Appalachian Bark Baskets
More than an arts and crafts class, these eager students learned the context of making natural containers which their ancestors used many years ago.
Firecraft Essentials
Fire is life and learning many methods to achieve a sustainable fire is essential.
Modern ferrocerium rod in action.
Although we teach primitive and modern techniques, we stress that your fire kit should be simple enough that a five-year-old can use it.
Homeschool Co-op Demo in North Carolina
Melonie demonstrating the utility of turning raw animal hides into useful material for clothing and gear.
Axmanship 101
Students discovered and practiced hands-on techniques to safely fell, limb, buck, and split wood with their ax only. Thanks to Georgia Bushcraft, LLC for hosting this class.
Georgia Bushcraft Fall Gathering
A few of the classes we taught at this years fall gathering. Mel of the Mountains showing students how to make their own buckskin medicine pouches.
Two ladies getting their hands dirty practicing the Flip-Flop Winch.
As you can see, we’ve had a busy schedule recently! If you’d like to stay up to date on future classes and content, be sure to subscribe to our email list here. By the way, we will travel to you or your group’s location for classes and personal instruction.
I’d also like to thank my long-time blogging friend, Patrick Blair of NinjaWolf Studios, for his expert work in building the new Survival Sherpa School website! Be sure to check out Southern Dreams Homestead where he and Jessie are building a self-reliant urban homestead right here in Georgia.
P.P.S – If you find value in the blog, I would appreciate your vote on Top Prepper Sites! You can vote daily by clicking hereor on the image below. Check out all the other value-adding sites while you’re there…
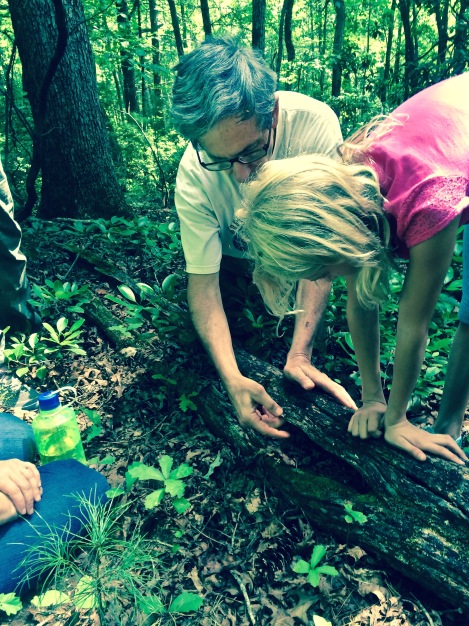
My legs felt like a bowl of jello sliding down an old wash board. I crouched in a non-human silhouette stalking in Ultra Slow Motion. A twig beneath my foot snapped and my prey jolted his head toward the sound. I froze and hoped my screaming quadriceps would support my motionless body until he dipped his head to graze again.
What was my prey? A deer realistically mimicked by our instructor, Mark Warren. This was my first of several classes I’ve attended at Medicine Bow in the north Georgia mountains.
I discovered Mark and his primitive school of earthlore from reading his first book, “Two Winters in a Tipi: My Search for the Soul of the Forest.” With every turn of the page, I knew I had unearthed a rare gem in the mountains of Southern Appalachia. That was over three years ago. To date, Mark has published his fourth volume of “Secrets of the Forest” and two books in a historical novel trilogy on “Wyatt Earp: An American Odyssey.” These books reflect Warren’s lifelong pursuits as a naturalist, instructor of Cherokee survival skills, and wild west history.
Over a year ago, I shared my thoughts on the first book in the Secrets of the Forest series, calling it, “The Best Outdoor Education Book I’ve Read.” I should amend my statement to include volumes II and III in my assessment. Knowing Mark’s passion for archery and canoeing, the last volume in the series, which I’ve yet to read, I’ll bet he saved the best for last. For now, I want to highlight Volume III…
Eye to Eye with the Animals in the Wild and At Play in the Wild
The opening of this article was one of many exercises our class took part of in a two-day class at Medicine Bow. Reading this volume brought back my Real World experience as vividly as the day I studied a one-foot square plot of earth for slight changes Mark secretly made. Revisiting my field notes from the Stalking and Tracking class reveled just how much knowledge and experience had been shared that weekend. However, I had one regret – not taking better notes. Not a problem. I now have at my fingertips his many years of experience in a beautifully illustrated, photographed, and written field guide.
Who would benefit from this book?
The obvious benefit is for hunters pursuing game with traditional archery equipment. Hunting an animal with primitive weapons requires that one be as close as possible to the intended prey. In doing so, an ethical hunter shows respect and thanksgiving to the animal for providing nourishment and many sustainable resources.
Observers and photographers of wild animals would do well to practice stalking and tracking. Many phantoms of the forest you’ve only dreamed of capturing in your lens will appear when practicing these techniques. No telephoto lens required.
Anyone wishing to challenge their physical prowess should add stalking to their workout regimen. The level of functional fitness needed to stalk wild animals is different from any sport or recreational activity I’ve ever experienced. Mark told us that martial artists found the most success of anyone attending his stalking class. Even more so than professional athletes.
The main benefit I personally received under Mark’s instruction was the complete immersion in nature. Slowing down to a snail’s pace uncovered small, “invisible” wilderness details unnoticed when trekking full speed with human locomotion.
I approached this otter family to within 15 feet as they fed on crawdads in the creek.
An analogy Mark used was that of a rock tossed into a pond. The impact ripples to every shoreline. A stalker’s task is to minimize the wake in the animal’s living space. One’s goal is to become part of the “wild” world and not merely a visitor.
“Stalking and tracking are symbiotic. Tracking teaches where to stalk. Stalking teaches how to interpret a nuance in a track.” ~ Mark Warren
Mark describing details to a young student during our tracking class.
Educators will find lessons, exercises, and games throughout this volume. In our age of electronics, parents have the challenge of disconnecting kids from devices and coax them into trading virtual screens for forest streams. Mark offers hundreds of ways to make this transition fun, educational, and experiential.
If you are searching to find a unique gift for someone special this Christmas, I would recommend checking the book link at Medicine Bow. I’ve not found a more comprehensive book detailing the lost art of tracking and stalking.
P.P.S – If you find value in our blog, Dirt Road Girl and I would appreciate your vote on Top Prepper Sites! You can vote daily by clicking hereor on the image below. Check out all the other value-adding sites while you’re there…
The human love affair with fire is intimate and ancient. Over the flames we cook, celebrate, spin tales, dream, and muse in the swirls of wood smoke. Fire is life. Its warming glow draws us like moths to a flame.
It’s not a stretch to believe that a Stone Age chemist recognized the idea of using carbon for future fires. Disturbing the leftover carbon ashes from the night fire, she stares at sparkles of light glowing like the pre-dawn stars above. She carefully nurses a baby “star” back to life to warm her hearth and home.
It ain’t rocket surgery. Even cavemen knew the importance of the sixth most abundant element in the universe.
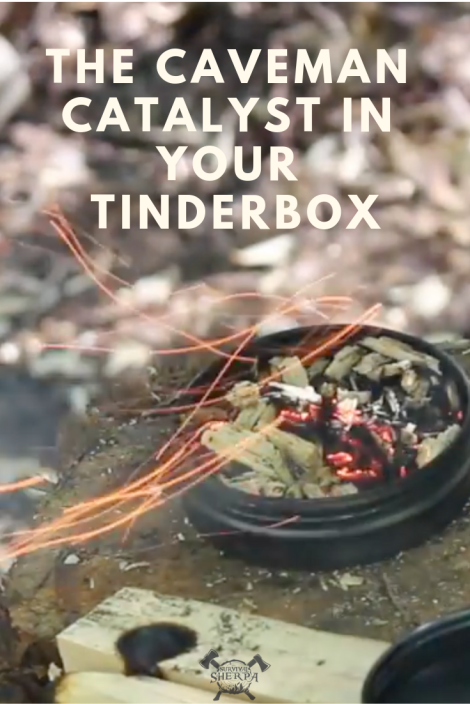
Carbon and Future Fires
The game of chasing lightning strikes for each fire was no longer required. This unreliable practice was abandoned for twirling sticks together to create enough heat to initiate the combustion of blackish, carbonized dust. Even with a dependable friction fire apparatus, a more elemental plan was stumbled upon for their next fire. Carbon was the caveman catalyst for future fires.
Carbonized dust glowing from friction.
Charcoal speeds up that wonderful exothermic reaction of combustion. Align a convex lens perpendicular to full sun on different non-charred tinder material. Smoke will rise in a minute. Do the same with charred material and a glowing ember is birthed in seconds. Weak flint and steel sparks produce the same glow.
When material containing carbon is heated without enough oxygen, charred material is the result. We teach our students to make char cloth at school. One side of the Fire Triangle is neglected by heating material in a closed chamber (Altoids tin). [I have a class set of Altoids tins stored in an old cassette tape container. Only a few students have ever heard of these “ancient” musical devices.] The lid hinge vents the volatile gases as the material is heated. When baked, the black charred material takes a spark from flint and steel.
Un-Burned Carbon in Ashes
Over the years, David West sparked my interest in the role of wood ash impregnated in tinder through his experiments on his channel. View his entire Ashed Tinder Playlist here. This, my pyro friends, has been a game-changer for me. Rubbing wood ash on any tinder material accelerates the combustion process.
Saving wood ash from previous fires has become an important part of my fire kit. A few years ago at a Georgia Bushcraft Gathering, I had a young kid ask during a Rudiger Roll (fire roll) demonstration why I added ashes to the cotton ball before rolling between the two boards. I had no real scientific explanation. I just did what I saw David West do.
Here’s my theory. Though wood ash looks nothing like charcoal, enough non-burned carbon remains in ash to significantly lower the temperature required to ignite tinder. Saturating any un-charred tinder (inner bark, jute twine, plant fiber, cotton material) with wood ash provides an excellent fire extender. In the video below, David shows a 4 foot strip of ashed denim burning/smoldering for 3 hours in time-lapse.
Following the lead of Stone Age chemists, making plans for future fires was smart. The thumb drill (lighter) was several millennials away from store shelves. Fire was not automatic. I make it a habit of separating burning logs in the fire pit at the end of each class at school. These partially charred sticks of cellulose are the stepping stone for the next morning’s fire lay. No need to start from scratch each day when charcoal is plentiful in the fire pit.
Modern re-enactors and nostalgic woodsmen continue to use flint and steel as fire starters. The method takes less energy and practice than fire by friction. The typical flint and steel kit consist of a high-carbon steel striker, a sharp rock (doesn’t have to be flint – any hard, silica based rock will work), and char cloth in a metal container.
However, cotton cloth does not grow in the woods. For a flint and steel kit to be sustainable long-term, natural materials can be carbonized.
My best experiences using charred natural material include:
Punky wood – Decaying wood which is spongy when squeezed between thumb and finger. My favorite is the sap wood of Eastern Red Cedar (Juniperus virginiana). I’ve had good luck finding it on the underside of blown down cedars in the right stage of decay.
Punky cedar sap wood has a stringy consistency which makes great char material.
Pithy weed stalks – Crack open the woody stalk of dead Mullein (Verbascum) and remove the spongy pith. Cook it in a container like char cloth for an excellent F&S spark-catcher.
Natural tinder/cordage – Tulip Tree (Liriodendron tulipifera) twisted cordage has worked but not as well as the previously mentioned materials. Yucca (Asparagaceae) cordage works as well.
The only non-charred natural material I’ve found to consistently take a weak spark from F&S is:
Chaga (Inonotus obliquus) – This fungus grows on birch trees in higher altitudes. It is called True Tinder Fungus as it will catch a spark from F&S. It also will smolder for a long time for a fire extender.
Thin slices of chaga ignited with flint and steel sparks.
I have friends who have achieved F&S embers using other non-charred material. Phillip Liebel, instructor at Flint and Steel Critical Skills Group, discovered that the inner lining of gourds will take a spark from F&S. It’s a very fine, papery material which burns rapidly. Joshua Enyart, founder of Flint and Steel Critical Skills Group, has used the Milkweed (Asclepias) pod to make fire with F&S. I’m sure there are other non-charred natural material out there that will work. Just recently I attempted the following with no success…
Dog hair – Moose, our oldest rescue dog, sheds fine clumps of hair. A few sparks landed and fizzed out without catching. Looked promising.
Cattail duff – White fluffy stuff is always worth trying. Still a no-go for me.
Mullein pith – Did not work. I sliced some to form a fine, triangular edge. Sparks landed on the edge with no glow.
The above works well when carbonized, except dog hair. In my experience, any natural tinder material you’d normally use to build a tinder bundle will take a spark from F&S when charred. The exception to this is fat lighter’d (aka – fatwood). Don’t char fat lighter’d in a tin. You’ll end up with resin coating the bottom of your container.
Non-charred and Un-natural F&S Ignition
Good luck finding the elusive steel wool tree in the wilderness. I keep a pad of 0000 steel wool in my pack for cleaning axes and tools in the field. For stubborn tinder, add a pinch of steel wool and strike it with F&S. Once the spark catches and begins to spread like tiny dynamite fuses, the tinder becomes super-heated from rapid oxidation.
Gun powder will also ignite with F&S sparks. Flintlock rifles utilized this technology to explode powder and launch projectiles down range. A modern woodsman will likely have a cartridge of some kind which contains gun powder. Carefully remove the bullet from the brass cartridge and pour out a small amount of powder charge. Be ready to transfer the heat from the lit powder to your tinder material. It goes up in a flash.
Carbon Ash Experiments Coming
The South African tonteldoos pocket tinderbox I made rides in my F&S kit. It works well as long as the charred surface is charred well. With sporadic use, the dark char turns brownish from knocking around in my kit. In a future post, I plan to experiment with the mop head strands to see if impregnating them with wood ash will aid in ignition on brownish charred ends. This should be interesting.
A student achieving ignition with the Tonteldoos.
We’re also planning a post on making charred material without the typical metal container. Stay tuned.
P.P.S – If you find value in our blog, Dirt Road Girl and I would appreciate your vote on Top Prepper Sites! You can vote daily by clicking hereor on the image below. Check out all the other value-adding sites while you’re there…
Arguably, the most underrated and overlooked primitive technology is rope and string. That is until you run out of modern cordage. A whole new appreciation for stuff that binds will quickly become apparent.
Ropes and knots predate the ax, the wheel, and possibly the controlled use of fire by our ancestors. Think of stone tools. These had to be tied to the end of sticks. Shelters stood with joints bound by fibrous lashing material. Animal sinew, catgut, and hide were used as well. But, as my friend, Mark Warren, says, it’s easier to get your hands on plants since they don’t run away from you.
Fibers that Bind
In my area of Georgia, tree bark, roots, leaves, stems, and stalks can be used for bindings. For our cordage class at school, we used Tulip Poplar (Liriodendron tulipifera) and cattail (Typha) for fiber material. Cattail from our second-hand beaver pond, and tulip poplar from my stash I collected over the years.
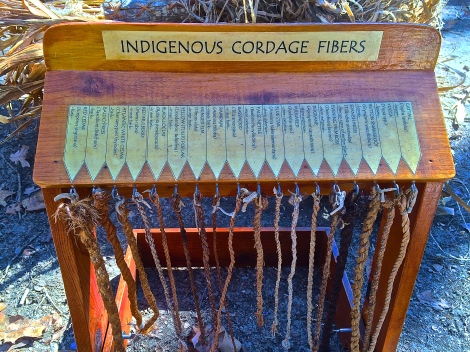
You’re not limited to a few choices in nature. Below are 18 cordage fibers made and displayed by Scott Jones at one of his workshops I attended. If you’re into primitive skills and technology, I highly recommend you pick up his books, Postcards to the Past, and A View to the Past. Both are essential for any primitive practitioner on your Christmas list!
18 indigenous cordage fibers Scott Jones has on display for demonstrations
Besides the 18 listed below on the display, we also used okra stalk, that’s right, the garden variety, to make cordage in his class.
From L to R:
Red Cedar
Bald Cypress
Atlantic White Cedar
Red Mulberry
Black Locust
Yellow (Tulip) Poplar
Winged Elm
Paw Paw
Basswood
False Nettle
Blue Star
Milkweed
Dogbane
Evening Primrose
Spanish Moss
Button Snakeroot
Yucca
Cattail
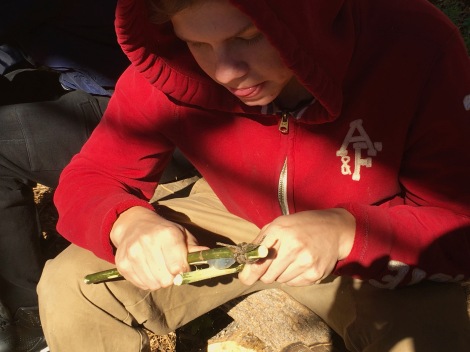
Different materials require different methods of extracting fibers. For our purposes, and to keep this article manageable, we’ll stick with the two materials we used in class – tulip poplar and cattail.
Preparing Fibers
As mentioned earlier, I collect tulip polar bark every chance I get. This tree has many uses – (see here and here). It’s best to harvest in late spring and summer as the bark will “slip” off the trunk with ease. The inner bark is what you’re after. I like to use inner bark from fallen limbs or dead standing saplings. Simply soak the dried bark, a process called, retting, in water for a few days to a few week. At my fixed camp, I toss large sections of bark into the creek and weigh them down with rocks. The soaking helps break down the stuff that holds the outer and inner bark together. After the bark is retted, the inner bark should peel in long, useful strips.
Hang the strips to dry. Pre-dried fibers are less prone to shrinkage even after wetting them during the cordage making process. Separate the strips into finer fiber bundles (hair-like fibers) for stronger cordage. Or you can start twisting wider strips for expedient cordage.
We have a nice stand of cattails next to our outdoor classroom. At this point in the season, the leaves are dead and brown. For green leaves, cut and dry until they turn brown. You’ll notice these leaves twist better when damp. Even a morning dew enhances their flexibility.
Cattail leaves can be striped into smaller widths for stronger cordage but wasn’t worth the effort for our class. For expediency, we used whole leaves. Here’s how…
Reverse Twist Two-Ply Method
For our beginner cordage-makers, we used whole cattail leaves and wide strips (1/2 inch) of tulip poplar inner bark. Larger material allows the student to see how the twisting works and is easier to handle than fine fiber bundles.
Also, keep the fiber material damp during the whole process.
Start in the middle of a strip of fiber material about arm’s length long. Pinch the ply with the index finger and thumb of both hands with 2-3 inches between your pinch points. Begin to twist the ply away from your body with your right hand in a clockwise rotation and left hand counterclockwise. This will cause the ply to twist until it naturally bends into a kink/loop.
Forming the loop.
Pinch the loop with your left hand (index finger and thumb). You now have two plies extending in a “Y” formation. Pinch the strand furthest from your body with your right hand close to your left hand (about 1/4 to 1/2 inches). Twist your right hand away from your body in a quarter turn or 90 degree rotation.
Starting the outside ply twist.
A full 90 degree rotation of the outside ply.
While holding the twisted ply between your thumb and index finger, reach your middle finger on your right hand around to grab the strand closest to your body. Grip this ply with your middle finger against your index finger. Now twist back a quarter turn to the original starting position. This motion brings the outside ply over the inside ply. The two plies have now switched places. Release the ply you were pinching and repeat the process on the “new” outside ply.
Rotating back 90 degrees with the opposite ply pinched with the middle finger.
Once you get the mechanics down you’ll be able to hand-twist tightly woven cordage like a champ. One student picked this motion up quickly and made a few feet of cattail cordage in less than 30 minutes.
RISE student twisting cattail cordage. He began teaching other students the technique.
Splicing Technique
If both plies are even when you begin twisting, you’ll end up backtracking (unwinding twists) to make a splice. With experience you’ll find that starting the kink/loop with one ply longer than the other will take care of this problem.
When you get to the end of your rope (about an inch left on the outside ply with a longer inside ply), and need to make longer cordage, a splice is needed. Take another length of fiber material of similar diameter and lay it in the “Y” with an inch of material overlapping. Pinch the overlapping new fiber on the existing two-ply cord you’ve already made. With the new ply running parallel with the short outside ply, pinch these together with your right hand and continue the two-ply twisting technique described above. This splicing technique will continue until you twist a length of cord long enough for your needs.
New fibers added in the crook of the “Y” to be spliced.
Trim the overlapping spliced end when your cordage is complete.
Note: For any left-handed folks, reverse the instructions.
Trim the overhanging spliced material on the finished cord. Now you can terminate the end of your cord with a couple of half hitches.
Start using your new cordage for primitive binding projects like a Hoko knife.
Tying it all together with natural cordage.
Below is a video we did during class on making cordage for those interested…
The reverse twist method is useful when smaller lengths of tightly woven cordage are needed. We’ll do a future post on a method called the “Thigh-Roll”. This technique is a speedy way to make large quantities of natural two-ply cordage… and easier on your hand muscles.
P.P.S – If you find value in our blog, Dirt Road Girl and I would appreciate your vote on Top Prepper Sites! You can vote daily by clicking hereor on the image below. Check out all the other value-adding sites while you’re there…
The blood of our ancestors flows in our own veins. Our aboriginal legacy is written in the very make-up of our bodies. The ancient caves and campfires of our pasts call to us from within. Primitive Technology is our inheritance as well. It is a world heritage which knows no race, creed, or color. It is foreign to no one. It is the shared thread which links us to our prehistory and binds us together as human beings.
Steve Watts ~ “Primitive Technology, A Book of Earth Skills”
It seems with every generation, the disconnect between the earth and her resources widens. But deep inside us all, our primal roots desire to reconnect with the raw resources that have sustained our species for millennia. Touching our Stone Age past offers this tangible connection.
A simple way to introduce primitive technology to students is by making a Hoko knife. This stone cutting tool was discovered on the Hoko River archeological site in Washington State. A landslide destroyed the native fishing village about 2,700 years ago preserving artifacts of their material culture.
Steps to Making a Hoko Knife
Materials needed:
Sharp stone flake
Wooden handle
Cordage
A.) Stone Flakes
You don’t have to possess mad flintknapping skills to construct this simple cutting tool. The original Hoko knife was made of a thumbnail size flake hafted with spruce root to a cedar handle. Archeologist believe this delicate tool was used to butcher fish for eating and longterm preserving.
Discarded flakes from Justin Cook.
Our stone flakes were gifted to our class by a good friend and master flintknapper, Justin Cook of Wayback Wilderness. He had a pile of flakes left over from his flintknapping class at our Georgia Bushcraft Fall Campout and offered them to me. I gladly accepted.
You can also make your own flakes. Find a stone which breaks like glass. As you know, broken glass creates sharp edges. My friend and primitive skills mentor, Scott Jones, introduced me to bipolar flaking. Use a hammerstone and stone anvil to strike smaller stones which fracture into sharp, straight, useable flakes. Flat, long flakes work best for this application.
B.) Wood Selection
Next to our outdoor classroom, a willow (Salix) tree grows in our secondhand beaver pond. I cut a finger-size branch for handle material. I also had a section of box elder (Acer negundo) left over from friction fire kits. We used both for our project since they’re split easily and evenly. Experiment with woods in your locale to find what works for you.
Willow on top, Box Elder on bottom.
C.) Cordage
Since we haven’t taught natural cordage yet, students used manmade cordage to haft the flakes in place. A partial spool of tarred bank line is what we had left over from our bamboo shelter construction project. Natural cordage options in our woods include inner bark of several trees, dogbane, yucca, cattail, and many more. Artificial sinew, real sinew, or leather would also serve as good bindings.
D.) Assembly
Split one end of your handle with either a stone flake or metal knife. If the split starts to run off to one side, bend the thicker half more than the thinner half to even up the sides. The split should be long enough to accept the flake with room for binding the split end.
With the flake inserted in the split stick, lash the split ends together. With modern line, we used a jam knot to start the lashing (clove hitch also works). After 4 or 5 tight wraps, we tied two half hitches (down-n-dirty clove hitch) to secure the line. This provides enough friction to hold the flake securely. The problem point with this method is the chance that the handle will continue to split on the un-lashed side. To help prevent this, give the backside of the flake one wrap to reach the other side of the handle. Terminate the lashing just above the flake with two half hitches.
Wrapping both sides of the stone flake.
A finished Hoko knife bound with jute twine.
Without fish to butcher, we used our new stone tools to scrape bark off handles. I need to bring a mess of fish to class soon for some experimental archeology. One student asked, “Would this thing cut the head off a fish?” We shall find out.
P.P.S – If you find value in our blog, Dirt Road Girl and I would appreciate your vote on Top Prepper Sites! You can vote daily by clicking hereor on the image below. Check out all the other value-adding sites while you’re there…
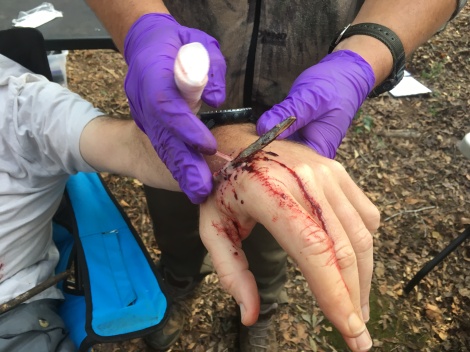
More and more people are getting back to nature to enjoy its beauty and benefits. The list of outdoor activities seems endless. With these pursuits comes risk of injury. Common injuries like scrapes, sprains, burns, bites, and blisters can turn serious in remote locations. I’ve had my share of bumps, bruises, stings, and close calls. Thankfully, none were life threatening… but could have turned sideways quickly.
Note: All injuries depicted look real but are not. If you’re queasy about blood and guts, you may want to reconsider reading the rest of this article.
A skill set I’ve neglected for years is wilderness first aid. Teaching students outdoor self-reliance skills at RISE spurred me on to train with one of the best Wilderness Emergency Care instructors available, Mark DeJong, owner of Off Grid Medic. We were also fortunate to have Michelle Pugh, an accomplished long distance hiker, author of two books of her adventures, and Off Grid Medic staff instructor teaching our class. Their style of teaching fits perfectly in my “Doing the Stuff” wheelhouse. You won’t sit and watch boring power points in a sterile environment. Courses are held where outdoor enthusiasts roam – the woods. Our class was hosted by Georgia Bushcraft, LLC.
Besides imparting real-world knowledge, Mark works his magical moulage abilities by transforming last night’s rib eye bone into a patient’s open fracture. These realistic injuries aren’t for shock value but to help students “train like you fight.” Discovering a bone protruding from the skin or an impalement in a training exercise will give you a clue as to how you’d respond in a real wilderness emergency.
See what I mean? Some of Mark’s handiwork on “Dutch Oven” Bill.
Wilderness First Aid
Urban first responders are equipped with tools and reinforcements to get patients to definitive care within minutes typically. For wilderness rescuers, hospitals and doctors might be hours or days away. Environmental stressors, evacuation over rugged terrain, limited medical resources, and other unknown variables present unique challenges for patient care and treatment.
If you interested in professional training in wilderness emergencies, contact Off Grid Medic. Below are a few things to consider if you’re ever in the role of wilderness rescuer.
You’re Number One
You can’t rescue a victim if you step into a dangerous situation and become one yourself. Before rushing in, assess the situation, location of patient, and possible hazards; dead tree limbs overhead, steep/loose ground, freezing water, etc., etc. Take care of yourself and team before providing care.
As an example, use the Reach, Throw, Row, Go steps to protect yourself in an open water rescue.
Reach: Use when victim is close to shore line and can be reached with by hand, pole, paddle, etc. without having to enter the water.
Throw: Victim is too far away to be reached, throw a line, rope, PFD attached to rope, if the victim is conscious and able to grab the rope.
Row: Rescuers will use a boat/canoe/kayak if Reach and Throw isn’t an option. Get close enough to use Reach, Throw, or lift the victim into the craft.
Go: This is the last and least safe option for rescuers. It may be necessary due to the victim being unconscious or unable to grab a rope.
McGyver Mentality
Even if you are a medical professional, the wilderness changes the game. After your initial patient assessment, a typical first aid kit may not contain every item you’ll need in remote emergencies. Be prepared to improvise… a lot.
Space blankets come in many styles. Buy good quality, sturdy blankets.
Besides a first aid kit, I’ll wager that you probably have the following items in your supplies. If not, consider adding them.
Emergency Shelter: Start with proper clothing for the rescuer, space blanket (not the cheap mylar sheets), control body temperature, body wrap for victim, shield from elements, signaling device (orange), etc.
Duct Tape: Wound closure (butterfly stitches), splints/wraps, slings, neck/head immobilization, fire starter, and uses too long to list here.
Ziplock Baggies: Exam gloves, wound irrigation, occlusive dressing for large burns, sucking chest wound taped on three sides, and more.
Rope/String: Splinting, litter bed, lashing a litter together, emergency shelter, etc.
Bandana/Cotton Material: Bandages, sling, splint padding, dressing, wet dressing, etc.
Metal Container: Disinfect water for hydration via boiling, cooking, warm liquids, hot/cold pack, etc.
Fire Kit: Emergency tinder, lighter, road flare (not joking), signaling, warm patient and rescuers, comfort, cooking (unexpected stay), water disinfection, etc.
Knife/Saw/Ax: Tools to make other items for rescue (litter, fire, etc.), remove insect stinger, collecting firewood, etc.
Head Lamp: You’ll need your hands free to attend to a patient in dark conditions.
Compass: Preferable one with a mirror and magnifying lens – all kinds of uses beside navigation.
To Splint or Not to Splint
Sprains, strains, and closed fractures are not always distinguishable. Open fractures are easier to diagnose since the bone protrudes from the skin. A closed fracture may not show deformity in a limb. The rule of thumb is to splint if a limb is painful, swollen, or deformed – this applies to sprains and strains. Immobilize the limb(s) before the patient is evacuated.
Makeshift splint by Mike and Jessica. Interesting note: I taught Mike middle school P.E. in 1985. Man, I’m old!
We learned to splint limbs with resources on hand and materials from the wilderness. Without a modern SAM Splint, you’ll have to get creative. Two sticks, cordage, and a shirt stuffed with leaves will pad and immobilize an arm or leg.
SAM Splints are great to have in your pack.
Mark demonstrating the B.U.F.F. splint – Big, Ugly, Fat, Fluffy – on Michelle.
Slings for an arm/shoulder/collar-bone injure have to offer support and keep the limb secured to the body. Through hands-on experimentation, my partner and I found that zipping her arm inside her light jacket created a snug fitting sling which was comfortable and warm. There’s more than one way to sling a limb.
Another diy sling.
Transporting the Victim
Depending on location and terrain, rescue reinforcements may be far way or unable to respond in remote areas. You’re injured friend will have to be carried out. A makeshift litter can be made from poles and string.
Happy people carrying a litter full of Casey.
Two Litter Options:
Large group of 6-8 people
Small group with as few as 3 people with backpacks
Large Group: Cut two saplings about 8 feet long and sturdy enough to carry weight. Cut 5-6 sturdy cross pieces about 5 feet long. Position the two long poles parallel next to the victim. Place the cross poles under the long poles at intervals which support the head, mid back, hips, knees, and feet. Lash the poles together using square lashing or any knots to secure them in place. If time is an issue, or cordage is sparse, use a jam knot with two short pieces of bank line or paracord.
Demonstrating square lashing and jam knot techniques.
Transfer the patient to the litter. Team members lift at the extended cross poles and walk.
Small Group: Use two saplings as above. If sturdy rope is available, wrap the rope around the poles to create a bed. The pole ends are tucked into the lower part of the shoulder straps of two backpacks. This allows two people, with proper fitted backpacks, to transport a victim.
Two poles inserted in the backpacks straps to carry our patient on a rope litter. Obviously, they wouldn’t be facing each other if not in the class.
The culmination of our three-day, 20 hour training was a nighttime rescue. I mentioned that Off Grid Medic likes to keep it real for “train like you fight” scenarios. Mark and Michelle didn’t let up and provided excellent, realistic, hands-on training the entire weekend!
If you’re a camper, hiker, woodsman, or Scout leader, consider learning wilderness first aid. This is an entry-level course into the world of wilderness emergency care. Contact Markfor next-level courses and continuing education. I offer my highest recommendation to the Off Grid Medic team for their professionalism, knowledge, and real-world training.
P.P.S – If you find value in our blog, Dirt Road Girl and I would appreciate your vote on Top Prepper Sites! You can vote daily by clicking hereor on the image below. Check out all the other value-adding sites while you’re there…
I discover at a young age that pouring Boy Scout Juice on sticks for a “quick” campfire was not real smart. Boy Scout Juice is a vague term which includes all sorts of liquid accelerants. We had gasoline at the cabin that day. I can’t remember who to blame for this grand idea, Henry or Craig, but I vividly remember the low whoosh sound that transformed a flickering kitchen match into a flaming mushroom cloud billowing up my legs. Screaming and wild dancing, reminiscent of cartoon characters, commenced in a desperate attempt to extinguish my now flaming trousers.
When the scent of singed hair and screaming finally settled, a silver dollar size blister on my calf taught us all a lesson that day.
Accelerants are dangerous and unnecessary in traditional fire craft. Cheating, some might call it. I’ve often said that there is no such thing as cheating when you really need a fire. Use a road flare if you have one. Camping ain’t an emergency. In modern camps, building a sustainable fire, less the fancy accelerant-impregnated fire starters, seems to be a lost art these days. I find the process of preparing a wooden meal to feed my fires pleasurable, even meditative.
Our irresistible fascination with fire was passed down by early humans who, through observation and notions and necessity, came upon the crazy idea of harnessing the flame. They weren’t content to live out their days cold and wet. This simple, powerful tool warmed hearths, made pottery, fashioned other tools, cooked meals, made potions, dispelled darkness, forged bronze, just as we use it today. The only difference for us moderns is that we route fire through insulated wires. But we’ve lost the aroma of wood smoke in our modern processes. Ah, that wonderful smell!
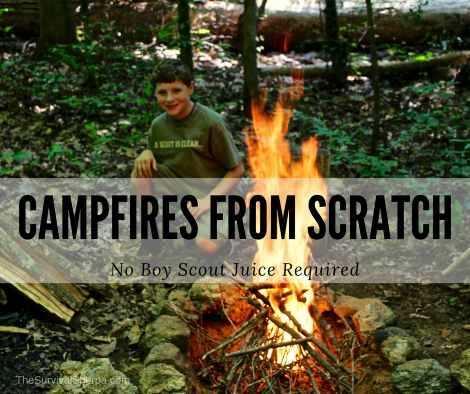
Many moderns never learned how to build a campfire, not from scratch. We hope this whets your appetite. Gather around our fire ring as we burn a few sticks and embrace the warming gift of fire.
Fire from Scratch
To transition from modern to a traditional fire-starter, you need things. Things like wood and air. These two are the easiest to procure. The third thing, which can be the most difficult to come by, is a heat source hot enough to complete the fire triangle, and, as intended, set stuff alight.
The heat source, modern or traditional, won’t produce a sustainable fire without properly prepared wood. I’ve witnessed, on occasion, fire-starting fails by people using a plumber’s blow torch. Lightening is another option… but you must wait patiently near the chosen tree.
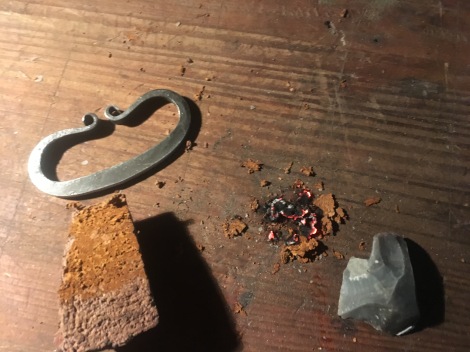
For this exercise in fire-starting, our heat will come in the form of sparks from rocks and metal. Those of the traditional camping style call these materials flint and steel (not to be confused with ferrocerium rods). Sharp rocks are used to scrape micro particles from the steel which oxidizes rapidly into sparks. If you’d like to know the Secret of Flint and Steel, our previous article may help.
Flint and steel
Moderns may scoff at flint and steel as a fire maker. Why not use a Bic? It’s your fire. Use whatever ignition method you like. In my experience of teaching and learning fire craft, an open flame offers no distinct advantage until you understand how a fire eats. Practicing traditional methods makes the learner more attentive to the finer details of planning a fire’s menu.
One test for beginner and experienced campers is to start a campfire using a single match. This experiment gives immediate feedback as to how carefully the fire-chef prepared the menu. If the match ignites and consumes your meal, you’ll be ready to practice more traditional methods.
A true primitive Fire from Scratch method requires rubbing sticks together. If you’re interested in twirling up fire, read and practice these articles: Bow drill and hand drill.
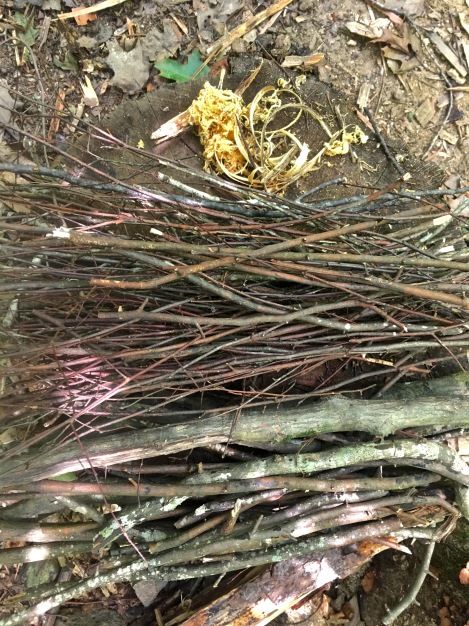
Wood Size Matters
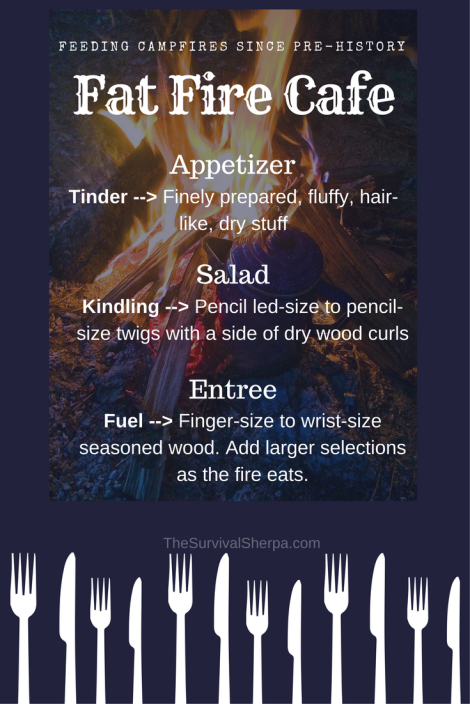
The most common failure in feeding a fire is wood size. I’ve used the analogy before of creating a fire meal plan – breakfast, lunch, and dinner. It’s worth repeating… with a bit of a twist.
Don’t cheat on preparing the appetizer for flint and steel ignition. If you’ve ever placed a delicate fire egg (ember) in a tinder bundle (via friction methods), you understand the importance of this starter meal. The same holds true for charred material aglow from flint and steel sparks. A baby ember’s appetite is delicate. If it likes the first offering, it will be stimulated to eat more of your carefully prepared fare.
Top to bottom: fat lighter’d shavings and curls, pencil lead to pencil size twigs, and larger fuel.
In many flint and steel demonstrations viewed on computer screens, char cloth is laid on the rock in such a way as to catch a spark flying from the scraped steel. I’ve found that having a larger landing strip for sparks increases the chance of glowifing the charred material. Try sending your sparks into the target-rich char tin. Once you see points of light in the tinder box, place your appetizer on top of the glowified stuff and blow it to flame. Remember to close the lid of your tinder box to starve the glowified embers of oxygen for your next fire.
Appetizer aflame, your fire is ready to ravage the kindling salad above it. Surface-area-to-volume ratio (SAV) plays an important role in the combustion of cellulose. This is a fancy way of describing a particles fineness. The more fineness (higher SAV), the more readily wood will burn. Fine twigs/sticks have low ignition times and burn quickly.
Arrangement
Ever watch a cooking show? Chefs know the importance of plating a meal to be visually appealing. Presentation can cause the guest to be attracted or reject the meal based solely on appearance and arrangement. We eat with our eyes.
Appetizer below the salad (twigs) with fuel ready to eat.
When plating your fire’s meal, keep in mind that different arrangements affect how a fire eats.
Loose fire lays allow more oxygen to flow through the fuel to burn hotter and quickly dry sticks to the point of combustion. Give your fire plenty of elbow-room to eat.
Arrange too tightly and the fire will be choked to death from lack of oxygen. However, once a coal bed is established, a tight arrangement of larger fuel will provide longer burn times.
Boy Scout Juice Substitute
This stuff doesn’t come in liquid form, but it’s the closest thing in my Georgia woods to an accelerant. Fat Lighter’d, fatwood, lighter wood, lighter knot, etc. is the resin-rich heartwood of many dead pine trees.
Fat Lighter’d Facts
All natural with no petroleum products
Won’t catch your pants on fire at ignition like accelerants
Smoke from fat lighter’d makes a great mosquito repellant in a smudge pot
The long leaf pine, which was clear-cut to almost extinction, is the best pitch producing pine tree
The term ‘fatwood’ came about from the wood in pine stumps being “fat” with resin that was highly flammable
Not every pine is created equal. In my experience, one tree in the pine family, White Pine (Pinus strobus), makes poor fat lighter’d. I discovered its lackluster lighter’d on a winter trip with my buddy Bill Reese. We set up camp on the scenic Raven Cliff Falls Trail near a fallen White Pine. I figured all pines would offer up that beautiful, flammable fat lighter’d for our initial fire needs. Not so. With much labor, I finally nursed life into our traditional fire.
Know the wood in your woods.
Once you develop a taste for traditional fire-making, you’ll realize Boy Scout Juice is not required for a comforting campfire menu.
P.P.S – If you find value in our blog, Dirt Road Girl and I would appreciate your vote on Top Prepper Sites! You can vote daily by clicking hereor on the image below. Check out all the other value-adding sites while you’re there…
I recently began working with at-risk youth in our county’s alternative school, Rise Academy. My “job” is to offer project-based learning opportunities to develop self-reliant skills in our students.
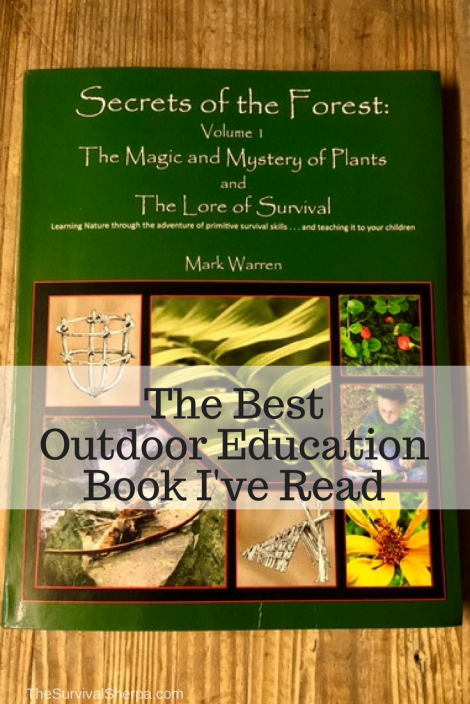
My curriculum guide is a blank slate. There are no state approved guides for Doing the Stuff of Self-Reliance in academia. I must write my own. Out of necessity, I began to pull from my own experience and those of my mentors. Fortunately, one of my teachers, Mark Warren, director of Medicine Bow, recently published the first in a series of four books, Secrets of the Forest.
Secrets of the Forest, Volume 1, is broken into two parts:
The Magic and Mystery of Plants, and…
The Lore of Survival
I ordered and quickly devoured Volume 1. If you’ve ever wondered how to transfer lost knowledge and skills to our next generation, this book series is your guide. Mark is no newcomer in the world of primitive skills and nature study. He’s been passing on his knowledge to young and old for over a half century. I’ve had the pleasure of attending several of his classes in Dahlonega, Georgia. Mark is a walking encyclopedia of earth-lore and the skills required to call Nature home.
Mark showing an impromptu lesson on stringing a bow during a Winter Tree Identification class.
Part 1: The Magic and Mystery of Plants
Students at Medicine Bow are fully submerged in experiential, hands-on learning. Reading Mark’s book is no different. Over 200 original activities are included to engage one’s senses in the forest. Making your own Botany Booklet, written and illustrated by you, is worth the price of this first volume. It only consist of six sheets of folded paper (12 pages) but will set a student on a path of discovery in the amazing green world surrounding us.
Sassafras
“Plant study is the foundation upon which all survival skills are built.” ~ Mark Warren, p. 16
Mark is quick to point out that modern humans have lost the instincts of our paleo ancestors regarding plant usage. Therefore, we must approach our study of plants on an academic level. Eating the wrong plant, or wrong part of a plant, in the wrong season can be deadly. However, embracing the study of plants and trees for food, medicine, and craft is worth the time and effort.
I’ve read many online discussions of outdoorsy people expressing their desire to become more proficient in plant identification and use. Many have purchased botanical field guides specific to their locale. These guides are helpful for identification but rarely offer hidden secrets of a plant. In Chapter 6, 100 Plants ~ And Their Many Gifts, Mark offers insight into plants/trees of southern Appalachia which I’ve never read in other botanical books. Color photos of each plant await at the end of this chapter to aid in identification.
Chapter 10 is devoted entirely to Poison Ivy. Anyone spending time outdoors will appreciate the information on this rogue plant. From identification, protecting ourselves, treating the rash, and even making oneself immune, Mark covers it all.
Part 2: The Lore of Survival
“If you get lost out there, the world around you may seem your enemy, but it’s not. It’s just that you’ve forgotten what your ancestors knew a long time ago.”
~ Natalie Tudachi, Blue Panther Woman of the Anigilogi clan, Let Their Tears Drown Them (p. 167 – Secrets of the Forest)
Reading this volume will give you knowledge, but knowing is not enough – there must be urgency in doing the stuff. As with Part 1, many hands-on activities accompany The Lore of Survival section. Chapters include:
The First Step ~ getting started in survival skills
The Ties That Bind ~ cordage
Oh Give Me a Home ~ shelter building
Sticks and Stones ~ the multi-use rabbit stick
Water, Water Everywhere ~ water purification
Hors D’oeuvres of Protein ~ adventures with larvae
A Kitchen in the Forest ~ cooking in the wild
An Army of Silent Hunters ~ traps and snares
Describing the finer details in a tracking class at Medicine Bow.
Mark’s approach to wilderness survival centers around the primitive technology used by the Cherokee who called Southern Appalachia home. Our relationship with “the real world” (forest) becomes intimate as we integrate primitive survival skills. This may seem overwhelming, depending on the forest to provide your needs, so take one skill of interest and practice until proficiency is developed.
Of particular interest to me, since I’m allergic to yellow jacket stings to some degree, is the section on making yellow jacket soup. Larvae, not adults, are used to make a nutty flavored, protein-packed soup. Mark gives detailed descriptions on how to “safely” dig and harvest larva from a yellow jacket nest. My experience with the business end of these stinging insects has prevented me from attempting a heist. However, after reading his experience, it sounds doable even for me.
Hands-on learning in a creek studying animal tracks and sign.
I respect Mark Warren a great deal, not only for his passion to share this lost knowledge, but more so because he lives what he describes his book. He traded theory for action decades ago. When purchasing his book or attending his classes, you’ll quickly discover that Mark is the real deal with a depth of experience sorely lacking in the world of outdoor education.
If you teach wilderness living skills, scouts, school children, or just interested in expanding your own outdoor education, I highly recommend Secrets of the Forest! Order yours at his site: Medicine Bow.
While you’re there, check out his class schedule. I’ll be attending The Art of Archery class in September. Mark knows a thing or two about archery. He was the World Long Bow Champion in 1999.
P.P.S – If you find value in our blog, Dirt Road Girl and I would appreciate your vote on Top Prepper Sites! You can vote daily by clicking hereor on the image below. Check out all the other value-adding sites while you’re there…
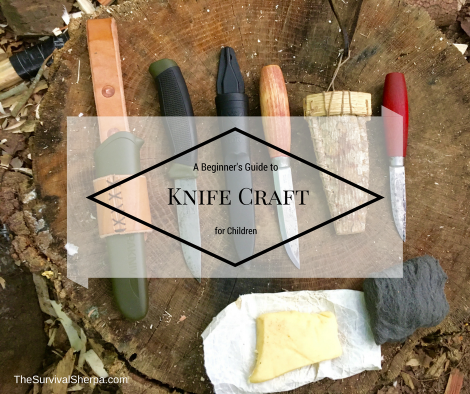
I’ll never forget my first one. It had two blades, one long, one short, which folded into the wood grain handle with a snapping sound only good pocket knives make. I had crossed over, in my mind, from boy to man with my knife in the bottom of my jeans pocket. I had finally become a part of a long line of Southern knife toters.
No man in my family would ever be caught without a sharp pocketknife while wearing pants. The tool was used for everything from peeling a fresh Georgia peach, gutting a blue gill, cutting bailing twine, sharpening a carpenter’s pencil, and for the inevitable splinter removal while chopping firewood. But, by far, the most relaxing task was whittling on a stick as the aroma of wood smoke soaked into our clothes and canvas tent.
Without a knife, a man from my parts was close to useless.
For this tutorial on beginner knife use, we’ll cut through all the fluff and get back to the basics of selecting and using a knife safely.
Knife Selection
As the parent, only you will know when your child is responsible enough to use a knife. When that time comes, allow him/her to hold and use several knives to test the fit in smaller hands. My first knife was the pocket knife described above. For camping and other outdoor activities, we’ll focus our attention on sheath knives (non-folding).
However, if you decide to go with a jack knife (pocket knife), which is hard to beat for simple whittling, steer away from multitool types. They’re too fat, bulky, and uncomfortable for longterm use. Buy a folder with three or less blades. The handle should have smooth edges to prevent hot spots which lead to blisters. When gripped, your child should have enough room to rest his thumb on the knife handle and not the open blade.
Two blade, three blade, and a multi-blade knife.
No need to spend a lot of money on a kid’s first sheath knife. I bought my grandson his first fixed-blade knife, a Mora Companion, for under $15.00. This four-inch blade has a non-slip handle which fits his hand. There is also a slight knob on the forward handle near the blade for added protection against slipping a hand down the blade. The carbon steel is easy to sharpen and maintain. The scandi grind really bites into wood to produce fine, controlled shavings when whittling.
L to R: Mora Companion, Mora Classic, and a smaller Classic. Below is Fixin’ Wax and steel wool.
The spine of the sheath knife (opposite of the cutting edge) isn’t given much thought to new campers. It’s not the business end of your blade, right? Not true. A 90 degree spin comes in handy for many camp tasks such as creating fat lighter shavings, sparking ferro rods, and smoothing wood surfaces. If your knife spine is rounded, take a bastard file to the edge and create right angles on the spin. Our video below demonstrates the usefulness of a sharp spin in fire craft…
A fixed blade sheath should hold your child’s knife firmly in place. If you turn the sheath upside down, the knife should stay put.
Knife Safety
Our gun community does an excellent job of teaching gun safety to children. The same should be taught concerning knives. A knife is a tool, not a toy. A sharp knife holds potential for serious injury, even death. There are inherit dangers with edged tools. With proper training, supervision, and experience (and a few band aids), your child will soon build confidence in his new skills.
Here’s a few safety guidelines to remember:
To remove a knife from a belt sheath like the Mora Companion, grip the handle and place your thumb on sheath tab. With gentle downward pressure from the thumb, the knife will release. Do not forcefully pull the knife as you will lose control of the blade. Return the knife in the same manner, in a controlled manner, until the blade snaps back into the sheath. In the beginning stage of practice, you may want to add a strip of painters tape to the cutting edge until you demonstrate proficiency in the process.
Grip handle and press the thumb tab to safely remove blade.
Only use a knife when your Blood Circle is clear of others and obstacles. To define the Blood Circle, stand with arms outstretched. Turn full circle to make sure no other person is within this space.
Never whittle with a knife within your Blood Triangle. It may seem natural to whittle between your legs while in the seated position with knees spread. Cutting within this danger zone, a triangle formed between your knees and crotch, is inviting disaster. One slip and the blade could plunge into the femoral artery.
For basic whittling, always cut away from your body. There are times when cutting towards the body is acceptable, but these strokes are for more advanced users.
With a knife in hand, it is your responsibility to make sure no person is within your Blood Circle. If someone enters, stop whittling and sheath your knife.
Keep your knife sharp (We’ll cover sharpening in a later article). It may sound contrary, but a dull knife poses more danger than a sharp one. It takes more applied force to make a dull knife cut wood or potatoes. A keen edge slices with more control.
Never attempt to catch a falling knife.
Keep your knife sheathed when not in use. Do not walk, much less run, around with an unsheathed knife.
To pass your knife to someone, hold the spin between your curled index finger and thumb with the handle towards the person. When the fellow grips the handle, don’t release the blade until he says “thank you.” This lets you know he has a firm grip on the handle.
“Thank you”
Knife Care
Carbon steel blades are sharpened more easily than stainless steel. However, high carbon will rust if neglected. Always wipe excess moisture from the blade after each use. Lubricate your blade with a food safe oil before stowing your knife for your next adventure.
If a rust spot appears, hit the area with 0000 steel wool and apply oil. My go-to lubricant is my DiY Fixin’ Wax. This stuff has many uses for camping and woodcraft.
Whittling Skills
Once you’ve learned and demonstrated the above safety tips, it’s time to do some whittling. You’ll need a softwood stick with no knots. Pine, tulip poplar, and basswood are all good choices. If green, pine will coat your blade and hands with resin. Fixin’ Wax will remove the sap from both. Dowels from hardware stores will work as well. Find a stick about an inch in diameter and about a foot or two long. A longer stick can be tucked between your elbow and side for extra stability while whittling.
Overhand Grip
The overhand grip will be your most used method in basic whittling. Place the spine side of the handle in the palm of your strong hand. The spine/back of the handle should lay in the “V” between your thumb and index finger. Don’t put a death grip on the handle until your knuckles turn white. Relax your hand. Your brain will tell your hand when to grip the handle tight in use. With your arm and fist extended in front of you, the cutting edge will face away from your body.
Back of handle fits into the V between your thumb and index finger. It’s like you’re shaking hands with the handle.
The first step will be to remove the bark from the stick. This helps you get the feel for how the blade bits into the wood. With the stick gripped in your off-hand, begin slicing the bark off your stick with controlled slices an inch or so below/past your off-hand. Try not to dig your blade into the wood beneath the bark. When half the bark is removed, flip the stick and remove the other half.
Remember to work outside your Blood Triangle.
Now sharpen one end of the stick to a pencil point. Gradually begin shaving small amounts of wood off to a point. No need to hurry the process. Just relax and enjoy whittling. If you get tired, stop and rest. Fatigue leads to careless mistakes.
Gradual strokes to get to the point.
Try to make your stick resemble a sharpened pencil.
Thumb Lever/Push Cut
This technique, a bit more advanced, allows you make controlled cuts for notches and detailed carving work. Yep, it’s time to notch the opposite end of the pencil point your just whittled. You’re about to create your first tent stake.
Using an overhand grip, rock the blade of your knife perpendicular on your stick about an inch or two on the end opposite the pencil point. Cutting across the grain of wood with an edged tool is difficult and applies lots of downward pressure. It’s best to place the stick on a support (a chopping stump, large log, etc.). Rock the blade until you create a 1/8 to 1/4 inch kerf across the grain.
Cut across the grain on a solid support.
You’re now ready to use the thumb lever. Grip the stick with your off-hand about an inch or so from the kerf you just rocked. Maintain your overhand grip with the blade resting an inch down from the kerf. Grip the stick with your off-hand just behind the blade. Place your off-hand thumb on the knife handle in the “V” of your strong hand. Angle the blade into the wood and push the handle with your off-hand thumb until the blade reaches the kerf. Again, take small, shallow cuts until you reach the bottom of the kerf. You’ll want to rock the blade in the kerf until your reach about 1/3 the diameter of the stick. Continue alternating between each cut for a smooth notch to tie off your tent or tarp line.
You thumb acts as a fulcrum to leverage your blade through wood safely.
One last cut to finish your tent stake. On the notched end of the stick (the end you’ll pound on to drive the stake), whittle off a small portion of the right angle edge (1/8 inch) of the rim. This chamfer cut will help prevent the stake from splitting when pounded into the ground.
Use the thumb lever to remove the sharp edge. Keep your fingers safely below the top edge of the stick.
Congrats on making your first tent stake!
As your skills progress, try carving a few simple pot hooks for your camp kitchen. I think you’ll find your journey into woodcraft and camping to be very rewarding. Knife craft is only the beginning… now get outside and whittle something useful!
P.P.S – If you find value in our blog, Dirt Road Girl and I would appreciate your vote on Top Prepper Sites! You can vote daily by clicking hereor on the image below. Check out all the other value-adding sites while you’re there…
What’s in your pockets? If you look at the popular trend of pocket dumps on social media, the answer appears to be everything, except the kitchen sink. I seldom see fire tools in these pocket dumps. Of course, our Everyday Carry items will look different depending on our jobs, lifestyle, and skill level.
Several of us from the Prepared Bloggers are sharing different EDC (Everyday Carry) items we never leave home without. Being the pyro that I am, I choose fire. Be sure to read the other value-adding articles by my friends in the links below this article.
The concept of carrying essential items on one’s person is smart habit. If ever separated from your main preparedness kit, the stuff in your pockets, plus your skillset to use said items, may be the only tools available.
The tool doesn’t determine your success. Your skills determine the tool’s success.
The quote above applies to preppers, survivalists, campers, carpenters, homesteaders, accountants, school teachers, and, well, all of us.
Pockets of Fire
If you frisked me, no matter the locale (urban or wilderness), you’d discover a minimum of three ignition sources in my pockets…
Mini Bic lighter (open flame)
Ferrocerium rod (spark ignition)
Fresnel lens (solar)
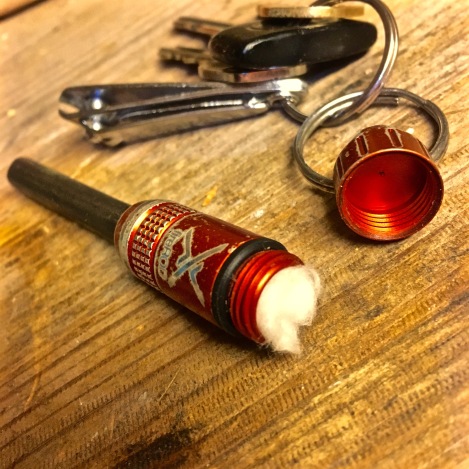
L to R: Key chain Exotac fireRod, mini Bic lighter, wallet fresnel lens, and two wallet tinders: duct tape and waxed jute twine.
Let’s break these down and discuss the advantages, disadvantages, and a few tips to successfully use each fire tool. Keep in mind that these are simply ignition sources and do not guarantee a sustainable fire. For more info on the importance of fire, you may find this article useful.
Bic Lighter – Open Flame
Since a road flare isn’t practical for EDC, I carry a mini Bic. The resemblance of road flares to dynamite puts people on edge, especially law enforcement officers. I do have them in my vehicle kits though.
The times you really need fire is usually when fire is hardest come by. I’ll take an open flame over sparks, solar, and especially fire by friction every day of the week and twice on Sundays! As mentioned previously, you must put in deliberate practice to hone your fire craft skills by actually Doing the Stuff or these fire tools just look cool in pocket dumps on Instagram.
To learn more on building sustainable fires, browse our Fire Craft Page.
Cold hands loose dexterity and make normally simple tasks, striking a lighter, difficult. Modify your EDC lighter by removing the child-proof device wrapped over the striker wheel. Pry it up from the chimney housing. Once free, pull the metal band from the lighter. Two metal wings will point up after removal. Bend the wings down flat to protect your thumb when striking the lighter.
What if your lighter gets wet?
On a recent wilderness survival course, I taught our boy scout troop how to bring a wet lighter back to life. Each threw their non-child-proofed lighter into the creek. After retrieval, they were instructed to blow excess moisture out of the chimney and striker wheel. Next, they ran the striker wheel down their pant leg several passes to further dry the flint and striker. Within a few minutes, lighters were sparking and each scout had a functioning fire tool again.
The lighters I carry in my bushcraft haversack and hiking backpack are more tricked out than my plain ole’ EDC Bic. Here’s a few ideas I’ve picked up for adding redundant lighters which may be of interest…
This full-size Bic is wrapped in duct tape holding a loop of cord which attaches inside my haversack. The green cap (spring clamp handle end) idea came from Alan Halcon. It keeps moisture out and prevents the fuel lever from being accidentally depressed.
The cap removed reveals the child-proof device missing.
Advantages
A mini Bic will give you approximately 1,450 open flames.
A wet Bic can be back in service within a minute or so.
It’s difficult to monitor the fuel level unless the housing is clear.
They are consumable… eventually.
Extreme cold limits a Bic. Keep it warm inside a shirt pocket under your overcoat.
A mythical disadvantage is that lighters won’t work in high altitudes. If Sherpas use them on Mt. Everest, this lowland sherpa is sold.
Ferrocerium Rod (Firesteel)
In the bushcraft/survivalist/prepper community, ferro rods have the hyped reputation of being a fail-safe fire maker. The device is simple and won’t malfunction, they say. Scrap the metal off the rod, and, poof, you have a fire, even in the rain. Sounds good but don’t buy the marketing hype!
“Much of the social history of the Western world, over the past three decades, has been a history of replacing what worked with what sounded good.”
~ Thomas Sowell
In my experience teaching both children and adults, using a ferro rod for the first time ends in failure more times than not. Yet everyone is told to add one to their emergency fire kits. I carry a small one on my key chain because I enjoy practicing fire craft skills. They’re a novel way of making fire but, like any skill, require practice to become proficient.
The fireROD by Exotac has a watertight compartment which will hold a full cotton makeup pad for tinder.
Of these three ferro rod techniques – push, pull, and thumb lever – the latter is my favorite on softer firesteels. It offers more accurate placement of sparks. The drawback is that the thumb lever requires more fine motor skills and coordination which go bye-bye in an adrenaline spiked emergency scenario. That’s why I carry a Bic!
If you’ve never tried the thumb lever technique, here’s a short video demonstration which may help…
One of the many reasons I practice fire by friction is the fact that it teaches the importance of preparing proper tinder material. Marginal tinder takes more heat to combust. Even with 3,000 degree ferro rod sparks, you may fail to ignite damp, finely shredded tinder. The amount of heat needed for ignition depends on the amount of surface area compared to its volume. Think in terms of small hair-like fibers. When you think you’ve got fine tinder, shred it some more.
Even without a “proper” striker or knife, any object hard enough to scrap metal off makes a good substitute.
A ferro rod/metal match is not my first choice in fire starters. It’s a fun bushcraft tool to use though.
Advantages
Scraped with a sharp rock, broken glass, or any object sharp enough to remove metal particles, 1,500º F to 3,000º F sparks spontaneously combust as they meet air.
Sparks even in wet conditions.
The average outdoors person will never use up a ferro rod.
Can ignite many tinder sources.
For more info on ferro rods, click here. My EDC rod is way smaller than the one in the link.
Disadvantages
They are consumable… eventually.
They’re difficult to use if you’ve never practiced with this tool.
Intermediate skill level needed.
Fresnel Lens
A quality fresnel lens is useful for starting fires, examining plants and insects, splinter and tick removal, and reading navigational maps. I carry a 4 power lens in my wallet. It takes up about as much space as a credit card. I ordered a 3-pack from Amazon for under $7.
Sunshine is loaded with electromagnetic energy in the form of photons. A fresnel lens simply harnesses the energy to a focused point creating enough heat to start a fire.
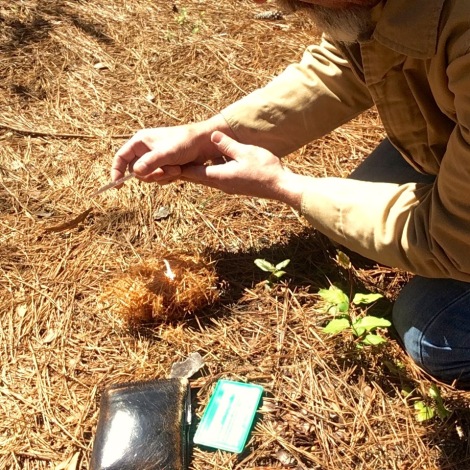
A few tips I’ve learned may help here. Not all tinder material will combust. You’ll get smoke and char but may never have an actual flame. In the short video below, within a second you’ll see smoke on crushed pine straw. Once a large area was smoldering, I had to blow the embers into a flame.
Increase your odds of solar ignition by keeping the lens perpendicular to the sun’s rays and the tinder. Move the lens closer or further away until the smallest dot of light strikes the target. Brace your hand to steady the spot of heat. Smoke should appear almost immediately. Afternoon sun is stronger than morning sun. Keep this in mind when practicing this method.
Keep the lens perpendicular to the sun’s rays to concentrate the most radiant energy on your tinder.
Just for fun, I discovered that cocoa powder, which I carry in my bushcraft kit, makes a useable coal with solar ignition. Have fun playing and experimenting with fire!
Advantages
Beginner skill level. Ever drive ants crazy with one as a kid?
Can ignite different tinder materials
Lightweight
Saves other ignition sources on sunny days.
Never wears out. Always protect your lens from scratches and breakage.
Disadvantages
Dependent on sunshine.
May only create an ember which can be coaxed into flame.
EDC Fire Tinder
Duct tape and waxed jute twine ride alongside my fresnel lens in my wallet. You’ll also find a full-size cotton makeup pad stuffed inside the cap of my ferro rod. Wrapping a few feet of tape around an old gift card gives you an emergency tinder source for open flame ignition. Setting fire to a foot long strip of loosely balled duct tape will help ignite your kindling. There are so many multi-functional uses of duct tape, fire being one of them, that you should always carry at least a few feet in your wallet.
The waxed jute twine can be unravelled to create surface area for spark ignition. Unraveled, it can also be used as a long-burning candle wick. Either way, it’s nice to have another waterproof tinder in your pocket/wallet. Here’s a link if you’re interested in making your own waxed jute twine.
If all you have for ignition is a ferro rod, duct tape will ignite, but again, don’t count on it if you haven’t practiced this method. See our video below…
It never hurts to have multiple fire starting methods on your person. Drop us a comment on other EDC fire starters that I haven’t mentioned.
Be sure to scroll down and check out the other articles by my friends at the Prepared Bloggers.
P.P.S – If you find value in our blog, Dirt Road Girl and I would appreciate your vote on Top Prepper Sites! You can vote daily by clicking hereor on the image below. Check out all the other value-adding sites while you’re there…
Everyday carry, or EDC for short, refers to items that are carried on a regular basis to help you deal with the normal everyday needs of modern western society and possible emergency situations.
Some of the most common EDC items are knives, flashlights, multitools, wallets, smartphones, notebooks, and pens. Because people are different, the type and quantity of items will vary widely. If you have far to travel for work or have young children, your EDC could be huge!
But, even if you’re just setting out for a walk around the neighborhood, taking your essential items with you in a pair of cargo pants with large pockets, may be all you need to be prepared.
Follow the links to see what a few of the Prepared Bloggers always carry in their EDC.
Shelle at PreparednessMama always carries cash, find out why and how much she recommends.