I welcome the sight of goldenrod blooming in Georgia. These tiny, golden flowers signal the end of the dog days of summer and usher in cooler weather.
Goldenrod gets a bad rap when it comes to seasonal fall allergies. The average person sees the blooming yellow stalks on roadsides and fields and automatically blame these showy goldenrod heads for their itchy eyes, runny nose, and sneezing. The most likely allergy suspect is goldenrod’s cousin – ragweed.
Goldenrod and ragweed both belong to the Asteraceae family. The good news is that goldenrod, the good cousin, can be used to treat seasonal allergies caused by the bad cousin, ragweed. Instead of blaming goldenrod, use it. Here’s a simple tincture recipe.
Harvest goldenrod in full bloom by cutting a few inches below the yellow flower head. I don’t recommend harvesting from highways/roadsides that are likely sprayed with chemicals for weed control.
I was in a hurry so I didn’t finely chop the flowers, stems, leaves for this batch. Chopping creates more surface area for contact with the alcohol used in the tincture process. We’ll see how this goes. I’m betting it’ll turn out fine.
Add the chopped goldenrod to a clean glass jar. Pack it down as you fill the container about 3/4’s full of plant material.
Pour enough alcohol into the jar to cover the chopped goldenrod. I used cheap vodka… because I’m cheap, and retired.
I remembered seeing someone top off the alcohol with water to fill the jar. They said some of the medicinal properties in goldenrod could only be extracted using water. I’m no expert herbalist, but I thought I’d give it a shot. I used filtered water from my Berkey water filter even though I have well water.
Seal the jar with a lid and label it with the date of production. Store it in a cool, dark cupboard. Shake the jar and contents every day or so if you remember… which I forget to do at times.
In about six weeks, the tincture can be strained and ready to use.
I mention that I’m far from a professional herbalist. I do have two friends who are highly accomplished in this field. If you’re interested in learning more from them, follow them at the links below:
The usual disclaimer: I never give medical advice here. I’m not a doctor. Consult your physician for your health care needs. I have personally overcome health challenges using plant-based medicine. Your mileage may vary.
Goldenrod has been used for many years to help with allergy symptoms, sore throat, runny nose, itchy eyes, and colds and flu. It may also relieve toothache, sore muscles, inflammation and pain. Some claim antioxidants in the plant have anti-cancer properties.
Researching the benefits of goldenrod, I also discovered it shows promise for fighting kidney stones. This possibility alone makes me smile big! If you’ve never had a kidney stone, you won’t understand.
If you’ve personally found goldenrod to be helpful, drop us a line in the comments, please.
What’s in your pockets? If you look at the popular trend of pocket dumps on social media, the answer appears to be everything, except the kitchen sink. I seldom see fire tools in these pocket dumps. Of course, our Everyday Carry items will look different depending on our jobs, lifestyle, and skill level.
Several of us from the Prepared Bloggers are sharing different EDC (Everyday Carry) items we never leave home without. Being the pyro that I am, I choose fire. Be sure to read the other value-adding articles by my friends in the links below this article.
The concept of carrying essential items on one’s person is smart habit. If ever separated from your main preparedness kit, the stuff in your pockets, plus your skillset to use said items, may be the only tools available.
The tool doesn’t determine your success. Your skills determine the tool’s success.
The quote above applies to preppers, survivalists, campers, carpenters, homesteaders, accountants, school teachers, and, well, all of us.
Pockets of Fire
If you frisked me, no matter the locale (urban or wilderness), you’d discover a minimum of three ignition sources in my pockets…
Mini Bic lighter (open flame)
Ferrocerium rod (spark ignition)
Fresnel lens (solar)
L to R: Key chain Exotac fireRod, mini Bic lighter, wallet fresnel lens, and two wallet tinders: duct tape and waxed jute twine.
Let’s break these down and discuss the advantages, disadvantages, and a few tips to successfully use each fire tool. Keep in mind that these are simply ignition sources and do not guarantee a sustainable fire. For more info on the importance of fire, you may find this article useful.
Bic Lighter – Open Flame
Since a road flare isn’t practical for EDC, I carry a mini Bic. The resemblance of road flares to dynamite puts people on edge, especially law enforcement officers. I do have them in my vehicle kits though.
The times you really need fire is usually when fire is hardest come by. I’ll take an open flame over sparks, solar, and especially fire by friction every day of the week and twice on Sundays! As mentioned previously, you must put in deliberate practice to hone your fire craft skills by actually Doing the Stuff or these fire tools just look cool in pocket dumps on Instagram.
To learn more on building sustainable fires, browse our Fire Craft Page.
Cold hands loose dexterity and make normally simple tasks, striking a lighter, difficult. Modify your EDC lighter by removing the child-proof device wrapped over the striker wheel. Pry it up from the chimney housing. Once free, pull the metal band from the lighter. Two metal wings will point up after removal. Bend the wings down flat to protect your thumb when striking the lighter.
What if your lighter gets wet?
On a recent wilderness survival course, I taught our boy scout troop how to bring a wet lighter back to life. Each threw their non-child-proofed lighter into the creek. After retrieval, they were instructed to blow excess moisture out of the chimney and striker wheel. Next, they ran the striker wheel down their pant leg several passes to further dry the flint and striker. Within a few minutes, lighters were sparking and each scout had a functioning fire tool again.
The lighters I carry in my bushcraft haversack and hiking backpack are more tricked out than my plain ole’ EDC Bic. Here’s a few ideas I’ve picked up for adding redundant lighters which may be of interest…
This full-size Bic is wrapped in duct tape holding a loop of cord which attaches inside my haversack. The green cap (spring clamp handle end) idea came from Alan Halcon. It keeps moisture out and prevents the fuel lever from being accidentally depressed.
The cap removed reveals the child-proof device missing.
Advantages
A mini Bic will give you approximately 1,450 open flames.
A wet Bic can be back in service within a minute or so.
It’s difficult to monitor the fuel level unless the housing is clear.
They are consumable… eventually.
Extreme cold limits a Bic. Keep it warm inside a shirt pocket under your overcoat.
A mythical disadvantage is that lighters won’t work in high altitudes. If Sherpas use them on Mt. Everest, this lowland sherpa is sold.
Ferrocerium Rod (Firesteel)
In the bushcraft/survivalist/prepper community, ferro rods have the hyped reputation of being a fail-safe fire maker. The device is simple and won’t malfunction, they say. Scrap the metal off the rod, and, poof, you have a fire, even in the rain. Sounds good but don’t buy the marketing hype!
“Much of the social history of the Western world, over the past three decades, has been a history of replacing what worked with what sounded good.”
~ Thomas Sowell
In my experience teaching both children and adults, using a ferro rod for the first time ends in failure more times than not. Yet everyone is told to add one to their emergency fire kits. I carry a small one on my key chain because I enjoy practicing fire craft skills. They’re a novel way of making fire but, like any skill, require practice to become proficient.
The fireROD by Exotac has a watertight compartment which will hold a full cotton makeup pad for tinder.
Of these three ferro rod techniques – push, pull, and thumb lever – the latter is my favorite on softer firesteels. It offers more accurate placement of sparks. The drawback is that the thumb lever requires more fine motor skills and coordination which go bye-bye in an adrenaline spiked emergency scenario. That’s why I carry a Bic!
If you’ve never tried the thumb lever technique, here’s a short video demonstration which may help…
One of the many reasons I practice fire by friction is the fact that it teaches the importance of preparing proper tinder material. Marginal tinder takes more heat to combust. Even with 3,000 degree ferro rod sparks, you may fail to ignite damp, finely shredded tinder. The amount of heat needed for ignition depends on the amount of surface area compared to its volume. Think in terms of small hair-like fibers. When you think you’ve got fine tinder, shred it some more.
Even without a “proper” striker or knife, any object hard enough to scrap metal off makes a good substitute.
A ferro rod/metal match is not my first choice in fire starters. It’s a fun bushcraft tool to use though.
Advantages
Scraped with a sharp rock, broken glass, or any object sharp enough to remove metal particles, 1,500º F to 3,000º F sparks spontaneously combust as they meet air.
Sparks even in wet conditions.
The average outdoors person will never use up a ferro rod.
Can ignite many tinder sources.
For more info on ferro rods, click here. My EDC rod is way smaller than the one in the link.
Disadvantages
They are consumable… eventually.
They’re difficult to use if you’ve never practiced with this tool.
Intermediate skill level needed.
Fresnel Lens
A quality fresnel lens is useful for starting fires, examining plants and insects, splinter and tick removal, and reading navigational maps. I carry a 4 power lens in my wallet. It takes up about as much space as a credit card. I ordered a 3-pack from Amazon for under $7.
Sunshine is loaded with electromagnetic energy in the form of photons. A fresnel lens simply harnesses the energy to a focused point creating enough heat to start a fire.
A few tips I’ve learned may help here. Not all tinder material will combust. You’ll get smoke and char but may never have an actual flame. In the short video below, within a second you’ll see smoke on crushed pine straw. Once a large area was smoldering, I had to blow the embers into a flame.
Increase your odds of solar ignition by keeping the lens perpendicular to the sun’s rays and the tinder. Move the lens closer or further away until the smallest dot of light strikes the target. Brace your hand to steady the spot of heat. Smoke should appear almost immediately. Afternoon sun is stronger than morning sun. Keep this in mind when practicing this method.
Keep the lens perpendicular to the sun’s rays to concentrate the most radiant energy on your tinder.
Just for fun, I discovered that cocoa powder, which I carry in my bushcraft kit, makes a useable coal with solar ignition. Have fun playing and experimenting with fire!
Advantages
Beginner skill level. Ever drive ants crazy with one as a kid?
Can ignite different tinder materials
Lightweight
Saves other ignition sources on sunny days.
Never wears out. Always protect your lens from scratches and breakage.
Disadvantages
Dependent on sunshine.
May only create an ember which can be coaxed into flame.
EDC Fire Tinder
Duct tape and waxed jute twine ride alongside my fresnel lens in my wallet. You’ll also find a full-size cotton makeup pad stuffed inside the cap of my ferro rod. Wrapping a few feet of tape around an old gift card gives you an emergency tinder source for open flame ignition. Setting fire to a foot long strip of loosely balled duct tape will help ignite your kindling. There are so many multi-functional uses of duct tape, fire being one of them, that you should always carry at least a few feet in your wallet.
The waxed jute twine can be unravelled to create surface area for spark ignition. Unraveled, it can also be used as a long-burning candle wick. Either way, it’s nice to have another waterproof tinder in your pocket/wallet. Here’s a link if you’re interested in making your own waxed jute twine.
If all you have for ignition is a ferro rod, duct tape will ignite, but again, don’t count on it if you haven’t practiced this method. See our video below…
It never hurts to have multiple fire starting methods on your person. Drop us a comment on other EDC fire starters that I haven’t mentioned.
Be sure to scroll down and check out the other articles by my friends at the Prepared Bloggers.
P.P.S – If you find value in our blog, Dirt Road Girl and I would appreciate your vote on Top Prepper Sites! You can vote daily by clicking hereor on the image below. Check out all the other value-adding sites while you’re there…
Everyday carry, or EDC for short, refers to items that are carried on a regular basis to help you deal with the normal everyday needs of modern western society and possible emergency situations.
Some of the most common EDC items are knives, flashlights, multitools, wallets, smartphones, notebooks, and pens. Because people are different, the type and quantity of items will vary widely. If you have far to travel for work or have young children, your EDC could be huge!
But, even if you’re just setting out for a walk around the neighborhood, taking your essential items with you in a pair of cargo pants with large pockets, may be all you need to be prepared.
Follow the links to see what a few of the Prepared Bloggers always carry in their EDC.
Shelle at PreparednessMama always carries cash, find out why and how much she recommends.
The power of simple machines, smartly employed, are capable of moving most anything. Over the years I helped my daddy move really heavy stuff in his plumbing/welding business and on our farm. He once moved and installed a new 3,000 gallon metal water tank at our elementary school using only ropes, pulleys, and levers… by himself.
Daddy didn’t possess superhuman strength, he simply understood the power of simple machines.
Give me a lever long enough and a fulcrum on which to place it, and I shall move the world.
Archimedes
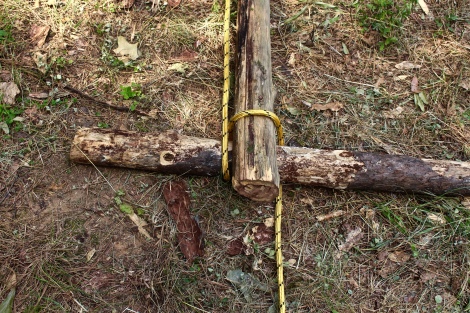
I first discovered this ingenious flip-flop winch from a YouTube demonstration by Mors Kochanski, the Godfather and author of Bushcraft. A search of flip-flop winches on YT will garner several clips demonstrating the power of using two logs and some rope. So why would I add my video to mix? Because it’s only theory until you put it into action by Doing the Stuff!
The flip-flop winch combines two simple machines, lever and pulley (wheel and axle), as a force multiplier to free vehicles stuck in the mud, safely dislodge hang-ups when felling trees, and/or move heavy rocks. I decided to pull my truck up a slight incline in a field.
Flip Flop Winch
In an emergency vehicle kit, weight and space are not an issue – unless you tool around in a Smart Car. For this winch, all you need are two logs and some rope. Of course, you’re not hauling eight foot logs in your vehicle. You will have to cut those with your truck ax or takedown bucksaw.
Material and Tools
Ax or Saw – cut two logs about 8 feet in length
Rope – non-elastic is preferable for safety reasons
Cordage – enough to make two loops about 1 foot in diameter
L to R: Green paracord loops, 100′ of rope, truck saw, truck ax. Top pole – lever pole. Bottom pole – pulley pole.
Cut Two Poles
You’ve hit a ditch or snow bank (rarely happens in Georgia) in the hinter-boonies and need to get unstuck. Reach into your vehicle emergency kit and fetch your saw or ax. You have an emergency vehicle kit, right? Be sure to add 100 feet of strong rope to the kit if you haven’t already. A tow strap won’t be useful with this winch unless it’s really long.
Scout for a straight tree (dead or live – it’s an emergence) to cut. Anything between 4 to 6 inches in diameter is suitable. Cut two lengths in the 8 foot range. De-limb the poles by chopping any branches off with your sharp truck ax. You can saw them off but proper ax-manship makes quick work of the de-limbing. This process is best done by cutting from the trunk end to the top end of the pole. Keep the pole between your body and the moving ax.
Lever and Pulley Pole
Now that you’ve got two poles, one will be used as the “lever pole” and the other will be your “pulley pole.” I noticed in my video that I called the drum pole a “barrel” pole interchangeably. In this written tutorial, I will use “pulley pole” to hopefully clear up the verbiage. The terminology is not that important. What you need to know is that the pulley pole is where the rope will coil similarly to that of a modern come-along.
Using Rig 2 causes the rope to coil on one side of the pulley pole
A larger diameter pulley will winch more rope with each revolution. The pulley pole I used was a standing dead pine which was a bit lightweight for the job. I was forced to drive two stakes in the ground to prevent the pulley pole from swinging in towards the tensioned rope in our video. With two people available, the stakes wouldn’t be necessary. A heavier pulley pole will solve the issue as well. I wanted to simulate and experiment with the lowest quality wood I could scavenge. The lever was a smaller dead cedar but the most solid of the two poles.
Locate an Anchor
The base of a live tree is perfect. A dead tree is not a good candidate. You’ll risk toppling the tree down if the object you’re pulling is really stuck or heavy. Wrap the rope around the base of the anchor twice and tie it off with a tensioning knot.
The base of a Sourwood tree was used as an anchor point.
Ideally, you want the anchor point and the object you’re pulling to form a straight line sighted down the rope.
Both truck and anchor point are lined up for optimal pull.
2 Rigging the Systems
Midway between the anchor and object lay the two poles perpendicular to one another. Run the rope on top of the pulley pole about a foot from the larger end of the pole. Pull the rope back under the pole to form a loop. Insert the lever pole into the loop from the side of the pulley pole where the loop is formed. Give yourself about a foot of lever sticking through the loop.
The loop formed to receive the lever pole.
There are two methods of rigging the winch. Rig 1: One causes the rope to coil on both side of the pulley pole where the lever pole crosses (demonstrated on the video). Rig 2: This technique causes the rope to spool on one side of the pulley pole. I’ve found that the latter method causes less side-to-side torque since the rope remains in a straight line.
With the winch rigged, pull the slack out of the line and tie to the object you’re pulling. Another tension knot will work.
Start the Flip-Flop
Flip the lever pole up and over the pulley pole. Once on the ground, check the first wrap on the pulley pole. This is the time to straighten the loops around the pulley before real tension begins. Try to keep the rope from spooling on top of the previous coils as this may weaken the rope. With each flip-flop, the rope will begin coiling on the pulley pole.
Rig 1: This set up will spool rope on both sides of the pulley pole (shown in the video)
Note: I’ve watched others spool rope on one side of the pulley pole only. This technique decreases the swing of the pulley pole towards the rope under tension. To use this method, place the rope attached to the anchor and the object on the same side of the lever pole before flip-flopping.
Rig 2: One revolution with the rope spooling on one side of the pulley pole
Notice how the rope coils to one side of the lever pole (Rig 2). With the rope in line, the pulley pole is less likely to torque in towards the tow rope..
Now, flop the pulley pole over the rope for the next flip of the lever. If the pulley pole was magically suspended off the ground, no flop would be required. This would become a Spanish windlass. You’d simple spin the lever around a wheel and axle. The earth prevents this continuous spin. But the ground is what keeps the system from unraveling. The flop of the pulley pole is necessary for the lever to make another 180 degree revolution.
The rope spooling down the long end of the pulley pole (Rig 2).
Continue this flip-flop action until the object is freed. Six full revolutions around the pulley is what it took to inch my truck up the incline to level ground in the video.
Flip-Flop Tips When Alone
If you practice the technique with rope coiling on the pulley pole on both sides of the lever, you’ll find that the pulley has a tendency to swing in towards the rope as tension increases. My fix was to drive two stakes on opposite sides of the rope where the pulley pole lands on each flop. If the ground is too hard for stakes, a heavy rock or object may prevent the slide. As mentioned above, a heavier pulley pole would decrease the chances of this happening.
Experimenting with the rope spooling on one side of the pulley pole remedied the torque issues. I recommend using this method (Rig 2) vs. the rope spooling on opposite sides of the lever pole (Rig 1).
Also, under tension, the lever pole can rise off the ground with either method. Attach a loop of cordage on the tow rope where the flipped lever lands. Slide the loop over the lever on each flip once a good amount of tension is present.
A Prussic Loop is a quick way to connect to the standing rope
Disconnecting the Rig
Obviously, once a vehicle is freed, the rope is no longer under tension. However, when pulling a tree or rock, tension can be released by reversing direction of the flip-flop. Once tension is removed, the spooled line can be handled safely.
Safety Concerns
There are inherent dangers when tension is applied to a rope or cable. If the rope has elasticity and snaps, the potential energy turns to kinetic energy moving like a slingshot or bow and arrow in opposite directions. Use rope without elasticity, nicks, abrasions, and a working load suitable for the task.
If you’re alone, you must cross over the rope in this process. Minimize the risk from flying rope by laying a heavy coat or blanket (if available) on the rope at both ends. You can also lay branches on the line if no blanket is available. With two people, nobody has to step over the taut line.
Another safety precaution is to wear leather gloves and eye protection. A smart thing to have is a knife handy to cut the rope if you somehow manage to get a hand pinched between the rope and pulley. Not sure how that might happen but better safe than sorry.
This powerful simple machine takes practice to perform properly. With a minimum of tools and some rope, the flip-flop winch can be a life saver on the homestead or in the backcountry. Add it to your preparedness toolbox. Give it a try and share your results.
P.P.S – If you find value in our blog, Dirt Road Girl and I would appreciate your vote on Top Prepper Sites! You can vote daily by clicking hereor on the image below. Check out all the other value-adding sites while you’re there…
Primitive fire – bow drill sets and tinder material
Inner bark for natural cordage
Spoons, bowls, cups, and tools
Medicinal uses
Material and building uses which we employ today
The best time to harvest the bark is late spring and early summer when the sap is rising.
Obviously, you don’t want to cut down the only tulip tree in the forest. I scout my woods to find an overcrowded stand of poplars and harvest one out of 3 or 4 which are close together. The rest of the tree doesn’t go to waste. What’s not used for containers is used for natural cordage, tinder material, spoons and bowls, and primitive fire sets.
Trees under 6 inches in diameter are felled with my take down buck saw. I use an ax for trees over 6 inches. Need felled a tree? Click hereto learn how.
Arrow Quiver
The entire process can be done in the woods. Or, do as I did… cut the log into 6 foot lengths and haul it to the vehicle for transport home. Actually, I did part of the project in the woods and finished up at my shop.
Below are a few tools used to make my quiver…
Bucksaw is not pictured
Cut and Remove Bark
On a straight section with few knots (or eyes), measure off the desire length of your quiver. Cut through the bark to the white sap wood on both ends in a ring fashion. A saw makes quick work of this task but can also be done with a knife.
The whole sleeve removed. The bucksaw is 21 inches long.
With your knife, cut a straight line from both ring cuts down the length of the log all the way to the sap wood. Be sure to cut through the outer and inner bark.
Work your knife or a wedged stick under one edge where the parallel cut meets the ring cut and begin gently prying the bark free from the sap wood.
Take it easy. Going too fast will cause the bark to crack and ruin your resource. You’re not cutting the bark loose as you might skin a big game animal. The knife is a pry bar now. Free the bark about an inch or so on both edges of the center cut.
Wedge your fingers between the freed bark edge and the sap wood and slowly begin separating the bark. Work your way around the entire log from the center cut. Be careful not to prick your finger on any small prickly points on the sap wood.
Once disconnected from the sap wood, the flexible bark sleeve can be removed. Now your ready to make lacing holes along both sides of the center cut.
Bore Holes
Now that the bark is off the tree, slip it back on. The log will be used as an anvil for boring lacing holes along both sides of the center cut. You don’t have to use the log as an anvil but it’s a bit more convenient to do so. A wheel punch used in leather work is another option for making holes in bark.
Stitching holes bored into both sides of the parallel cut
With a bone awl or modern awl, bore a line of holes about 1/2 inch from the edge of both center cuts. I spaced my row of holes about 1.5 inches apart – starting at about 1 inch from each end. Try to keep the holes matched up on both sides of the center cut.
Lacing
Rawhide, natural cordage, or synthetic string are all options. Your choice depends on what’s available and how primitive you want your quiver to look. Tarred bank line is a down and dirty option that will work… forever.
I used artificial sinew and leather work needles to stitch the seam in a ‘X’ pattern. Measure and use about 4 times the length of the quiver in cordage. This allows enough leftover cordage to attach a carrying sling when the stitching is done.
Plug End
Cut a 1/2 to 3/4 inch section of wood off the log to be used as a plug for the quiver. The plug cut should come from where you made your ring cut.
Once the seam is laced (loosely), insert the plug into the end of your quiver. Tighten the lacing. Stand the quiver vertically and tap the plug end on a flat surface to ensure a flush fit. The lacing will hold the plug via friction but needs a more secure method.
I used about 8 small nails spaced around the plug end. Drill evenly spaced pilot holes which are slightly smaller than the diameter of your nails/tacks. Hammer the nails into the pilot holes to secure.
As the bark dries, it curls in on itself. The plug prevents this on the bottom end. However, on the open end, stuff some newspaper, bubble wrap, or other material a few inches down tube to hold the cylindrical shape as it dries. The drying time takes a few days to a week depending on weather conditions.
Shoulder Sling
You should have the long tag ends of cordage leftover at the plug end. I laid a two foot length of leather thong evenly between my two tag ends of cordage. Secure the thong to the quiver with a simple square knot (right over left, left over right).
This sling is similar to the hands-free ax sling I made only more narrow
I did the same thing at the opposite end and attached a piece of scrap leather (25 inches long) to the thongs. The thongs allow me to adjust the length of my quiver much like the sling I made for my hands-free ax sheath.
You may also want to add a strip of fur on the inside rim to prevent arrows from banging against the bark quiver when walking the woods. It also adds a great primitive touch to your functional work of art!
This Tulip Tree will provide enough bark for more containers and other resources of self-reliance. Here’s a bonus berry basket made from another 22 inch section of bark…
P.P.S – If you find value in our blog, Dirt Road Girl and I would appreciate your vote on Top Prepper Sites! You can vote daily by clicking hereor on the image below. Check out all the other value-adding sites while you’re there…
Thanks for Sharing the Stuff!
Copyright: Content on this site (unless the work of a third-party) may be shared freely in digital form, in part or whole, for non-commercial use with a link back to this site crediting the author. All links in articles must remain intact as originally posted in order to be republished. If you are interested a third-party article, please contact the author directly for republishing information.
Try these skills and projects, even if it’s in your backyard. In fact, your backyard may be the best place to start your journey to outdoor self-reliance.
P.P.S – If you find value in our blog, Dirt Road Girl and I would appreciate your vote on Top Prepper Sites! You can vote daily by clicking hereor on the image below. Check out all the other value-adding sites while you’re there…
Thanks for Sharing the Stuff!
Copyright: Content on this site (unless the work of a third-party) may be shared freely in digital form, in part or whole, for non-commercial use with a link back to this site crediting the author. All links in articles must remain intact as originally posted in order to be republished. If you are interested a third-party article, please contact the author directly for republishing information.
If you had the four basic materials – graphite, cedar, metal, and rubber, could you produce a wooden pencil?
You may be wondering why we’re even talking about a simple writing utensil. They’re not on most List of Lists to help you survive mutant biker zombie attacks. I’ve read that we need guns, lots of ammo, and mall ninja weapons to repel the un-dead. Even blunt objects work in a pinch!
This question isn’t just mental gymnastics. The reality is that no one person can produce a single wooden pencil. The production process is too complicated. If you want to learn more on what goes into producing one pencil, read Leonard Reed’s essay “I, Pencil.” You’ll never take pencils for granted.
If you can’t produce a simple pencil, do you have any hope of producing sustainable stuff like food, water, and fuel? The good news is, yes!
Here’s more good news – you don’t have to produce everything. In fact, you may be better situated by being dependent on others for some of your stuff. This may not sound like SmartPrepper advice, so I’ll explain.
Complete self-sufficiency is rarely going to happen. Think for a moment about the complexity and interconnectedness of our goods and services that we depend on and consume. I make my own DiY deodorant, grow some of our food, collect rain water, and pride myself in being able to produce some stuff we need around our place. I trade time and skill as a teacher for stuff (money) which I exchange with other producers to fill in the gaps for things I don’t or can’t produce, yet. We haven’t ‘arrived’ yet, but every new item I learn to produce is one step closer to freedom.
Take a look at self-sufficiency pins on Pinterest, or #PrepperTalk on Twitter, or other popular preparedness/homesteading blogs to see if you measure up. We tend to fall into the dangerous trap of comparison. Or we get motivated to apply knowledge and start doing the stuff.
Whether events unfold as we fear or not, there will always be the need to trade with other producers. Positioning yourself to be a producer, at whatever scale, will only add value to your future preparations.
Here are just a few of the many benefits of becoming a producer.
Value. Producers are people who add value to others. A product or service that adds quality of life to others will always be in high demand and barter-able.
Frugal. If you produce your own food or energy, you have a great appreciation for the stuff you’re producing. You understand the hard work, skill, and time that goes into your gadget or groceries. Producers are less likely to take their product for granted. Producers are stewards and are reluctant to squander resources.
Independence. Producing stuff, if only for personal use, reduces your dependence on the system that is rigged against you.
Interdependence. This is the flip side of producing stuff. No matter how self-sufficient we become, we’ll still need stuff others produce. You’d think this would be a negative. It’s not. If everyone was completely self-sufficient, where would you find a demand for you product. It’s all tied into the complex web of producing and consuming.
Wealth. This is a tricky word. The definition changes depending on the circumstance we find ourselves in. After a collapse, fiat dollars in a bank won’t build much wealth for you. When hyperinflation kicks in and you need a wheelbarrow of greenbacks to buy bread, you’re not a wealthy individual. Wealth in this situation means skills, tangibles, and attitude.
“I don’t want to be a product of my environment; I want my environment to be a product of me.” — William Monahan
The road to preparedness and self-sufficiency is paved with obstacles. Some are speed bumps. Others seem like mountains. Having the ability to produce the food, water, and energy makes you more antifragile. Antifragile systems improve with random roadblocks. They don’t curl up in a corner and cry.
Fuel or energy is needed to do all the pushing, pulling, and lifting to leverage your time. Once the balloon goes up, there will still be modern heavy equipment and vehicles sitting around for resourceful, SmartPreppers use. Instead of an eight ton piece of yard art, producers will be able to fire up these bad boys and do work.
Prepping or Producing?
To prep or produce. Both are necessary. Storing stuff is smart. But how long will that your stored fuel last? And how much is enough? It will eventually go bad or be consumed. I have gas stored for emergencies, but not long-term use.
Here are some sustainable ideas on how to feed the machines to get work done. Before any environmentalists write nasty comments about creating greenhouse gases, go out with your spade and till an acre, no, just a half-acre garden spot by hand and get back to me. Nothing runs like a deere.
Produce it Yourself energy. To build a generator, you’ll need wire, motion, and magnets. The amount of electricity produced depends the size of these items. Here’s a simple science experiment you can try with the kids to get you in the flow.
Water is a way to provide the force needed to create motion. Hydro power is a viable alternative for those with water available. And you don’t need a large river on your property to get the power flowing.
Producing stuff should be an essential part of your preparedness strategy. That stored stuff won’t last forever.
P.P.S – If you find value in our blog, Dirt Road Girl and I would appreciate your vote on Top Prepper Sites! You can vote daily by clicking hereor on the image below. Check out all the other value-adding sites while you’re there…
Thanks for Sharing the Stuff!
Copyright: Content on this site (unless the work of a third-party) may be shared freely in digital form, in part or whole, for non-commercial use with a link back to this site crediting the author. All links in articles must remain intact as originally posted in order to be republished. If you are interested a third-party article, please contact the author directly for republishing information.
I had hoped to get this project finished last weekend. With out-of-town family coming in yesterday, Dirt Road Girl gave me the nudge I needed.
Why is your kitchen table the most important piece of furniture in your house?
Here’s what Caroline Cooper had to say about this project two weeks ago:
“In my opinion, the kitchen table is the most important piece of furniture in a household. It is the place that family and friends share their meals and their lives. The kitchen table can be the place of home industry where the household produces goods rather than just consuming. The household table was once the center of activity for food storage preparation, crafting, and other forms of paid work. The kitchen table used to be the place for teaching our children, but that use has gone out of style, or has been regulated by the state out of existence.”
This is the last picture y’all saw of the table assembled, but unfinished.
All it needed was stain and 3 coats of sealer applied. That process took more time than actually building the table. DRG picked out a stain that would give it a weathered look. After testing it on a scrap piece of wood, we decided against it. It had a blue tint to it. Not our style.
After two more trips to the box store, we settled on the color pictured below:
The most important piece of furniture in our house
Getting it into the house was the challenge. With a combination of dollies, ramps, and one blood blister, DRG and I moved it to its proper place. We used an incline plane to navigate steps – and save energy and back pain. My daddy taught me to work smarter, not harder.
I estimate a total of 15 hours to complete this project from the first saw cut to the last brush of polyurethane. We invested a total of $150.00 in materials. The finished product is a priceless family heirloom.
Last night we broke bread for the first time on our new family table with DRG’s cousin and wife we haven’t seen in years. Caroline, you’re right. We spent the whole evening catching up around the most important piece of furniture in our house. Lots of great memories will be created on and around our simple, rustic, functional farmhouse table.
To learn more about building one yourself, click here.
Do you have any DiY Preparedness Projects you’d like to learn about? Drop us a line in the comments or email us and we’ll get busy with a tutorial. In the meantime, check out the other preparedness projects on our DiY Projects page. Ideas are always welcome.
The importance of probiotics to intestinal health has been common knowledge for some time. I’ve written about the helpful bacteria we ingest via fermented foods here. But there is less known about the health benefits of probiotics for our largest bodily organ – our skin.
Just as our gut is infested with billions of microorganisms busily doing their thing to boost our immune system, researchers are now looking into how these friendlies actually help our skin.
Our skin is literally bathed with trillions of bacteria. For all you ultra clean freaks, you can’t just wash them off. Why would you want to anyway? Just as a healthy gut flora benefits overall immune function, studies are showing the colonies of skin microorganisms play a major role in your overall health as well. Though you can’t see these little critters, we live together with them in a symbiotic relationship, much like a bird lives in symbiosis with the hippopotamus. You scratch my back, I’ll scratch yours.
In other words, the bacteria living on your skin are involved in a symbiotic relationship with you.. The bacteria on your inner elbow, for instance, process the raw fats it produces and in turn moisturize your skin. – Source
Let’s talk arm pits shall we. I stopped using commercial deodorant a while back. Aluminum chlorohdrate or aluminum zirconium found in commercial brands was not something I wanted absorbed through my skin. I’ve always used natural brands. They’re expensive though. I’ve used a coconut oil and corn starch mix before – and other homemade recipes – but was never really satisfied.
Then Andrea over at Frugally Sustainable comes out with a probiotic deodorant recipe. Right on! Two of my favorite things: probiotics and another DiY project!
So, Dirt Road Girl and I go shopping for ingredients. What a hoot. I broke one metal – yes metal – scoop digging out bulk cocoa butter. It’s cheaper to buy in bulk and I was determined to do just that. The store had everything we needed that we were missing at home. And they were probably glad to see us leave before breaking more equipment.
I used Andrea’s recipe over at Frugally Sustainable. Click here to for details. If you haven’t visited her site, stop by. It’s loaded with great tips on frugal preparedness and health tips.
Instead of rehashing her recipe, I’ve added it below with a few of my own [italicized] comments in brackets. Also, photos are mine. To see original pics from Andrea’s site, click the link above.
Homemade Probiotic Deodorant
Ingredients
-1 tbsp. cocoa butter
-1 tbsp. coconut oil
-1 tbsp. shea butter
-1 tbsp. beeswax
-2 1/2 tbsp. arrowroot powder
-1 tbsp. baking soda
-1/4 tsp. vitamin E oil
-15 drops essential oil of your choice
-2 capsules powdered probiotics
Method
1. Melt cocoa butter, coconut oil, shea butter, and beeswax over low heat. [I used a grater to shave of the beeswax. The cocoa butter is rock hard. I dug out enough with a spoon – without breaking it – to get the tbsp. need. We almost passed on the shea butter due to its smell. I talked DRG into buying it since we’d be adding peppermint essential oil to the mixture.]
Let it cool before adding probiotics
2. Remove pot from heat, then add arrowroot powder and baking soda. Whisk with chopsticks until all powders are dissolved and combined. [Since I don’t own chopsticks to stir with, I used an old-fashioned fork and a whisk. Even if I had chopsticks, I prefer the whisk and fork. It seems like they’d accomplish the desired effect (stirring) better. I’ve never been skilled with those little sticks.]
Add vitamin E oil and essential oils at this time. [I added 12 drops of peppermint essential oil at this point. I’m calling my concoction “Candy Cane B.O. Killer”.] Allow mixture to cool in pan. Once it is cooled and the consistency of pudding, open capsules of probiotics and add powder to mixture. Stir with spatula quickly to combine. [Let it cool. I dumped two capsules of probiotics into the pan before it cooled. Realizing that the heat cooked my probotics, I followed directions and added two more after the right temp was reached.]
3. Add mixture to a clean, used deodorant container. Place in refrigerator to cool and harden. After this, product may be stored on counter (Note: Using a shelf stable probiotic such as Bio-Kult will prevent the need for refrigeration). This recipe will fill container and last for 3-4 months. Remember…a little goes a long way!
The stick on the left is only partially full.
Notes
-When choosing a probiotic supplement for this deodorant it is important to find one that is shelf stable. It should also contain highly resistant beneficial bacteria such as lactobacillus and bifidobacteria. These “good bacteria” have the ability to survive the pH of our stomach acid during digestion and are the one’s that should be included in this recipe.
-If you have sensitive skin, substitute baking soda and use arrowroot powder solely. You may also consider omitting the essential oils.
-Use good smelling essential oils, any scent or combination of scents will do. So pick your favorite and have fun with it!
My Results
I used my Candy Cane B.O. Killer for the first time yesterday. It was a typical work day for me. Standing all day teaching. I also did my usual 3 sets of 30 push ups between classes and on breaks. In the past, the natural store-bought deodorant starts to wane by 4 or 5 o’clock. Not big a problem since I’m getting home by then where I can reapply as needed.
But here’s the real test.
DRG has a highly sensitive sniffer. When I walked in after work, I kissed my lovely wife, dropped my lunch pail, and raised my arms in surrender and said, “Smell.” Drum roll…..
It really works! I pasted the DRG sniff test – and with only two light swipes under each arm. My old deodorant took several swipes and left my pits soaked.
My pits, my students, and DRG would like to give a sniffing shout out to Candy Cane B.O. Killer!!!
P.P.S – If you find value in our blog, Dirt Road Girl and I would appreciate your vote on Top Prepper Sites! You can vote daily by clicking hereor on the image below. Check out all the other value-adding sites while you’re there…
Thanks for Sharing the Stuff!
Copyright: Content on this site (unless the work of a third-party) may be shared freely in digital form, in part or whole, for non-commercial use with a link back to this site crediting the author. All links in articles must remain intact as originally posted in order to be republished. If you are interested a third-party article, please contact the author directly for republishing information.
I’ve had different compost bins over the years. I usually make them out of four shipping pallets sitting directly on the ground. We’d have to manually stir the pile with a pitchfork. I wanted to “up” grade.
“Up” being the key word here. The goal is to give Dirt Road Girl the ability to roll her wheelbarrow or garden wagon to the compost station, dump in black garden gold, and distribute to our garden and potted plants.
The Dirt Road Girl Compost Tumbler
Over the last year of fighting cancer, her body has weakened – not her desire to get beneficial bacteria under her nails. She’s never shrunk from any outdoor tasks like clearing land or hauling firewood. This is my attempt to make garden life a little more efficient and less labor intensive. Work smart, ya know.
There’s an ol’ timer who sells barrels ten minutes from our house on the main highway. I’ve traded with him in the past for plastic and metal containers. I bought two plastic 55 gallon food grade barrels from him. One for the DRG tumbler and one to be used for rainwater – or some other resilience project.
Tip: When buying containers for gardening, water storage, or food storage, make sure they are food grade.
My barrels contained apple cider vinegar.
Now onto the project.
Step 1: Mark and cut the axle holes.
Measure half the diameter of your barrel and place a center mark on both ends of the barrel. I used a sharpie but a pencil will work if you have good eyesight. I then cut a short piece off my axle pipe to be used to trace a circle for the cut. I had an old piece of chain link fencing pole out back. It measured 1 1/4 inches in diameter by about 6 feet in length. Center the short piece of pipe on the center mark on the end of the barrel and trace around the outside of the pipe. Repeat on the opposite end of the barrel.
I then used a 1 1/4 inch paddle bit to bore the holes in the barrel ends.
Step 2: Mark and cut the door opening.
My door measures 18″ x 12″. You want to get your door centered with the 18″ side running the length of the barrel. Use a framing square to make sure the door corners are 90 degree angles. I used a flexible 18″ metal ruler for tracing on the curved barrel.
Once you love the door outline, it’s time to cut. Since you’ll be using the cut out to make the door, don’t drill large holes at each corner to get your saw blade into the plastic to make the cut. I drilled a couple of 1/8″ holes in one corner to get my jigsaw blade started. This worked on the first corner. On the remaining corners, I held my jigsaw at an angle, braced against the barrel, and started the cut until I penetrated the plastic barrel. This technique is not for finishing work, but it’ll get the job done.
Step 3: Door installation. Install the hinges on the door first. I placed mine about three inches in from each corner on the door. I quickly realized that my door would need a stop along both the hinge side and the latch side. I screwed two pieces of wood molding to the inside of the barrel along both 18 inch door frames. That turned out to be good fix for a floppy door.
I installed a barrel lock on the other side of the door. Not impressed with its ability to keep the door shut. I plan to replace it with a better latch.
Step 4: I then inserted the axle through the barrel leaving enough pipe to rest on the brackets. To keep the weight of the barrel off the plastic holes, I attached an “L” bracket to the pipe and barrel on both ends.
The barrel is now ready to take a spin. All I need is a frame.
Step 5: Build the frame. I’ve seen many different types of stands for tumblers: Posts in the ground, X posts, and drums that spin lengthwise. I wanted a stand that was more mobile.
Here’s my material list for my frame:
Two pressure treated 4x4x8’s (purchased at box store) – used for vertical posts and base
One 5’ length of pressure treated 2×4 (scrap from my wood pile) – used for cross support on base
5’ length of 1×6 pressure treated fence panel (scrap from my wood pile) – screwed to top of post to maintain plumb on vertical posts
Two 5/16×5” carriage bolts (poached from an old swing set a few years back) – secure vertical posts to base accompanied by decking screws
Hand full of exterior decking screws (I keep plenty of these and other assorted hardware on hand)
Bracket for axle – I was going to drill a hole through the vertical posts to accept the axles but didn’t have the proper size hole saw bit. The paddle bit would have worked, but I wanted a slightly larger hole diameter to allow the axle to spin without binding. I improvised and screwed two metal caster brackets to the posts.
Two hinges for the door
One barrel lock
Tools needed:
Circular saw or any saw to crosscut the stock
Jigsaw to cut the barrel door
Drill/impact driver and 1 ¼ inch paddle bit. The bit size will differ if you use a pole with a different diameter.
Palm-sander to take off rough edges on door and door opening left by the jigsaw.
Measuring device and writing utensil
Framing square
First, cut two 5’ lengths of 4×4. You’ll have two 3’ sections leftover for the base of the frame if you use 8 foot stock. To join the vertical post to the base, cut a 3 ½ inch x 1 ¾ deep notches in both ends of the vertical posts. Cut the same size notches in the center of each base piece. Newbie tip: Set your circular saw to the desired depth (1 3/4″) and make several passes over the area to be notched. Strike these “feathers” with a hammer and clean up the bottom of the notch with a chisel.
Mate the vertical posts with the notch in the middle of each base. Now, drill a suitable diameter hole for the carriage bolt in the center of each notched area. Carriage bolts aren’t necessary but recommended. Go ahead and press the bolts through holes and tighten with a nut and washer. No need to worry too much about the bases being square now. You’ll make sure they’re perpendicular when you screw in a few decking screws in the joint.
My barrel measured 35 inches from rim to rim. I decided to use 46 inches as the inside measurement between my vertical posts. I cut my 2×4 53 inches long and attached it to the back-end of the two base supports. Square it and screw it. The frame should stand on its own now.
Next, I cut my 1×6 the same length (53 inches) and attached it to the tops of both vertical posts. I then attached the brackets 13 inches from the top of each vertical post. Skip this step if you bore holes into your posts for your pipe axle.
The last step is to mount the tumbler on the frame. Since I used metal brackets, I simply slid one end of my axle into a bracket and repeated on the other side with the opposite bracket. I slid two more poached carriage bolts in the end of the brackets to keep the axle in place.
Note: If using drilled holes in the vertical posts to mount the tumbler, you’d probably want to insert the axle through the holes before attaching the bottom and top cross rails to the frame.
This was a weekend project. I worked off-and-on for about 3 hours. DRG now has an elevated tumbler for easy access to compost.
Future modifications:
Add a couple of agitator bars running through the length of the barrel to help stir the contents as barrel spins.
Replace the barrel lock with a more secure lock to keep the door from flopping open while spinning.
Add an improvised crank handle on the end of the axle for easy spinning.
Add some 20 inch rims and low profile tires for added mobility – just checking to see if you’re paying attention 🙂
Any suggestions on making a better “mouse trap”? Don’t be shy. Please let me know.
P.P.S – If you find value in our blog, Dirt Road Girl and I would appreciate your vote on Top Prepper Sites! You can vote daily by clicking hereor on the image below. Check out all the other value-adding sites while you’re there…
Thanks for Sharing the Stuff!
Copyright: Content on this site (unless the work of a third-party) may be shared freely in digital form, in part or whole, for non-commercial use with a link back to this site crediting the author. All links in articles must remain intact as originally posted in order to be republished. If you are interested a third-party article, please contact the author directly for republishing information.
Baking soda, a.k.a. sodium bicarbonate, is another house old item that every well-prepared home should have plenty of. Keep it on hand for daily use as well as those special occasions where this wonder powder is irreplaceable. Like vinegar, baking soda has hundreds of uses and applications, including keeping your home clean, shiny, and most importantly, toxin-free.
From Wikipedia:
Sodium bicarbonate or sodium hydrogen carbonate is the chemical compound with the formula NaHCO3. Sodium bicarbonate is a white solid that is crystalline but often appears as a fine powder. It has a slightly salty, alkaline taste resembling that of washing soda (sodium carbonate). The natural mineral form is nahcolite. It is a component of the mineral natron and is found dissolved in many mineral springs.
Since it has long been known and is widely used, the salt has many related names such as baking soda, bread soda, cooking soda, and bicarbonate of soda. In colloquial usage, its name is shortened to sodium bicarb, bicarb soda, or simply bicarb. The word saleratus, from Latinsal æratus meaning aerated salt, was widely used in the 19th century for both sodium bicarbonate and potassium bicarbonate. The term has now fallen out of common usage.
The following list of uses is by no means completely comprehensive, but it should give you a good idea why I buy baking soda in bulk and why I recommend that everyone stock up and learn to use it in their everyday lives.
In the Bathroom
Soothe an Upset Stomach
Mix a teaspoon into a glass of warm water to combat heartburn, acid stomach, and other stomach issues. Baking soda is alkaline, and it can help neutralize the acids that can cause digestive problem and discomfort. Note: Always seek proper medical support if you feel you have a serious issue or if your condition worsens.
Bath/Foot Soak
Mix some baking soda into a bath for a soothing and skin-softening experience. Add a few drops of your favorite essential oil for a relaxing enhancement. The foot version can be done in large bowl or bucket while reading the latest seed catalogs. Or simply add baking soda to your entire bath for all-over skin softening.
Toothpaste Alternative
Lightly dip your toothbrush into a small bowl of baking soda to use as toothpaste and give a mild abrasive quality to your brushing. It will also give your mouth a nice fresh feeling. A drop of mint oil can also be added to the bowl for a more traditional “minty toothpaste” flavor.
Soothing Stings, Insect Bites, or Sunburn
A topical paste of baking soda and water is a time-tested, quick, soothing remedy for bee and wasp stings. Be sure to remove the bee’s stinger first, if there is one. A cool baking soda paste also eases insect bites and sunburn.
Underarm Deodorant
Apply a dusting of baking soda with a powder puff for an effective underarm deodorant.